MICHELANGELO CRISP TOP User manual
AIR FRY, BROIL & CRISP ALL IN ONE TECHNOLOGY
PERFECT GEAR FOR YOUR PRESSURE COOKER*
INSTRUCTION MANUAL
MICHELANGELO
CRISP TOP
MICHELANGELO
CRISP TOP
MICHELANGELO
CRISP TOP
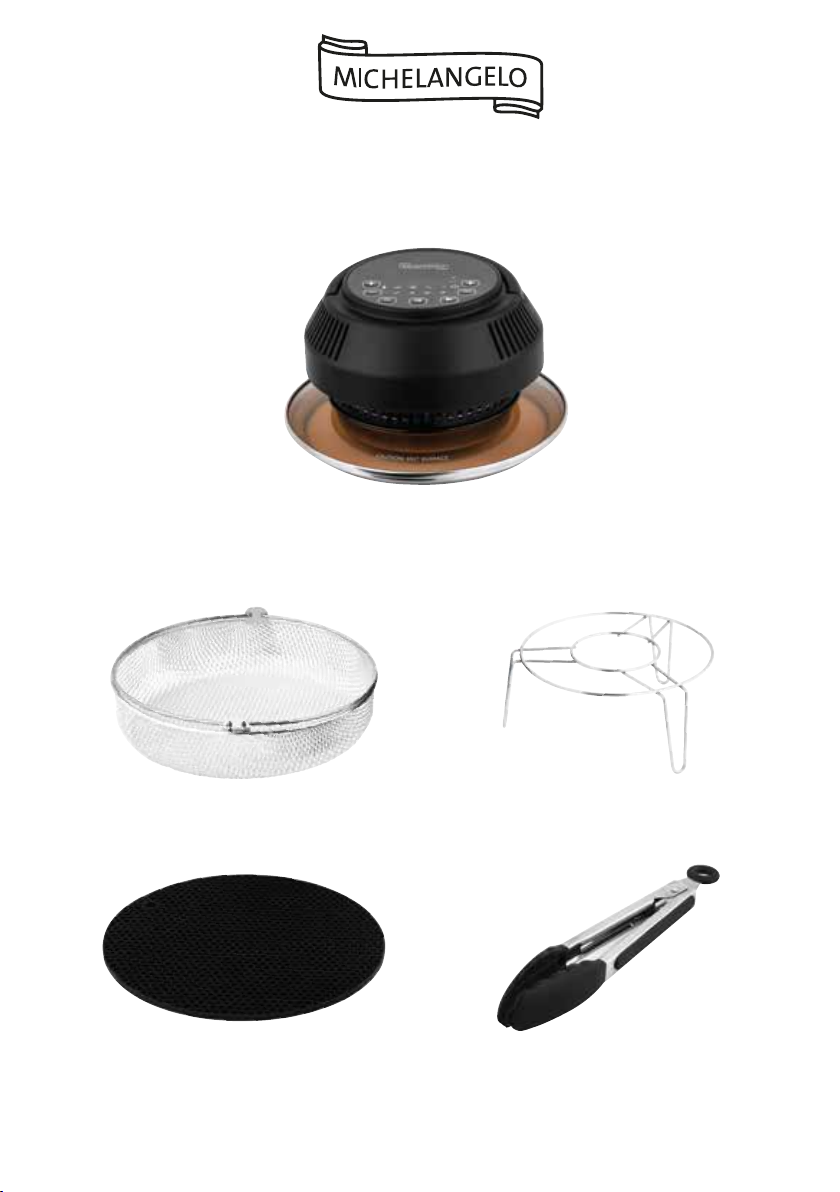
*Compatible with 22cm diameter 6-quart and 24cm diameter 8-quart inner cooking pots.
Stainless Steel
FRYER BASKET
Stainless Steel
RAISED TRIVET
Heat-Resistant
SILICONE PAD
Stainless Steel
TONGS
ELECTRIC CRISP TOP
AC 120V 60Hz 1000W
Model No.MICHLINCRT-01
Made in China
1
Thank you for purchasing the Michelangelo Crisp Top.
The Crisp Top is a fun and easy way to crisp, broil, and
air fry food for home used pressed cooker 6qt or 8qt.
Michelangelo Crisp Top is designed to compatible with
multi-size electric pressure cooker. The new designed
Crisp Top delivers the safety and satisfaction for you
to enjoy cooking.
This manual introduces you how to use the Crisp Top
and how it performs. Please read all instructions
carefully and thoroughly before first using the Crisp
Top. Save this guide for future reference.
Note: Pictures in this guide are only for reference.
2

Table of Contents
1.0 IMPORTANT SAFEGUARDS SAFETY FIRST 4
2.0 INTRODUCTION 6
3.0 CONTROL AND FEATURES 7
4.0 INSTRUCTION FOR USE 9
5.0 BROIL/ CRISP/ AIR FRYER/ DEHYDRATE 9
6.0 CARE AND CLEANING 10
7.0 TROUBLESHOOTING 11
8.0 LIMITED WARRANTY 12
9.0 WARRANTY SERVICE 13
3

1.0 IMPORTANT SAFEGUARDS SAFETY FIRST
1. NEVER use an extension cord with your Michelangelo Crisp lid. The short power cord is specifically
made as a safety precaution to reduce the risk of children grabbing or playing with the cord, and
to keep you from tripping over a long cord.
2. NEVER use Crisp lid without inner pressure cooker cooking pot in place.
NEVER use Crisp lid with bowls or pots other than the inner pot of electric pressure cooker.
NEVER use Crisp Top with ceramic.
3. NEVER use Crisp Top when pressure cooker is on or plugged in.
4. NEVER place Crisp Top on or near hot gas, ceramic, induction, or electric burners. Doing so can
cause damage, injury, and will void your warranty.
5. NEVER place Crisp Top in an oven. Doing so can cause damage, injury, and will void your warranty.
6. NEVER move electric pressure cooker when Crisp Top is positioned and in use. Doing so may
cause damage, injury, and will void your warranty.
7. The Crisp Top is only for household use.
NEVER use Crisp Top for anything other than its intended use.
Do NOT use in moving vehicles or boats.
Do NOT use outdoors.
8. NEVER tamper with, disassemble, or otherwise remove any portion of the Crisp Top. This may
damage the Crisp Top and invalid for warranty service.
9. Do NOT use abrasive cleaners, steel wool, or scouring pads to clean your Crisp Top.
10. NEVER drape cord over counter edge.
11. Do NOT cover air intake vent or outlet vent while Crisp Top is in use. This can cause uneven
cooking and damage the Crisp Top.
12. Do NOT use other accessories with the Crisp Top, only the provided or approved accessories.
13. NEVER put sealed canned food into pot for using Crisp Top, which will be dangerous and void
your warranty.
14. NEVER use plastic bags/wrap or any other plastic accessories in pot when using Crisp Top.
15. NEVER connect Crisp Top to an external timer switch or separate remote-control system.
16. To prevent electrical shock, NEVER immerse cord or Crisp Top in water or any other liquid.
Do not rinse Crisp Top under a tap. Doing so can cause damage, injury, and will void your
warranty.
17. NEVER use Crisp Top or accessories in a microwave, oven or on outdoor grill. This can damage
your Crisp Top and void your warranty.
4

18. NEVER use your Crisp Top to deep fry foods with oil, which can cause damage, injury, and void your
warranty.
19. ALWAYS ensure Crisp Top is properly positioned before use.
20. ALWAYS use caution when operating your Crisp Top. Keep Crisp Top away from children or individuals
whose physical, sensory, or mental abilities may prevent safe use of the appliance.
21. ALWAYS ensure electric pressure cooker is o and unplugged before using Crisp Top.
22. ALWAYS set hot Crisp Top on provided silicone trivet or other heat-resistant surface after use until
device cooks down. NEVER place hot Crisp Top directly on countertop or heat-sensitive surface.
23. ALWAYS provide adequate space above and around Crisp Top for proper air circulation. Suggested
at east 150mm from wall side.
24. ALWAYS ensure Crisp Top is clean before using. NEVER let power cord contact with hot surfaces.
25. The Crisp Top is intended for countertop use only with an electric pressure cooker. Ensure the
surface is level, clean, and dry.
26. To prevent overheating, temperatures have a maximum of 420and cook time for 60 minutes at
most.
27. To reduce the risk of electric shock, cook only in the pot of an electric pressure cooker.
28. To eliminate a choking hazard for young children, remove and discard any protective film and bags
fitted over the device and its accessories.
29. Use extreme caution when handling hot food and hot surfaces to avoid injury. Must use protection
gloves or mittens and stainless steel tongs for hot food.
30. Pressure cooker pot will be extremely hot during and after cooking. Always use protective gloves or
mittens.
31. Regularly inspect your Crisp Top and its power cord and plug. Do not use Crisp Top if there is damage
to the power cord or plug. If Crisp Top malfunctions or is damaged in any way, stop use it and ask
for help from customer service.
32. The Crisp Top becomes extremely hot during cooking process. ALWAYS use care and caution when
removing Crisp Top.
33. To prevent possible illness, ALWAYS use a thermometer to verify that food is cooked to the
temperatures recommended.
34. The Crisp Top is only compatible for the 120V~60Hz electrical systems. It has a 3-pronged grounding
plug, can only be plugged into a grounded electrical outlet.
35. Make sure no programs are running before unplugging.
36. Make sure the Crisp Top is unplugged and cool down before cleaning or storing.
5

2.0 INTRODUCTION
The Michelangelo Crisp Top is designed to anticipate your every broiling, crisping, and air frying
needs. The Crisp Top is packed with a 3-inch raised trivet, air frying basket, silicone trivet, stainless
steel tongs and a recipe booklet. Your Michelangelo Crisp Top is compatible with most brand of 6-8
quart electric pressure cooker on the market today. We have built the Crisp Top to the highest
safety and functional standards for your safety and satisfaction.
MODEL
POWER SUPPLY
RATED POWER
WEIGHT
DIMENSIONS
MICHLINCRT-01
120V ~ 60Hz
1000W
3.66 lbs
10 x 10 x 5.5 in
6

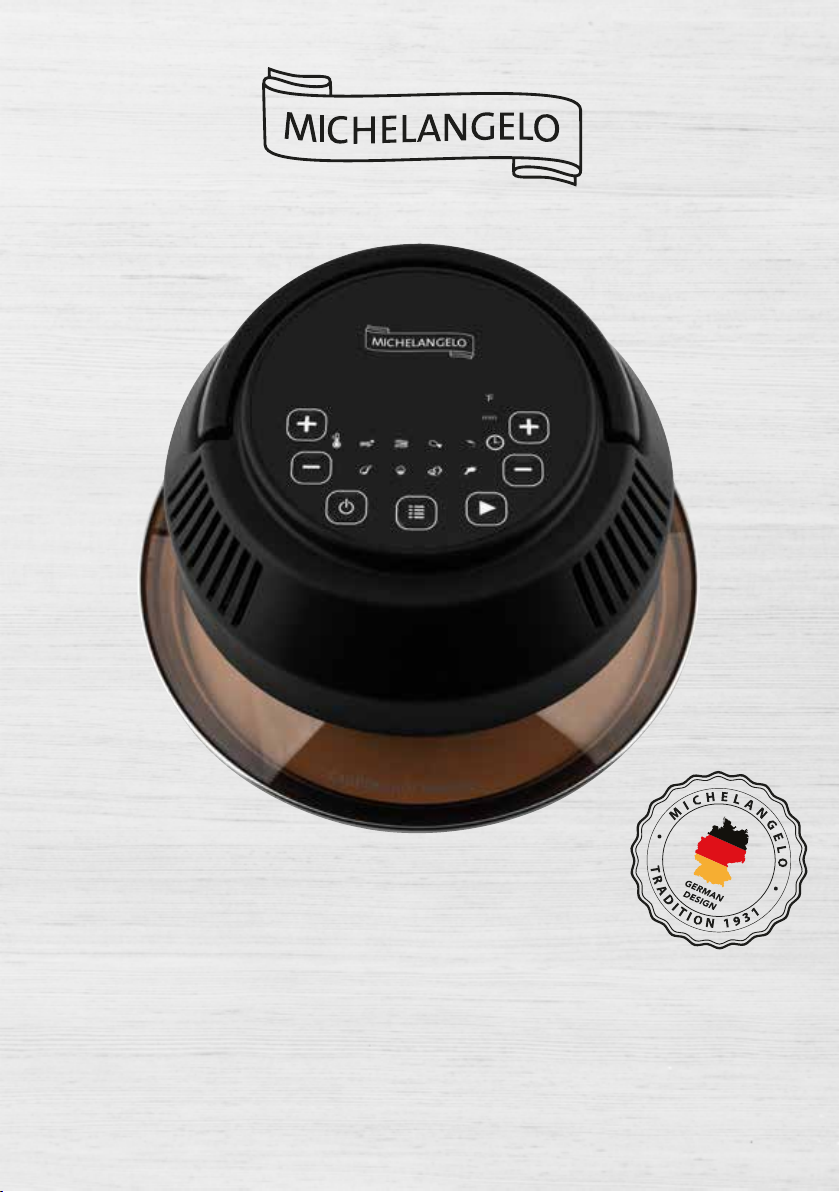
3.0 CONTROL AND FEATURES
The Michelangelo Crisp Top consists of the main housing with heating unit and control panel situated
on a glass lid. The glass lid fits most 6-8 quart electric pressure cookers. The main housing consists of
the handle, control, panel, vents, heating element, fan, and stainless steel cover over.(Below draft is
only for reference, not the real product)
7

3.0 CONTROL AND FEATURES
The Michelangelo Crisp Top control panel consist of seven buttons(temperature, time, +/-, menu, pause
and stop), eight food logos which represent dierent type of food. The LED screen displays time and
temperature you set. Below outline is for your reference.
Note: The handle of Crisp Top can pause the cooking when it is raised up.To restart cooking, just
lower back the handle to correct position(you will hear clicks), press button will resume
cooking.
TIME CONTROL
EIGHT MOLDS SYMBOL
STARTPAUSE / STOP
MENU
TEMPERATURE
CONTROL
8

4.0 INSTRUCTION FOR USE
1. Make sure your 6-8 quart electric pressure cooker is power o, unplugged and sit on a flat surface.
2. The inner pot of your pressure cooker is on the base correctly.
3. Put the Crisp Top trivet in the pot and basket(if needed) on the trivet, put food onto the basket,
make sure no food is higher than the rim of inner pot.
4. Place the Crisp Top on top of the inner pot and plug in the Crisp Top. Press menu to choose the
function, press the temperature+/- to set temperature, and press time+/- to set time. Finally
press the start button, the Crisp Top start cooking.
5. If you want to flip the foods or shake the basket during the cooking, just pull the handle of the
Crisp Top up, it will pause cooking. Remember to place the Crisp Top on the silicone trivet when
not in use.
6. After turning or shaking your food, replace the Crisp Top and press the handle back into the
down position. The Crisp Top will remember your preset for seconds, just press button to
continue the cooking. Or you can also resume to set time and temperature and press to start.
5.0 BROIL/ CRISP/ AIR FRYER/ DEHYDRATE
For some foods, you can choose to broil or crisp after pressure cooking or just need air fryer or
dehydrate the food
1. Unplug the pressure cooker after releasing and cancelling all pressure programs.
Remove the pressure cooker lid as pre instructions.
2. Transfer cooked food to the broiler basket and remove the liquid inside the pot.
Then return the inner pot to the pressure cooker base and place the stainless trivet into
inner pot. Place the basket on the trivet.
3. Put on the Crispy Top on top of inner pot and plug the lid into a grounded 3-prong outlet.
4. Press menu button and set the temperature and time as per instruction for using.
5. Finally press button to start broiling. And enjoy your food at last.
Note: When pressing the button, it will beep. If you don’t want the sound, just press and hold pause
button for few minutes until SOFF display on the panel, it will be silent. If press and hold pause
button for few minutes more until S on display on the panel, beeps will be back. Press and hold
for seconds, the original default settings will display on the LED screen. The Crisp Top light will turn
on and o during cooking for your checking of the food process.
9

6.0 CARE AND CLEANING
1. Wait until the Crispy Top has completely cooked before cleaning.
2. Use a clean damp cloth to wipe down the interior of the lid.
3. The perforated steel heating element cover can become discolored after using.
This is normal occurrence with stainless steel, as it is exposed to high heat long time.
This does not indicate damage or aect performance.
To restore the shine of the steel portions, you need dip a clean cloth in white vinegar and
rub into steel. Afterwards, dry or bu it with a clean dry cloth.
Note: The trivet, basket, silicone plate, tong are dishwasher safe.
NEVER remove perforated steel cover, screws, or dismantle lid in any way when cleaning;
or you may damage the Crisp Top and will void your warranty.
10

7.0 TROUBLESHOOTING
The issues outlined below don not necessarily indicate a faulty Crisp Top.
If you need more support, please contact our customer service.
In some rare situations, there will be error code display on the LED screen and the unit will beep
several times. The below table is to determine the cause of the error code and its solution.
The Issue
LED screen flashes
continuously, beeps
several times and the
unit will not start
Steel portions of unit
are discolored
Possible causes
This is normal occurrence.
The handle is not locked
in the down position.
The Crisp Top may have
a faulty sensor or circuit
The Crisp Top handle
may have a faulty sensor
Solutions
Error code Possible causes Solutions
Refer to care and cleaning
part.
Press handle down until it
clicks into place of the
locked position.
E001
E002
E003
E004
E006
The Crisp Top may have
a faulty sensor.
The Crisp Top may have a
faulty sensor or has short-
circuited.
The Crisp Top may have
overheated.
Unplug Crisp Top and cool
completely. Contact customer
service if it recurs.
The Crsip Top may have a
faulty temperature sensor.
Heating light turns on
immediately upon plug in;
the Crisp Top may have a
faulty sensor
Contact customer service
Contact customer service
Contact customer service
Unplug Crsip Top and
contact customer service.
Contact customer service
Contact customer service
11

8.0 LIMITED WARRANTY
Michelangelo warrants this appliance to be free from defects in workmanship and material, under
normal residential use, for a period of one (1) year from the date of purchase. This warranty extends
only to the original purchaser and use in USA and Canada. A purchase receipt, purchase order number
or other proof of date of original purchase is required before warranty service is performed.
Michelangelo obligation under this warranty is limited to replacing or repairing, or assisting in the
repair at Michelangelo option. All repairs for which warranty claims are made must be pre-authorized
by Michelangelo.
This appliance comes equipped with many safety features. Any attempt to interfere with their
operation may result in serious injury/damages and void this warranty. No warranty service will be
provided to any appliance that has been tampered with, unless directed by a Michelangelo
representative.
This warranty does not cover normal wear of parts or damage resulting from negligent use or misuse
of the appliance, use contrary to the operating instructions, failure to provide reasonable and
necessary maintenance, or disassembly, repair or alteration by anyone unless directed by a
Michelangelo Representative.
This warranty does not cover units that are used outside of US and Canada. Further, the warranty
does not cover damage resulting from Acts of God, such as fire, flood, hurricanes and tornadoes.
Michelangelo is not responsible for shipping cost for warranty service.
Limitation and Exclusions
To the extent permitted by applicable law, the liability of Michelangelo, if any, for any allegedly
defective appliance or part shall be limited to repair or replacement of the appliance or part and
shall not exceed the purchase price of a comparable replacement appliance or part.
THE PROVISIONS OF THIS WARRANTY ARE YOUR SOLE AND EXCLUSIVE REMEDY WITH RESPECT TO THE
PRODUCT(S) COVERED BY THIS WARRANTY. ALL IMPLIED WARRANTIES WITH RESPECT TO THE
APPLIANCES(S) INCLUDING, BUT NOT LIMITED TO, IMPLIED WARRANTIES OF MERCHANTABILITY AND
FITNESS FOR A PARTICULAR PURPOSE, ARE HEREBY EXPRESSLY EXCLUDED.
Michelangelo is not responsible or liable for indirect, special or consequential damages arising out
of or in connection with the use or performance of the appliance or damages with respect to any
economic loss, loss of property, loss of revenues or profits, loss of enjoyment or use, costs of
removal, installation or other consequential damages of whatsoever nature. Some provinces/ states
do not allow the exclusion or limitation of incidental or consequential damages. Accordingly, the
above limitation may not apply to you.
You as the buyer may have other rights and remedies under your state's or province’s applicable laws,
which are in addition to any right or remedy which may be available under this limited warranty.
12

9.0 WARRANTY SERVICE
If the appliance should become defective within the warranty period, please contact Michelangelo
Customer Service team by Email to cservice@cs-solingen.com representative To facilitate speedy
service, please provide:
Your name, email address or phone number
A copy of the original purchase receipt with order number, the model and serial number
Description of the product defect, pictures or video if possible
All contents in this document have been checked carefully. Michelangelo Company reserves the right
to interpret any printing mistake or mis under-standing of content.
For any technical improvement or change in appearance or name plate, changes shall be placed in
the revised manual without further notice. In case of changes in appearance and color, please refer
to the actual product for detailed information.
How to contact Michelangelo Customer Service : Sign in your Amazon account - My Orders - Click"Ask Seller" or
"Ask Product Question" to send emails. We are always here to help you 24/7.
Please read this manual carefully and retain for future reference.
Thanks for your trust!
13

4
AIR FRY, BROIL & CRISP ALL IN ONE TECHNOLOGY
PERFECT GEAR FOR YOUR PRESSURE COOKER*
MICHELANGELO
CRISP TOP
This manual suits for next models
1
Table of contents
Other MICHELANGELO Fryer manuals


