User Guide 12266
1
11
2
4
3
5
6
7
8
9
10
High Power Rapid Tyre Inator
Thank you for purchasing the Michelin Tyre Inator. This inator utilises some of the lastest
compressor motor technology currently available today.
Please read the operating instructions carefully before using your tyre inator. Improper
use of the inator can cause damage to property and possibly harm the user. When using
the inator ensure the vehicle is parked in a safe location, o the road with the vehicle
handbrake on and where your personal safety is not at risk.
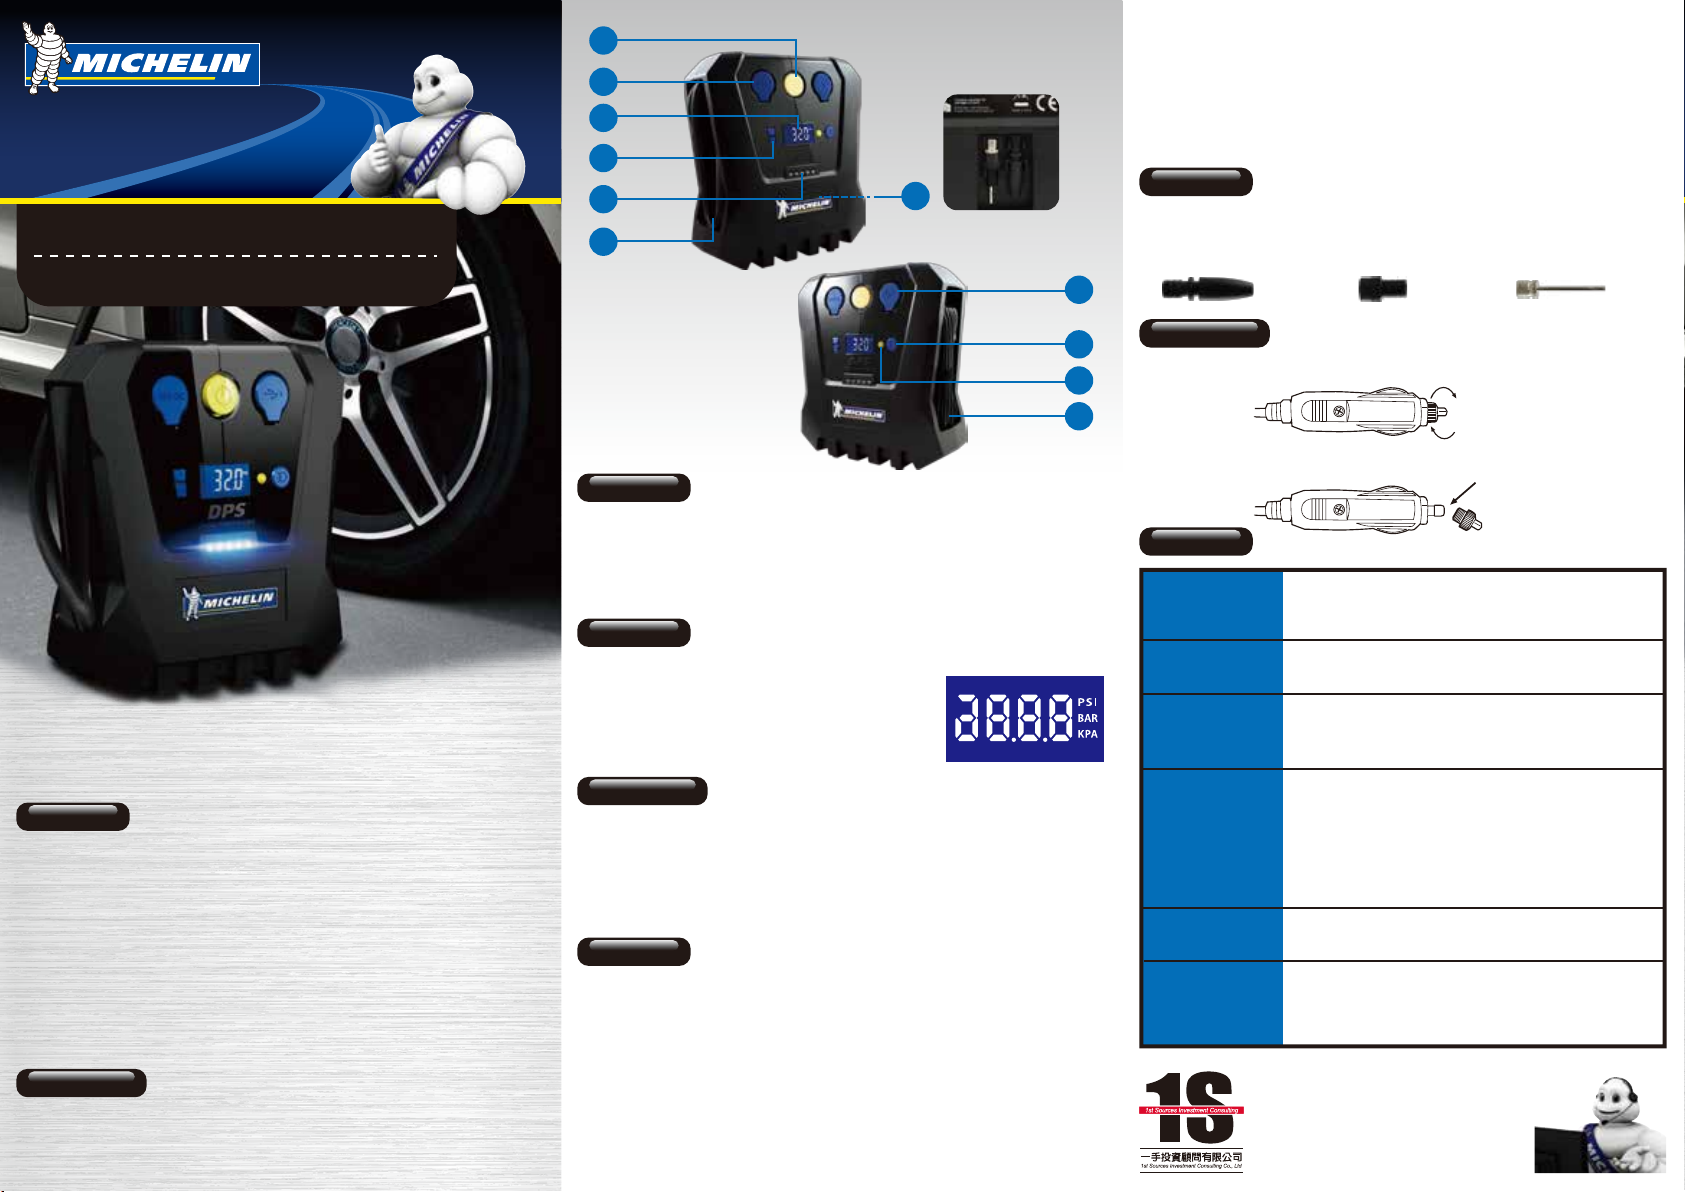
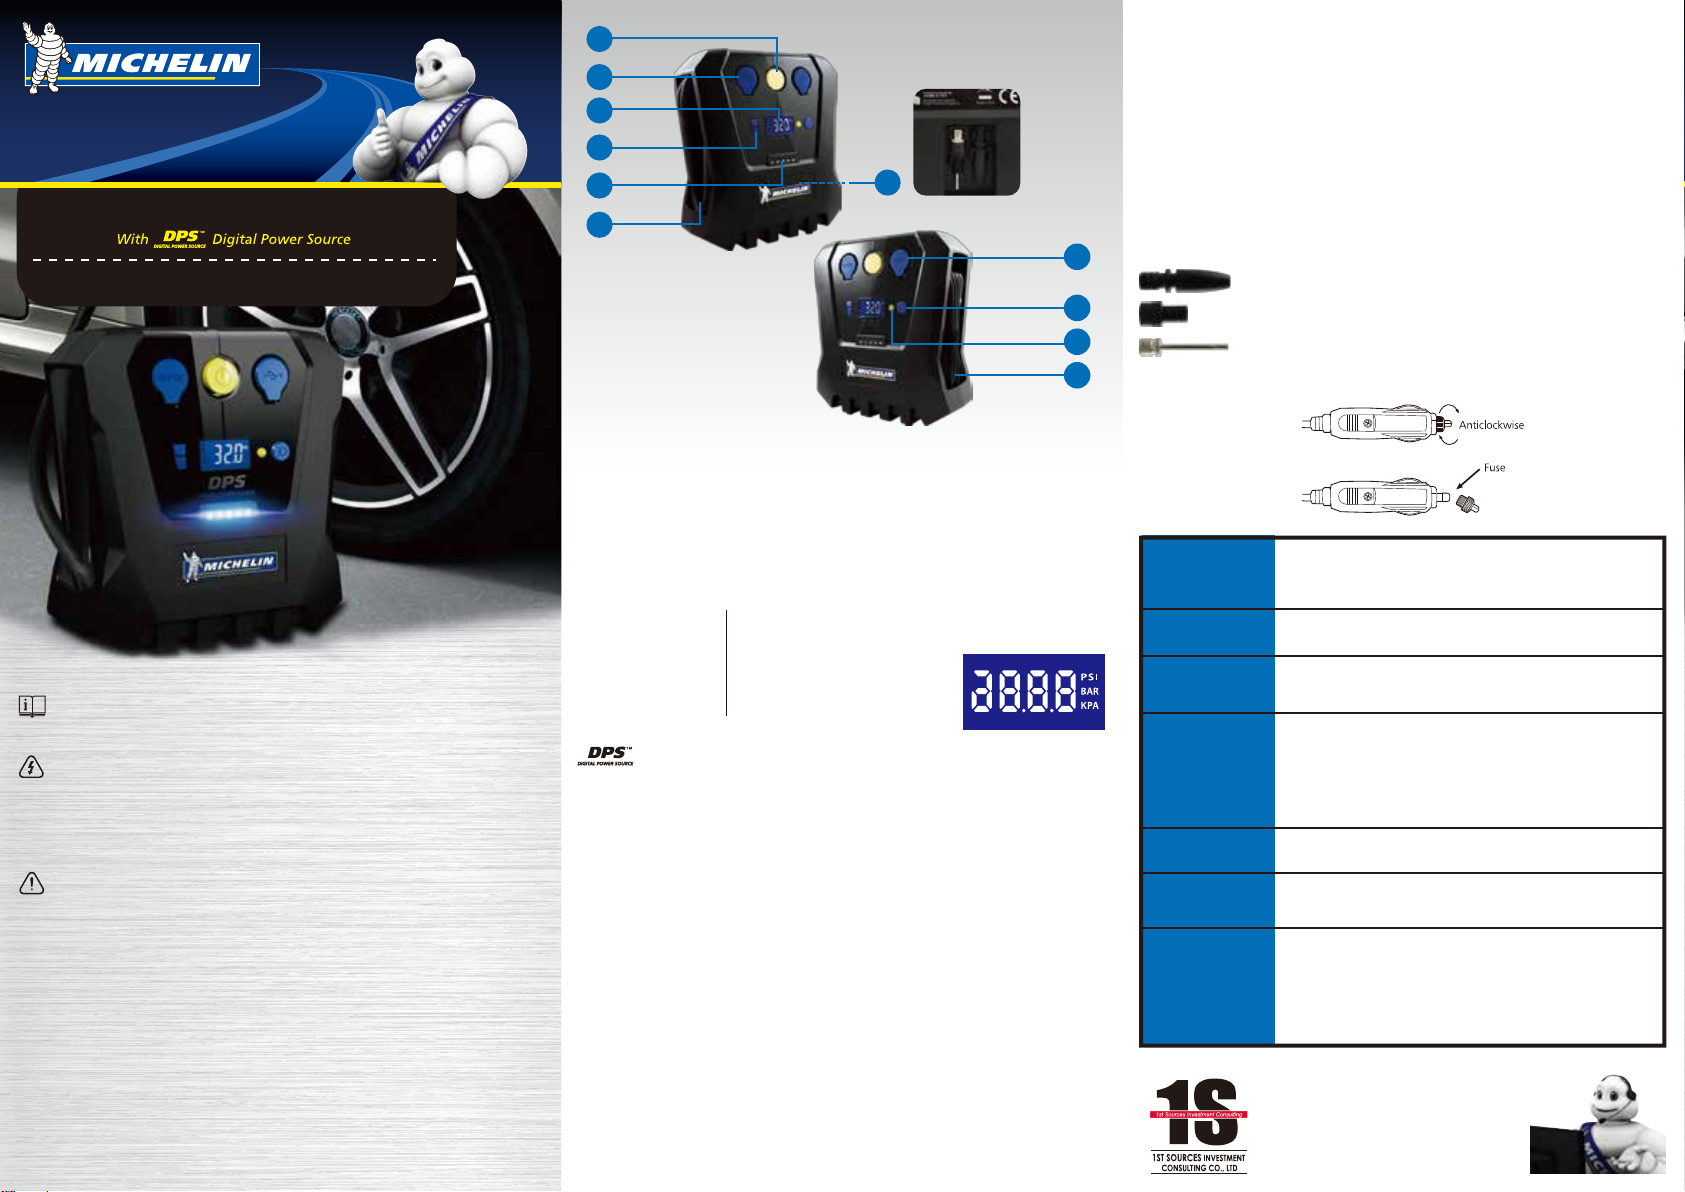
OPERATING FEATURES
●On/O button
●12V power outlet source
●White L.C.D digital display
●Pressure pre-set buttons
●Superbright L.E.D lights
●60cm (approx) high pressure air hose with tyre valve connector
●5V USB outlet source
●L.E.D push button switch
●PSI, BAR & KPa button / Reset button
●300cm (approx) power cord with fused 12v power plug (side of unit)
●Adaptors (snap-in storage at rear of unit)
This Michelin tyre inator incorporates a 12v power socket & 5v USB port.
12V POWER SOCKET
Lifting the left hand cover reveals a 12v power socket ● This is suitable for accessories, such as
inspection light or vacuum cleaner with a maximum rating of 12 amps.
USB PORT
Under the right hand cover is a single 5v USB port ● suitable for charging mobile phones/MP3
players with a maximum rating of 1 amp.
TYRE INFLATION
1. With the On/O button ● in O position, unwind power cord ●completely from the storage
compartment and plug into your vehicle’s 12v power plug socket. Wait a few seconds until
digital display shows zero. Please note – when the On/O button is in the O position, it
protrudes from the the unit slightly. When in the On position the the button is ush to the unit.
2. To choose desired pressure format PSI, BAR, KPa, press the yellow button ●. Each press of
the button cycles through the pressure format.
3. Uncoil high pressure hose and screw tyre valve connector ●onto the tyre valve. When
connected correctly the gauge will display the current pressure in the tyre. If this is tyre pressure
as stated in your vehicle’s handbook, you can simply remove the tyre valve connector ●.
4. If the tyre is below the recommended pressure (as specied in your vehicle handbook)
press either the (–) or (+) pre- set button ●to adjust the pre-set value on the gauge display to
the correct tyre pressure.
Note: The unit has a built in memory and will default to the last tyre pressure set in gauge
display of the inator. You can then scroll up or down using the (–) or (+) buttons ●to set
correct tyre pressure (as specied in your vehicle handbook).
5. If the tyre is above the recommended pressure remove the valve connector from the tyre valve
and release some air from the tyrSe. Follow steps 3& 4 inate the tyre to the correct pressure.
WARNING! COMPRESSED AIR CAN BE DANGEROUS
■ Never allow children to use this tyre inator.
■ Never leave unattended when running and never over inate.
■ Always use in a safe area away from trac and other dangers.
■ Never run for more than 10 minutes. After each 10 minute run allow inator to cool for
10 minutes.
■ Correct tyre pressure is vital for road safety.
■ Under or over inated tyres can be dangerous.
■ Always ensure that regular weekly checks are carried out to the vehicle
manufacturer’s recommended pressures including the spare, but excluding space
saver tyres. Check always before a long journey or after loading or unloading vehicle.
■ Always check pressure in an ambient temperature, never immediately after a long
journey.
CAUTION
■ Inspect tyre inator before each use.
■ Do not leave connected to 12v DC socket unattended.
■ Do not kink or block the air hose while the compressor is working.
■ Do not use the compressor if bent, broken, melted, burnt, wet or any of the
components are damaged.
■ Only use the adaptors supplied with device.
■ The compressor contains no user serviceable parts – Do not open.
6. Press On/O button ●to turn inator on. Your tyre inator will now inate your tyre to the
pre-set level, as selected and switch o automati-cally. When the inator is nearing the pre-set
value it stops momentarily but can start up to 3/5 times within 2-3 seconds to make sure it has
reached the pre-set pressure you have entered. This is a feature of the sensor
within the inator to aid accuracy of the pre-set pressure.
7. Remove the tyre valve connectpr ●from the tyre valve. Take care when unscrewing the
tyre valve connector.
8. If you are inating multiple tyres then follow the procedure stated from 3 to 7 above. If the
12v power supply is disconnected the always reconnect the 12v power supply before
connecting the high pressure hose to the tyre valve. If there is a power interruption during
the ination cycle, please follow the reset procedure outlined in the Trouble Shooting
guide.
12v POWER PLUG
TO REPLACE FUSE IN 12V PLUG: Undo knurled ring anticlockwise.
Replace fuse and knurled ring. (Max’ 15A)
ADAPTORS
Included with your Michelin High Power Rapid Tyre Inator, on the back of the unit, is a
snap-in storage compartment ●containing various adaptors, to enable you to inate other
items. To avoid over-ination, always follow manufacturer’s instructions on the items to be
inated.
---Small Toy Inator adaptors
---Sports Ball adaptors
---Presta Valve adaptor (High Pressure cycle tyres)
Only suitable for vehicles with a negative earth. Check your vehicle owner’s manual.
■ This inator can inate car tyres up to 40 PSI (do not inate space saver tyres) and
bicycle tyres up to 120 PSI. Higher pressures can be achieved in cycle tyres due totheir
smaller air volumes compared to car tyres.
■ When inating vehicle tyres this inator should ONLY be used for car tyres and bicycle
tyres. Low pressure items such as sports balls and small inatable toys mayalso be
inated using the adaptors provided.
■ Max power requirement during normal use: 7.5 AMPS / 96 WATTS.
SPECIFICATIONS
Max pressure:
Pressure accuracy:
Pressure resolution:
Max current:
Fuse size:
Hose length:
Power cord:
40 PSI for car tyres (120 PSI for cycle tyres)
Backlit pressure gauge (+/- 1 PSI up to 50 PSI)
PSI / BAR /kPa
7.5 AMPS / 96 WATTS
15 AMP glass
60cm (approx)
300cm (approx)
DIGITAL POWER SOURCE FEATURES
1
2
3
4
5
6
7
8
9
10
11
2
1
6
11
7
110
9
6
6
4
4
TROUBLE SHOOTING
Unit fails to stop at
preset.
Power lead/
plug becomes hot
Unit is running but
tyre is not inating
Unit displays
ERR message
■ Check that plug is fully inserted into 12v socket.
■ Check internal plug fuse (15 amp glass type).
■ Your car may require the ignition key to be turned to the
accessory position.
■ Check you are following the setting instructions correctly.
■ Check that you have set the correct pre-set pressure.
■ If power lead is coiled uncoil to full length.
■ Ensure 12v socket is clean with no debris in it.
■ Ensure 12v plug components are tight and clean.
■ When the tyre valve connector is attached, before switching the
unit on, ensure the gauge isreading your current tyre pressure.
■ Disconnect valve connector from the tyre. Remove plug from
power source for at least 5seconds, reconnect to power.
■Press and hold yellow reset button until display shows all the
digits the returns to 0.0.
■Connect valve connector to tyre.
■ Check that the tyre valve adaptor is correctly tted to tyre valve.
■ Ensure tyre valve is correctly connected to the tyre valve
adaptor.
■ Connect the 12v power plug to the vehicles 12v supply.
Do not connect the valve connector tothe tyre valve.
Allow the gauge to settle for a few seconds,press and hold the
yellowbutton for 5 seconds.
This will reset the pressure sensor.
If the problem persists the pressure sensor has failed -please
contact the Michelin helpline.
Customer Enquiries:0800-888-748
1st Sources Investment Consulting Co., Ltd
11F., No.176, Jiankang Rd., Jhonghe District,
New Taipei City 235, Taiwan
http ://www.rst-sources.com
E-mail:Services@rst-sources.com
Gauge does not
illuminate.
Unit fails to run with
switch in ‘On’ position
Gauge appears to
read incorrectly or is
unreadable.
Gauge reads 0.0 or
ERR.
Gauge does not
display when tyre
valve is connected.