MicMol Aqua Pro User manual
Hello Again
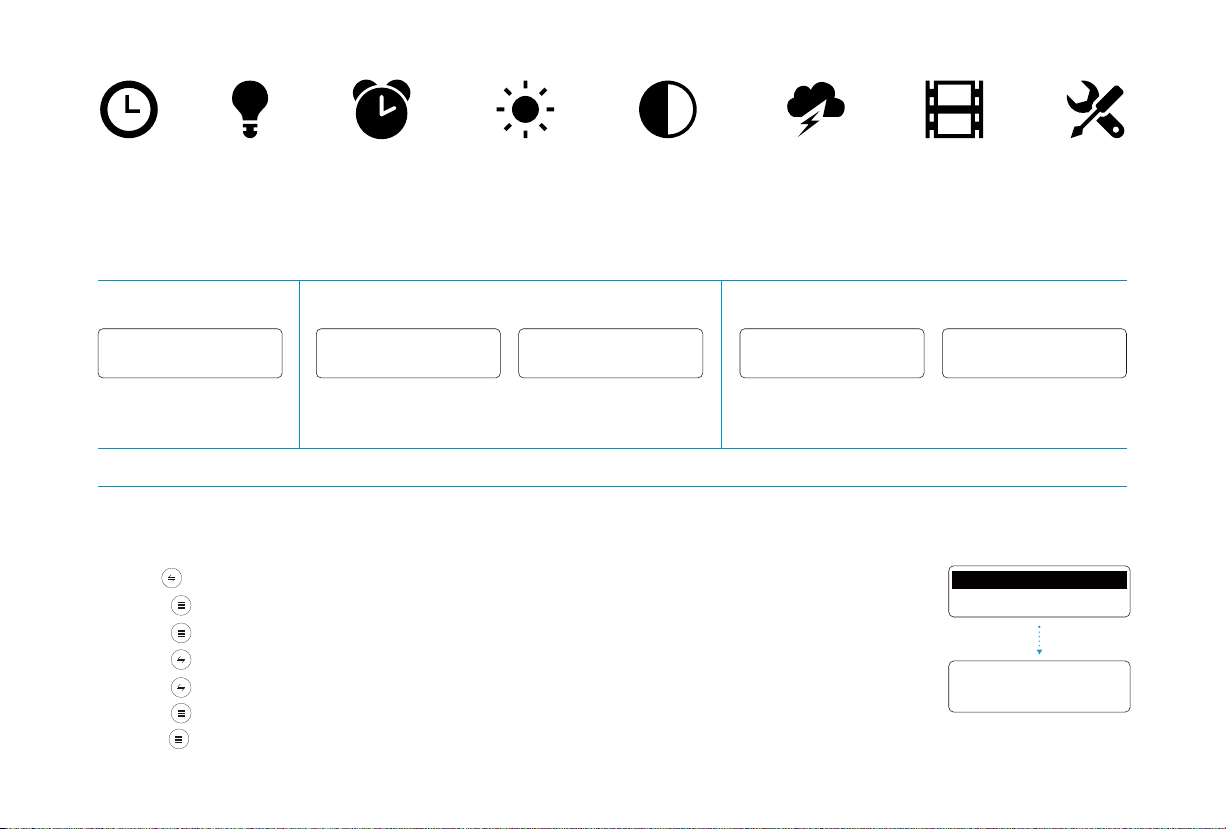
Quick Start Guide
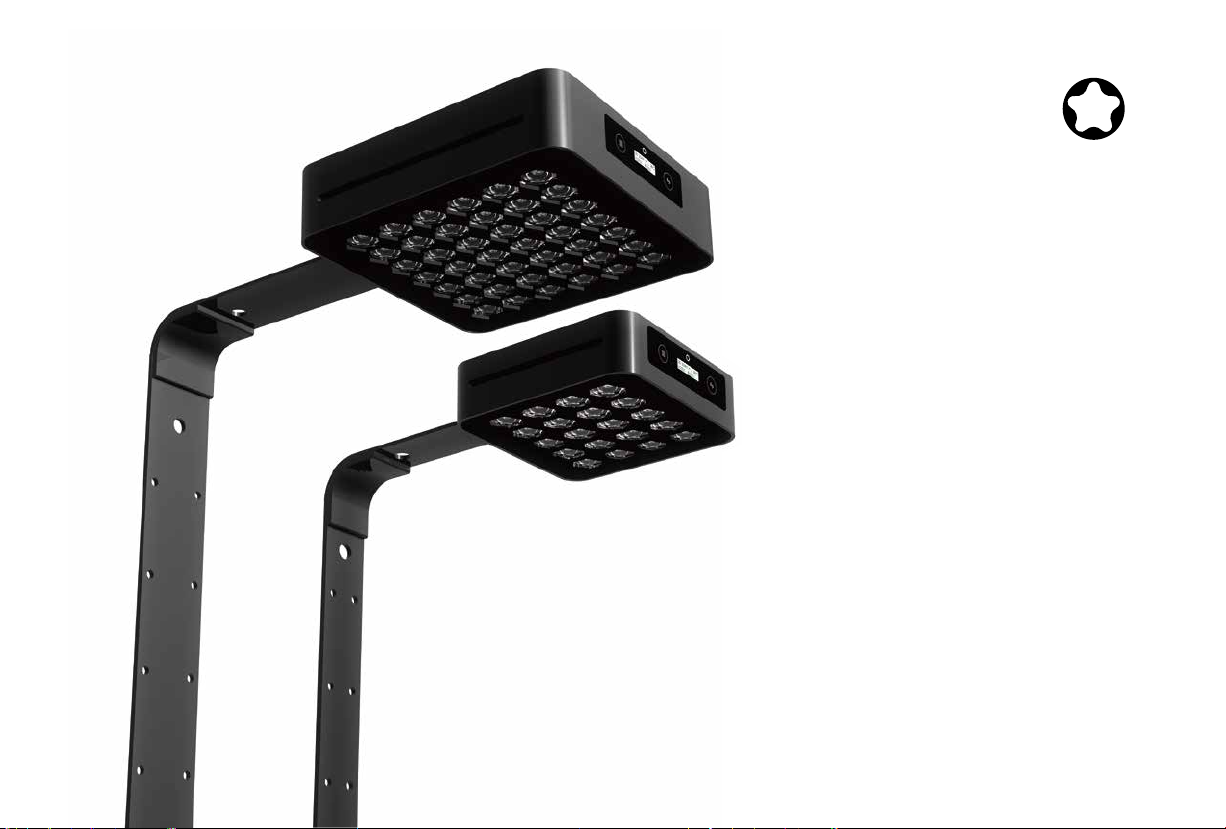
Welcome to your Aqua mini & Aqua Pro
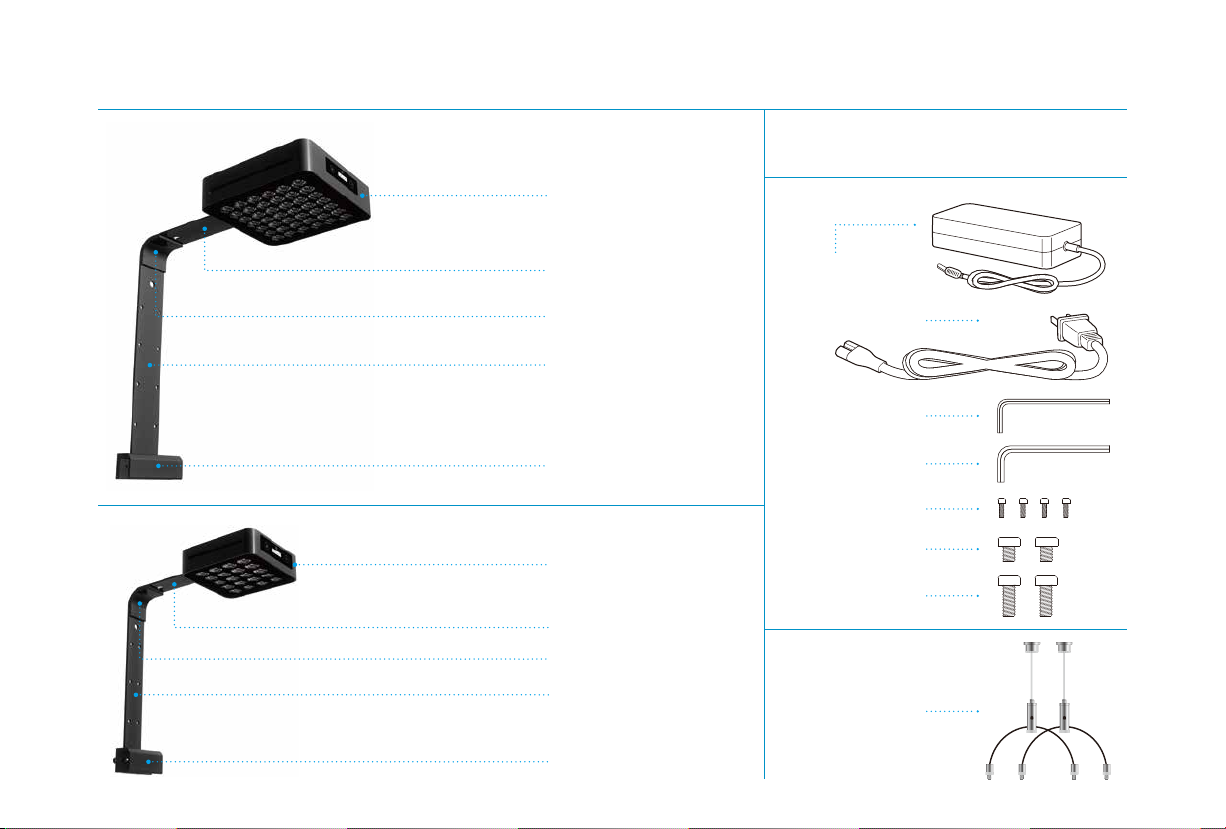
Overview what’s in the box
Accessories
1
Hanging kits
(Optional)
1
Power adapter
1
Aqua Pro
1
Super bracket - Part A
1
Super bracket - Part B
1
Super bracket - Part C
1
Super bracket - Part D
2.0 Hex key 1
3.0 Hex key 1
AC power cord 1
(Plastic)
(Stainless steel)
(Stainless steel)
Bracket screws 2
Bracket screws 4
1
Aqua mini
1
Super bracket - Part A
1
Super bracket - Part B
1
Super bracket - Part C
1
Super bracket - Part D
Bracket screws 2
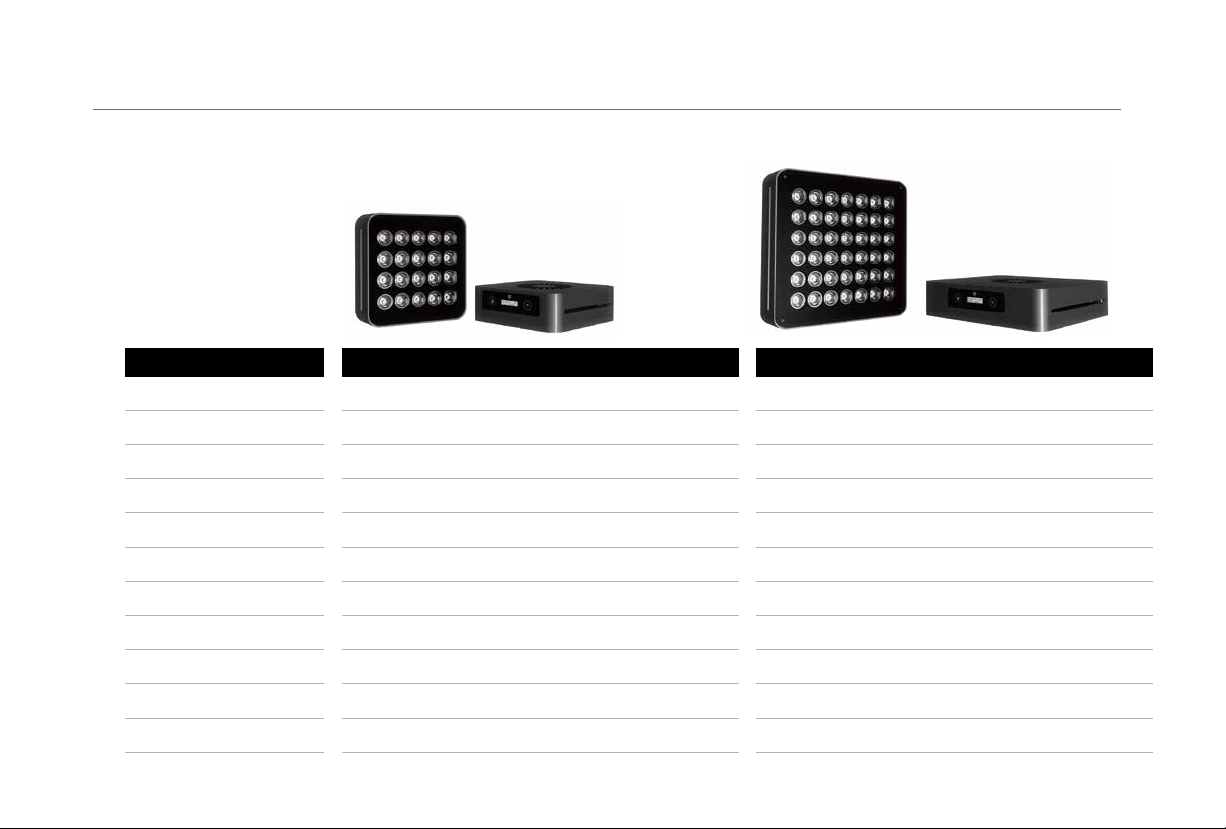
Lighting Specification
Item No.
Power
LED Quantity
LED Brand
Light Weight
Shipping Weight
Size
Packing
Universal Input Range
Lighting Cover
PSU Certification
AQUA MINI AQUA PRO
G3-AM
60W
20pcs High Intensity
3W Bridgelux / Epistar LEDs
1.0kg (2.2pound)
2.0kg (4.4pound)
140X140X46mm (5.5"x5.5"x1.8")
310x180x70mm (12"x7.0"x2.8")
AC80-240V, 2.0A
Suit For Min: 240mm ~ Max: 600mm
UL, CE, Rosh, PSE, SAA etc.
G3-AP
120W
42pcs High Intensity
3W Bridgelux / Epistar LEDs
2.0kg (4.4pound)
3.5kg (7.7pound)
200X200X50mm (7.8"x7.8"x1.9")
430x230x70mm (17"x9.0"x2.8")
AC80-240V, 2.0A
Suit For Min: 400mm ~ Max: 900mm
UL, CE, Rosh, PSE, SAA etc.
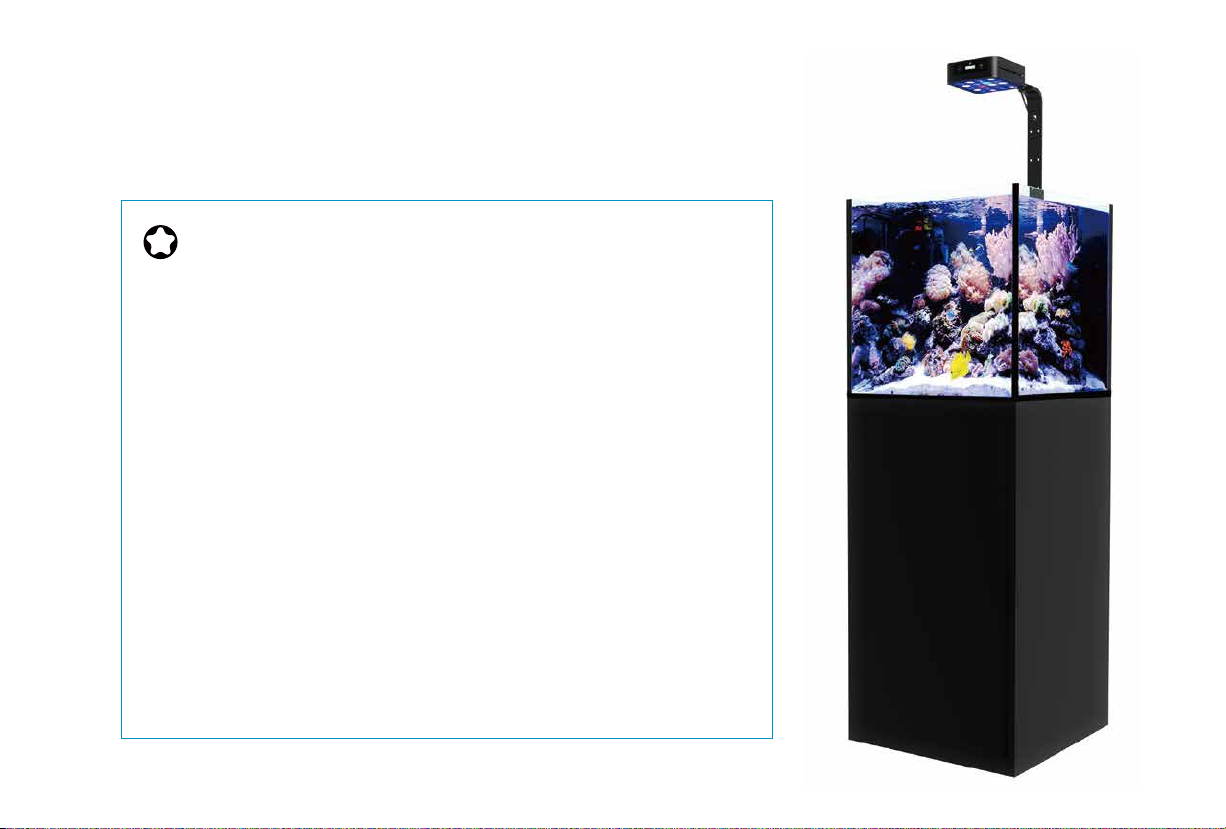
Congratulations on purchasing your Aqua mini & Aqua Pro. Read this guide to get started to installing your lighting.
Getting Started
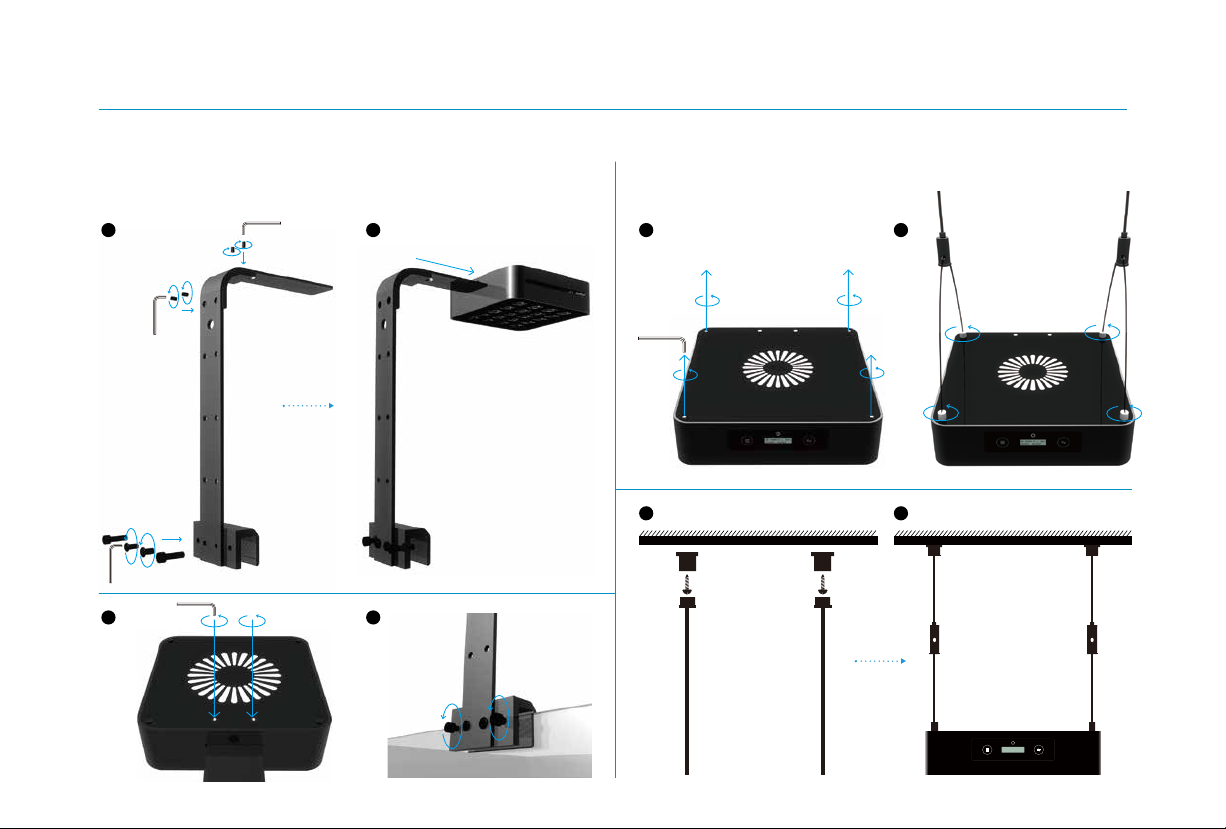
Super Bracket Hanging Kits
13:47PM M L 36
•
C
W:100% B:100%
1 2 1 2
3 4
3 4
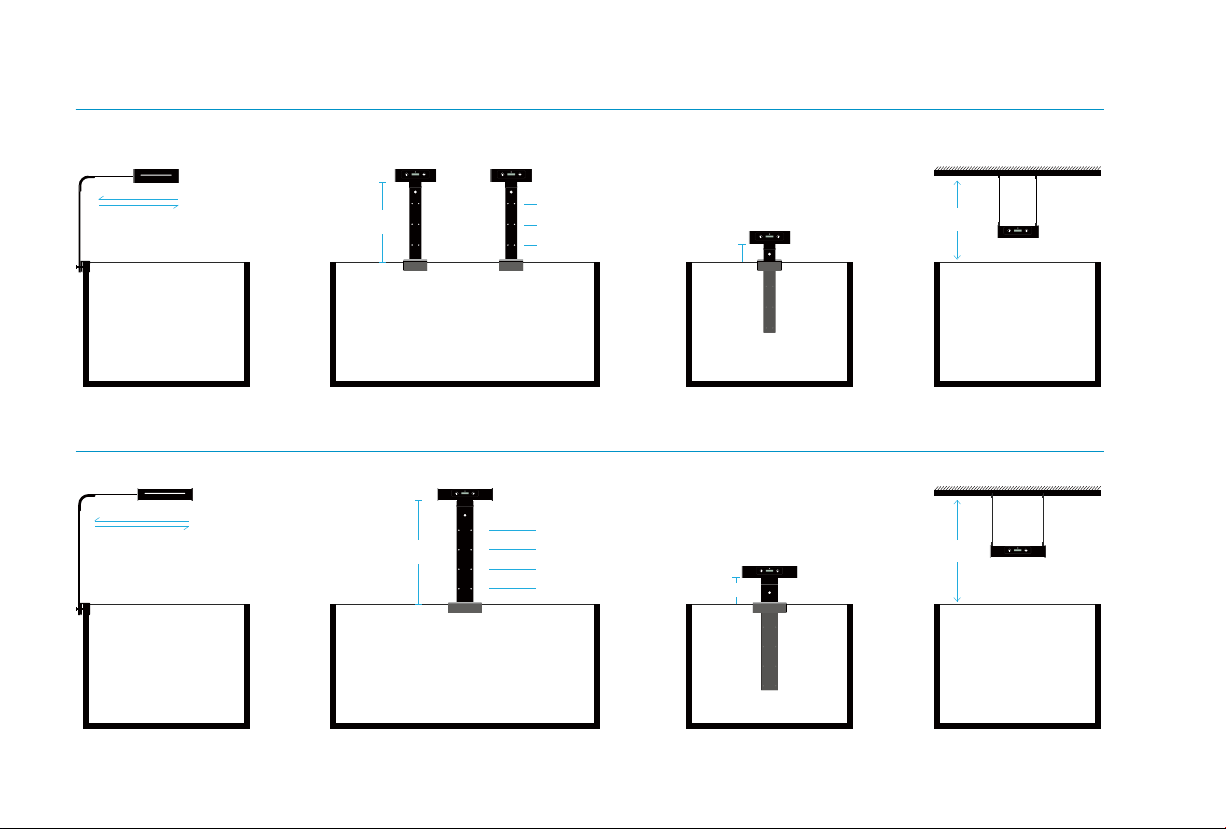
Mount Specification
3.5” / 9cm
min:
6.2” / 16cm
3.5” / 9cm
9” / 23cm
11.8” / 30cm
14.5” / 37cm
max: Adjustable
2.3” / 6cm
min:
10.5” / 27cm
max: 2.3” / 6cm
5.1” / 13cm
7.8” / 20cm
Adjustable
Up and Down Scalable Range Lowest Height Hanging Kits (optional)
Up and Down Scalable Range Lowest Height Hanging Kits (optional)
13:47PM M L 36
•
C
W:100% B:100%
13:47PM M L 36
•
C
W:100% B:100%
13:47PM M L 36
•
C
W:100% B:100%
13:47PM M L 36
•
C
W:100% B:100%
13:47PM M L 36
•
C
W:100% B:100%
13:47PM M L 36
•
C
W:100% B:100%
13:47PM M L 36
•
C
W:100% B:100%
Min: 7” / 18cm
Max: 11.5” / 29.5cm
Aqua mini
Side Scalable Range
Min: 9.8” / 25cm
Max: 14”.5 / 37cm
Aqua Pro
Side Scalable Range
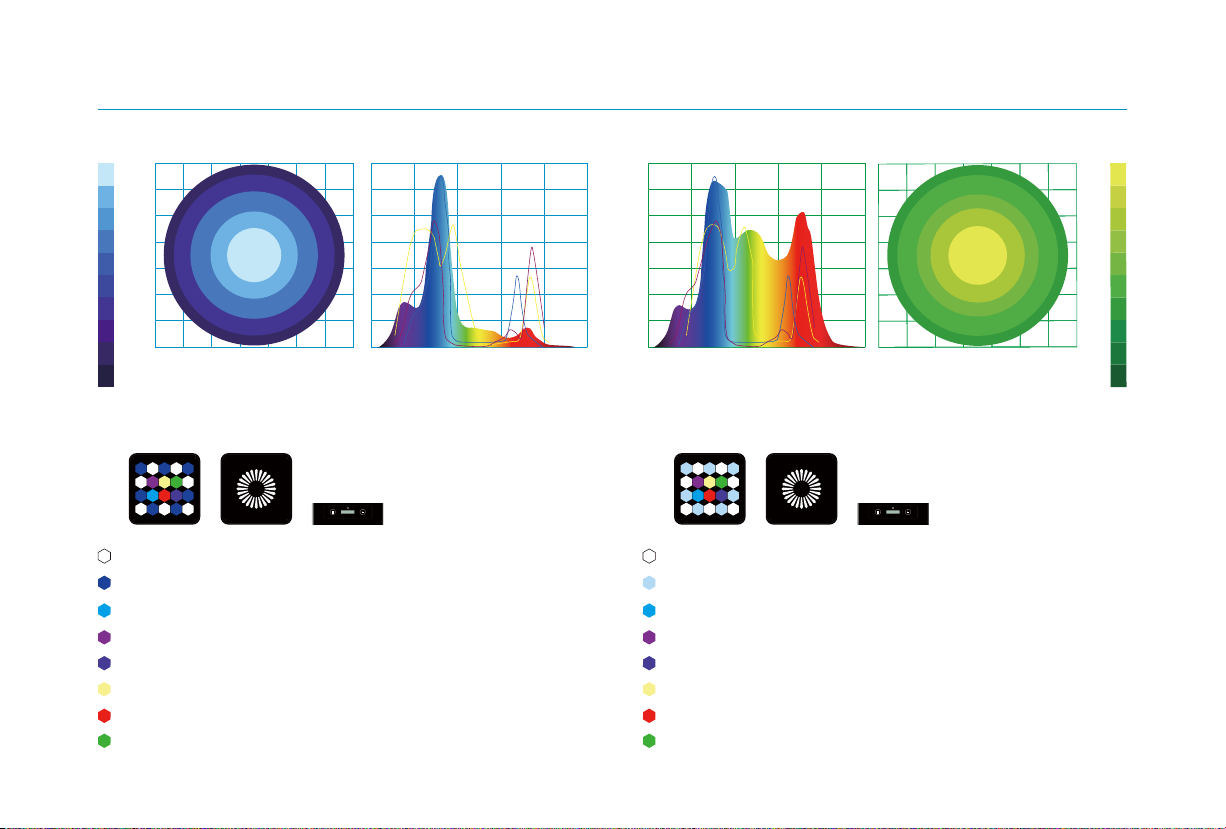
Aqua mini Performance
7pcs - Cool White - (12000~16000K) Channel A - White
7pcs - Royal Blue - (450~455nm) Channel B - Blue
1pc - Blue - (470~475nm) Channel C - Special
1pc - Violet - (410~415nm) Channel C - Special
1pc - UV - (380~395nm) Channel C - Special
1pc - Warm White - (3000~3500K) Channel C - Special
1pc - Deep Red - (660~665nm) Channel C - Special
1pc - Green - (510~520nm) Channel C - Special
7pcs - White - (6000~6500K) Channel A - White
7pcs - Cool White - (12000~16000K) Channel B - Blue
1pc - Deep Blue - (470~475nm) Channel C - Special
1pc - Violet - (410~415nm) Channel C - Special
1pc - UV - (380~395nm) Channel C - Special
1pc - Warm White - (3000~3500K) Channel C - Special
1pc - Deep Red - (660~665nm) Channel C - Special
1pc - Green - (510~520nm) Channel C - Special
180
120
80
60
30
Aqua mini 24x24 inch area
280
220
160
100
50
500400300 600 700 800 18inch. height
Aqua mini 24x24 inch area
0
0.2
0.4
0.6
0.8
1.0
500400300 600 700 80018inch. height
Marine Version Planted Version
13:47PM M L 36
•
C
W:100% B:100%
13:47PM M L 36
•
C
W:100% B:100%
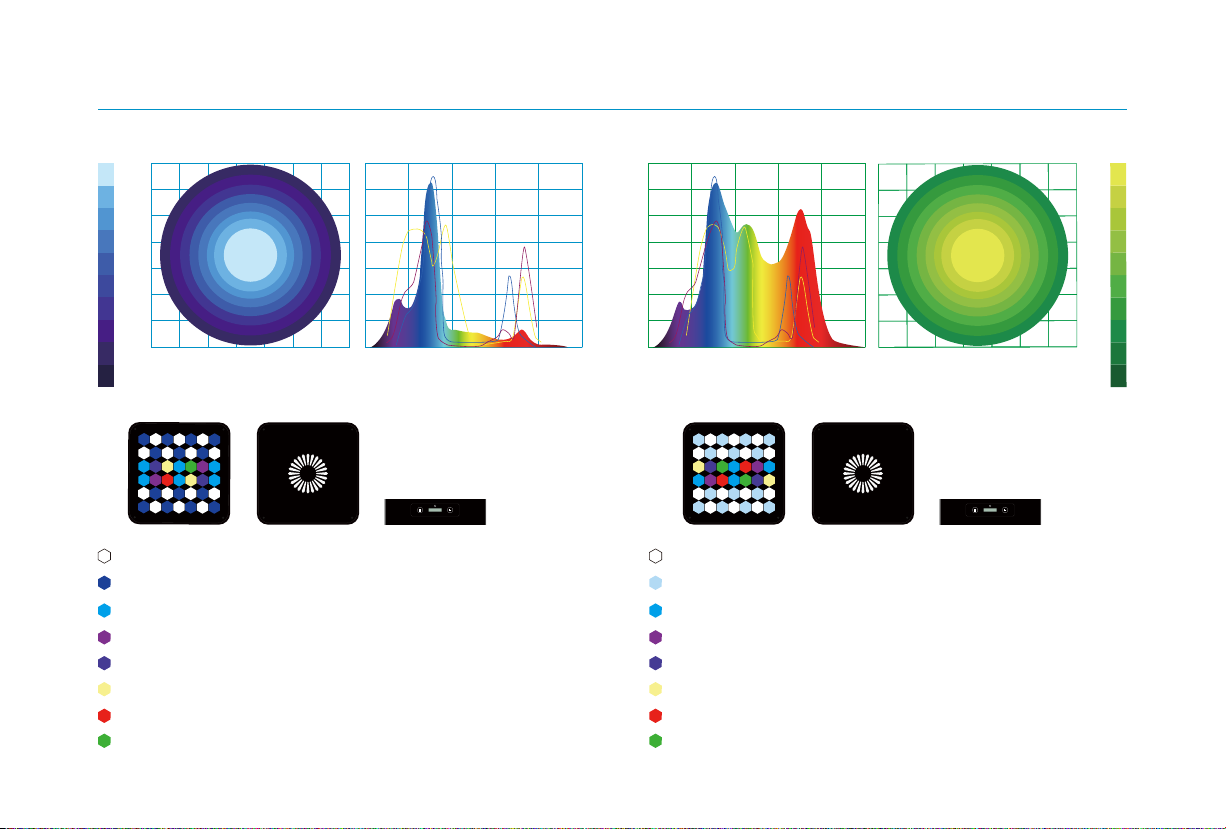
Aqua Pro Performance
14pcs - Cool White - (12000~16000K)
Channel A - White
14pcs - Royal Blue - (450~455nm)
Channel B - Blue
6pcs - Blue - (470~475nm)
Channel C - Special
2pcs - Violet - (410~415nm)
Channel C - Special
2pcs - UV - (380~395nm)
Channel C - Special
2pcs - Warm White - (3000~3500K)
Channel C - Special
1pc - Deep Red - (660~665nm)
Channel C - Special
1pc - Green - (510~520nm)
Channel C - Special
14pcs - White - (6000~6500K)Channel A - White
14pcs - Cool White - (12000~16000K) Channel B - Blue
4pcs - Blue - (470~475nm) Channel C - Special
2pcs - Violet - (410~415nm) Channel C - Special
2pcs - UV (380~395nm) Channel C - Special
2pcs - Warm White - (3000~3500K) Channel C - Special
2pcs - Deep Red - (660~665nm) Channel C - Special
2pcs - Green - (510~520nm) Channel C - Special
180
120
80
60
30
Aqua Pro 36x36 inch area
280
220
160
100
50
24inch. height 500400300 600 700 800 24inch. height
Aqua Pro 36x36 inch area
0
0.2
0.4
0.6
0.8
1.0
500400300 600 700 800
Marine Version Planted Version
13:47PM M L 36
•
C
W:100% B:100%
13:47PM M L 36
•
C
W:100% B:100%
05 30PM M L 27•C
W:100% B:100%
Clock Light Temperature
System LockMode
Channel IntensityHome / Menu Select / Lock
:
Smart Control System
Home / Menu - Browse menu.
Special Function 1 : Hold on 3 second to return to the previous menu.
Special Function 2 : Hold on 3 second under the screen locked to quickly switch the "Auto mode" and "Manual mode".
Select / Adjust - Enter the sub-menu to adjust the parameters.
Special Function 1: Hold on 3 second to unlock system.
Special Function 2: Hold on 3 second to lock system.
Setting Up Your Aqua mini & Pro now.
Note: “A” = Auto Mode, “M” = Manual Mode, “L” = Locked, “LT” = Lightning ON.
1) Set Clock
2) Auto Mode
1) Set Clock
10:29 AM
1) Set Clock
1. Hold Select/Lock for 3 seconds to unlock controller
2. Press Home/Menu to enter main menu
3. Press Home/Menu to toggle through options
4. Press Select/Lock to select 1) Set Clock menu
5. Press Select/Lock to adjust Time.
6. Press Home/Menu to toggle through options
7. Press Home/Menu to return to main menu
Systems Loading
iMOS 3.0M
Boot screen
05
:
30PM AL 33
•
C
W
:
060% B
:
060%
05
:
30PM ALT 33
•
C
S
:
030%
Home screen 1 Home screen 2
Auto Mode
05
:
30PM ML 33
•
C
W
:
100% B
:
100%
05
:
30PM MLT 33
•
C
S
:
100%
Home screen 1 Home screen 2
Manual Mode

1) Set Clock
2) Auto Mode
Set White
Set Special
Set Blue
Set White Set Blue
Set Special
Set Blue
Dawn 06:00 AM
Intensity 001%
Sunrise 07:00 AM
Intensity 050%
Midday 12:00 PM
Intensity 100%
Sunset 03:00 PM
Intensity 100%
Dusk 07:00 PM
Intensity 050%
Night 10:00 PM
Intensity 001%
2) Auto Mode - Set LEDs (e.g: Set White Channel)
1. Hold Select/Lock for 3 seconds to unlock controller
2. Press Home/Menu to enter main menu
3. Press Home/Menu to toggle through options
4. Press Select/Lock to select 2) Auto Mode menu
5. Press Select/Lock to select Set White menu
6. Press Select/Lock to adjust DawnTime.
7. Press Home/Menu to toggle through options
8. Press Home/Menu to select Intensity
9. Press Select/Lock to adjust Intensity.
10. Press Home/Menu to toggle through options
11. Press Home/Menu to move to next setpoint
12. Repeat Steps 5-9 for Sunrise, Midday, Sunset, Dusk and Night
13. Press Home/Menu to return to main menu
Auto Mode (Set Blue & Special Channel)
Set the Blue Channel and Special Channel are same as the White Channel operate step.
3) Manual Mode
1. Press Select/Lock to select 3) Manual Mode menu
2. Press Home/Menu to adjust Enable Manual Mode > Yes/No
3. Press Select/Lock to enter the channel selection list
4. Press Home/Menu to select the White, Blue, Special Channel
5. Press Select/Lock to adjust Intensity for each channel
6. Press Home/Menu to return to main menu
4) Lightning
The advanced settings allow you to control the time period storms will occur in a 24 hour period,
the number of storms during this set time and the frequency at which a storm period is activated.
1. Hold Select/Lock for 3 seconds to unlock controller
2. Press Home/Menu to enter main menu
3. Press Home/Menu to toggle through options
4. Press Select/Lock to select 5) Set Lightning menu
5. Press Home/Menu to set Start/End Hour
6. Press Select/Lock to adjust Start/End Hour. Press Home/Menu to toggle through options
7. Press Home/Menu to return to previous menu
8. Press Select/Lock to adjust Enable Lightning > Yes/No
9. Press Home/Menu to set Per Day and Frequency
10. Press Select/Lock to adjust Per Day
11. Press Home/Menu to set Frequency
12. Press Select/Lock to adjust Frequency
13. Press Home/Menu to return to main menu
3) Manual Mode
4) Lightning
3) Manual Mode
Enable
White
Blue
Special
100%
100%
100%
YES/NO
3)
Manual
Mode
4) Lightning
Start Hour 00AM
End Hour 00PM
Per Day 00
Frequence 00
4)
Lightning
Enable
YES/NO

6) Factory Reset
1. Press Home/Menu button to enter main menu
2. Press Home/Menu button to select Factory Reset
3. Press Select/Lock button to select YES
4. Press Home/Menu button to set Factory Reset
5) Demo
1. Press Home/Menu button to enter main menu
2. Press Home/Menu button to select 5) DEMO
3. Press Select/Lock button to select YES
Note: The DEMO will show all your settings in 1 minute
The Control system will gradually ramp the intensity of LED between set points.
The graph below outlines how the LEDs will ramp up and down between settings.
00am 05am 09am 12pm
24 Hours Lighting Cycle Overview
03pm 08pm
12am
Sunrise
Dawn
Midday
Sunset
Dusk
Night Night
5) Demo
6) Factory Reset
5) Demo
6) Factory Reset
YES/NO
5) Demo
Start Now
Demo is running
.........
6) Factory Reset
Reset Now
YES/NO

The sample settings below can be used to create different color spectrums in your tank.
0
20
40
60
80
100
00am 06am 12pm 03pm 07pm
12am
0
20
40
60
80
100
00am 06am 12pm 03pm 07pm
12am
0
20
40
60
80
100
00am 06am 12pm 03pm 07pm
12am
SunriseDawn Midday Sunset Dusk Night
0%
@ 6:00AM
White
Channel A
80%
@ 8:00 AM
100%
@ 12:00 PM
100%
@ 3:00 PM
80%
@ 6:00 PM
0%
@ 8:00 PM
Blue
Channel B
1%
@ 6:00AM
25%
@ 7:00 AM
50%
@ 10:00 PM
50%
@ 3:00 PM
25%
@ 6:00 PM
1%
@ 8:00 PM
75%
@ 12:00 PM
Special
Channel C
0%
@ 6:00AM
50%
@ 8:00 AM
75%
@ 3:00 PM
50%
@ 6:00 PM
0%
@ 8:00 PM
SunriseDawn Midday Sunset Dusk Night
0%
@ 6:00AM
White
Channel A
80%
@ 8:00 AM
100%
@ 12:00 PM
100%
@ 3:00 PM
80%
@ 6:00 PM
0%
@ 8:00 PM
Blue
Channel B
1%
@ 6:00AM
80%
@ 7:00 AM
10%
@ 10:00 PM
100%
@ 3:00 PM
80%
@ 6:00 PM
1%
@ 8:00 PM
75%
@ 12:00 PM
Special
Channel C
0%
@ 6:00AM
50%
@ 8:00 AM
75%
@ 3:00 PM
50%
@ 6:00 PM
0%
@ 8:00 PM
SunriseDawn Midday Sunset Dusk Night
0%
@ 6:00AM
White
Channel A
25%
@ 8:00 AM
50%
@ 12:00 PM
50%
@ 3:00 PM
25%
@ 6:00 PM
0%
@ 8:00 PM
Blue
Channel B
0%
@ 6:00AM
25%
@ 7:00 AM
50%
@ 10:00 PM
50%
@ 3:00 PM
25%
@ 6:00 PM
0%
@ 8:00 PM
75%
@ 12:00 PM
Special
Channel C
0%
@ 6:00AM
50%
@ 8:00 AM
75%
@ 3:00 PM
50%
@ 6:00 PM
0%
@ 8:00 PM
20K Heavy Blue
10K White
15K White & Blue

WARNING: Never push objects of any kind into this product through the ventilation openings in the case. Doing so may
be dangerous and damage your light.
NOTICE: Failure to follow these handling instructions could result in damage to your Aqua mini & Pro or other property.
Important Handling Information
Carrying your Aqua mini & Pro before you move your Aqua mini & Pro, shut it down and disconnect all cables and cords connected to it.
Using power cord Never force a connector into a port. Don't put the power cord into your tank when it connected.
When you Setup your Aqua mini & Pro please make sure that there are no loose items (such as paper, metal or other) that could accidentally
get inside the Aqua mini & Pro through vent openings or get stuck inside a port.
Mount your power supply where it won’t get wet. Include a “drip loop” - a tied loop of cord hanging down below the level of the electrical outlet.
That way, if water happens to run down the cord from the tank, it will drip off onto the floor rather than into the outlet. Drip Loops should always
be used to help prevent water from traveling along the cord and coming into contact with an electrical outlet. Drip loops must always be below
the level of the outlet. If the plug or outlet does get wet, DO NOT TOUCH the cord.
Storing your Aqua mini & Pro If you are going to store your Aqua mini & Pro for an extended period of time, keep it in a cool location (ideally, 71°
F or 22° C).When cleaning the outside of your Aqua mini & Pro, first shut down your Aqua mini & Pro and unplug the power cord. Then use a
damp, soft, lint-free cloth to clean the lamp exterior. Avoid getting moisture in any openings. Do not spray liquid directly on the lamp. Do not
use aerosol sprays, solvents, or abrasives that might damage the finish.
MicMol and the Environment
Information
MicMol. recognizes its responsibility to minimize the environmental impact of its operations and products.
MicMol warrants all MicMol products to be free from manufacturing defects for one
year from the original purchase date when purchased through an authorized MicMol
retailer. This warranty does not cover any damages caused by misuse, neglect,
alterations or improper handling / transport / maintenance / installation. Physical
damages are not covered by warranty. MicMol does not cover personal injury,
personal loss, or other damages associated with the use of our products. In order to
receipt is required for any warranty service. Products requiring warranty service must
be returned to MicMol or authorized MicMol retailer. You are responsible for the cost
of shipping a warranty claim to MicMol and any damages that may occur during
transit. Once a returned product has been inspected, it will be repaired or exchanged
at our discretion and returned to you. Thank you very much.
Warranty

© 2012~2018 MicMol Limited. All rights reserved.
MicMol , the MicMol logo, Aqua mini, Aqua Pro, Aqua Air, Aqua CC, BloomBee are trademarks of MicMol registered.
MP003-1720-A Printed in China
This manual suits for next models
1
Table of contents
Other MicMol Pet Care Product manuals


