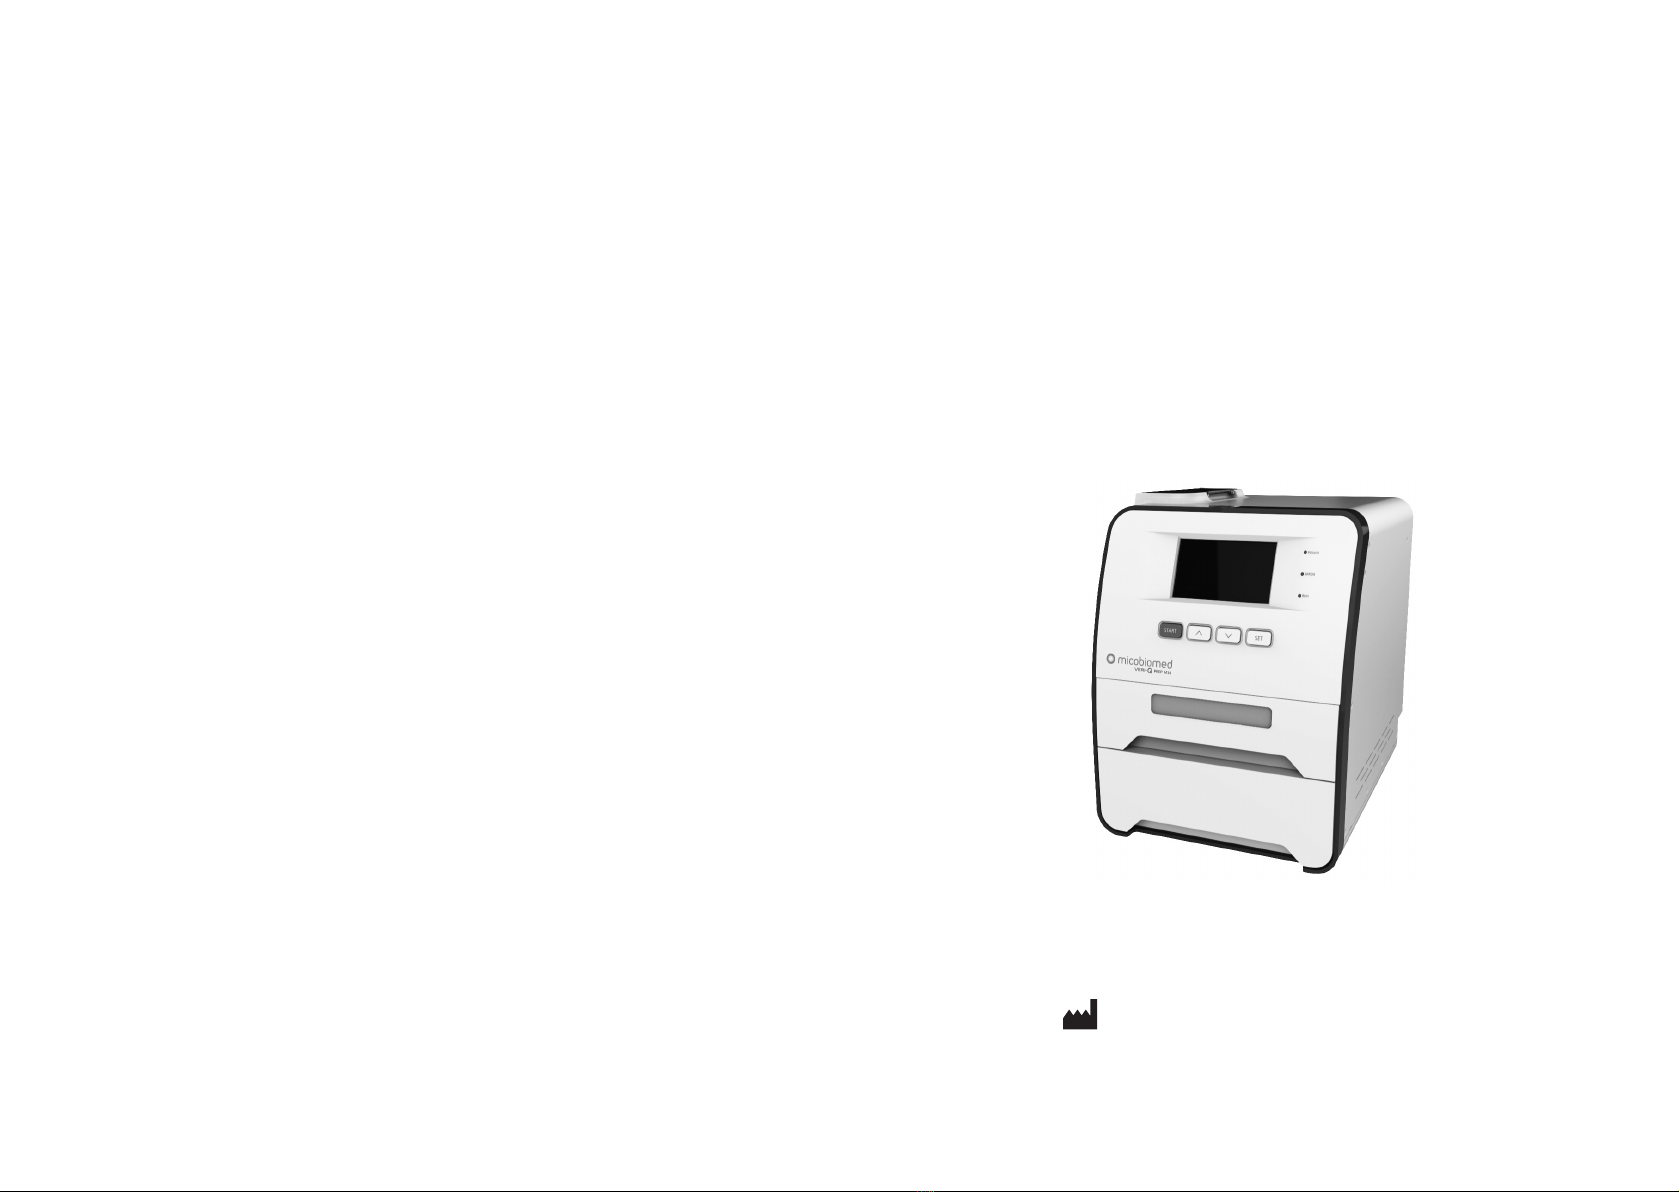
MiCo BioMed Veri-Q PREP M16 G2-16TU User manual

Veri-Q PREP M16
G2-16TU
User Manual
Apr. 2020
Cat No. 9S101
User Instructions
Common name : Nucleic Acid Extraction Device
Brand name : Veri-Q PREP M16
Model name : G2-16TU
For safe use, please use the device after reading the manual thoroughly.
Please furnish this document at a designated location so it can be used at all times.
MiCo BioMed Co., Ltd.
3rd and 4th Floor , 54 Changeop-ro, Sujeong-gu,
Seongnam-si, Gyeonggi-do, Korea, 13449
TEL: +82-70-5227-6000 FAX: +82-70-5227-6001~2

4 5
Veri-Q PREP M16 G2-16TU User Manual
5. Recommendations 29
6. Trouble Shooting 30
6.1 Error Messages 30
6.2 Additional Error Situation and Required Action 31
7. Warranty Policy 32
8. Return and Refund Policy 32
9. Disposal of Electrical & Electronic Equipment 32
10. EMC & Safety Test Results 33
11. Purchase of Reagents and Consumables 33
11.1 Consumables 33
11.2 Reagent 33
12. Cleaning 34
12.1 Cleaning of Air Rubber 34
12.2 Cleaning of Tray 34
12.3 Cleaning of Pre-run Cartridge 34
12.4 Cleaning of Solution Bottle34 34
13. Maintenance Checklist 36
Table of Contents
1. Before You Begin 4
1.1 About the manual 6
1.2 General Requirements for Installation 6
1.3 How to Obtain More Information 6
1.4 About Customer Support 6
1.5 Precautions on distribution or duplication of the manual 6
1.6 Laboratory Biosafety 6
2. Safety Guideline 7
2.1 Precautions when using the device 7
2.2 Working Environment and Installation Method 8
2.3 Operation and Maintenance 10
2.4 Transport and Storage 12
2.5 Limitation 12
2.6 Symbols of G2-16TU 12
2.7 Additional Symbols of this Manual 13
3. Product Components and Specications 14
3.1 Product Components 14
3.2 Product Performance 14
3.3 Purpose of Use 15
3.4 Detailed Information on Accessories 15
3.5 Consumable Components 15
3.6 Equipment Part Names and Functions 17
4. Product Features and Explanation 19
4.1 Product Features and Principle 19
4.2 Unpacking the G2-16TU 19
4.3 Transporting the G2-16TU 20
4.4 How to Use 20
4.5 G2-16TU Nucleic Acid Extraction Procedure 21
6 7
Veri-Q PREP M16 G2-16TU User Manual
2. Safety Guideline
This manual contains information and warnings the user must follow for the safe use of Veri-Q
PREP M16-G2-16TU. Hazards that could harm the user or damage theequipment are clearly stated
in this manual. If the product is used in a manner notdesignated by the manufacturer, the product
may become damaged.
Safety regulations are used like the following.
Warning
Warning is used to inform the user or other users that a situation like injury can
occur. Details about these situations are included in a box like this.
Caution
Caution is used to inform the situation that can cause damage to the product or
other equipment. Details about these situations are included in a box like this.
Before using the equipment, please read this manual carefully. And pay attention to the advice on
all hazards that may arise during operation. The caution clearly stated in this manual is intended to
supplement, not replace, safety requirements applied to the user’s country.
2.1 Precautions when using the device
2.1.1 Veri-Q PREP M16–G2-16TU must be only used by skilled personnel who have received
training on the relevant area.
2.1.2 Please thoroughly familiarize yourself with the manual before using the product We
recommend the user to read the warnings represented by symbols.
Warning
Risk of Injury and Damage to Materials
Improper use of G2-16TU may cause injury to the user or damage the product. G2-
16TU must only be used by users qualified after completing a training course.
Servicing on G2-16TU is performed by MiCo BioMed.
2.1.3 The user must use only components of MiCo BioMed in order to receive guarantee of the
product. Please perform regular maintenance according to the user manual. MiCo BioMed charges
the repair cost regarding problems arising due to incorrect maintenance.
2.1.4 In case of an emergency or malfunction, turn off the power switch on the back of G2-16TU,
and unplug the power cord from the power outlet. Afterwards, contact the contact address
specified on the user manual.
1. Before You Begin
1.1 About the manual
This manual is prepared for researchers or related staff for using and conducting research using
Veri-Q PREP M16-G2-16TU and for related staff who installs and maintains the product. This
product is a medical device.
1.2 General Requirements for Installation
If you wish to use this manual, the following is required.
-You must have basic knowledge in handling DNA and RNA samples for PCR.
1.3 How to Obtain More Information
To obtain detailed information on Veri-Q PREP M16-G2-16TU, please visit the following website
1.4 About Customer Support
For prompt response to customers, please contact us at +82-70-5227-6000.
Technical support is also available at our website at http://micobiomed.com.
1.5 Precautions on distribution or duplication of the manual
The content of this document cannot be sent or duplicated without the permission of the
copyright holder : MiCo BioMed Co., Ltd.
1.6 Laboratory Biosafety
Non-propagative diagnostic laboratory work (e.g. sequencing, NAAT) should be conducted at
facilities and procedures equivalent to BSL-2.

8 9
Veri-Q PREP M16 G2-16TU User Manual
2.2.5 Do not use a loose power cable or connector. If a power cable is overheated, it may be
damaged and can cause fire or electric shock.
2.2.6 Do not damage or alter the power plug. It may cause electric shock or fire.
2.2.7 When using a power extension cable, do not operate multiple devices at the same time. It
may cause an overload and cause a fire.
2.2.8 When handling a power cord, please handle it with hands that are completely dry.
Warning
Risk of Electric Shock
Do not touch G2-16TU with wet hands.
2.2.9 Do not place any objects in front of the door of the product which can interfere with the
door. It may lead to the malfunction of the door.
2.2.10 Have at least 30 cm of space between the product and the wall for proper ventilation. If
not, the product may be damaged.
Warning
Risk of Overheating
Maintain a space of a minimum of 30 cm for proper ventilation.
2.2.11 Do not install the product in a dusty environment since it may damage the product.
2.2.12 Make sure the product does not come in contact with heat sources.
2.2.13 Keep the product away from humid environment since it can cause electric shock, fire or
damage to the system.
2.2.14 Keep the product away from combustible and flammable vapor. If gas leaks, open the
windows and ventilate.
Do not operate electric switch during a gas leak because it may cause an explosionor fire. The
device must be installed on a clean and level place. A place with corrosive gas or high density
magnetic properties can damage the device.
2.2.15 Do not dismantle or repair the product. It may cause a fire and electric shock, and warranty
will not apply. Only a designated engineer can provide repair and services.
2.2.16 When the product is not used for a prolonged period of time, turn off the switch and
unplug the power plug. If not, the product may overheat and cause a fire.
2.2.17 Wipe off the dust from the power plug and do not use a loose power cord. If not, it may
cause a fire.
2.2.18 The optimum operating temperature of the product is 15℃~ 40℃. If the temperature is
higher or lower than this, it may damage the device or generate inappropriate data values.
2.1.5 If the device does not meet the performance conditions, make an inquiry to the
manufacturer.
2.1.6 This device is an electronic and mechanical device. Since there is a risk of electric shock or
physical injury, you must operate the device according to the user manual.
2.1.7 Follow the safety precautions attached to the device.
2.1.8 Do not touch the switch or power with wet hands.
2.1.9 When cleaning the device, turn off the power and unplug the power cord.
2.1.10 Only a designated engineer can provide repair and services.
2.1.11 Please install the device on a clean and level surface. Corrosive gas or high density
magnetic location can damage the device.
2.1.12 Avoid direct sunlight and strong light.
2.1.13 You must wear safety gear when handling toxic substances and substances which cause
infection.
2.1.14 Please close the door when operating the device. When you take out the door during
operation, physical shock may be applied to the device and cause malfunction of the operating
part, and you may also receive physical injury.
2.2 Working Environment and Installation Method
2.2.1 Please check the rated voltage of the power before operating the product. Veri-Q PREP M16
– G2-16TU uses 220V. For the safe use of the product, we do not recommend the use of Automatic
Voltage Regulator (AVR) or uninterruptible power supply (UPS) . This device is an electronic and
mechanical device. Since there is a risk of electric shock or physical injury, you must operate the
device according to the user manual.
2.2.2 This product must be grounded to protect it from electric shock. If not, it may cause a
serious injury or damage to the device.
2.2.3 Electromagnetic environment must be evaluated before operating the product.
2.2.4 Do not use this device near a powerful electromagnetic radiation source.
For example, unshielded intentional RF source may intefere with normal operation.
Warning
Electrical Hazard
Any interruption of the internal protective conductor (ground/grounded lead) and
disconnection of the protective conductor or external terminal may cause risk to
the product. Intentional interruption is prohibited.
Voltage inside the device
When the product is connected to line power, terminal may be active. If the cover
is opened or parts are removed, it is highly likely that active parts can be exposed.
10 11
Veri-Q PREP M16 G2-16TU User Manual
placed on the right position, malfunction may occur. (Both switches must be located on the left.)
2.3.6 Do not open the tray door for safe operation. Be sure to close the door when the device is
operating. When you take out the door during operation, physical shock may be applied to the
device and cause malfunction of the operating part, and you may also receive physical injury.
Warning
Moving parts
Never open the G2-16TU tray door during operation.
2.3.7 When cleaning the product, be sure to unplug the power cable from the power outlet.
2.3.8 Biological safety - Samples containing materials originated from humans should be treated
as follows. Use safe laboratory procedures as explained in the following publication. Biosafety in
Microbiological and Biomedical Laboratories, HHS (www.cdc.gov/od/ohs/biosfty/biosfty.htm).
2.3.9 Samples - Samples may contain infectious substances.
You should be aware of the health hazard presented by agents, and should use, store, and dispose
of such samples according to the stipulated safety regulations.
2.3.10 Chemical substances: You must wear safety gear when handling toxic substances and
substances which cause infection.
Warning
Harmful chemicals
Some chemical substances used with this product may be dangerous or may
become dangerous after the completion of the protocol execution. Always wear
goggles, gloves, and lab coat. A responsible person(e.g. Laboratory manager)
must take the necessary precautions to ensure that the workplace is safe and
that the equipment operators are not exposed to hazardous levels of toxic
substances(chemical or biological) defined in the applicable Material Safety Data
Sheets(MSDSs) or OSHA, ACGIH or COOSHH documents.
Ventilation for fumes and disposal of wastes must follow all national, and local
health and safety regulations and laws.
Please wash your hands after handling the reagents.
2.2.19 Operate the product in an environment with humidity of 20~80%. If not, the device may
malfunction or be damaged.
2.2.20 Prep reagent, sample type, and pre-treatment method may affect performance.
Operating Environment
A. Operating temperature: 15℃~ 40℃
B. Operating humidity: 20 ~ 80%
C. Max. 80% at 40℃, no condensation
D. Min. 20% at 15℃~ 40℃
Caution
Damage to the device [C1]
Make sure water or chemical substances are not spilt on the G2-16TU.
Product damage caused by water or chemical substance leakage will void the
warranty.
2.2.21 Do not place any objects in front of or behind the product. It may block the vent and
damage the product.
2.2.22 Do not drop or apply strong force to the product since it can damage the product.
2.2.23 Install Veri-Q PREP M16 (G2-16TU) away from direct sunlight and strong light.
2.2.24 Do not place paper or synthetic resin underneath the product. It may cause fire. Do not
cover the product with paper or plastic while operating the product. It may cause fire.
Warning
Explosive atmosphere
The G2-16TU is not designed for use in an explosive environment
2.3 Operation and Maintenance
2.3.1 Do not use the product for purposes other than extracting nucleic acid. It may damage the
product.
2.3.2 Please check if there is any foreign substance on the LabChip. It may cause damage and
malfunction of the product, and generate inaccurate test results.
2.3.3 Maintenance must be performed using the maintenance chart of Veri-Q PREP M16–G2-
16TU.
(Attachment) Last page of the user manual
2.3.4 In case of product malfunction, error message must be displayed on the LCD. If error
message is indicated, do not operate the product by force and make an inquiry to MiCo BioMed
A/S team.
2.3.5 The setup port on the back side of the product is only for engineers. If the switch is not

12 13
Veri-Q PREP M16 G2-16TU User Manual
2.3.11 Waste disposal - Used lab ware such as sample tubes and filter-tips may contain harmful
chemical substances or infectious substances occurring from the extraction process. Such wastes
must be appropriately collected and disposed of according to local safety regulations.
2.3.12 If you need calibration, please make an inquiry to the manufacturer or dealer. And If there
is a change in the performance characteristics of QD-P100 device, please make an inquiry to the
manufacturer or dealer.
2.4 Transport and Storage
Operating Storage Transport
Ambient Temperature (℃)15 ~ 40 RT RT
Relative humidity (%) 20 ~ 80 10 ~ 90 20 ~ 90
Air Pressure (kPa) 70 ~ 100 70 ~ 100 70 ~ 100
2.5 Limitation
The G2-16TU is optimized to use with Veri-Q PREP M16 reagent kit made by MicoBioMed and it
couldn’t guaranteed performance excepting the system.
2.6 Symbols of G2-16TU
Symbol Location Explanation
Tray door Warning or Caution for each parts
Near sample tubes
Biological hazard - Since the tubes or waste cartridges
become contaminated with biohazardous materials, they
must be handled while wearing gloves.
Near buffer bottles and
sample tubes
Toxic material. Since the tubes or waste cartridges
become contaminated with toxic materials, they must be
handled while wearing gloves.
Label on the back side Used in in vitro diagnosis
Label on the back side Refer to the user manual
Symbol Location Explanation
Label on the back side Disposal of Electrical & Electronic Equipment
REP Label on the back side Indicates the manufacturer’s catalog number
so that the medical device can be identified
SN Label on the back side Indicates the manufacturer’s serial number so that a
specific medical device can be identified.
Label on the back side Indicates the medical device manufacturer as defined in
EU Directives 90/385/EEC, 93/42/EEC and 98/79/EC
Label on the back side Fragile, handle with care
2.7 Additional Symbols of this Manual
Symbol Explanation
Please wear protective goggles.
Please wear protective gloves.
Please wear lab coat.
Please wash your hands after using the product.
14 15
Veri-Q PREP M16 G2-16TU User Manual
3. Product Components and Specications
The warranty period of Veri-Q PREP M16–G2-16TU is 1 year from the date of purchase. This warranty
does not apply to damage from transport or handling, misuse of the device, or normal wear condition.
All repair work performed after thewarranty period will be charged. Before installing the product,
check if the following product components are included in the package.
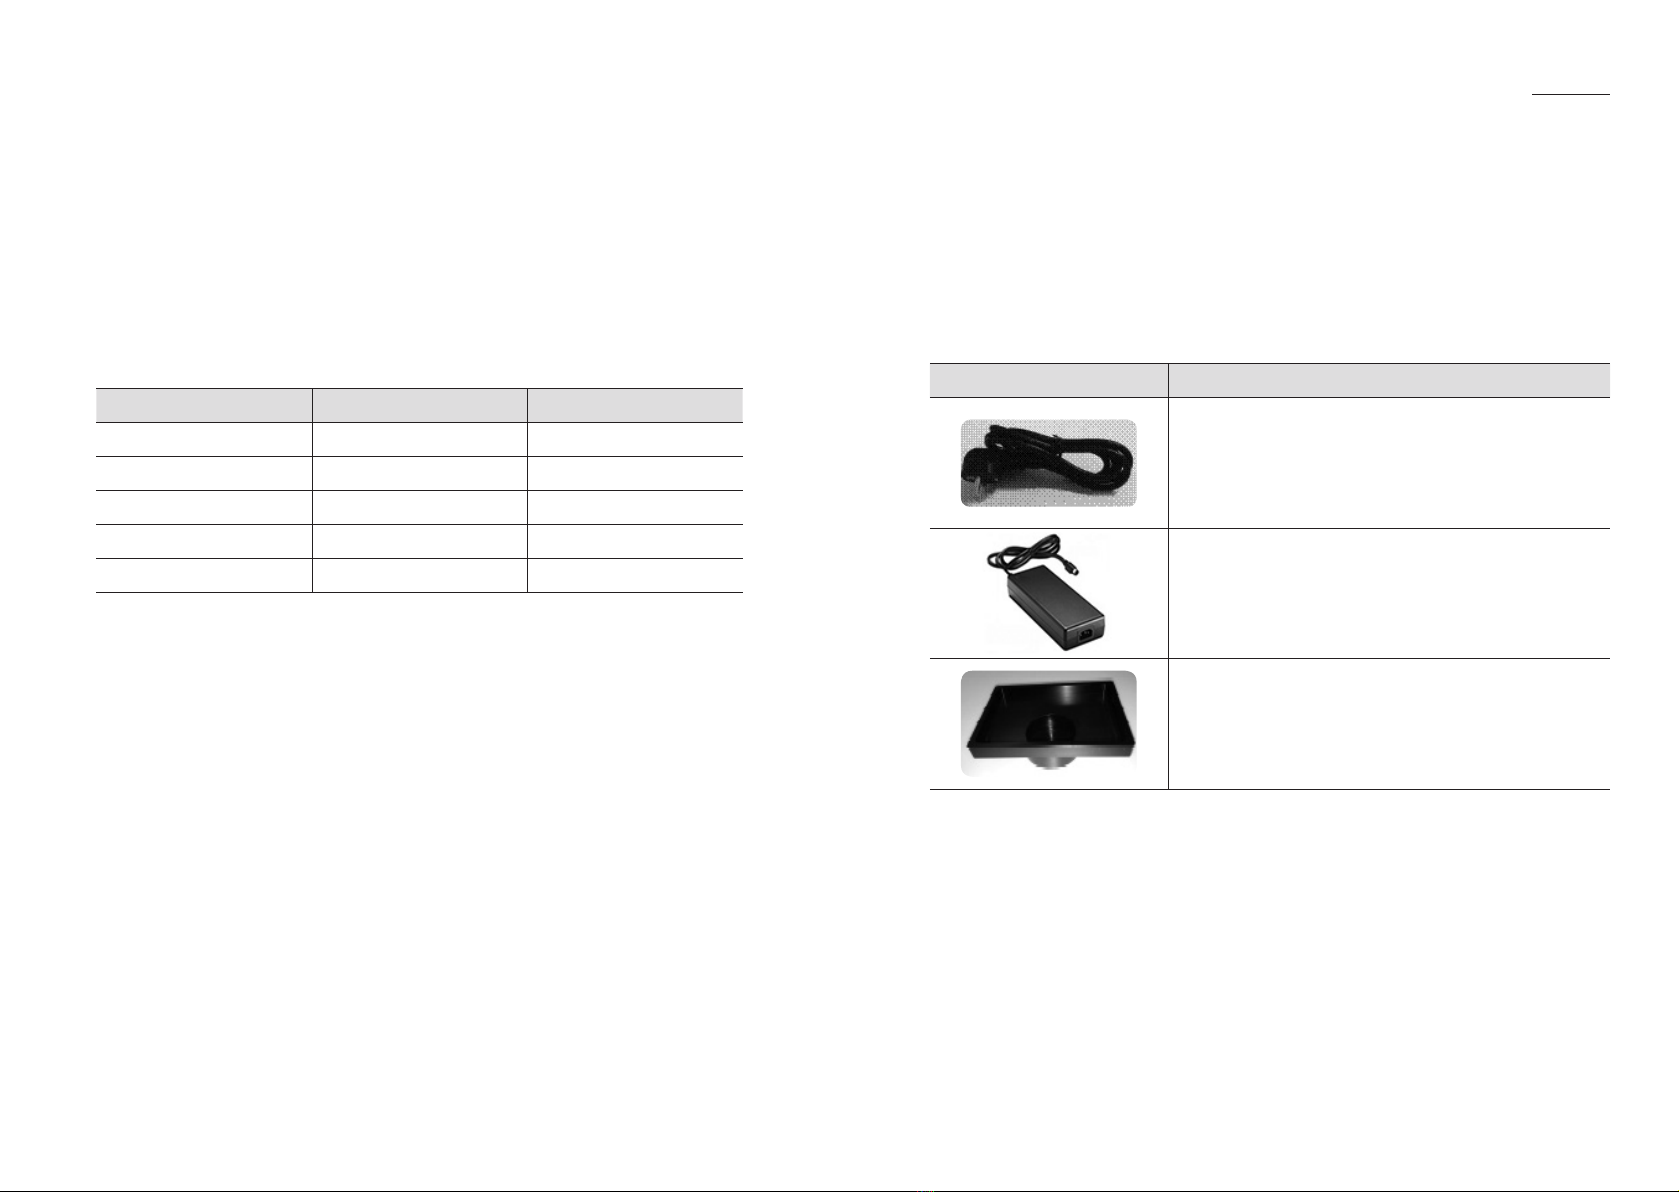
3.1 Product Components
Components Quantity Check(O/X)
Product 1 EA
Power cable 1 EA
Adapter 1 EA
Pre-run Cartridge 1 EA
User manual 1 EA
3.1.1 Product name
•Common name : Nucleic Acid Extraction Device
•Brand name : Veri-Q PREP M16
•Model name : G2-16TU
3.2 Product Performance
3.2.1 Specifications
•Equipment Input Voltage : 12V
•Frequency : 50~60Hz
•Adapter Output : 12V 16A
•Weight : 13.3Kg
•Dimensions : 260x335x355mm(DOOR OPEN: 260x620x355mm)
3.2.2 Product Specification
•Product input voltage: 12V
•SMPS requirement: 12V 16A
•Average electric consumption: 30W
•Instantaneous maximum power consumption: 110W
•Safety device: We made sure the electric shock inside the board does notaffect the element
by using Varistor on operating parts such as valve, pump, fan, etc. We made sure the electric shock
inside the board does not affect the element by using diode in the motor operating part.
3.3 Purpose of Use
As a device which separates nucleic acid from various samples such as blood, serum, sputum,
tissue, etc. for gene amplification test, this product is for In VitroDiagnostic device.
3.4 Detailed Information on Accessories
Components Explanation
Power cable
100~240V. Min. 10A
Operable with any cable approved by the European
Certification Authority
Adapter-
Output: 12V 16A
It must be used identically with the certified genuine
product.
Pre-run Cartridge
Product provided by MiCoBioMed must be used.
3.5 Consumable Components
Consumable components are needed to operate the product. Sample Prep kits for G2-16TU are
produced by MiCoBioMed. For sample treatment and preparation process, refer to the ‘guideline
for use’ of prep reagent for each sample (ex. Blood, sputum, serum, etc.)

16 17
Veri-Q PREP M16 G2-16TU User Manual
Contents Explanation
NST (Sample Tube)
Plastic tube with nucleic acid binding membrane.
Nucleic acid will be separated with this tube.
* Disposable, re-use prohibited.
NET (Elution Tube)
Extracted nucleic acid is collected with Elution Tube.
* Disposable, re-use prohibited.
Buers
Lysis solution, cleaning solution 1, 2, Elution solution, etc.
(Contents vary depending on the type of kit.)
NETR(Elution cartridge)
Elution tubes will be placed in the Elution cartridge.
NWTR(Waste Cartridge)
All wastes will be filled in this waste cartridge.
Lid
This lid will cover the Elution Cartridge.
3.6 Equipment Part Names and Functions
1
2
3
4
5
6
7
No. Name Explanation
1LCD Operates and sets equipment with touch LCD, and displays User
interface
2LED Indicates the equipment status with LED Power, Error, Run
3Button Operates and sets equipment
4Upper tray Upper tray can be manually inserted and taken out by pulling to
install and replace sample tubes.
5Lower tray Lower tray can be manually inserted and taken out by pulling to
install and replace Elution cartridge, and clean the lower tray
6Air vent hole Hole for discharging air inside the body(heat)
7Buer door The door can be manually opened and closed to fill up the buffer

18 19
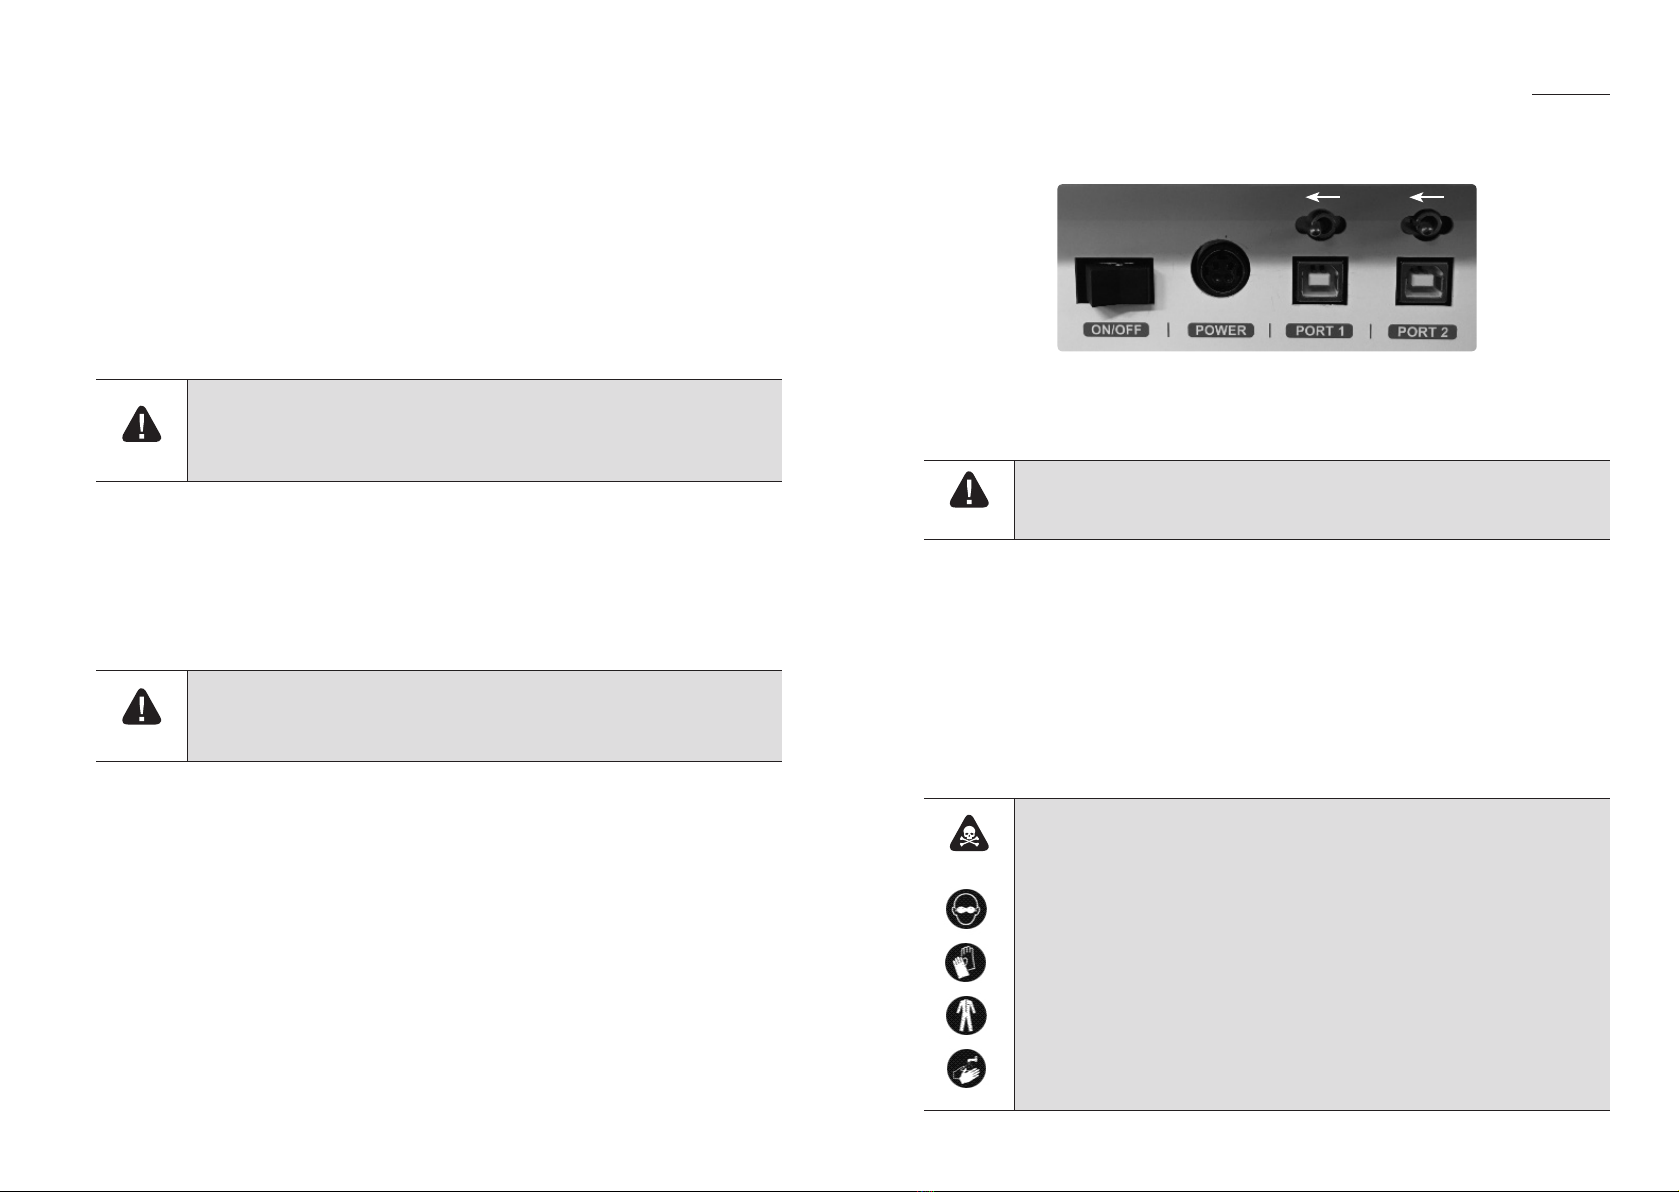
Veri-Q PREP M16 G2-16TU User Manual
3 4
2
1
No. Name Explanation
1Fan Built-in fan for cooling heat inside the device
2Power switch Turns on and turns off equipment
3Power connector Connects to adapter and turns on equipment power
4Service port
Port for downloading the equipment operating program or
upgrading the operating program, port to be used by only
engineers
4. Product Features and Explanation
4.1 Product Features and Principle
4.1.1 Product Features
Main body Fluid control part for washing, air pumping, and extraction
Moving part to perform pre-treatment per channel
4.1.2 Operation Principle
This device has the function to rapidly extract nucleic acid from the samples that have gone
through the pre-treatment process.
Moving Part This part rotates the upper tray containing NST and lower tray containing NET
to filter waste and extract nucleic acid from a sample.
Fluid Control
Part
This part pours buffer and pumps air into NST to filter waste and extract
nucleic acid from a sample.
4.2 Unpacking the G2-16TU
Unlock the Case Open the Case Take out the
Equipment
Connect Power
cable and AC
adapter
Connect Power
cable to the
Equipment

20 21
Veri-Q PREP M16 G2-16TU User Manual
4.3 Transporting the G2-16TU
When moving the device, please protect the device by using the silver case. When packing the
equipment,
•Remove all liquid in a bottle
•Perform Pre-run 3 times to remove liquid in the equipment
•Place the power cable and AC adapter at the bottom of the case
•Put the equipment in the silver case
•Put the pre-run cartridge in the empty space on the side of the case.
4.4 How to Use
Check the G2-16TU device with the required parts according to installation protocol. You must
start the operation in a normal operating condition.
4.1.1 Power Supply and Self-Test Method
1) Connect instrument power cable on the power connect at the rear side of the G2-16TU, and
then, turn on the power.
2) When power is supplied to the device, POWER LED should light up. Please refer to the
following photo. The green light coming on means the device is working properly.
3) When the power is turned on, self-test and initialization is automatically performed. If a
problem occurs during a self-test, the equipment does not work properly, and a message,
“Motor Initialize (RUN-INIT)” appears on the bottom of the LCD. In this case, do not operate
the equipment by force. And please make an inquiry to the AS team of Mico Biomed Co., Ltd.
regarding such malfunction.
4.5 G2-16TU Nucleic Acid Extraction Procedure
For sample preparation, see the instructions for use of Veri-Q PREP M16 reagent kit made by
MicoBioMed
4.5.1 Filling buffer solution
1) Carefully fill up each bottle with the solution. Afterwards, place the bottle in a suitable location.
2) Open the lid after suitably placing the bottle.

22 23
Veri-Q PREP M16 G2-16TU User Manual
4.5.3 Placing Elution Tube and Cartridge
1) Open the lower tray and place a Waste cartridge.
2) Insert the Elution Cartridge: Place the Elution Cartridge so it fits in the location for insertion.
3) Insert Elution tube: Insert the Elution tubes into the Elution Cartridge.
Make sure the lid of each tubes faces outward.
4.5.2 Pre-running
1) Please check “PreRUN Required” message from the configuration screen.
2) Pull out the upper tray and place a “Pre-run Cartridge” in an appropriate position of “Sample
Rotor.”
** Do not place the Pre-run cartridge upside down. The buffer solution can flow into the
equipment. Please refer to the photo below.
XO
Correct Incorrect
A. Press “Prerun” button on the LCD screen.
B. If “YES” button is pressed, “Prerun” begins (It will take about ~80 seconds.)
C. If you hear a beep sound, the equipment automatically finishes “Prerun.”
D. Press “YES” button and then, remove “Pre-run Cartridge.”
E. Remove buffer solution from the waste liquid container.
F. Refill the bottle with solution
**Please fill the bottle with solution after Pre-run is finished.
**Please perform pre-run right before starting sample extraction.

24 25
Veri-Q PREP M16 G2-16TU User Manual
4.5.6 Load eluted sample
1) Carefully place the samples into the Sample tubes and close the upper tray.
(Never perform “Initializing step”after loading the samples.)
4.5.7 Select protocol
1) Press ‘ ’ button on the left side of the Configuration menu.
2) Select appropriate protocol from the menu, and then press “Next ” or “START” button to
return to the Configuration menu.
** You can change menu page by pressing ‘ ’ , ’ ’ image or pressing ‘ ’ , ’ ’ button.
** You can check the firmware version on the left corner. The latest version is v2.00.
4.5.8 Select extraction volume
1) Press “E-Volume” image or ‘ ’ button. You can select one of 3 extraction volumes.
4) Place the lid on the Elution Cartridge. This lid is for preventing the Elution tube from being
contaminated. Afterwards, close by pushing the lower tray again.
4.5.4 Placing the sample tubes
1) Press “Init” image or ‘SET’ button to initialize the position.
4.5.5 Placing the sample tubes
1) Insert sample tube
Open the upper tray and place the Sample tubes into the Sample rotor.

26 27
Veri-Q PREP M16 G2-16TU User Manual
B. Washing
During the washing process, the equipment will inject washing solutions into the
sample tubes. And current washing status will be shown in the LCD channel. During the
washing process, the following error message may appear.
Or
This error message occurs when there is almost no buffer in the bottle during injection. If
the user filled the bottle completely before operation, there is no need to fill up the bottle
with solution or halt operation. If the buffer is not filled completely, it may cause incomplete
operation.
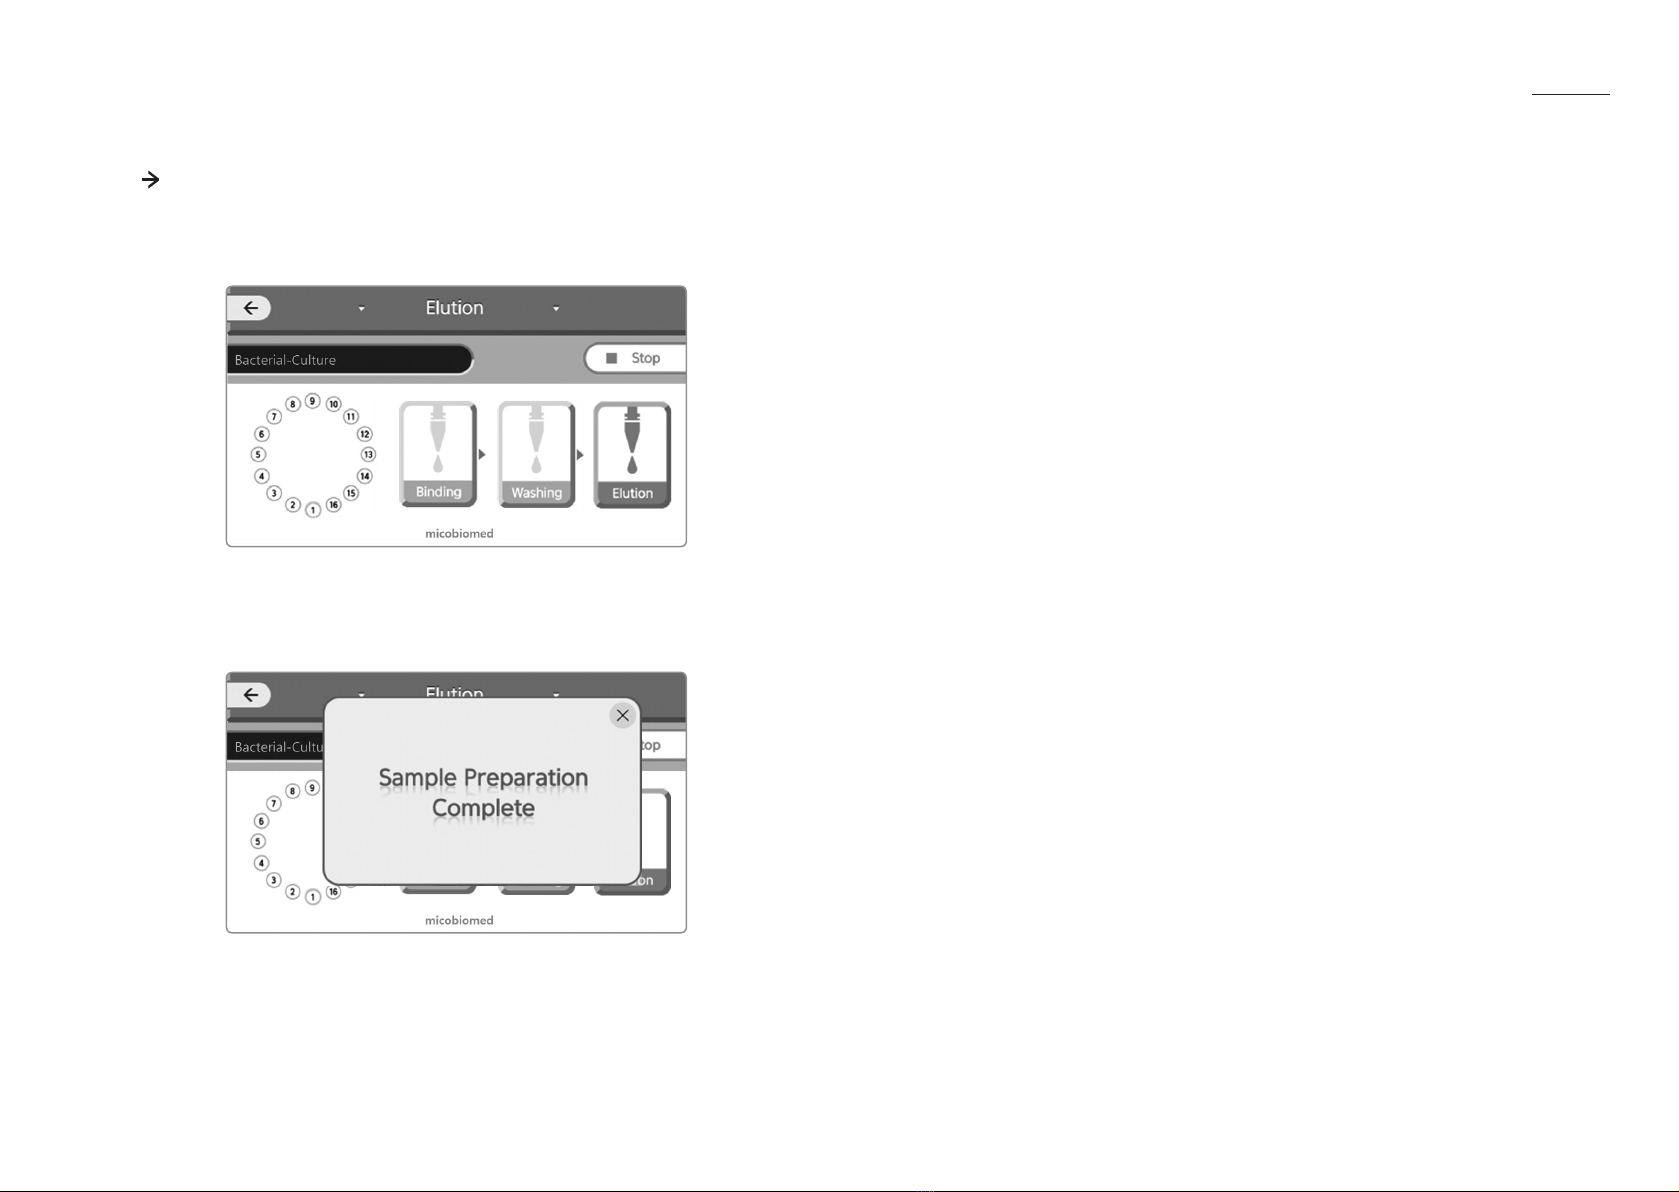
4.5.9 Start operation
1) Press “START” button or “▶Start” image. The equipment automatically operates. Please refer
to the following for operating procedures.
A. Checking & Binding
When the user operates the equipment, the operation screen of the equipment
changes or is displayed.
In this procedure, the equipment rotates the sample rotor and checks the insertion of sample
tubes. If there is a sample tube, the image changes to inform the user. In addition, if there are
tubes in all channels, the image will change as shown below.
**
If the indicated image does not match the inserted sample tube position, stop the
operation.
After checking, the equipment starts the binding process. During the binding process, the
binded sample tube is highlighted with blue as shown below.
28 29
Veri-Q PREP M16 G2-16TU User Manual
D. Close the lid of the bottle containing solution.
E. Turn off the G2-16TU..
3) If you want to operate equipment again, follow below procedures.
A. Press 'SET' button or touch "Init" image.
B. Check the error message "Motor Initialize (Run INIT)" disappear.
C. Refill the all buffer bottles.
D. Go to section 4.5.3
4) Unless if you not, follow below procedures.
A. Close the lid of the bottle containing solution.
B. Turn off the G2-16TU.
5. Recommendations
We recommend that you use only MiCo BioMed reagents optimized for the equipment. For more
C. Elution
In this step, the eluate will be gathered in the micro tube which is inserted into the
elution cartridge. Because G2-16TU does not check the insertion of elution tube, if the user
does not insert the elution tube or insert the tube without matching the position of the
sample tube, the eluate may be poured out on the equipment.
4.5.10 Finish
1) If the device operation is finished, you will hear a‘beep’sound. And the following image will
appear.
2) Next, follow the following procedure.
A. Open the upper tray and remove the sample tubes.
B. Open the lower tray, take out the elution tubes containing DNA or RNA sample and store
them appropriately.
C. Please empty the waste solution from the waste cartridge.

30 31
Veri-Q PREP M16 G2-16TU User Manual
Elution Door Open
This error message occurs in the following situation.
a. When lower tray door is opened
b. In this case, close the lower tray.
Tube Empty
(Running
Interrupted)
This error message occurs in the following situation.
a. When there is no sample tube in the upper tray during the checking
step
In this case, insert the sample tube into the upper tray.
6.2 Additional Error Situation and Required Action
Error Situation Action
Equipment is turned
on but nothing is
displayed on the LCD
This error occurs in the following situation.
a. When USB port switch location is wrong
In this case, relocate switch position as described in 2.3. (5).
Equipment is turned
on but buzzer alarm
is constantly set o
This error occurs in the following situation.
a. When USB port switch location is wrong
In this case, relocate switch position as described in 2.3. (5).
Lower tray does not
open after inserting
sample tube
This error occurs in the following situation.
a. When Elution cartridge and lid are inserted into the lower tray
In this case, remove sample tube from the upper tray.
** If a problem cannot be solved, please make an inquiry for services through the manufacturer or
distributor.
6. Trouble Shooting
6.1 Error Messages
Message Explanation
Motor Initialize
(Run INIT)
This error message occurs in the following situation.
a. When motor initialization fails upon turning on the equipment
b. When sample extraction is complete
In this case, take the following measures.
a. Remove all sample tubes from the upper tray
b. Press “INIT” image or “SET” button.
Washing1 Buer
Empty
This error message occurs in the following situation.
a. When there is not enough Washing solution 1
b. When there is no bottle containing Washing solution 1
In this case, take the following measures.
a. Fill the bottle with sufficient amount of the solution
b. Properly insert the bottle in the rack
Washing2 Buer
Empty
This error message occurs in the following situation.
a. When there is not enough Washing solution 2
b. When there is no bottle containing Washing solution 2
In this case, take the following measures.
a. Fill the bottle with sufficient amount of the solution
b. Properly insert the bottle in the rack
Elution Buer Empty
This error message occurs in the following situation.
a. When there is not enough Elution solution
b. When there is no bottle containing Elution solution 1
In this case, take the following measures.
a. Fill the bottle with sufficient amount of the solution
b. Properly insert the bottle in the rack
PreRUN required
This error message occurs in the following situation.
a. When the equipment is turned on but pre-run is not carried out yet
In this case, follow 4.5. (2).
Buer Waste Empty
This error message occurs in the following situation.
a. When there is no waste cartridge in the lower tray
In this case, properly put the waste cartridge in the lower tray.
Sample Door Open
This error message occurs in the following situation.
a. When upper tray door is opened
In this case, close the upper tray.

32 33
Veri-Q PREP M16 G2-16TU User Manual
Recycling of device materials will be helpful in protecting the environment. Therefore, do not dispose
existing electrical and electronic wastes with household wastes. For details on recycling this product,
please make an inquiry to the city hall of the applicable area, household waste processing service or
the shop where the product was purchased.
10. EMC & Safety Test Results
The system fulfills the EU safety test & EMC test requirements (IEC 61010-1:2010, IEC 61326-1:2012).
This equipment complies with IEC 61326-1:2012, IEC 61326-2-6:2012 Class A requirements and
the emissions of the energy used are low and not likely to cause interference in nearby electronic
equipment.
The equipment is tested for immunity to electrostatic discharge at test level 2kV, 4kV, 8kV of air
discharge.
The equipment is tested for immunity to radio frequency interference at the frequency 80 MHz to 1.0
GHz and test levels 3V/m.
The equipment is tested for immunity to radio frequency interference at the frequency 1.0 GHz to 2.0
GHz and test levels 3V/m.
The equipment is tested for immunity to radio frequency interference at the frequency 2.0 GHz to 2.7
GHz and test levels 1V/m.
This instrument complies with IEC 61010-1("Safety requirements for electrical equipment for
measurement, control and laboratory use; General requirement")and was in perfect safety conditions
when it left the factory. Installation, use and maintenance of the G2-16TU is the full responsibility of
the user.
11. Purchase of Reagents and Consumables
11.1 Consumables
You must use the Pre-run Cartridge which is a G2-16TU product manufactured by MiCo BioMed.
For detailed purchase information, please check the homepage. (http://micobiomed.com/)
11.2 Reagent
You have to use only reagents optimized for GT-16TU. For detailed purchase information, please
check the homepage. (http://micobiomed.com/)
7. Warranty Policy
MiCoBioMed shall be excluded from warranty obligations when a person other than the dedicated
engineer performs repairs or modifications, except in cases where the company has given its written
consent to perform repair or modifications.
According to this warranty, all replaced materials are guaranteed only for the original warranty period,
and shall not exceed the original expiration date unless there is written consent from MiCo BioMed.
The device, interface device, and related software is guaranteed only during the period originally
provided by the manufacturer.
If any damage is found at device during shipment or before using, please contact the manufacturer or
dealer.
Representations and warranties made by any person including the representative of MiCo BioMed
which are inconsistent with or in conflict with the conditions of this warranty cannot be binding
unless there is written consent. This warranty is added to the legal or other rights of the purchaser.
8. Return and Refund Policy
Our goal is to provide our customer with the device of the highest quality at the lowest possible cost.
Due to this, we can only accept returns on devices wrongly delivered by mistake. Before returning the
product, you must process the procedures on the return beforehand. Please process the equipment
to be returned within 7 days. Refund can be made only when the device is shipped.
9. Disposal of Electrical & Electronic Equipment
The meaning of the symbol on the product, its accessory or packaging indicates that this product
must not be treated as a household waste. Dispose this equipment at the collection point for recycling
of electrical and electronic equipment waste. The European Union and other European countries have
a separate collection system for used electrical and electronic products. By guaranteeing the proper
disposal of this product, potentially harmful environment and damage to health can be prevented.

34 35
Veri-Q PREP M16 G2-16TU User Manual
12. Cleaning
12.1 Cleaning of Air Rubber
12.1.1 Open the upper tray.
12.1.2 Prepare a clean cotton or cloth wetted with 70% ethanol.
12.1.3 Scrub the air rubber, especially the bottom side, with cotton or cloth wetted with 70%
ethanol.
12.2 Cleaning of Tray
12.2.1 Open the upper tray.
12.2.2 Prepare a clean cotton or cloth wetted with 70% ethanol.
12.2.3 Wipe the top and bottom side of the upper tray. And if necessary, wipe the hole of the
upper tray with a cotton swab.
12.2.4 Open even the lower tray and wipe it in the same manner.
12.3 Cleaning of Pre-run Cartridge
12.3.1 Dispose the waste liquid from the‘pre-run cartridge.’
12.3.2 Wipe it clean with cotton or cloth wetted with 70% ethanol.
12.3.3 Dry the cartridge at room temperature.
12.4 Cleaning of Solution Bottle
12.4.1 Check solution bottle on whether there is particle or dust inside.
12.4.2 If there is, dispose the solution and clean the bottle with distilled water.
12.4.3 Dry the bottle under the clean bench.
Date of preparation : Apr. 2020

36 37
Veri-Q PREP M16 G2-16TU User Manual
13. Maintenance Checklist
4. Semiannual Checklist (through MiCo BioMed sta)
Checklist Pass Fail
The air pump pressure has been checked and calibrated if necessary.
The discharge amount of the buffer has been checked and calibrated if necessary.
The equipment has been checked for any contamination and cleansed if necessary.
※If the equipment cannot be calibrated on the basis of the inspection, the equipment is to be
recovered from the client and inspected by the manufacturer.
Equipment Checklist
1. Daily Checklist
Checklist Pass Fail
The equipment is in the designated location.
There are no foreign objects or leaks around the equipment.
The device is not exposed to direct sunlight.
There are no installations that can cause dust, heat, and fluid inflow into the equipment.
The port switch direction on the rear of the equipment is correct.
The solution bottle contains no foreign substances.
There are no objects on the equipment that can cause LCD damage.
The washing condition of the pre-run cartridge has been checked.
The cap of the solution storage bottle of the equipment is closed after operation.
※For any failed items, contact the equipment manager.
2. Monthly Checklist
Checklist Pass Fail
The equipment is free of contamination.
The solution storage bottle is clean.
※For any failed items, contact the equipment manager.
3. Quarterly Checklist
Checklist Pass Fail
The collet (rubber cover for pressurizing the sample tube) has been replaced.
※Contact the manufacturer for more collets.

38
Warranty
Manufacturer’s Warranty :
Mico BioMed co., Ltd. Warrants to the original purchaser that this device will be free from
detects for 1 year from the date of original purchase.
Limitation of Warranty :
This warranty is subject to the following exceptions and limitations :
1. Mico BioMed co., Ltd. Shall not be required to replace any unit which is damaged or malfunctions
due to abuse, accidents, alteration, neglect, misuse, maintenance by someone other than Mico
BioMed co., Ltd. or failure to operate in accordance with the instructions.
2. Mico BioMed co., Ltd. reserves the right to make changes in design without obligation to
incorporate such changed in to previously manufactured devices.
3. Mico BioMed co., Ltd. has no knowledge of the performance of the device when reagents is altered
or modified in any way.
This manual suits for next models
1
Table of contents
Other MiCo BioMed Laboratory Equipment manuals

Popular Laboratory Equipment manuals by other brands


SYSMEX
SYSMEX ogt Cytocell Multiprobe OctoChrome Instructions for use

Idexx
Idexx Quanti-Tray Sealer PLUS user manual

STERILUX
STERILUX SterOx System V Series Instructions for use

Spicer Consulting
Spicer Consulting SC28 user manual

Leica
Leica RM2235 user manual

Bullard
Bullard Edge Thermal Imager user manual


