Micromax Instruments SRM100 User manual

Proven compliance solutions.
Relentless service.
SRM100 Soil pH and Resistivity Meter User Guide
SRM100 Soil pH and Resistivity Meter
User Guide

Information in this document is subject to change without notice.
© 1999 - 2019 American Innovations, Ltd. All rights reserved.
American Innovations | www.aiworldwide.com | 12211 Technology Blvd | Austin, TX 78727
Reproduction in any manner whatsoever without the written permission of American Innovations is strictly
forbidden.
The American Innovations logo and icon and products are trademarks of American Innovations, Ltd. Other
trademarks and trade names may be used in this document to refer to either the entities claiming the marks
and names or their products. American Innovations, Ltd. disclaims any proprietary interest in trademarks and
trade names other than its own.
122221-000
Revised May 2019

Contents
SRM100 Soil pH and Resistivity Meter User Guide i
Contents
Chapter 1: Getting Started 1
Overview 1
Controls and Display 2
Probes 3
Technical Support 3
Chapter 2: Using the SRM100 Meter 5
Operations Overview 5
Displaying Readings During Measurements 6
Start Up Message 6
Idle State Message 6
Resistivity State Message 7
pH State Message 7
Chapter 3: Maintenance & Battery 8
Probe Sensor 8
Battery Life 8
Battery Replacement 9
Appendix A: SRM100 Meter Specifications 10

1
SRM100 Soil pH and Resistivity Meter User Guide 1
Chapter 1: Getting Started
The MicroMax SRM100 Soil pH and Resistivity meter is a portable, weather-resistant (NEMA 4), hand
held instrument for measuring the pH and resistivity of soil. The soil pH and resistivity
measurements are digitally processed and displayed on the meter's numeric LCD display. Soil pH
measurements are shown in standard pH units, while resistivity measurements are shown in ohm-cm.
The SRM100 meter incorporates both the measurement of soil pH and soil resistivity from sensors in
one convenient and rugged probe.
For soil resistivity measurements, the SRM100 meter generates a bipolar square wave at a frequency
that is non-harmonic with 60 Hz (97 Hz). This voltage is sensed through a calibrated geometric gap
in the tip of the probe and is then converted directly to ohm-cm units on the display. The soil pH is
measured by the chemical reaction between two elements to provide a voltage proportional to pH.
This voltage is conditioned and converted to pH units on the display.
Overview
The following information covers the construction and usage of the SRM100 Soil pH and Resistivity
meter:
lThe SRM100 Soil pH and Resistivity meter is a single-probe (PIN) soil pH and resistivity meter.
The measurements are taken at the point of the probe's sensor array.
lThe meter's probe sensors must be in good ground/soil contact to produce the best
measurement results for pH and resistivity. If the probe sensors are placed in rocky, course,
dry, or sandy soil, ensure that the probe sensors are in contact with these soils to achieve
accurate measurements.
lThe soil pH measurements obtained from the SRM100 meter are not intended to replace a
laboratory prepared and analyzed soil sample. The soil pH measurement obtained from the
meter is an average measurement at the point where the probe pH sensor has contact with the
soil.
lThe pH probe sensor creates an electrical chemical reaction between the soil at depth and the
two measurement sensors of the probe. If the soil is not moist at the measurement depth, the
pH measurement may be inaccurate or the pH cannot be measured, which will result in no pH
reading being displayed.

SRM100 Soil pH and Resistivity Meter User Guide
Chapter 1: Getting Started 2
Controls and Display
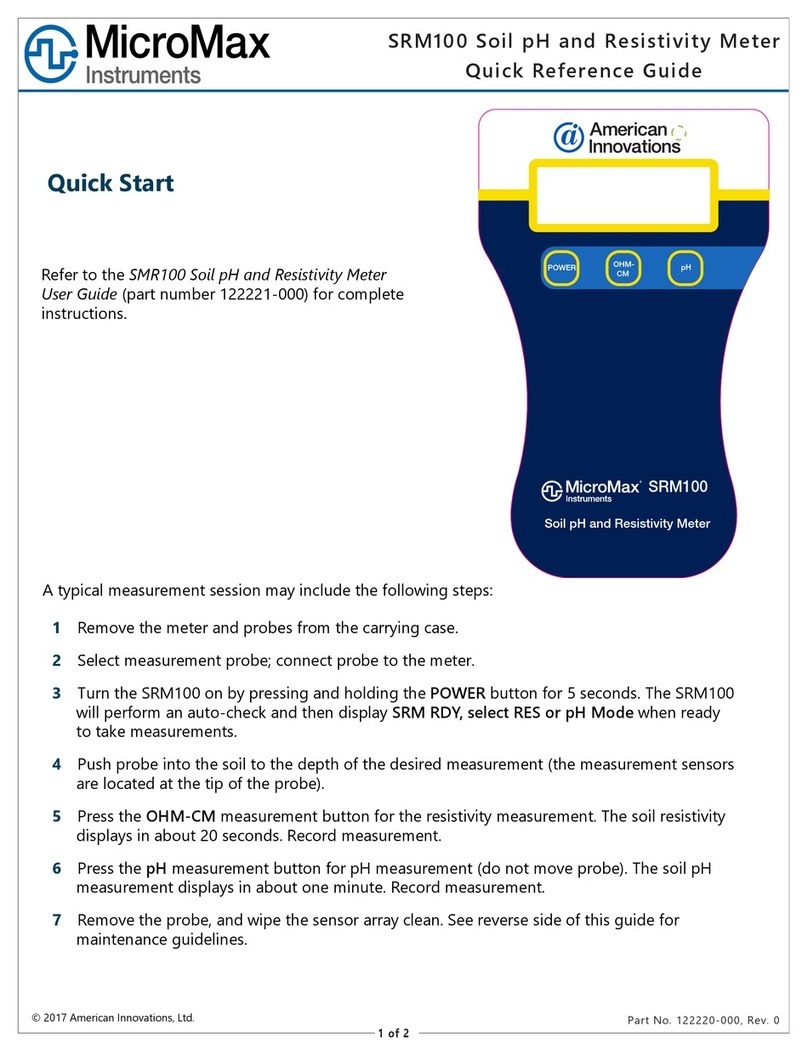
The SRM100 Soil pH and Resistivity meter has a two-line LCD display, three control buttons, a
battery compartment, and a probe connector.
Figure 1-1. Meter Features
lDisplay – all readings are shown on a two-line liquid crystal display (LCD). Each line consists of
16 characters. The display is super-twist nematic type for maximum readability and contrast.
lPower – a push button to turn meter on and off. Using normal pressure, hold down for 5
seconds to turn on and off.
lOHM-CM and pH – push buttons to take either a resistivity measurement (OHM-CM) or a pH
measurement (pH).
lBattery Compartment – the meter uses 4 AA size batteries that are secured in a weather-
resistant compartment on the back of the unit.
lProbe Connector – a twist-lock connector that attaches the meter to the soil probe
connecting cable.

SRM100 Soil pH and Resistivity Meter User Guide
Chapter 1: Getting Started 3
Probes
The SRM100 Soil pH and Resistivity meter can be used with either a bell hole probe or a subsurface
probe. Each probe includes a measurement sensor that reads pH and resistivity when in contact with
the soil, as well as a cable to connect it to the meter.
Figure 1-1. Probes and Cables
lBell Hole Probe – a 12-in T-handle probe for confined/limited space soil pH and resistivity
measurement areas, such as the walls of a bell hole.
lSubsurface Probe – a 40-in T-handle probe for conducting soil pH and resistivity
measurements from ground surface to depth. Includes a meter cradle to hold the SRM100
meter.
Technical Support
AI Technical Support is available to provide assistance with Meters, accept feedback about Meters,
or discuss your organization’s training needs. Use the following information to contact AI Technical
Support:
Telephone:
1-800-229-3404
Email:
techservices@aiworldwide.com

SRM100 Soil pH and Resistivity Meter User Guide
Chapter 1: Getting Started 4
Address:
American Innovations, Ltd.
Attn: AI Technical Support
12211 Technology Blvd.
Austin, TX 78727

2
SRM100 Soil pH and Resistivity Meter User Guide 5
Chapter 2: Using the SRM100 Meter
The SRM100 Soil pH and Resistivity meter was designed for easy operation and use. Before getting
started with taking measurements, review the following best practices for using the meter and
probes.
lKeep the SRM100 meter clean of any soils, corrosion, or scale. The soil probe sensor should
be wiped clean with an oil-free cloth to remove any soil attached to the sensor. If the soil
probe sensor is covered with corrosion or scale, it should be removed by a non-metallic non-
grit pad, such as a scour pad. For soil probe sensor cleaning instructions, refer to Probe Sensor
on page 8.
lThe SRM100 meter is connected to the soil probe by a cable and twist-lock connector. The
connector is keyed so it only attaches one way. Insert the cable connector into the meter
connector by aligning the key and key-way. Twist the locking collar until you feel a slight
catch.
Operations Overview
A typical measurement session may include the following steps. Refer to Displaying Readings During
Measurements on page 6 for more details on display readings during operation.
lRemove the SRM100 meter from the carrying case.
lSelect measurement probe and connect probe to the SRM100 meter.
lTurn the SRM100 meter on by pressing and holding the POWER button for 5 seconds. The
SRM100 meter will perform an auto-check and then display SRM RDY, select RES or pH
Mode when ready to take measurements.
lPush probe directly into the soil to the depth of the desired measurement (the measurement
sensors are located at the tip of the probe). Do not twist the probe into or while it is in the
soil. This could damage the sensors.
lPress the OHM-CM measurement button for the resistivity measurement. The soil resistivity
displays in about 20 seconds. Record measurement.
lPress the pH measurement button for pH measurement (do not move probe). The soil pH
measurement displays in about one minute. Record measurement.
lRemove the probe, and wipe the sensor array clean.

SRM100 Soil pH and Resistivity Meter User Guide
Chapter 2: Using the SRM100 Meter 6
NEVER twist the probe while it is embedded in the ground. If the probe becomes stuck,
move the probe side to side or toward/away from you to loosen it from the soil.
Displaying Readings During Measurements
After the SRM100 meter has been powered on, the display will show the various states that the
meter goes through during use. The SRM100 meter's states include start up, idle, resistivity, and pH.
After measurements are taken at one location, the display can be cleared by pressing the OHM-CM
and pH buttons at the same time. At the new location, if resistivity is chosen, the initial resistivity
display will show (starting a new set of measurements) and both of the previous measurements will
be cleared.
Review the following sections for more information on how readings are displayed on the SRM100
meter.
NOTE: To maximize battery life, it is recommended the SRM100 meter be powered down if there
is a long period between readings.
Start Up Message
Once powered on, the SRM100 meter's display shows a startup message for two seconds before
moving to an idle state, similar to the following:
SRM II V1.4
STARTUP....
Idle State Message
If idle for more than 10 minutes, the SRM100 meter will automatically power itself off. During this
time, the timer can be re-started by pushing the power button. The meter will shut off if you hold
the power button down for 5 seconds. Press OHM-CM button to start resistance measurement. The
display will then go to the resistivity state. If the pH mode is selected, the display will go to the pH
state instead.
SRM II V1.4
STARTUP....
READY, PRESS RES. OR PH BUTTON

SRM100 Soil pH and Resistivity Meter User Guide
Chapter 2: Using the SRM100 Meter 7
Resistivity State Message
In the resistivity state, the SRM100 meter is attempting to measure the soil resistivity. The value will
be shown as dashes until the reading has stabilized, or until 20 seconds pass. The display will then
show the resistivity directly in ohm-cm units. If the reading was still unstable after the 20 second
window, an asterisk is included.
The display will then go the pH state. If it is desired to re-check the same sample, press the OHM-
CM button again to re-read the resistivity. The current reading will be cleared as the display goes to
the initial resistivity state and starts another measurement sequence. This can also be done if it is not
necessary to test the pH. Just move the probe to the new location, and cycle the button for a new
reading. Press the pH button to check the pH of the soil sample. The following is an example of the
resistivity state:
RES= - - - Ω-CM
RES= 23.4 Ω-CM*
RDY FOR PH MEAS
pH State Message
In a pH state, the SRM100 meter is attempting to measure and stabilize the pH reading. If the pH
reading finishes first, the top line will be blank, since no resistivity measurement has been taken.
RES= 23.4 Ω-CM
PH= ----
Similar to the display for resistivity state, when the reading appears stable, or if more than one
minute passes without stability, the pH reading displays. If the reading is unstable, an asterisk
displays instead. The example below shows both readings complete.
RES= 23.4 Ω-CM
PH=6.4 DONE
To re-check the same sample, press the pH button to remeasure the pH. The current reading will
clear as the display goes to the initial pH state and starts another measurement sequence.
NOTE: The pH reading obtained is an average reading not a laboratory pH reading.

3
SRM100 Soil pH and Resistivity Meter User Guide 8
Chapter 3: Maintenance & Battery
The SRM100 Soil pH and Resistivity meter requires very little maintenance. The probe sensor should
always be cleared of any accumulated soils, rust, or corrosion prior to measurements. The probe
cable and connector should be visually checked for cracks, frays, or other problems.
Probe Sensor
To ensure accurate and repeatable soil pH and soil resistivity measurements, ensure that the SRM100
meter's probe is properly maintained. Clean the probe sensor of any accumulated soils, corrosion,
and scale build-up.
To remove any accumulated and/or attached soils from the sensor, wipe sensor with a clean cloth
that is free of any hydrocarbons, cleaners, solvents, or other similar materials.
If corrosion or scale does build up on the sensor, following these steps to clean it:
1. Wipe the sensor with a clean cloth.
2. Remove the build-up corrosion and scale with a non-metallic scouring pad.
For best results, use a scouring pad, such as Scotch-Brite®.
3. Wipe the sensor again with a clean cloth.
WARNING: NEVER use steel wool, sandpaper, a knife, or other abrasive substances to clean the
sensor.
Battery Life
Although standard AA batteries can be used, alkaline batteries will provide longer life. The SRM100
meter should operate approximately 100 hours of run time with alkaline batteries.
To view the sate of battery charge, look in the lower right-hand corner of the display for a symbol in
the shape of a battery . If the symbol is solid, the battery is considered at full capacity. As the
battery voltage decreases, indicating lowered states of capacity, the symbol will become less and
less full. When the capacity is considered dangerously low, the symbol will be empty, and it will
blink. At this point, fresh batteries should be installed.

SRM100 Soil pH and Resistivity Meter User Guide
Chapter 3: Maintenance & Battery 9
Battery Replacement
Complete the following steps to replace the SRM100 meter's batteries:
1. Remove the battery door (located on the back of SRM100) meter by removing the two
Phillips head screws. The four AA batteries are directly under the door.
2. Replace the batteries, being careful to observe the correct polarity.
3. Replace the battery door when done.
NOTE: If the SRM100 meter is to be stored for an extended period of time, the batteries should be
removed to prevent acidic corrosion problems.

A
SRM100 Soil pH and Resistivity Meter User Guide 10
Appendix A: SRM100 Meter Specifications
Specifications for the SRM100 Soil pH and Resistivity meter and each of the meter's accessories are
listed below.
SRM100
lDimensions: 7.5" long, 4.75" high, 2.25" deep
lWeight: 2.5 lbs without probe(s)
lMaterial: ABS high-impact plastic, corrosion proof, sealed to NEMA4 /IP64
lOperating Temp: from -15 to 60° C
lOperating Humidity: 0 to 100% non-condensing
lPower Supply: 4 AA Batteries
lDisplay: Liquid crystal 2 lines of 16 characters
lSoil Resistivity:
— Range: 0 to 1.5M ohm-cm
— Accuracy: +/- 5% of the reading
lSoil pH:
— Range: 3 to 10 standard units
— Accuracy: +/- 0.5 pH standard units
SRM100 Probes
lBell Hole Probe:
— Type: T-Handle
— Size: 12 inches
— Weight: 3 lb. without SRM100 meter
— Diameter: 5/8" shaft, 3/4" sensor tip
— Material:

SRM100 Soil pH and Resistivity Meter User Guide
Appendix A: SRM100 Meter Specifications 11
¡Shaft: Carbon steel
¡Sensor Tip: Steel/copper/antimony
lSubsurface Probe:
— Type: T-Handle
— Size: 40 inches
— Weight: 5 lb. without SRM100 meter
— Diameter: 5/8" shaft, 3/4" sensor tip
— Material:
¡Shaft: Carbon steel
¡Sensor Tip: Steel/copper/antimony
SRM100 and Probe Protective Case
lDimensions: 53" long, 16" wide, 6.25" deep
lWeight: 20 lbs without meter and probe(s)
lMaterial: injection-molded polyurethane
lProtective Foam: case fitted with 2.2 pound density polyethylene foam
SRM100 and Probe Accessories Kit
lDimensions: 9" long, 4.75" wide, 1.25" deep
lWeight: 1 lb. with contents
lContents: cleaning kit (scour pads), Phillips head screwdriver, and replacement batteries (one
set)
Other manuals for SRM100
1
Table of contents
Other Micromax Instruments Measuring Instrument manuals