MID WEST PRODUCTS GSF-31M-NT User manual

©2019 Mid West Products, Inc. -1- Form No. M15-1603
VEGETABLE GARDEN SEED ROW PLANTER
MODEL GSF-31M-NT
No Tools Required Owner’s Manual and Parts List
SAVE THIS MANUAL
You will need this manual for the safety instructions, assembly instructions and parts list. Put it in a
safe, dry place for future reference.
Additional Information/Link to PDF Copy of this Manual:

©2019 Mid West Products, Inc. -2- Form No. M15-1603
VEGETABLE GARDEN SEED ROW PLANTER AND FERTILIZER APPLICATOR
➢NO TOOLS ASSEMBLY
➢OPERATING
➢MAINTENANCE
➢PARTS LISTING
ASSEMBLY
1. Remove two Wing Nuts (37) from the Hex
Bolts (44) which are located at the top of
Lower Handle Tubes (10). Install the Upper
Handle Tube (11) onto the Hex Bolts (44) in
the Lower Handle Tubes (10) and secure
with previously removed Wing Nuts (37).
2. Remove Wing Nut (37) from Hex Bolt (45) in
the fertilizer section of the Seed/Fertilizer
Hopper (1). Install Fertilizer Lever (19) onto
Hex Bolt (45) and secure with previously
removed Wing Nut (37).
3. Unscrew Plastic Knob (48) from Row Marker
Tube (21).
4. Assemble Row Marker Tube (21) to the Row
Marker Bracket (20) using the Hex Bolt (38)
that is inserted into the end of the Row
Marker Tube (21), with the head of the Hex
Bolt pointing away from the Seed/Fertilizer
Hopper (1).
5. Screw the previously removed Plastic Knob
(48) onto the Hex Bolt (38) to assemble the
Row Marker Tube (21) to the Row Marker
Bracket (20). Do not fully tighten hardware,
allowing row Marker Tube to pivot from side
to side.
OPERATION
1. To install the desired Seed Plate, hold the
Seed Plate at an angle with the bottom
against the straight wall in the Hopper. Line
up the slots in the Seed Plate with the raised
portions of the Hub, hold it firmly against the
inside of the Hopper and rotate it
approximately ½” in the “ON” direction as
indicated by the arrow on the Plate until the
cam action locks the Seed Plate in place on
the Hub. Do Not Force! OFF and ON
directions are indicated on the Seed Plates
with arrows.
2. Next, set the planting depth with the wedge-
shaped Furrowing Shoe located directly
under the Hopper. Move Furrowing Shoe
until top edge is in line with desired planting
depth. Retighten Wing Nut (35) after
adjustment is made. Check the depth by
moving the Seeder forward a few inches.
3. Pour seeds in the Seed Hopper. CAUTION:
Do not fill the Hopper above the center of the
Seed Plate.
4. Pour fertilizer into fertilizer hopper.
CAUTION: Do not over fill the Hopper.
Allow 1” from fertilizer to top edge of Hopper.
5. Adjust fertilizer flow by loosening Wing Nut
on Fertilizer Hopper. Slide calibrated plate
to desired setting and tighten Wing Nut.
Before filling, shut off Fertilizer Control.
6. Mark out the first row in your garden. Lower
the Row Marker Shaft and adjust the Row
Marker to the proper width for the next row.
You are now ready to plant
7. To empty seeds, remove Plug (2) from Seed
Hopper by simply putting pressure on center
of Plug and push inward. Pour seeds into a
clean container.
8. Empty fertilizer by placing a clean container
under Fertilizer Hose, setting Adjustment
Plate to No. 3 setting and open control,
allowing fertilizer to flow into the container.
9. To remove Seed Plate, hold Pulley and Belt
stationary with one hand and rotate the Seed
Plate approximately ½” in the “OFF”
direction indicated by an arrow on top of the

©2019 Mid West Products, Inc. -3- Form No. M15-1603
Seed Hopper. Push the Seed Plate off the
Hub through the hole just above the Pulley.
It will slip off easily.
NOTICE: Keep your Seed/Fertilizer Hopper
clean and free from sand, grit, and seed
treating materials.
SEED PLATE SELECTION GUIDE
Selection information as to seed size and
spacing are also found on your Seed Plates.
15-1018-1 Has a 9 inch seed drop spacing,
plants corn and sunflowers.
15-1018-2 Has a 3 ½ inch seed drop spacing,
plants small and medium peas
and beans, also similar seeds.
15-1018-3 Has 3 ½ inch seed drop spacing,
plants variety of peas and beans
including baby Lima.
15-1018-4 Has a 3 ½ inch seed drop spacing,
plants beets, extra small peas and
beans, okra, and related seeds.
15-1018-5 Has a 3 inch seed drop spacing,
plants radishes, small beets, and
seed of like size.
15-1018-6 Has 4 inch drop spacing, plants
most small seeds such as turnips,
mustard, lettuce, carrots, kale,
collards, endive, spinach,
rutabaga, parsnips, parsley, and
rhubarb. This plate may also be
used to plant seeds for vegetable
that are sometimes grown from
plants. These include broccoli,
brussel sprouts, cabbage,
cauliflower, celery, onions, and
peppers.
NOTE: When changing Seed Plates, be sure
Hopper is empty.
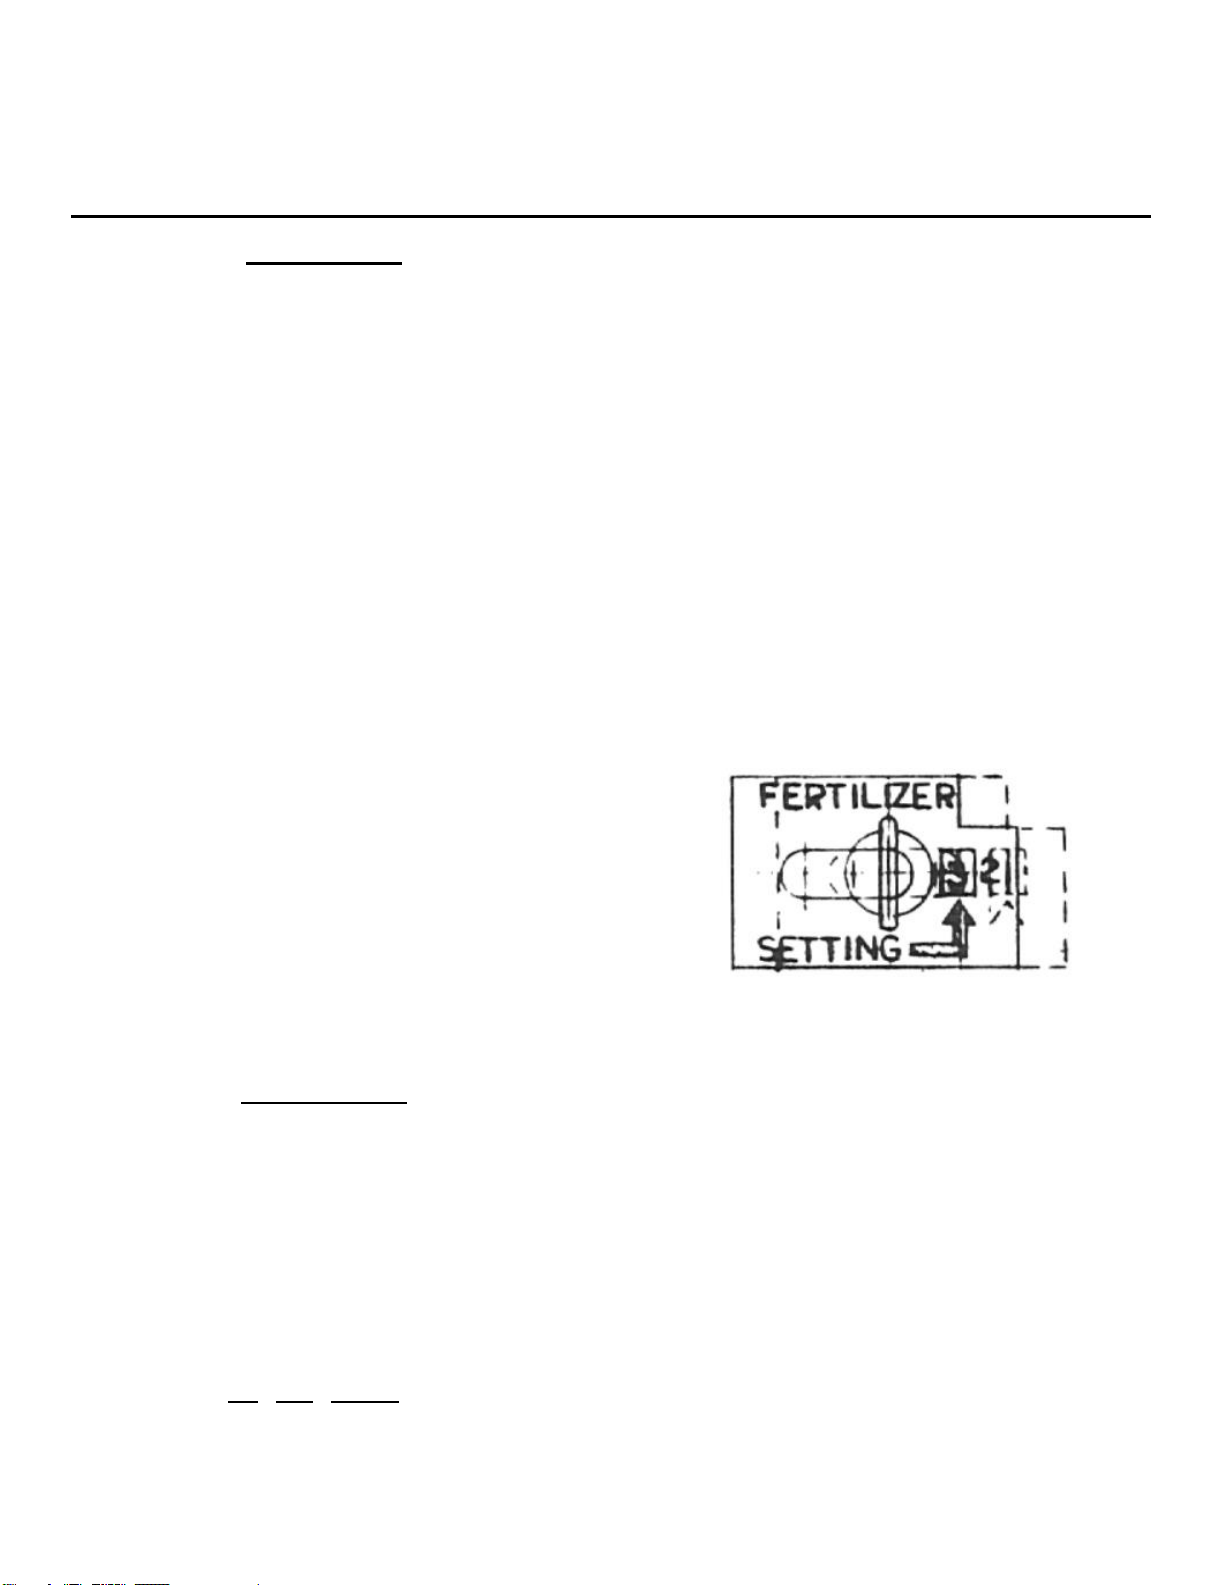
FERTILIZER ADJUSTMENT SETTINGS
Granular Fertilizer must be free flowing without
lumps.
No. 1 setting –1 lb per 100 ft.
No. 2 setting –2 lb per 100 ft.
No. 3 setting –3 lb per 100 ft.
Consult your fertilizer dealer for further
application data. We recommend that Users
contact their Local Ag Agent with the USDA
(United States Department of Agriculture) for
their recommendations on the proper fertilizers
to use in their particular County.
HELPFUL OPERATING SOLUTIONS
PROBLEM:
1. The Seeder will not go more than a foot or
two . . .
2. The peas, beans, and/or corn fly out of the
hopper . . .
3. The seeds break . . .
SOLUTIONS:
Be extra careful, do not back up the Seeder.
(Lift the Seeder to reposition the GSF 31M)
So, what happens if the Seeder is pulled
backwards?
1. The Seed Plate will come loose, whenever
the rear Wheel of the Seeder is pulled
backwards. If the Seed Plate loosens, even
a little, then seeds get caught between the
Seed Plate and the side of the Seed Hopper.
This causes the Seed Plate to quit turning.
2. As the rear Seeder Wheel is still being
pushed, the plate tightens and seeds that
are caught between the Plate and the
Hopper wall, then get crushed. Once the
seeds are crushed, then the Plate can’t turn
and the seeds are all planted on one spot or
they clog the Seed Chute.
The Upper Pulley and Spindle are too tight:
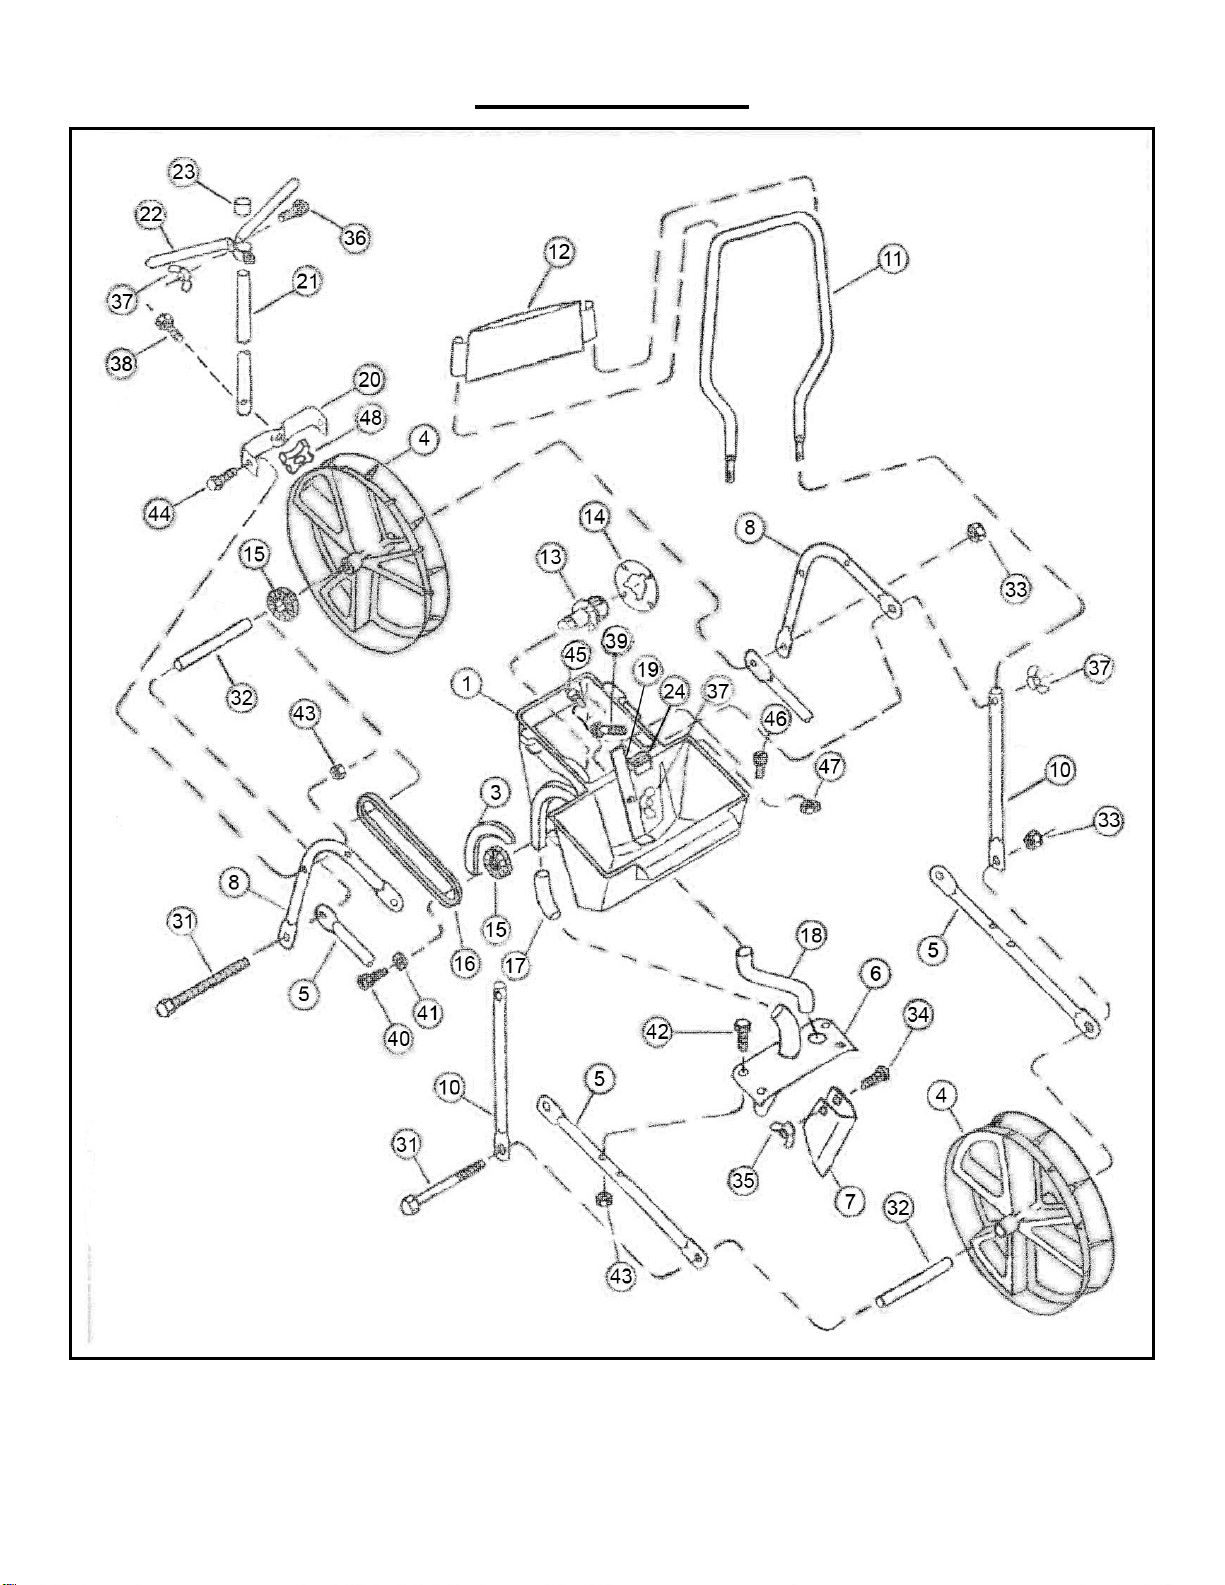
1. Remove the Belt (Item 16) —it is easiest to
remove the Belt located on the Lower Pulley
(Item 15) —pulling the Belt slightly to one
side and at the same time.
2. Check the Upper Pulley (Item 15) that is
connected to the Spindle (Item 13).
3. If the Pulley/Spindle Assembly does not spin
freely or is tight, then back off the Screw
(Item 40) one-fourth to one-half turn.

©2019 Mid West Products, Inc. -4- Form No. M15-1603
4. Then, place two fingers behind the Upper
Pulley (Item 15). While using your thumb,
push on the Screw (Item 40) with 2 or 3
pounds of pressure and pull the Pulley away
from the unit.
Re-check the Pulley/Spindle Assembly:
1. Now re-check to see if the Pulley and
Spindle Assembly spins more freely.
2. If the Pulley/Spindle Assembly does not spin
freely, you have almost solved the problem.
3. If the Pulley/Spindle Assembly wobbles
more than just a hair, it might be too loose.
(There is some uptake when the Seed Plate
is attached.)
Lubrication:
1. The GSF 31M is designed to not require
lubrication. We mold talc into the plastic to
add “lubricity”. So, if you want the Seed
Plates or Spindle to be “lubricated”, use
some powdered talc.
2. Some baby powders are all talc and
fragrance. However, DO NOT USE the baby
powder that has corn starch —or other
ingredients.
Re-assemble the Belt:
1. Put the Belt onto the Upper Pulley.
2. Start the Belt back onto the Lower Pulley.
Snap the Belt onto the Lower Pulley using
the leverage by turning the rear Wheel (4).
PARTS LIST
Key
Part No.
Description
Qty
Key
Part No.
Description
Qty
1
15-1160
Seed/Fertilizer Hopper
1
22
15A-1185
Row Marker Blade
1
2
15-1161
Plug (Not Illustrated)
1
23
15-1037
Row Marker Cap
1
3
15-1162
Seed Tube Cover
1
24
15-1181
Step - Fertilizer - Shut Off
1
4
15-1013
Wheel - 12” Diameter
2
31
X-1429-1
5/16-18 X 5 HHCS
2
5
15-1163
Frame Tube
2
32
15-1017
Wheel Spacer
2
6
15A-1166
Seed Tube Bracket
1
33
X-1107
5/16-18 Lock Nut
2
7
15-1167
Furrowing Shoe
1
34
L-116
5/16-18 X 1 ½ Carriage Bolt
1
8
15-1168
Support Tube
2
35
X-1007
5/16-18 Wing Nut
1
9
15-1186
Decal (Not Illustrated)
1
36
X-1318
¼-20 X ¾ Carriage Bolt
1
10
15-1170
Lower Handle Tube
2
37
X-1152
¼-20 Wing Nut
4
11
15-1171
Handle
1
38
L-81
5/16-18 X 1 ¼ HHCS
1
12
15A-1172
Pouch
1
39
L-276
¼-20 X 1 ½ HHCS
2
13
15-1173
Spindle
1
40
X-1577
¼-20 X ½ Self Tap Screw
1
14
15-1018
Seed Plate (6 Plates)
1
41
X-1433
¼ ID X 7/8 OD Flat Washer
1
15
15-1011
Pulley
2
42
X-2020
¼-20 X 1 HHCS
4
16
15-1174
Belt
1
43
L-303
¼-20 Lock Nut
6
17
15-1175
Seed Tube
1
44
X-1182
¼-20 X 1 ¼ HHCS
2
18
15-1176
Fertilizer Tube
1
45
L-172
¼-20 X ¾ HHCS
1
19
15-1177
Fertilizer Hopper Lever
1
46
X-A1568
¼-20 X ¾ Thumb Screw
1
20
15-1178
Row Marker Bracket
1
47
X-A1569
¼-20 Special Nut
1
21
15-1019
Row Marker Tube
1
48
9-1622
5/16-18 Knob
1

©2019 Mid West Products, Inc. -5- Form No. M15-1603
PARTS DRAWING

©2019 Mid West Products, Inc. -6- Form No. M15-1603
GUARANTEE
The merchandise you have purchased from us has been carefully engineered and manufactured under
Mid West Products rigid quality standards and should give you satisfactory, dependable operation.
However, like all mechanical merchandise, it may occasionally require adjustment or maintenance.
Should you need technical assistance, please contact MID WEST PRODUCTS.
INSTRUCTIONS FOR ORDERING PARTS
(Minimum Parts Order Charge $20.00)
1. Address all parts orders or correspondence regarding customer service to one of the following:
Parts Dept.
Phone:
(937) 337-3641
Mid West Products, Inc.
P.O. Box 301
E-mail:
Phillipsburg, OH 45354
Website:
www.Mid-West-Products-Inc.com
2. Write your name and address plainly (print or type).
3. Explain where and how to ship.
4. Give model number of unit.
5. Give part number from parts list, as well as a description, including color, of the part and the quantity
you need.
6. Inspect all shipments you receive. If any parts are damaged or missing, file a claim with the carrier
before accepting.
7. If you are returning parts, be sure to include WITH THE SHIPMENT a list of the parts with your
name and address.
8. All orders for repair and replacement parts will be shipped when paid with Master Card, Visa, or
personal check/money order. Prices subject to change without notice.

©2019 Mid West Products, Inc. -7- Form No. M15-1603
A basic garden with a little planning can provide enough fresh vegetables for a family of 4-5 for a summer. We suggest a 15’ x 25’
layout that will enable you to use your new Mid West Products Seeder and/or Cultivator efficiently and economically.
Select and area for your garden that has plenty of sunshine. Run the rows North and South thus allowing the plants to have about
the same amount of sunshine.

©2019 Mid West Products, Inc. -8- Form No. M15-1603
WOODEN UTILITY CARTS —GC-20 OR GC-26
It has a gate that lifts out to unload bulky loads like mulch, soil, gravel, firewood or waste
and also allow it to carry longer items. Once you have one, you’ll wonder what you ever
did without it!
The Standard-Duty Utility Cart has two 20” pneumatic wheels and a cargo capacity of 6.5
cubic feet or up to 300 pounds.
The Heavy-Duty Utility Cart has two 26” pneumatic wheels and a cargo capacity of 11.3
cubic feet or up to 400 pounds.
31” DELUXE PUSH LAWN SWEEPER —B-319
•The “Butterfly” Handles Increase the Hamper Capacity to a Huge 8.5-Bushel.
•Big 10” Precision Molded Plastic Wheels with Ribbed Tread Rubber Tire . . . Makes
this Unit Easy to Push.
•The Rear Swivel Casters Help Make this Easy to Maneuver.
•Our Easy to Operate One-Hand “Squeeze Me” Height Adjustment Makes it Easy to go
From Grass to Pavement.
•The Removable Hamper Allows for Easy Dumping and Fold Away Storage.
OTHER LAWN & GARDEN TOOLS FROM
MID WEST PRODUCTS, INC.
HIGH WHEEL CULTIVATOR —HWC-243A
•24” Steel Wheel For Easy Handling.
•Special Selection of 3 Tools (Mol-board Plow, Reversible Shovel, Welded Five-Tine
Cultivator).
•Slotted Foot For Plow Attachments Enables Easy Adjustment of Cutting Depth and
Angle.
•Adjustable Handle Height for more comfortable use.
•Handle Folds Easily For Storage or Transportation.
“TRACTOR SEAT ON WHEELS”/HANDY CADDY —GC-400R
Sit comfortably on the sturdy four-wheeled Handy Caddy to do any of the jobs that usually
require stooping, squatting, or kneeling. The 360° Swivel Seat allows freedom of
movement while working in the garden or the greenhouse. Tools and supplies are held
within easy reach in the handy Shelf below the Seat. Tasks, such as at your planter’s
bench or in the actual garden becomes easier and fun! At a weight of 34 pounds, this item
is durable, easy to use, comfortable, and ….yes….EASY on the KNEES! It has many
wonderful uses, just use your imagination!!! It is the ULTIMATE HELPER! Get up off your
aching knees and onto a “Tractor Seat on Wheels”today!
This manual suits for next models
1
Table of contents
Other MID WEST PRODUCTS Lawn And Garden Equipment manuals
Popular Lawn And Garden Equipment manuals by other brands

BLACK DECKER
BLACK DECKER GSN30 instruction manual

Gardeners
Gardeners 8610909 quick start guide

PLANTCRAFT
PLANTCRAFT 160 Litre Dual Batch Composter user manual

Melnor
Melnor Electronic Aqua Timer 3020 operating instructions

Maruyama
Maruyama LB300 Owner's/operator's manual

Peco
Peco 12031303 Operator's manual