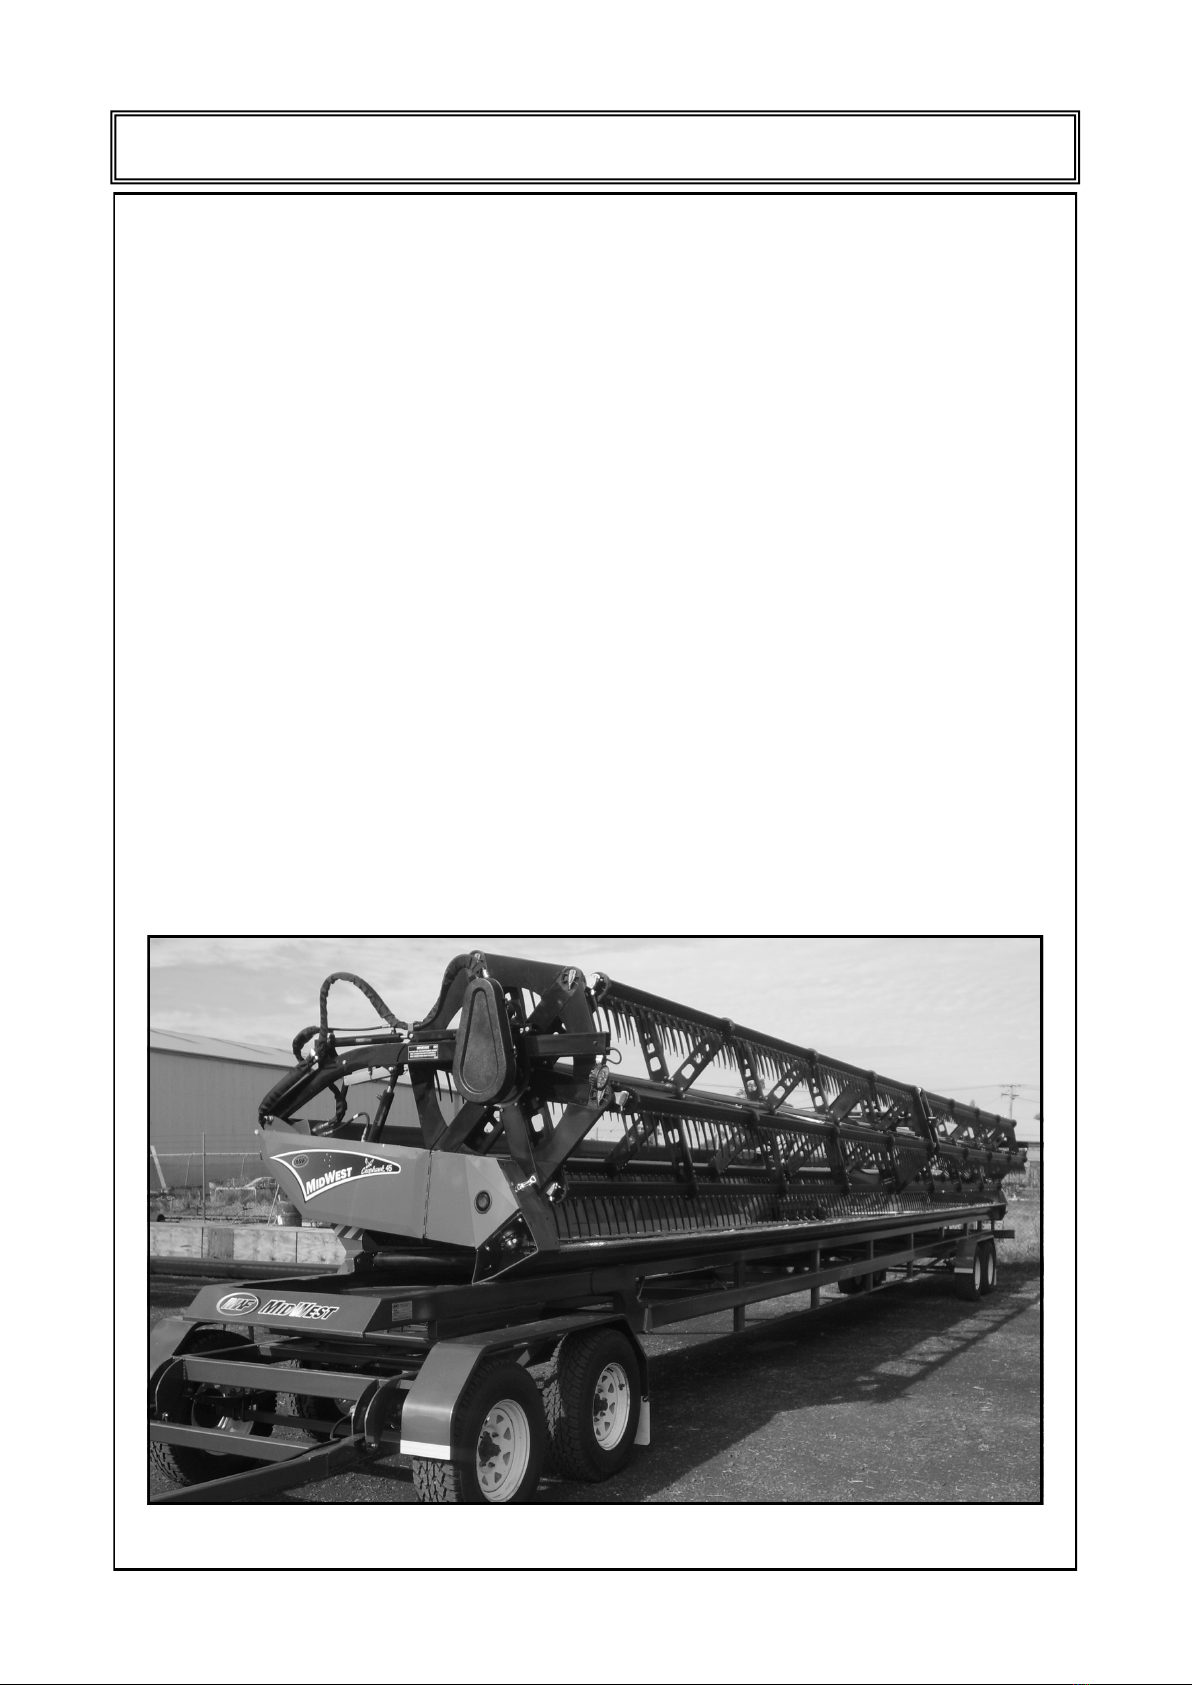
Midwest Crophawk Draper Platform User manual

CropHawk Draper Platform Operators Manual 1
OPERATOR’S MANUAL
From Serial Number
MWF-11040656
MIDWEST CROPHAWK
DRAPER PLATFORM
2012 Edition A
MidWest Fabrication Pty Ltd 6 Irvingdale Road, Dalby Qld Australia 4405
P: 07 46622137 F: 07 46622138 serv[email protected]

2CropHawk Draper Platform Operators Manual
Warranty
IMPORTANT
Has your dealer registered your new
platform for warranty ?
To activate warranty the following 4 documents from the pre-
delivery manual have been completed and returned to Mid-
West Fabrication.
Purchase Information (Fax/Email/Online)
Freight Delivery Report (Fax/Email/Online)
Pre-Delivery Report (Fax/Email/Online)
Customer Installation Form (Online Only)
Serial number: Signed:………………………………..
MWF-…………………... Dealership Representative
Platforms not registered for warranty may be ineligible for
warranty and manufacturer product improvement programs.

CropHawk Draper Platform Operators Manual 3
Warranty
Warranty is provided as part of Midwest's support program for customers who operate and maintain their Draper
Platform as described in this manual. All warranty work shall be carried out at point of sale or at the servicing dealer
premises.
NOTE: Where damage has been caused by collision or objects other than crop coming into contact with the
platform, warranty for that damage shall be void.
Draper Platforms are guaranteed against manufacturing faults for a period of 12 months from dealer installation
date.
Conditions of Warranty
IMPORTANT: To activate warranty the following 4 documents (contained in the pre-delivery manual or the
dealer secure zone 0n the MidWest website. www.midwestfabrication.net.au) MUST be filled out and
returned to MidWest Fabrication either by email (service@midwest.net.au) or fax (07 46622138)
1. Purchase Information
2. Freight Delivery Report
3. Pre-Delivery Report
4. Customer Installation Form
Tyres: Are not covered by MidWest Fabrication Pty Ltd but by the tyre manufacturer’s warranty.
Feed Drum: Feed drum guides and fingers are crop engagement parts , and therefore not subject to
manufacturer’s warranty.
Drive Belts: All belts are adjusted in the factory, checked and adjusted on pre-delivery. If the belt is proven
faulty, a claim will be considered. If the claim involves belt slippage or miss-alignment, claim
will be rejected.
Reel: Pick-up reel fingers and bats are crop engagement parts and therefore not subject to
manufacturer’s warranty. Reel bush wear is governed by crop conditions and speed therefore
subject to pro-rata consideration only. Such pro-rata assessment shall be carried out by a
representative of MidWest Fabrication Pty Ltd. Bent pick-up finger tubes or bats are not sub-
ject to warranty.
Knife: Knife guards and sickles are crop engagement parts and are therefore not subject to
manufacturer’s warranty. Bent or broken crop dividers or nose cones, are not subject to
warranty.
Paint: Paint scratches, normal wear and tear are not covered by warranty. If there is a problem with
the paint quality contact your dealer.
IMPORTANT: Should the Draper Platform be misused or modified beyond the original factory specifica-
tions, warranty and product improvement programs will be denied.
Disclaimer: All information, illustrations and specifications in this manual are based on the latest information
available at the time of publication, the right is reserved to make changes at any time without notice.

4CropHawk Draper Platform Operators Manual
Serial Number Information
Modification /Upgrade Record
PURCHASE INFORMATION
Dealers Name
Address
Phone
Purchase Date
Model
Serial Number
Delivery Date
Date Modification / Upgrade
CropHawk Draper Platform Operators Manual 5
Introduction
Read this manual very carefully to learn how to operate, maintain and service your Midwest Draper Platform cor-
rectly. Failure to do so could result in personal injury, equipment damage or void warranty.
NOTE: This manual does not provide all the information required to operate the combine harvester. The
Midwest Operators Manual must be used in conjunction with your Combine Harvester Operators Manual.
Carefully read all manuals to become familiar with recommended procedures before attempting to unload, assemble
or operate the Midwest Crophawk Draper Platform.
Record of Model and Serial numbers should be kept in a secure place off the platform. These numbers may be
required should the platform be stolen or when ordering parts through your MidWest dealer.
This Operators Manual should be considered a permanent part of the MidWest Draper Platform and should
remain with the platform when you sell it.
Note: Terminology used throughout this manual
Front - The knife side of the platform
Rear/Back - Combine side of the platform
Right (RH) - As seen facing direction of forward travel
Left (LH) - As seen facing direction of forward travel

6CropHawk Draper Platform Operators Manual
Contents
Warranty ---------------------------------------------------------------------------------------------------------- 2
Serial Number Information --------------------------------------------------------------------------------- 4
Introduction ------------------------------------------------------------------------------------------------------- 5
Safety --------------------------------------------------------------------------------------------------------------- 7
General Platform Information ------------------------------------------------------------------------------ 12
Warranty ---------------------------------------------------------------------------------------------------------- 16
Platform Operations ------------------------------------------------------------------------------------------ 28
Platform Set-up ------------------------------------------------------------------------------------------------ 20
AGCO initial Platform setup------------------------20
CNH initial Platform setup--------------------------22
Claas initial Platform setup-------------------------24
John Deere initial Platform setup-----------------26
Removable Components ------------------------------------------------------------------------------------ 30
Reel ---------------------------------------------------------------------------------------------------------------- 35
Feed Drum ------------------------------------------------------------------------------------------------------- 41
Drive System ---------------------------------------------------------------------------------------------------- 45
Knife / Cutterbar ------------------------------------------------------------------------------------------------ 54
Adaptor ------------------------------------------------------------------------------------------------------------- 56
Draper Belts ----------------------------------------------------------------------------------------------------- 59
Hydraulic/Electric system ----------------------------------------------------------------------------------- 65
Harvesting Tips ------------------------------------------------------------------------------------------------- 68
Connecting and Disconnecting the Draper ------------------------------------------------------------- 69
Storage Procedures ------------------------------------------------------------------------------------------- 71
Lubrication / General Maintenance ----------------------------------------------------------------------- 73
Unloading the Platform --------------------------------------------------------------------------------------- 78
Platform Restraint Guidelines ------------------------------------------------------------------------------ 81
Trouble Shooting ----------------------------------------------------------------------------------------------- 82
Options and Attachments ----------------------------------------------------------------------------------- 88
Specialty Tools -------------------------------------------------------------------------------------------------- 90
Index ---------------------------------------------------------------------------------------------------------------- 93

CropHawk Draper Platform Operators Manual 7
Continued on next page
Safety
Be alert to the potential for personal injury. Follow all recommended precautions and safe operating practices.
Ensure all safety messages in this manual are read and understood. Keep all safety signs in good condition and
replace damaged safety signs immediately. To install safety decals insure area is clean and dry. Remove the back-
ing paper and place in position.
Keep draper platform in proper working condition. Miss-use or modifications to the draper platform may impair the
function and/or safety and affect the life of the platform.
Learn how to operate the draper platform and how to use it properly. Under no condition should anyone operate the
draper without proper instruction. If you do not understand any part of this manual contact your Dealer.
Safety Decals
Throughout this manual and on draper decals you will find precautionary statement followed by specific instructions.
These precaution are intended for you personal safety and those working with you. Failure to follow “Important”, and
“Danger” instructions may result in serious injury or death.
The following safety decals have been placed on the MidWest Draper Platform in the areas indicated for your safe-
ty and to prevent potential machine damage if certain procedures are not followed.
Review the warning decals and the operating instructions detailed in this manual with machine operators.

8CropHawk Draper Platform Operators Manual
Continued on next page
Safety

CropHawk Draper Platform Operators Manual 9
Continued on next page
Safety
Personal Safety
Personal Protective Equipment.
When assembling, operating and servicing the draper platform
ensure adequate close fitting protective clothing and equipment are
used.
Prepare for Emergencies.
Keep a first aid kit readily assessable in case of injury.
Be prepared for a fire. Keep a fire extinguisher on/or near the
draper platform at all times. Ensure it is properly maintained and
the operator is familiar with its correct use.
Always remove the combine ignition key and engage park
brake.
Wait until all movement has stopped before making any
adjustments or servicing on the platform.
Never leave combine unattended while engine is running.
Be sure to remove ignition key and lock the operators cab.
Stay Clear of Draper Platform.
Platform knife, PTO shafts, draper belts, reel and drives cannot
be completely shielded due to their function. Stay clear of these
moving components during operation. Always disengage combine
separator clutch, shut off engine, set park brake and remove key
before making any adjustments or servicing.
Drive Belts.
Avoid serious injury from entanglement by shutting off engine,
remove the combine ignition key and engage park brake. Wait
until all movement has stopped before making any adjustments or
servicing the draper platform.
Do not attempt to clean drive belts with flammable cleaning
solvents.

10 CropHawk Draper Platform Operators Manu-
Continued on next page
Safety
Caution: Hydraulic systems operate at high temperatures and at
high pressure. Escaping fluid under pressure can penetrate the
skin causing serious injury. Avoid hazard by relieving pressure be-
fore disconnecting hydraulic lines. Tighten all connections before
applying pressure. If oil is hot allow adequate cooling period be-
fore adjusting or servicing hydraulic components on the platform.
Search for leaks with a piece of cardboard, NEVER USE YOUR
HAND. Protect hands and body from high pressure fluids with suit-
able protective clothing.
If an accident occurs, seek medical attention immediately. Any oil injected at high pressure into the skin
must be surgically removed within a few hours. Doctors unfamiliar with this type of injury should refer to a
knowledgeable medical source.
Hydraulic System.
Caution: Hydraulic oil is a flammable liquid.
Never attempt to gas heat or weld any hydraulic components,
lines or oil reservoirs. To do so may cause an explosion, causing
serious injury or death. Repairs of this nature should be carried
out by a qualified tradesperson only.
Remove Crop Debris.
Remove crop debris from moving parts as this is a fire hazard. Check and clean these
areas frequently. Always disengage separator combine clutch, shut off engine, set
park brake and remove key before removing crop debris from Draper platform.
Rotating Parts.
Avoid contact with rotating parts as contact may cause death.
Do not operate drive shaft without shields in place.
Ensure drive shaft is securely attached at both ends
Avoid Toxic Fumes and Dust.
Remove paint before welding or heating. Hazardous fumes can be
generated when paint is heated by welding, soldering or using a torch.
Always do work in an area that is well ventilated to carry dust or fumes
away.
Wear an approved respirator while using solvent or paint stripper, grinding
or welding.

CropHawk Draper Platform Operators Manual 11
Safety
Transport Safety
Service Safety
Follow all recommended procedures in your combine operators manual for transporting /towing.
Transport draper platform on a platform trailer or truck when moving long distances.
Follow local regulations for equipment size, lighting and marking before driving on public roads. Ensure all
signs and lights are working properly and are clearly visible. The width of the draper may not be apparent
under these conditions.
Always travel with platform below maximum height and width. Do not
drive the combine with platform attached on a road or highway
When transporting the draper platform ensure you are aware of all
locations of tie down points and it is properly secured.
Never exceed combine manufacture’s maximum recommended speed
with platform attached. To do so may cause loss of control, resulting in
machine damage or personal injury.
Before transporting
Complete a visual check of the platform and the transporter to ensure there are no loose parts that could be
dislodged or damaged during transport. Check all wheel nuts on transporter and hitch are tight. Ensure
platform ground wheels are locked in the transport position. Check hydraulic coupling hoses are secure and
PTO shafts are locked in transport position to ensure they will not pinch or drag during transport. Safety
chains must be securely fastened to the header or transporting vehicle. Check local road laws before
transporting. Ensure all safety signs and lights are displayed correctly.
Safe Maintenance
Keep service area tidy and ensure you understand service
procedures prior to doing work. Never lubricate, service or adjust
the draper while it is moving. Keep hands and feet and clothing
clear from drive parts. Disengage all power and relieve pressure.
Lower draper onto ground. Stop engine. Remove key and allow
draper to cool.
Securely support any machine parts that must be raised for ser-
vice work.
Replace worn and broken parts. Keep all parts in good condition.
Remove all build-up of grease, oil and debris.
WARNING:
Always engage mechanical locks before working under the
draper platform or reel.
Lowering of the platform or reel can cause serious injury or
death.
Refer also to combine operator’s manual.

12 CropHawk Draper Platform Operators Manu-
Continued on next page
General Platform Information
The MidWest Crophawk Platform consists of 9 main components:
1. Frame
The frame is the base structure that all operating
components are attached to. This single piece
structure has no serviceable components howev-
er regular visual checks for impact damage and
structure fatigue are recommended.
2. Removable Components
This sections relates to all components that can
be removed from the frame as a sub assembly or individual item that are not recognised in a specific platform area
and include the following components:
1. Ground wheel Assembly
(Tyre removed for clarity)
2. Nose cone & crop divider
3. Crop throat area
4. Sand Trap 5. Covers
1. Frame 2. Removable Components
3. Reel 4. Feed Drum
5. Drive system 6. Knife.
7. Adaptor 8. Draper Belts
9. Hydraulics / Electrics
1. Ground wheels 2. Nose cones/ crop dividers
3. Crop throat area 4. Sand trap
5. Doors and covers

CropHawk Draper Platform Operators Manual 13
Continued on next page
General Platform Information
3. Reel
The MidWest platform has two types of reels driven from
the combine’s own hydraulics system.
1. Pick-up reel (Pictured) is a poly finger, six bar,
single barrel unit to 10m (33’) with all sizes above
10m (33’) being twin barrel reel.
2. The Bat reel is a five slat configuration
manufactured from high tensile galvanised material
in single barrel units up to 10m (33’) with all sizes
above 10m (33’) being twin barrel reel.
4. Feed Drum
The MidWest feed drum is a mechanically driven 406mm
(16 in) diameter feed drum that has 19 to 21 retractable
fingers with 150 mm (5.9 in) of travel, and is protected by a
bi-directional torque clutch, accommodating combine feed-
er reverse. The Drum has 70 mm (2.7in) of vertical travel
and can be adjusted 60 mm (2.3 in) fore and aft.
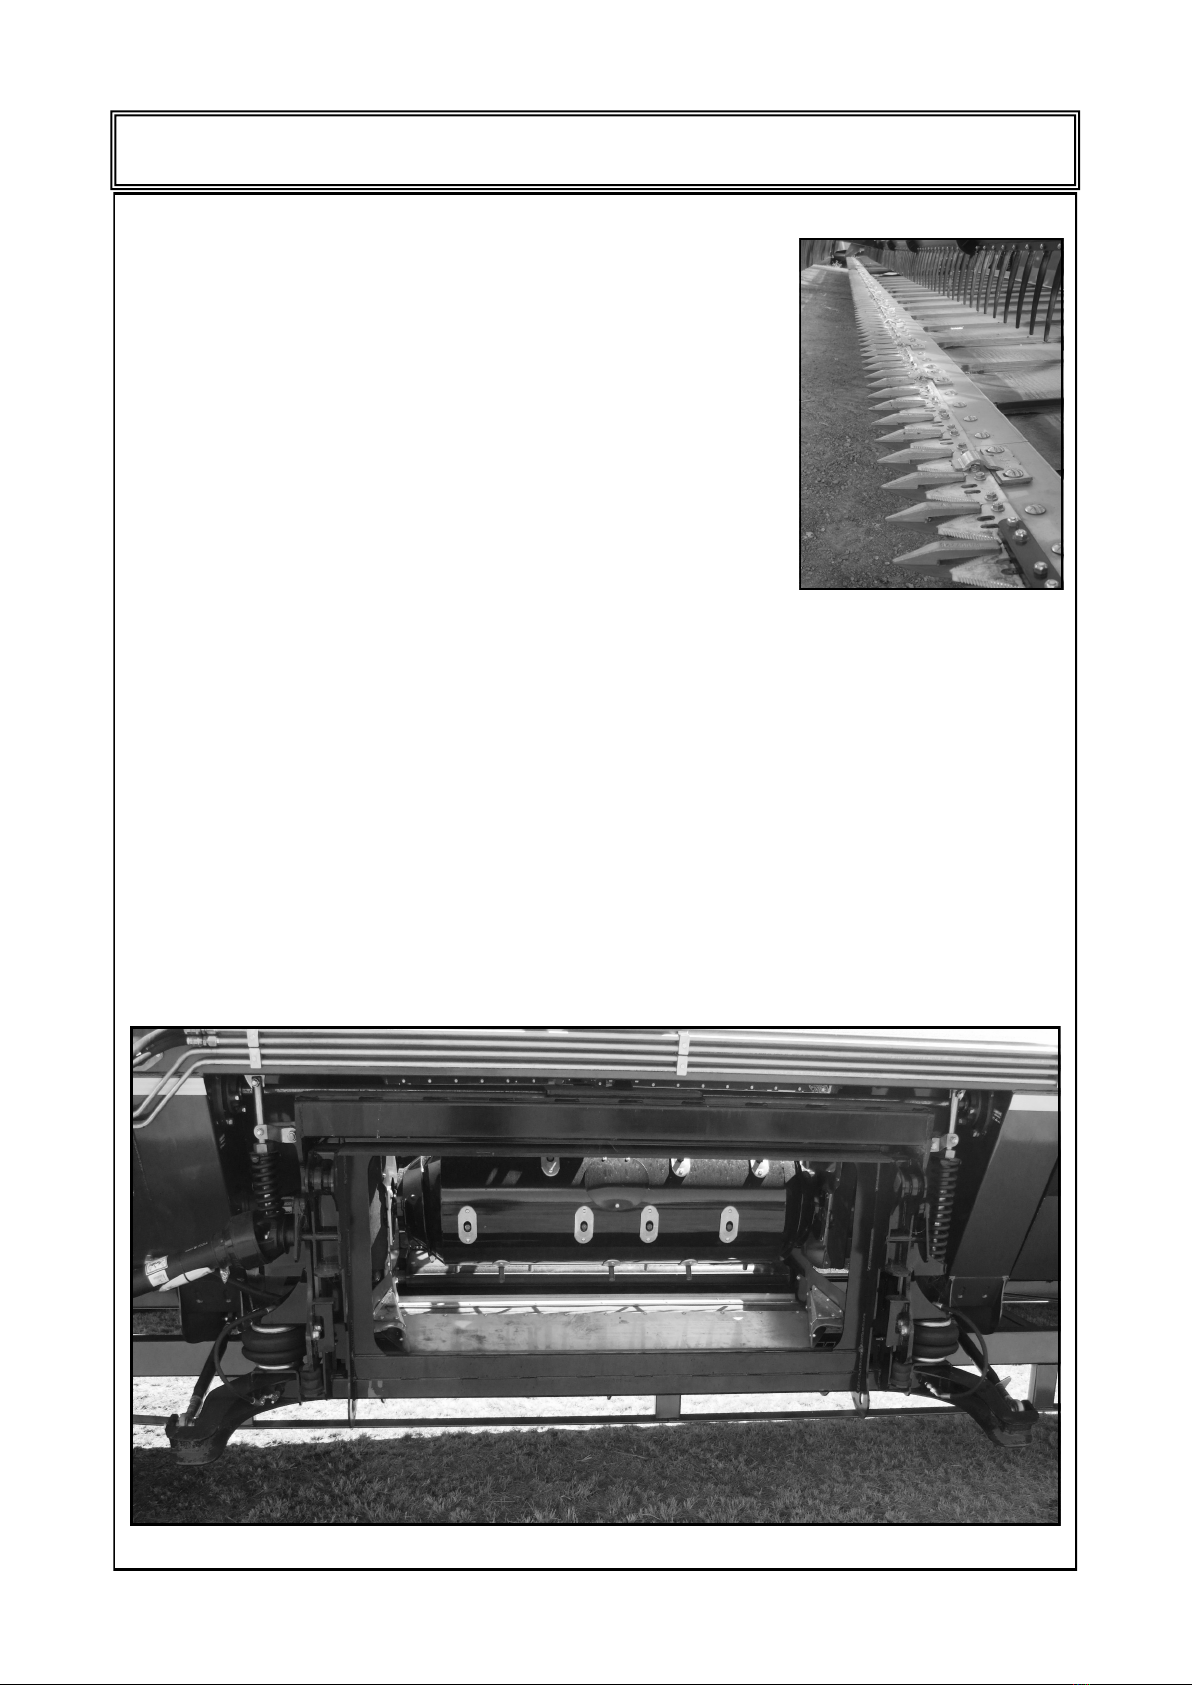
5. Drive system
The MidWest platform drive system relates to all mechani-
cal driven components. Power input is from the combine’s
feeder house output shaft via a PTO shaft to the platform’s
drive box (pictured). Within the drive box, power is trans-
ferred via a 90mm (A) belt to drive the feed drum (B) and
knife drive (C.) shafts. The feed drum drive is protected by
a bi-directional torque clutch and power to the feed drum
is via a PTO shaft. The knife drive shafts are protected by
an adjustable slip clutch (D) within the drive box and power
to the epicyclical knife drives is via a 37mm belt.
D C
B
A
C
D
14 CropHawk Draper Platform Operators Manu-
Continued on next page
General Platform Information
6. Knife.
The MidWest platform uses a synchronised (timed) dual knife system with twin epi-
cyclical grease lubricated knife drives. Driven by 37mm carbon cog belts drive en-
suring positive cutting power is maintained at all times. A clutch provides pro-
tection without affecting knife timing. This system is fitted to all mechanical driven
platforms.
7. Adaptor.
The MidWest adaptor attaches the platform to the feeder housing of the combine and is unique to the model and
series of combine. The adaptor comprises two separate floatation systems for both vertical and lateral movement. The
vertical float system is suspended by 2 air bags linked via a tank enabling 100mm vertical travel with the ride being
controlled by adjustments to air bag pressure. The lateral floatation system supports the entire platform weight on a
central pivot point and is suspended horizontally to the combine harvester. This unique ‘hover point’ patented suspen-
sion system allows the platform to mount closer to the combine allowing better visibility and decreasing stress on the
combine feeder house.

CropHawk Draper Platform Operators Manual 15
General Platform Information
8. Draper Belts.
The MidWest platform operates two types of Draper belts.
1. The outer Draper belts conveys the crop to the
centre feed belt . The outer draper belts are 915
mm wide and have a V form guide moulded to the
centre of the belt. This design ensures true
alignment and allows for the belt to be reversed.
The belt is driven hydraulically via a vulcanised
drive roller and is tensioned by the inner idler roller.
2. The centre feed belt conveys the crop to the feed drum, which
delivers the crop to the combine. The centre belt is 1500 mm wide
and has a V form guide moulded to the left hand side of the belt. The
belt is driven hydraulically via a steel drive roller and is tensioned by
the front idler roller.
9. Hydraulics / Electrics
The MidWest platform contains two separate hydraulic systems.
1. The self contained, fully integrated hydraulic system drives the draper belts.
The feeder house drive shaft from the combine is connected to an input
drive shaft on the platform via a PTO shaft. The accelerator gearbox is
mounted on the input shaft and drives the hydraulic pump. The draper con-
trol circuit is split between the lateral drapers and the centre draper. The belt
speeds are independently controlled by a dual flow control incorporating a
relief valve. The oil is filtered then returned to the reservoir tank.
2. Dependant on the combine ‘s hydraulic system is the reel
drive and reel cylinders. This system operates from the
combines hydraulics allowing full in cab control.
Electrics
The electrical system and sensors are integrated into the
combines operating system, and include reel speed control,
lighting and allowing for full platform recognition by the combine.

16 CropHawk Draper Platform Operators Manu-
Platform Specifications
Platform Standard Width
Widths 36 ft 41 ft 42 ft 45 ft 50 ft
(A) Overall width 11500mm 12870mm 13175mm 13937mm 15461mm
(B) Actual Cutting width including nose
cones
11204mm 12575mm 12880mm 13462mm 15166mm
(C) Knife cutting width 11049mm 12420mm 12725mm 13487mm 15011mm
(D) Ground wheel Tracking Width 7712mm 9083mm 9837mm 10600mm 12125mm
(E) Transport Width Tyres & Nosecones
Removed
2425mm 2425mm 2425mm 2425mm 2425mm
(F) Transport Width Tyres & Nosecones
Fitted
2713mm 2713mm 2713mm 2713mm 2713mm

CropHawk Draper Platform Operators Manual 17
Platform Specifications
Platform floatation
Reel
Draper Belts
Lateral tilts: + / - 4.5 deg
Pitch: 5 deg
Gauge wheels: Air bag suspended with fluid dampening system, enabling 350 mm travel, 40 deg caster
and adjustable depth control. Wheels are fitted with 9.00 x 15 implement tyres.
Midwest pick-up reel: Poly finger, six bar, single barrel unit to 10m (33’) and all sizes above
10m (33’) are twin barrel reel.
Midwest Bat Reel: Five slat configuration in single barrel units up to 10m (33’) and all sizes
above 10m (33’) are a twin barrel reel.
Outer Draper belts Centre feed belts
Belt Size 915 mm / 36” “V” Guided 1500 mm / 59” “V” Guided
Operating Speed 0-600 rpm 15% faster then outer belts
Speed Control Outer Hydraulic adjustable (in cab control option)/Centre Hydraulic adjustable
Drive Rollers vulcanised rubber on outer draper belts, steel on centre feed belt.
Feed Drum Diameter 406.4 mm / 16” diameter
Feed drum fingers 19mm diameter
Number of fingers 18
Finger reach 150 mm
Operating speed 210 - 240 rpm
25 ft 27 ft 30 ft 33 ft 36 ft 41 ft 42 ft 45 ft 50 ft
Reel Type 1 Piece Reel 1 Piece
Reel
1 Piece
Reel
1 Piece
Reel
2 Piece
Reel
2 Piece
Reel 2 Piece Reel 2 Piece
Reel
2 Piece
Reel
Reel Speed Hydraulic control operating from 6-90rpm
PU Barrel
Size 8”(200mm) 8”(200mm) 10”(250mm) 10”(250mm) 6” (150mm) 6” (150mm) 6” (150mm) 8”(200mm) 8”(200mm)
Height Con-
trol Hydraulic control
Reel Lift Outer ram 223 mm stroke & Centre ram 146 mm stoke
Fore & Aft 406 mm stroke
PU Reel
Diameter 1405 mm diameter
Bat Reel
Diameter 1280 mm diameter
Continued on next page
18 CropHawk Draper Platform Operators Manu-
Platform Specifications
Platform Weights
NOTE: Platform weights are base platform with standard reel, weights will vary with different options and con-
figurations.
Knife :
FORAGE GRAIN
Width 25 ft(7.6m) 27 ft(8.2m) 36ft
(10.8M)
41 ft(12.5m) 42 ft(12.8m) 45 ft(13.7m) 50 ft(15.2m)
Knife Drive Twin Knife Twin Knife Twin Knife Twin Knife Twin Knife Twin Knife Twin Knife
Knife
Speed
610 cycles per Minute (1220 Stroke)
36 ft ( 10.8m ) 41 ft ( 12.5m ) 42 ft ( 12.8m ) 45 ft ( 13.7m ) 50 ft ( 15.2m )
Bat Reel 3220 3301 3356 3492 3660
Pickup Reel 3256 3396 3460 3600 3780
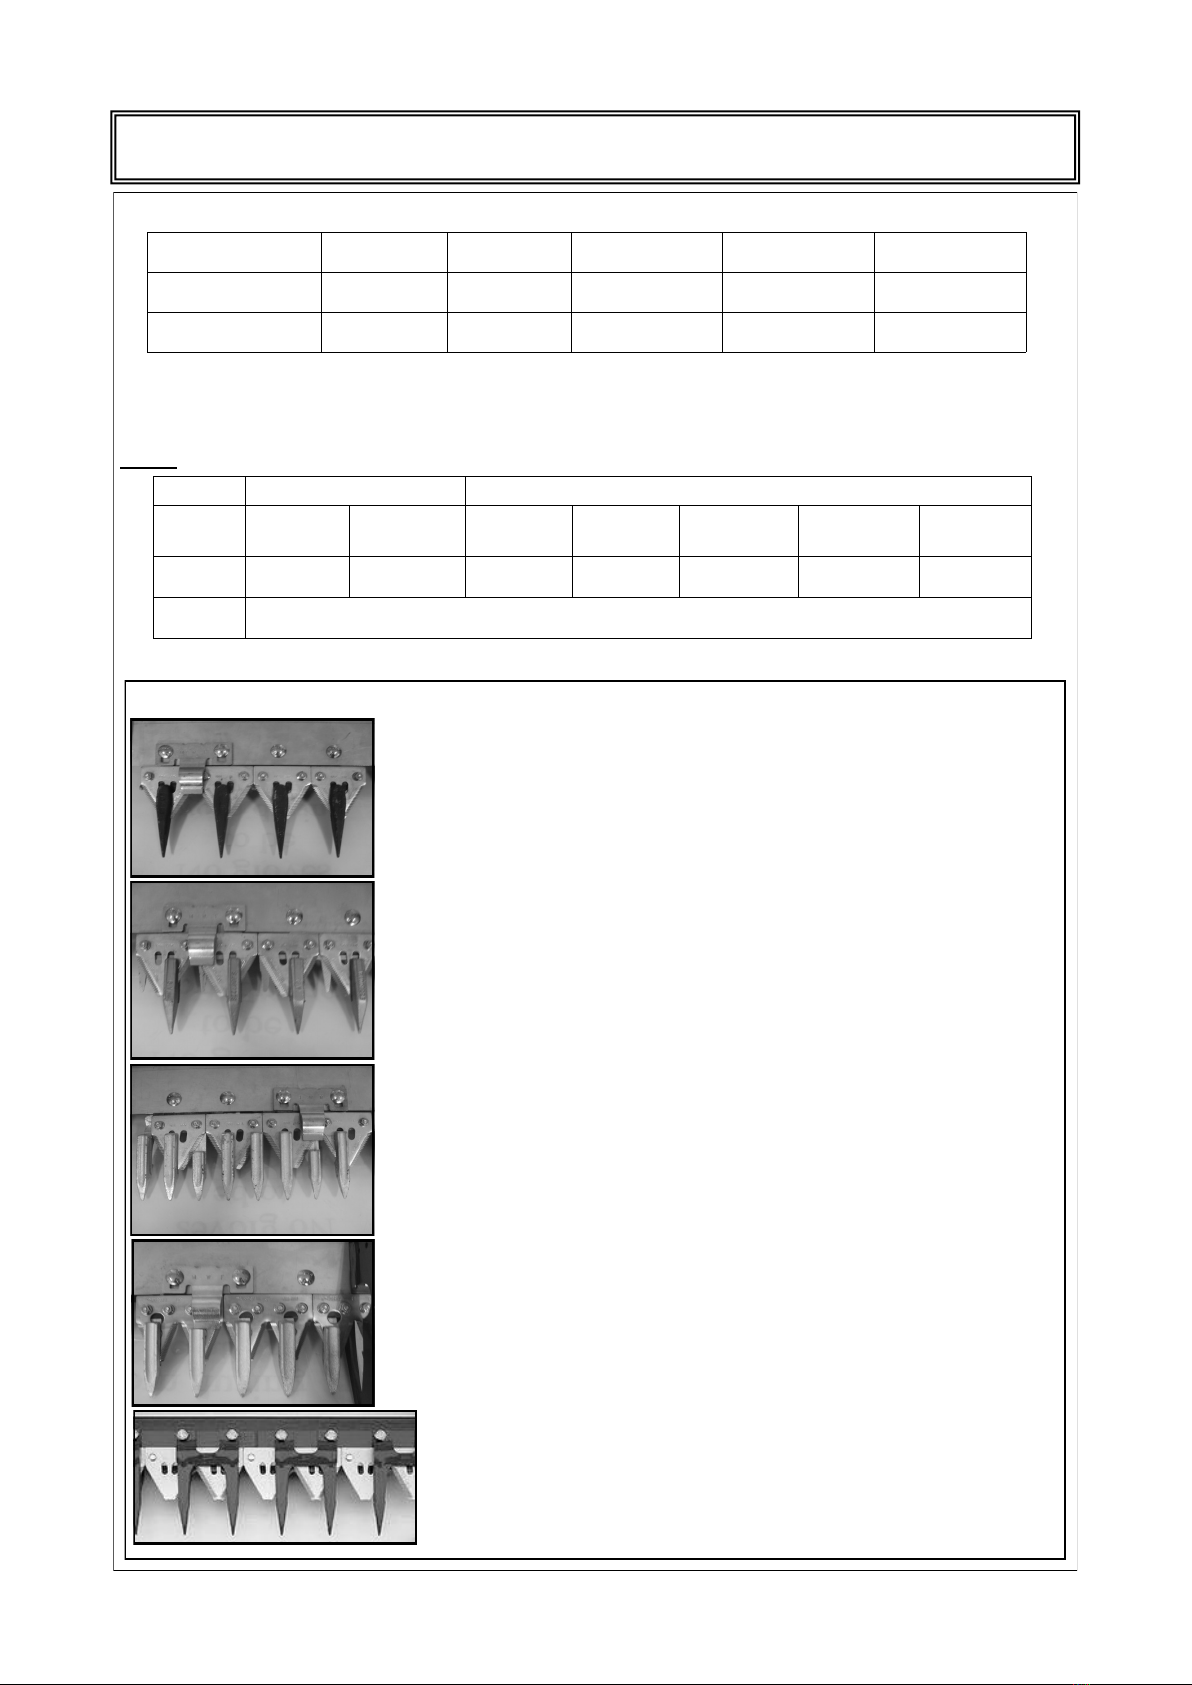
Knife Guard Options:
Standard Guards: General Purpose all crops.
Standard knife (2 finger) guards and sickle has 76 mm (3”)
centres.
NOTE: Rated to 11 kph cutting speed
No Choke Guards: Cereal & Pulse crops
No choke (long short) guards are used with standard sickle
knife sections. 76 mm (3”) centres design gives open access
to sickle while half guard helps reduce crop shatter in pulse
crops.
P4 Guards: Cereal and light crop
P4 guards (4 finger) used with standard sickle sections. 76
mm (3”) centres. Ideal for higher cutting speeds in lighter crop
conditions. Attachable extensions available.
P3 Guards: Quick cut Cereal & Pulse crops
P3 50 mm (2”) guards used with a double cut sickle bar on 2”
centres . Ideal for higher speed cutting conditions. Wider fin-
ger gap suits thicker stemmed crops. Attachable extensions
available.
Schumacher Guards: Green chop, Forage and Grass
applications.
Schumacher (2 finger) guards have 76 mm (3”) centres
and use standard sickles bolted on a one up and one
down system.
CropHawk Draper Platform Operators Manual 19
Platform Specifications
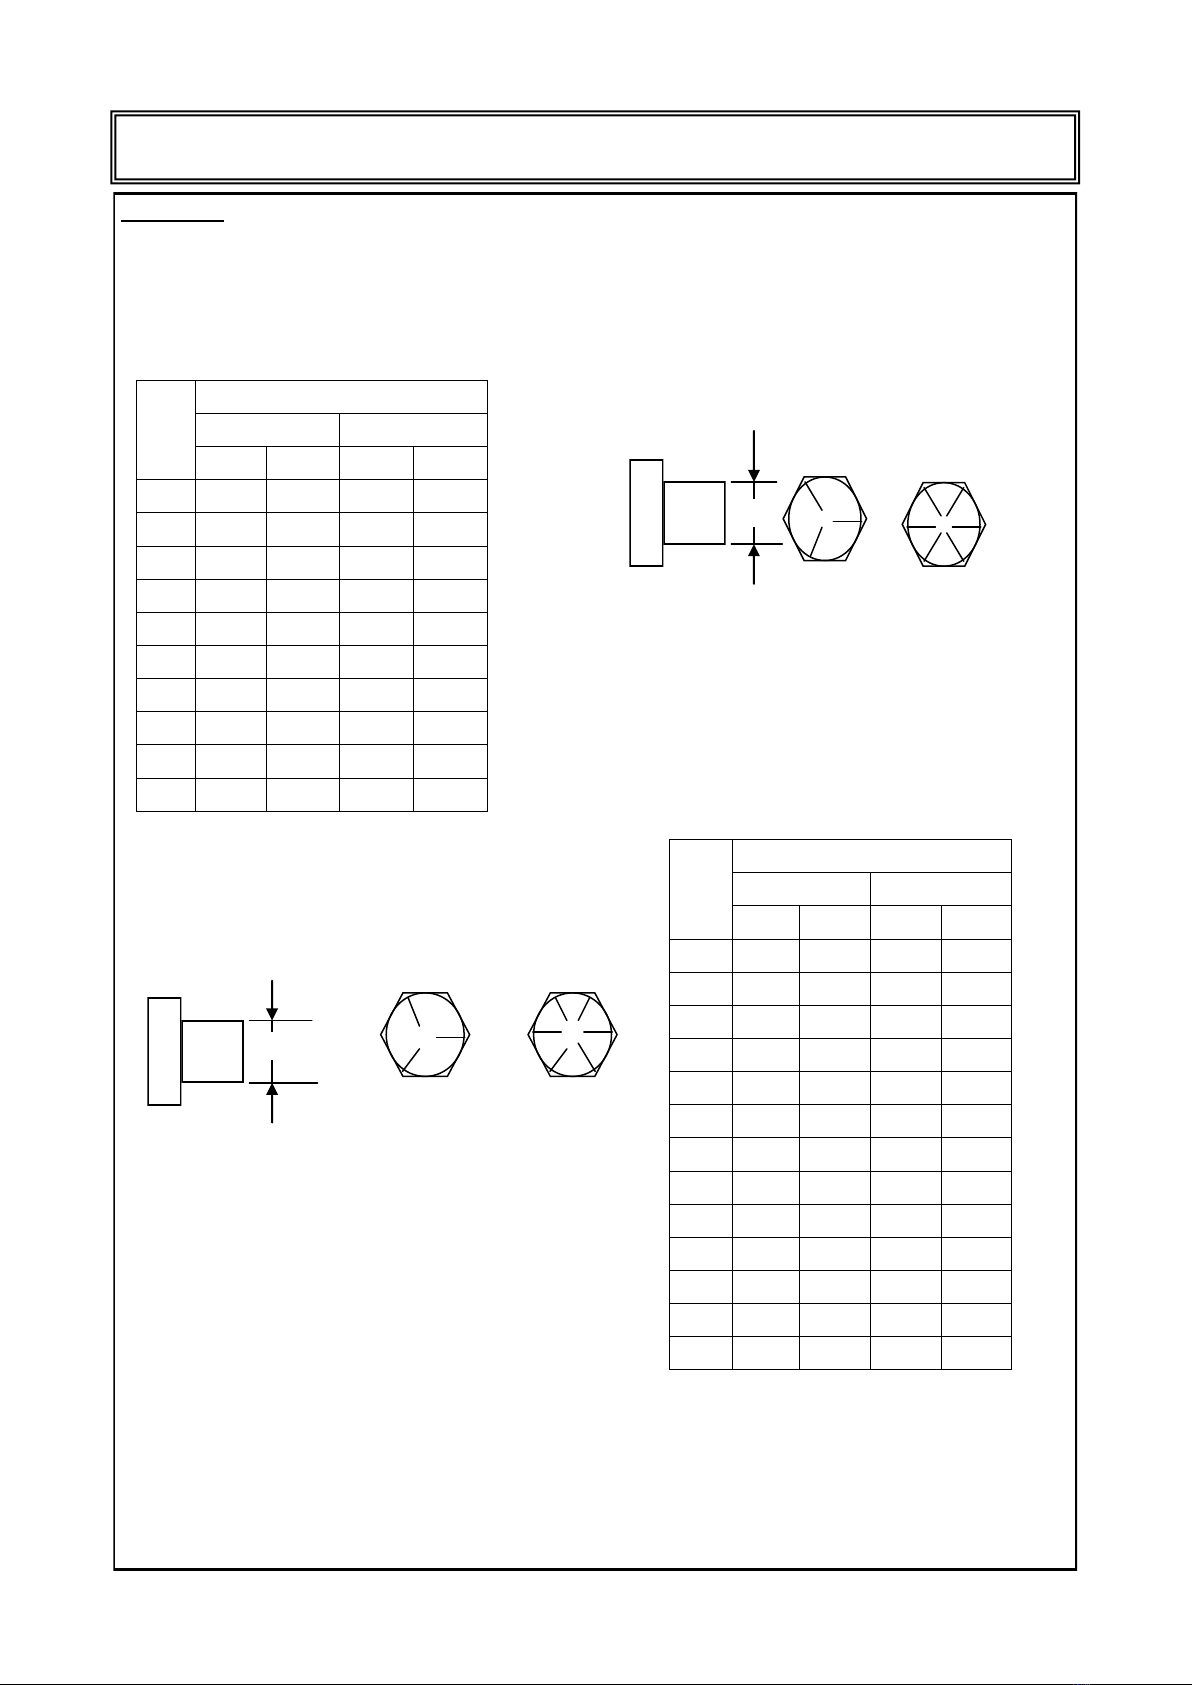
Bolt Torque
The table shown give correct torque for various bolts and cap screws. Tighten all bolts to the torque specified in
chart unless otherwise noted in this manual. Check tightness of bolts periodically using bolt torque chart as a guide.
Replace hardware with the same strength bolt.
Torque figures indicated are valid for non-greased threads and head unless otherwise specified. Do not grease bolts
or cap screws unless specified in this manual (see LUBRICATION section in this manual). When using locking
element, increase torque values by 5%.
Bolt
dia
‘A’
Bolt Torque
SAE—5 SAE—8
N. m (lb-ft) N . m (lb-ft)
1/4” 12 915 11
5/16” 24 18 34 25
3/8” 43 32 56 41
7/16” 68 50 95 70
1/2” 102 75 142 105
9/16” 149 110 202 149
5/8” 203 150 271 200
3/4” 359 265 495 365
7/8” 569 420 813 600
1” 867 640 1205 890
A
SAE—5 SAE—8
Bolt Torque
Bolt
dia
‘A’
8.8 10.9
N. m (lb-ft) N . m (lb-ft)
M3 0.5 .4 1.8 1.3
M4 32.2 4.5 3.3
M5 6497
M6 10 715 11
M8 25 18 35 26
M10 50 37 70 52
M12 90 66 125 92
M14 140 103 200 148
M16 225 166 310 229
M20 435 321 610 450
M24 750 553 1050 774
M30 1495 1103 2100 1550
M36 2600 1917 3675 2710
English Torque Specification
Metric Torque Specification
A
8 . 8 10 . 9

20 CropHawk Draper Platform Operators Manu-
Platform Set-up
AGCO initial set up
Continued on next page
Attaching Platform to Gleaner R6 and A86 series / Massey Ferguson 9005 Combines.
For combine models not listed contact your dealer
The following instructions are designed to assist you attached your MidWest Draper Platform to the combine
in a safe and easy manner. Follow the instructions carefully and in the correct order to avoid difficulties arising.
IMPORTANT: For Combine preparation see combine harvester’s operators manual.
Remove high attachment lugs (A) (see diagram ) and install
short attachment lugs to top of feeder house
Check feeder house chain slate protrusion past feeder house
face. If greater than 50mm (2in) remove link out of feeder chain
(more relevant when fitting to second hand combines).
Adjust bottom adapter link (A) to 640mm from centre to centre
of link pins (see diagram)
NOTE: Step 3 is to obtain maximum clearance for initial set-up only and NOT for operating the platform.
Check that feed drum is in
full forward position (see
FEED DRUM ADJUST-
MENTS in the operators
MANUAL)
Drive combine slowly for-
ward until feeder house is
centered in platform adapt-
er opening. Raise feeder
house until top of feeder
house engages into top
beam of adapter. Raise to
full height set parking brake shut off engine and remove the key.
Lower safety stop onto the hydraulic cylinder rod (refer to Combine Operator's Manual).
From LH side of platform remove hydraulic multi-coupler from stor-
age and couple to combine hydraulic coupling (Refer to Combine
Operator’s Manual)
IMPORTANT: to prevent damage to hydraulic components en-
sure hydraulic coupling surfaces are clean.
5. Engage over centre feeder house platform lock (C) (refer to
combine operator manual).
A
C
640 mm
Table of contents
Other Midwest Farm Equipment manuals


