Miele cva 610 User manual

Operating instructions
Coffee System
CVA 610
To prevent accidents and
machine damage,
read these instructions
before installation or use.
UV
05 766 570
M.-Nr.

Contents
IMPORTANT SAFETY INSTRUCTIONS . . . . . . . . . . . . . . . . . . . . . . . . . . . . . . . . . 4
Guide to the coffee system . . . . . . . . . . . . . . . . . . . . . . . . . . . . . . . . . . . . . . . . . . 7
Progr mming . . . . . . . . . . . . . . . . . . . . . . . . . . . . . . . . . . . . . . . . . . . . . . . . . . . . . 9
The program mode . . . . . . . . . . . . . . . . . . . . . . . . . . . . . . . . . . . . . . . . . . . . . . . . . 9
Choosing a language . . . . . . . . . . . . . . . . . . . . . . . . . . . . . . . . . . . . . . . . . . . . . . 10
Rinsing feature. . . . . . . . . . . . . . . . . . . . . . . . . . . . . . . . . . . . . . . . . . . . . . . . . . . . 11
Determining the water hardness . . . . . . . . . . . . . . . . . . . . . . . . . . . . . . . . . . . . . . 12
Setting the water hardness . . . . . . . . . . . . . . . . . . . . . . . . . . . . . . . . . . . . . . . . . . 13
Setting the drink temperatures. . . . . . . . . . . . . . . . . . . . . . . . . . . . . . . . . . . . . . . . 14
Pre-brewing feature . . . . . . . . . . . . . . . . . . . . . . . . . . . . . . . . . . . . . . . . . . . . . . . . 15
Pre-grinding feature . . . . . . . . . . . . . . . . . . . . . . . . . . . . . . . . . . . . . . . . . . . . . . . . 16
Hot water feature . . . . . . . . . . . . . . . . . . . . . . . . . . . . . . . . . . . . . . . . . . . . . . . . . . 17
Total coffee counter . . . . . . . . . . . . . . . . . . . . . . . . . . . . . . . . . . . . . . . . . . . . . . . . 18
Setting the standby timer. . . . . . . . . . . . . . . . . . . . . . . . . . . . . . . . . . . . . . . . . . . . 19
System lock . . . . . . . . . . . . . . . . . . . . . . . . . . . . . . . . . . . . . . . . . . . . . . . . . . . . . 20
Before using the coffee system . . . . . . . . . . . . . . . . . . . . . . . . . . . . . . . . . . . . . 21
W ter t nk. . . . . . . . . . . . . . . . . . . . . . . . . . . . . . . . . . . . . . . . . . . . . . . . . . . . . . . 22
Coffee be n cont iner . . . . . . . . . . . . . . . . . . . . . . . . . . . . . . . . . . . . . . . . . . . . . 23
Setting the serving sizes. . . . . . . . . . . . . . . . . . . . . . . . . . . . . . . . . . . . . . . . . . . 24
Coffee and espresso . . . . . . . . . . . . . . . . . . . . . . . . . . . . . . . . . . . . . . . . . . . . . . . 25
Hot water . . . . . . . . . . . . . . . . . . . . . . . . . . . . . . . . . . . . . . . . . . . . . . . . . . . . . . . . 26
M king coffee . . . . . . . . . . . . . . . . . . . . . . . . . . . . . . . . . . . . . . . . . . . . . . . . . . . . 27
Pre-warming. . . . . . . . . . . . . . . . . . . . . . . . . . . . . . . . . . . . . . . . . . . . . . . . . . . . . . 27
Preparing two cups simultaneously . . . . . . . . . . . . . . . . . . . . . . . . . . . . . . . . . 28
Cappuccino . . . . . . . . . . . . . . . . . . . . . . . . . . . . . . . . . . . . . . . . . . . . . . . . . . . . . . 29
Dispensing hot w ter. . . . . . . . . . . . . . . . . . . . . . . . . . . . . . . . . . . . . . . . . . . . . . 31
Setting the coffee grinder . . . . . . . . . . . . . . . . . . . . . . . . . . . . . . . . . . . . . . . . . . 32
Adjusting the coffee grinder . . . . . . . . . . . . . . . . . . . . . . . . . . . . . . . . . . . . . . . . . 32
Setting the quantity . . . . . . . . . . . . . . . . . . . . . . . . . . . . . . . . . . . . . . . . . . . . . . . . 33
Contents
2

Coffee system c re . . . . . . . . . . . . . . . . . . . . . . . . . . . . . . . . . . . . . . . . . . . . . . . 34
Daily care. . . . . . . . . . . . . . . . . . . . . . . . . . . . . . . . . . . . . . . . . . . . . . . . . . . . . . . . 34
Exterior. . . . . . . . . . . . . . . . . . . . . . . . . . . . . . . . . . . . . . . . . . . . . . . . . . . . . . . . . . 35
Stainless steel . . . . . . . . . . . . . . . . . . . . . . . . . . . . . . . . . . . . . . . . . . . . . . . . . . . . 35
Stainless steel colored controls . . . . . . . . . . . . . . . . . . . . . . . . . . . . . . . . . . . . . . . 35
Interior . . . . . . . . . . . . . . . . . . . . . . . . . . . . . . . . . . . . . . . . . . . . . . . . . . . . . . . . . . 35
Drip catch . . . . . . . . . . . . . . . . . . . . . . . . . . . . . . . . . . . . . . . . . . . . . . . . . . . . . . . 36
Waste unit . . . . . . . . . . . . . . . . . . . . . . . . . . . . . . . . . . . . . . . . . . . . . . . . . . . . . . . 37
Steam nozzle . . . . . . . . . . . . . . . . . . . . . . . . . . . . . . . . . . . . . . . . . . . . . . . . . . . . . 37
Brew unit . . . . . . . . . . . . . . . . . . . . . . . . . . . . . . . . . . . . . . . . . . . . . . . . . . . . . . . . 38
Rinsing cycle: Degreasing the brew unit . . . . . . . . . . . . . . . . . . . . . . . . . . . . . 39
Cleaning the brew unit filters . . . . . . . . . . . . . . . . . . . . . . . . . . . . . . . . . . . . . . 40
Lubricating the brew unit . . . . . . . . . . . . . . . . . . . . . . . . . . . . . . . . . . . . . . . . . 41
Change the gaskets. . . . . . . . . . . . . . . . . . . . . . . . . . . . . . . . . . . . . . . . . . . . . . . . 42
Changing the light bulb . . . . . . . . . . . . . . . . . . . . . . . . . . . . . . . . . . . . . . . . . . . . . 43
Desc ling the ppli nce . . . . . . . . . . . . . . . . . . . . . . . . . . . . . . . . . . . . . . . . . . . 44
Automatic descaling . . . . . . . . . . . . . . . . . . . . . . . . . . . . . . . . . . . . . . . . . . . . . . . 44
F ult mess ges . . . . . . . . . . . . . . . . . . . . . . . . . . . . . . . . . . . . . . . . . . . . . . . . . . 47
Frequently sked questions . . . . . . . . . . . . . . . . . . . . . . . . . . . . . . . . . . . . . . . . 48
After s les service . . . . . . . . . . . . . . . . . . . . . . . . . . . . . . . . . . . . . . . . . . . . . . . . 51
Inst ll tion instructions . . . . . . . . . . . . . . . . . . . . . . . . . . . . . . . . . . . . . . . . . . . 53
C ring for the environment . . . . . . . . . . . . . . . . . . . . . . . . . . . . . . . . . . . . . . . . . 55
Disposal of the packing materials . . . . . . . . . . . . . . . . . . . . . . . . . . . . . . . . . . . . . 55
Disposal of an old appliance . . . . . . . . . . . . . . . . . . . . . . . . . . . . . . . . . . . . . . . . . 55
Electric l connection . . . . . . . . . . . . . . . . . . . . . . . . . . . . . . . . . . . . . . . . . . . . . . 56
Inst ll tion . . . . . . . . . . . . . . . . . . . . . . . . . . . . . . . . . . . . . . . . . . . . . . . . . . . . . . 57
Installation options . . . . . . . . . . . . . . . . . . . . . . . . . . . . . . . . . . . . . . . . . . . . . . . . . 57
Gloss ry . . . . . . . . . . . . . . . . . . . . . . . . . . . . . . . . . . . . . . . . . . . . . . . . . . . . . . . . 61
Contents
3

When using electric l ppli nces, b sic s fety prec utions should lw ys be
followed, including the following:
Re d ll instructions before inst ll tion or use of the coffee system.
Please read these instructions care-
fully to prevent accidents and
machine damage.
This appliance is for household use
only. Any other use is not recom-
mended by the manufacturer and
could be dangerous.
This appliance complies with current
safety requirements. Improper use of
the appliance can cause personal
injury and material damage.
The manufacturer cannot be held
responsible for damage caused by
improper use of the appliance.
Electric l s fety
Before connecting the appliance to
the electrical supply, make sure
that the voltage and frequency listed on
the data plate correspond with the
household electrical supply. If in doubt,
consult a qualified electrician.
Be certain your appliance is
properly installed and grounded by
a qualified technician.
To guarantee the electrical safety of this
appliance, continuity must exist
between the appliance and an effective
grounding system. It is imperative that
this basic safety requirement be met. If
there is any doubt, have the electrical
system of the house checked by a
qualified electrician. The manufacturer
cannot be held responsible for dam-
ages caused by the lack, or inade-
quacy of, an effective grounding
system.
The appliance must be built into
cabinetry before operation to
ensure that no electrical components
are accessible. Ensure that electrical
power is not supplied to the appliance
while installation work, repairs or
maintenance is performed.
Do not use an extension cord to
connect the appliance to electricity.
Extension cords do not guarantee the
required safety of the appliance
(danger of overheating).
IMPORTANT SAFETY INSTRUCTIONS
4

Never open the housing of the
appliance. If electrical or mech-
anical components or electrical
connections are disturbed, an electric
shock could be caused damaging the
machine.
Before service or maintenance,
disconnect the power supply by
either removing the fuse, "tripping" the
circuit breaker or unplugging the unit
from the outlet.
Never use a steam cleaner to clean
the appliance. Pressurized steam
could damage electrical components
and cause a short circuit.
To protect against fire, electric
shock and injury to persons do not
immerse cord or plugs in water or other
liquid.
Do not operate any appliance with
a damaged cord or plug or after
the appliance malfunctions, or has
been damaged in any manner. Return
appliance to the nearest authorized
Miele dealer for examination, repair or
adjustment.
Do not let cord hang over edge of
table or counter, or touch hot
surfaces.
Inst ll tion
Installation work and repairs should
only be performed by a trained
technician to ensure safety. Repairs
and other work by unauthorized
persons could be dangerous.
This equipment has not been
designed for maritime use or for
use in mobile installations such as air-
craft or recreational vehicles. However,
under certain circumstances it may be
possible for an installation in these
applications. Please contact the near-
est Miele Dealer or the Miele Technical
Service Department with specific
requirements.
If the coffee system is to be
installed above another appliance,
there must be a full-width, closed shelf
between the appliances. (The shelf is
not necessary when installation is in
combination with the Miele Built-in plate
warmer.)
Before the appliance is connected,
the steam selector must be in the
off position to prevent an uncontrolled
escape of steam or hot water and
possible burns.
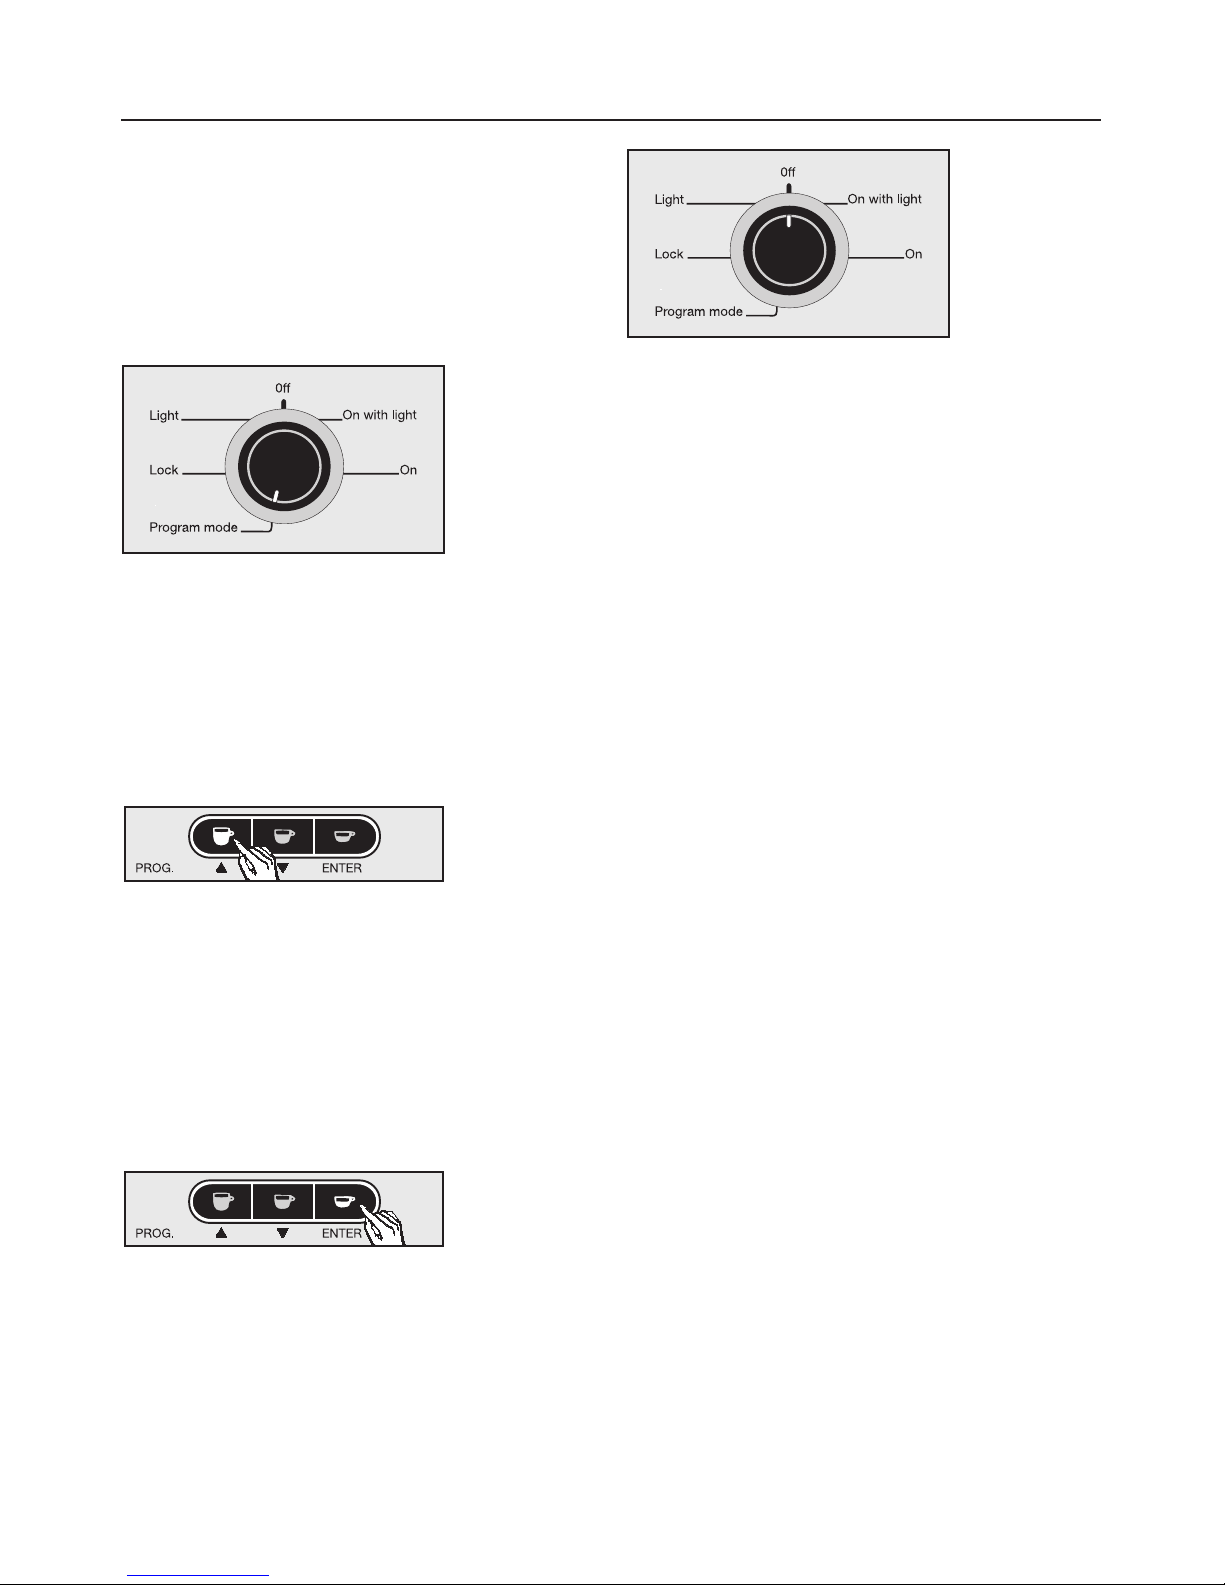
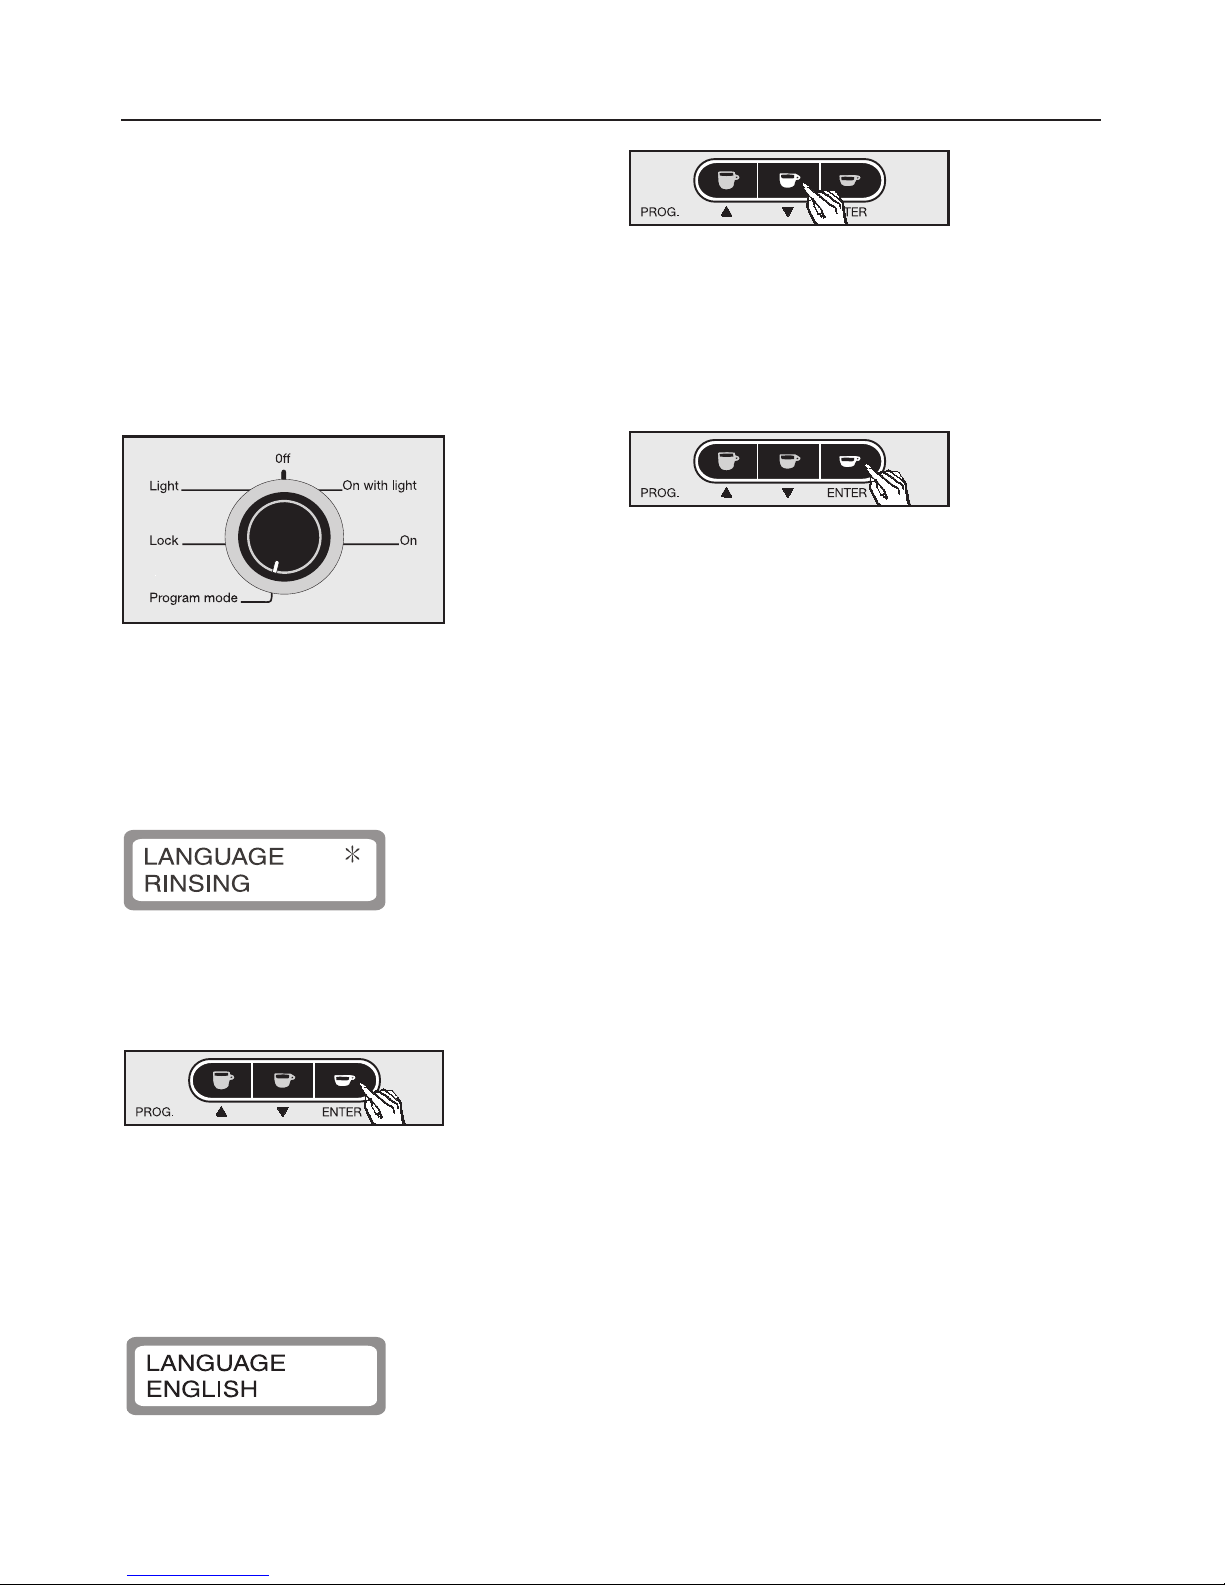
Always attach plug to appliance
first, then plug cord into the wall
outlet. To disconnect, turn program
selector to "Off", then remove plug from
wall outlet.
IMPORTANT SAFETY INSTRUCTIONS
5

Use
The coffee system must be cleaned
daily to prevent the growth of harm-
ful bacteria and mold. Please read
the "Coffee system care" section of
this booklet.
Warning: There is a danger of scald-
ing. The nozzles and the liquids
dispensed are very hot.
The hot water and steam dis-
pensed could cause scalding.
These functions must be used carefully.
Never direct the steam nozzle towards
the body.
The machine must never be used to
clean objects.
To prevent burns, turn the steam
selector to the off position when not
needed.
The steam nozzle and hot water
dispensers become very hot
during use. Always grip the steam
nozzle by the insulated collar.
Do not touch hot surfaces. Use
handles or knobs.
Allow the coffee system to cool
before putting on or taking off
parts, and before cleaning.
Children should not use the
appliance unsupervised.
Do not use
outdoors.
The use of accessory attachments
not recommended by the
appliance manufacturer may result in
fire, electric shock or injury to persons.
In areas subject to infestation by
cockroaches or other vermin, keep
the appliance and its surroundings
clean at all times. Any damage caused
by pests will not be covered under
warranty.
The water lines must be flushed
and the machine cleaned
thoroughly before the first coffee is
prepared.
Only fill the water tank with cold,
fresh drinking water. The water
must be changed daily to prevent
bacteria or mold growth.
Dispos l of n old m chine
Before discarding an old machine,
turn it off and unplug it. Cut off the
power cord and remove any doors to
prevent hazards.
SAVE THESE
INSTRUCTIONS
IMPORTANT SAFETY INSTRUCTIONS
6

aHot water dispenser
bCoffee dispensers (height-adjustable)
cHandle to open appliance front
dSteam selector
eSteam nozzle with milk frother
fDrip catch
gProgram selector
hMessage window
iCoffee serving buttons
jRinse/
pre-warm button
kHot water button
Guide to the coffee system
7

lCoffee bean container
mSlide control to select fineness of ground coffee
nSlide control to select quantity of ground coffee
oWater tank
pWaste unit
qBrew unit
Guide to the coffee system
8

The progr m mode
The coffee system can be customized
to each household through the
"program mode."
To program the appliance:
^Turn the program selector to
"Program mode".
The appliance is now in program mode
and will respond according to the
symbols shown under the coffee
serving buttons.
^By pressing the -or ebutton
– a programming option in the
message window can be highlighted
with an asterisk.
– the settings of the various program-
ming options can be adjusted.
^By pressing ENTER
– a programming option highlighted
with an asterisk can be selected.
– a change to the programmed
settings can be saved.
If a setting is accidentally changed,
turn the program selector to "0ff". The
changed setting will not be saved and
the original setting will be retained.
Progr mming
9

Choosing l ngu ge
The language for the commands in the
message window should be selected
before the machine is used.
The following languages are available:
German, Dutch, Portuguese, Spanish,
English, Italian, French.
^Turn the program selector counter-
clockwise to "Program mode".
The following will appear in the
message window:
Programming option "LANGUAGE" will
be highlighted with an asterisk.
^Press ENTER to select this program-
ming option.
The sub-menu will appear in the
message window.
^Press the ebutton until the desired
language appears (deutsch,
nederlands, portugues, espanol,
english, italiano or francais.)
^Press ENTER to s ve this setting, or
turn the program selector to "0ff" to
c ncel if a mistake has been made.
All text in the message window will now
appear in the selected language.
Progr mming
10

Rinsing fe ture
The rinsing feature flushes out coffee
residue and pre-warms the coffee
system. When "Rinsing - On" is selected
the system will automatically be flushed
and pre-warmed when the appliance is
turned on. If this feature is set to
"Rinsing - Off" the system will only be
flushed and pre-warmed when the
rinse/pre-warm button is pressed.
^Turn the program selector counter-
clockwise to "Program mode".
^Press the ebutton, to highlight
"RINSING" with an asterisk.
^Press ENTER to select this program-
ming option.
The sub-menu will appear in the
message window.
^Press button e, to turn the "Rinsing"
feature on or off.
^Press ENTER to s ve this setting, or
turn the program selector to "0" to
c ncel if a mistake has been made.
Progr mming
11

Determining the w ter
h rdness
The hardness of the water (tap or bot-
tled) used in the coffee system must be
determined and programmed into the
appliance. The water hardness will
determine how frequently the unit must
be descaled to maintain the coffee
system properly. The machine monitors
the volume of water passing through it
in conjunction with the hardness of the
water and will indicate when descaling
is necessary. Your local water authority
can tell you the hardness of your tap
water or you can measure the hardness
yourself using the enclosed test strip.
^Dip the strip in your drinking water for
one second, then shake off excess
water.
The result will be evident after a minute.
If the water hardness is greater than
40 gr/gal (700 ppm), the water must
be mixed in equal parts with
non-carbonated mineral water to
prevent excessive scale build-up.
Never use distilled water.
Use programming option "Water hard-
ness" to program the water hardness.
Progr m
setting
W ter
H rdness
gr/g l ppm
Hardness 1 1 (soft) 0 - 3 0 - 130
Hardness 2 1 (soft) 4 - 7 130 - 250
Hardness 3 2 (medium) 7 - 14 250 - 380
Hardness 4 3 (hard)
4 (very hard)
14 - 21
over 21
over 380
Progr mming
12

Setting the w ter h rdness
^Turn the program selector counter-
clockwise to "Program mode".
^Press the ebutton to highlight
"WATER HARDN." with an asterisk.
^Press ENTER to select this program-
ming option.
The sub-menu will appear in the
message window.
^Press the ebutton to set the water
hardness level (hardness 1 - 4).
^Press ENTER to s ve this setting, or
turn the program selector to "0ff" to
c ncel if a mistake has been made.
Progr mming
13

Setting the drink temper tures
The appliance can be set at different
temperatures to suit varying coffee
drinking preferences.
Five temperature levels are available for
each drink option.
^Turn the program selector counter-
clockwise to "Program mode".
^Press the ebutton to highlight a
drink option
"TEMP. L. COFFEE" (long),
"TEMP COFFEE" (regular) or
"TEMP. S. COFFEE" (espresso)
with an asterisk.
A different temperature can be
programmed for each drink.
^Press ENTER to select the option.
Depending on the programming option
selected, the sub-menu is shown in the
message window as follows:
^Press the ebutton to set the temp-
erature to minimum, low, medium,
high or maximum.
^Press ENTER to s ve this setting, or
turn the program selector to "0ff" to
c ncel if a mistake has been made.
Progr mming
14

Pre-brewing fe ture
When the pre-brewing feature is on, the
freshly ground coffee is moistened with
a little hot water to allow the aroma and
crema of the coffee to fully develop.
When the pre-brewing feature is off, the
hot water is forced through the coffee
immediately.
^Turn the program selector counter-
clockwise to "Program mode"
^Press the ebutton to highlight
"PREBREWING" with an asterisk.
^Press ENTER to select this option.
The sub-menu will appear in the
message window.
^Press the ebutton to set the
pre-brewing process on, off or to
"long" (an extra long pre-brew).
^Press ENTER to s ve this setting, or
turn the program selector to "0ff" to
c ncel if a mistake has been made.
When making coffee with the
prebrewing feature on, "PREBREWING"
will appear in the message window
after the coffee has been ground.
Progr mming
15

Pre-grinding fe ture
The pre-grinding feature allows a new
portion of beans to be ground after
each coffee is dispensed, so there is
always ground coffee ready. This saves
time if coffee is dispensed frequently.
To preserve aroma, the pre-grinding
feature should be turned off when only
preparing coffee occasionally.
^Turn the program selector counter-
clockwise to "Program mode".
^Press the ebutton to highlight
"PREGRINDING" with an asterisk.
^Press ENTER to select this option.
The sub-menu will appear in the
message window.
^Press the ebutton to turn the
pre-grinding feature on or off.
^Press ENTER to s ve this setting, or
turn the program selector to "0ff" to
c ncel if a mistake has been made.
Progr mming
16

Hot w ter fe ture
When the feature "Programmed hot
water" is turned on, the machine will
dispense a precise, pre-programmed
quantity of hot water when the hot water
button dis pressed. When the feature
is turned off, the machine will dispense
hot water until the hot water button d
is pressed again.
^Turn the program selector counter-
clockwise to "Program mode".
^Press the ebutton to highlight
"PROG. H. WATER" with an asterisk.
^Press ENTER to select this option.
The sub-menu will appear in the
message window.
^Press the ebutton to set the feature
on or off.
^Press ENTER to s ve this setting, or
turn the program selector to "0ff" to
c ncel if a mistake has been made.
Progr mming
17

Tot l coffee counter
The feature "Total coffee" will display the
number of cups of coffee (espresso,
coffee, long coffee) that have been
dispensed to date.
^Turn the program selector counter-
clockwise to "Program mode".
^Press the ebutton to highlight
"TOTAL COFFEE" with an asterisk.
^Press ENTER to select this option.
The number of coffees that have been
dispensed will be displayed in the
message window.
^Press ENTER to return to the main
menu.
Progr mming
18

Setting the st ndby timer
For energy efficiency the coffee system
can be set to power down after a
programmed time interval.
The time is measured from the last time
coffee / water was dispensed.
If the time is set at 0:00, the machine
will not switch to standby.
^Turn the program selector counter-
clockwise to "Program mode".
^Press the ebutton to highlight
"TIMER" with an asterisk.
^Press ENTER to select this option.
The sub-menu will appear in the
message window.
^Press the eor -button to select the
required length of time (ecounts
down, -counts up). The time can be
set in 15 minute periods.
^Press ENTER to s ve this setting, or
turn the program selector to "0ff" to
c ncel if a mistake has been made.
If the rinse feature is set to "On" and a
drink was already dispensed, the
system will be rinsed automatically
before going into standby.
Progr mming
19

The coffee system can be locked so
that it can not be used by children or
those not familiar with the operating
instructions.
Activ ting the system lock
^Turn the program selector counter-
clockwise to the "Lock" position.
The following will appear in the
message window:
^Press and hold the -button.
The following appears in the message
window:
The appliance is now locked and will
not operate. The system will remain
locked and the lighting will remain
turned off even if the program selector
is turned to other positions.
De ctiv ting the system lock
^Turn the program selector counter-
clockwise to the "Lock" position.
The following will appear in the
message window:
^Press and hold the -button.
The following appears in the message
window:
The machine is now unlocked and
ready for use.
System lock
20
Other manuals for cva 610
4
Table of contents
Other Miele Coffee Maker manuals

Miele
Miele CVA 4062 BRWS User manual

Miele
Miele CVA 2662 CVA 2662 User manual

Miele
Miele CM7300 User manual

Miele
Miele CVA 615 User guide

Miele
Miele CVA 7440 User manual

Miele
Miele CVA 4062 Manual

Miele
Miele CM 5310 Series User manual

Miele
Miele CM 7750 User manual

Miele
Miele cva 610 User manual

Miele
Miele DGC 6800 User manual

Miele
Miele DGC 6800 User manual

Miele
Miele CVA6405 User manual

Miele
Miele Built-in coffee machine User manual

Miele
Miele CVA 6805 User manual

Miele
Miele CM 5100 User manual

Miele
Miele CVA 6805 User manual

Miele
Miele CVA 4066 Parts list manual

Miele
Miele CVA 4066 User manual

Miele
Miele CM5310BRRT User manual

Miele
Miele CVA 7440 User manual