MIGEL GSI 230 User manual


1
GSI 230
GSI230

2
MAX
""

3
0

4
•
•
• •
• • •
Max
MAX

5
"0"
•••

6
MAX
"0"

7
Maximum

8
MAX
0

9


1
English
GSI 230
Dear customer!
Thanks for your worthful choce and confdence to Mgel
brand. We really hope that you enjoy operatng ths product
TECHNICAL DATA
Model Power Frequency Voltage
GSI230 1950-2300 W 220-240 V 50/60 Hz
Important Rules
1. Read this user’s manual carefully before using this laundry iron, and store
this manual for future reference.
2. Before plugging the iron’s power cord in a wall outlet, be sure the municipal
voltage matches the type label on the back of your iron.
3. Always plug out the iron’s power cord before lling water in its reservoir
and emptying its reservoir. Hold the plug, not the cord itself, while plugging
the power cord out.
4. Always empty the iron’s water reservoir after nishing with ironing. Be sure
to plug out its power cord before emptying its reservoir.
5. Keep the power cord away from hot objects and the iron’s base plate.
6. Always plug the power cord in a grounded wall outlet. If you need to use
an extension cord, it must contain a ground line and its cross section must
be minimum 1 mm2.
7. To avoid electric shock, do not immerse the iron in a liquid.
8. To avoid risks, always use the iron on a at and xed surface.
9. Lay the iron on vertical position after nishing with ironing and wait until it
cools, and do the same before taking a break from ironing. Be sure to lay the
iron on a xed and at surface.
10. Electric appliances are not a toy. Use and keep the iron away from
children. Do not leave it unattended near children while it is hot.
11. Never attempt to iron, wet or moist any of the clothes while wearing
them on you.
12. If the power cord is damaged, ensure your local service shop to replace it
in order to avoid hazard risks.
13. Never use the iron after it falls on the ground is damaged or leaks water.
Call your local service shop immediately.
14. If the iron is broken down in any way, do not use it and take it to your
local service shop
15. This iron must not be used by physically (sight or hearing) disabled
persons, mentally disabled persons, children or inexperienced persons
unless they are supervised by a responsible person.
16. If this iron is used by a child, supervise him/her at all times and be sure
him/her not to toy with it.
17. This iron meets the applicable international safety standards.
1. Do not ll the iron’s water reservoir excessively, otherwise it might overow.
To avoid overowing, hold the iron in vertical position and ll water in its
reservoir up to the MAX mark.
2. The base plate of the iron should be heated to a certain degree before
generating steam. When its temperature dial is set to steam and its steam
button is pressed, the anti-drip function will prevent it from dripping water
until its base plate is heated enough.
3. This iron was designed for use of tap water. Before using this iron for the
rst time, ll water in its reservoir, let it vaporize the water, and repeat this
process a second time. While vaporizing is in process, press the steam button
at frequent intervals. Thus vaporizing performance will improve, and dust
particles will be cleaned o the water troughs.
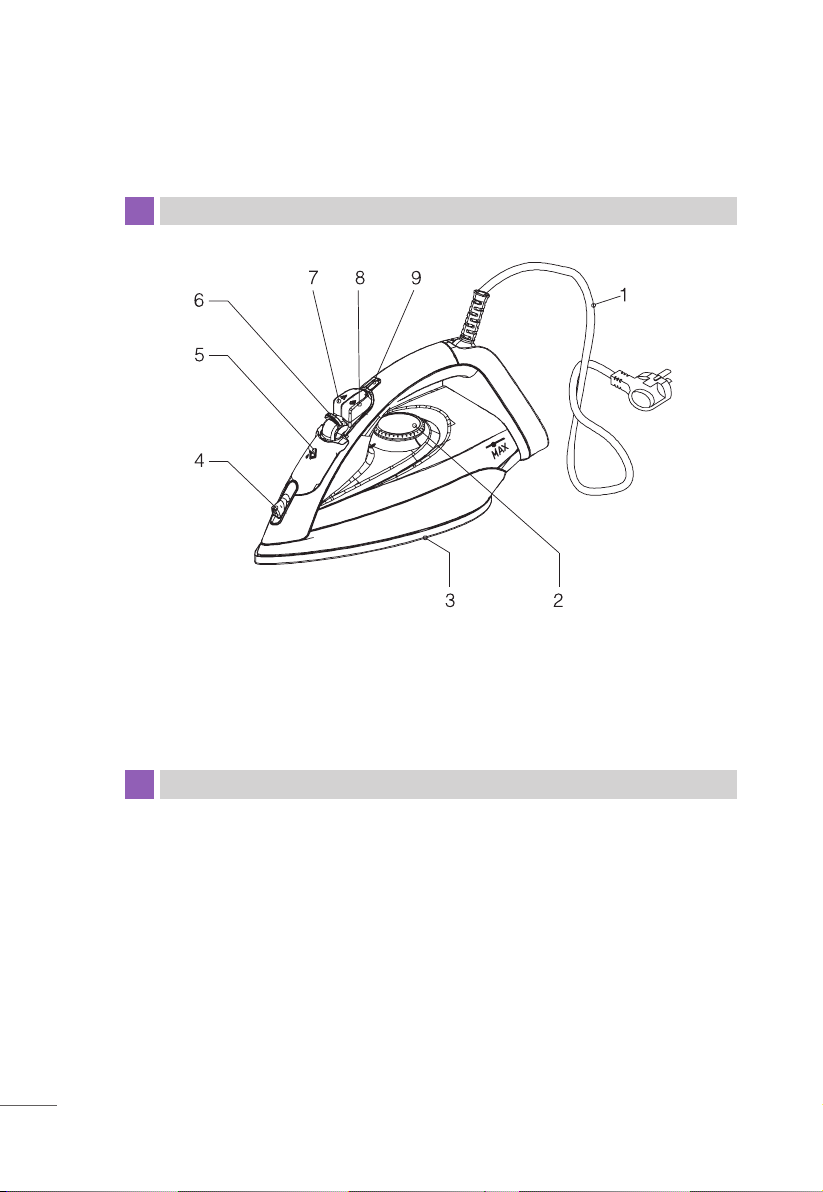
6. Steam setting dial
7. Water spray button
8. Shock steam button
9. Base plate temperature light
1. Power cable
2. Temperature setting dial
3. Base plate
4. Water spray
5. Water Inlet Cover
Technical Properties
Important notes on using the iron
2
Always plug out the power cord from the wall outlet before lling water in
the reservoir.
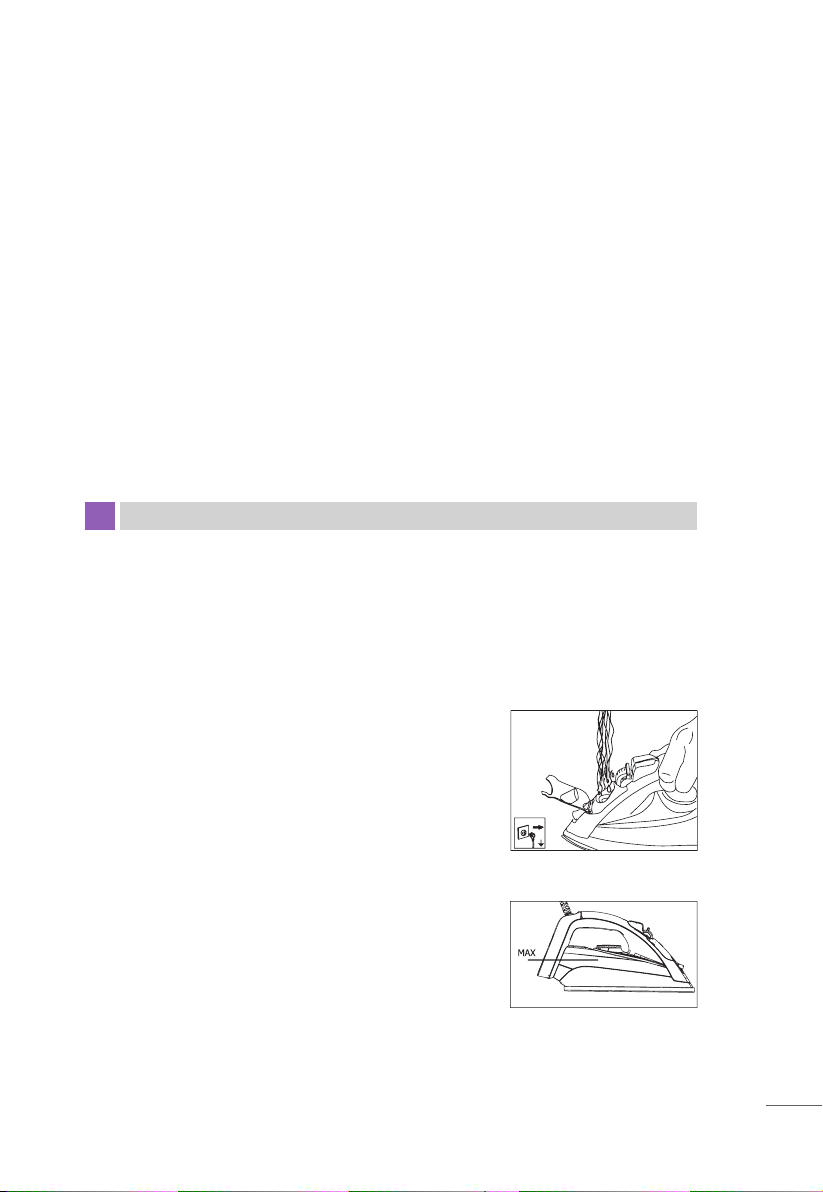
How to ll water in the reservoir
- Plug out the power cord from the wall outlet.
Turn the steam dial clockwise to“o”position.
- Open the reservoir’s lid, hold the iron in
horizontal position, slightly lower its front end
and ll water in its reservoir. Be sure the water
level not to exceed the MAX line marked on the
transparent water reservoir of the iron when the
iron is held in vertical position.
- Close the reservoir’s lid.
- You are recommended to ll water in the
reservoir even if you would not use steam for
ironing, thus you can use the spray function
when you want.
- Do not add any perfume, vinegar and starch,
decalcication agents, ironing supplements or
other chemical materials in the water reservoir.
- If your local tap water is too calcareous, you
are recommended to mix it with potable water
before lling the iron’s water reservoir.
4. If your local tap water is too calcareous, you are recommended to mix it
with potable water before lling the iron’s water reservoir.
5. When you use this iron for the rst time, a slight smell might occur. It will
normalize after using it a few times.
6. If the reservoir runs out of water during ironing, plug out the power cord
from the wall outlet and add water in the reservoir without waiting the iron
to cool.
7. If the spray function does not work, close the spray outlet with your nger
and press the spray button a few times to remove any clog.
8. Clothes requiring low temperature should be ironed rst, those requiring
high temperature should be ironed later. If you reduce the temperature
setting from a high degree to a low degree, you have to wait 3-4 minutes
until the iron cools down to the low degree.
9. The anti-drip function of this iron makes its base plate emit a “click”sound
when its temperature changes; it is normal.
10. Before using this iron for the rst time, remove the protective cover from
its base plate.
How to use the iron
3

4
How to set the temperature
- Plug the power cord in a grounded wall outlet,
set the temperature dial to a temperature proper
for the clothes you will iron, and lay the iron in
vertical position. To increase the temperature
level, turn the dial clockwise. If you would steam,
set the temperature dial to the red steam range
mark. are recommended to mix it with potable
water before lling the iron’s water reservoir.
- Check the labels of clothes to verify the proper ironing temperature setting.
- If you are not sure about the type of a particular clothe, make a test ironing
on an invisible part of the clothes to nd out the proper temperature setting.
- To avoid silk or other synthetic clothes to develop bright stains during
ironing, iron their reverse surfaces. Does not use the spray function as far as
possible, otherwise stains might develop.
Adjust the steam dial to set it to the range you
want.
You are recommended to follow the table given below while setting a
temperature level. The indicator will change to the color described below for
each temperature range.
Type of clothe
Synthetic
Silk
Wool
Cotton
Linen-denim
Temperature range
•
•
• •
• • •
Max
Steam
Do not use steam
Do not use steam
Steam is recommended
Use steam
Use steam
Steam ironing

5
For dry ironing, turn the steam dial clockwise to
“o”position.
You are recommended to have water in the
reservoir, so that you can use the spray button
when you want.
Some stubborn creases can be attened by
pressing the shock steam button 3 or 4 times
every 5 seconds to generate a strong steam
shock.
Shock steam might not be generated until the
iron reaches a proper heat. To generate shock
steam, the temperature dial must be set to •• or
higher.
Strong stream shock generated by pressing this button helps to iron
stubborn creases. However, if shock steam is applied for a long time, the
base plate might emit water together with steam.
If you would steam ironing, set the temperature dial to the red steam range.
When the thermostat’s light turns o and the base the base plate is ready to
generate steam.
Dry ironing
Shock steam

6
If there is enough water in the reservoir, press the
spray button to atten stubborn creases while
doing dry or steam ironing.
30-Second Delay
If you let the iron heats for the rst time in
horizontal position and do not move it for 30
seconds, the auto-o function will assume you
forgot it and turn it o.
If you press the shock steam button while
holding the iron in vertical position, it will emit
vertical steam. Thus steam can be applied on
certain clothes without removing them from
their hangers. This method can be used for
ironing the curtains without removing them.
Never direct the steam on clothes on people or
pets.
Water spray
Vertical steam
Auto-O
This iron contains an automatic shut-o mechanism in case it is left powered
and unattended.
8-Minute Delay
After you plug the power cord in a wall outlet and lay the iron in vertical
position, it will reach the temperature level you have set in 2-3 minutes. if
the iron is not moved for 8 minutes, the auto-o function will assume you
forgot it and turn it o.
2-Minute Delay
If you plug the power cord in a wall outlet, lay the iron in horizontal position
and do not move it for 2 minutes, the auto-o function will assume you
forgot it and turn it o.

7
This unit removes lime layers accumulated in the steam chamber of the iron.
Apply the self-clean procedure described below every 2 or 3 weeks. If your
local tap water is too hard (i.e. scales of lime falls from the base plate), you are
recommended to apply this procedure more frequently.
- Be sure to plug the power cord out of the wall
outlet.
- Fill the reservoir with water up to the MAX level
mark.
- Do not add vinegar, decalcifying agent, etc. in
the water reservoir.
- Turn the steam dial no steam setting of ‘0’.
- Plug the power cord in a grounded wall outlet
and turn the temperature dial to maximum level.
- Plug the power cord out of the wall outlet after
the thermostat warning light turns o.
Self Clean
In either of the three cases described above, the
soleplate auto-o light will blink to warn the
user.
If you move the iron in horizontal position, it will
resume operating and heating.
Anti-Calc System
The water tank of this iron contains an anti-calc system, so that steam outlet
will not be clogged. this system remains active at all times, and does not
need to be replaced.

- Pull the iron on a washbasin, pull the iron steam
setting dial to the self clean side (you will hear
click sound) and displace the dial, shake the iron
up and down. Thus the water in the reservoir falls
down to the steam chamber, and scales of lime
(if any) will fall out of the base plate’s holes.
- Replace steam setting dial after the water
reservoir empties. If there still are scales of lime,
repeat this procedure.
- After nishing the self-clean procedure, plug
the power cord in a wall outlet and let the iron
heats. Plug the power cord out of the wall outlet
after the iron reaches the temperature set and
move the iron slowly on an old piece of cloth.
Continue to move it until remaining water and
scales of lime are cleaned o. Let the iron cool
before storing it.
After nishing with ironing, plug the power cord
out of the wall outlet. Empty the water reservoir.
To empty the water reservoir, open its lid and tilt
the iron’s front end down. Let the iron cool. Wipe
it with a moist cloth while it is still warm.
After ironing
8

Soft metals and materials (buttons, zips, etc.) will not damage the base
plate under normal ironing conditions. Stains which might be left by such
materials on the base plate can be cleaned o with a piece of cloth soaked
with eau de toilette or detergent.
Maintenance and cleaning
Problem
- The power cord
is plugged in, but
the base plate
does not heat.
- The iron does
not generate
steam.
- Shock steam-
vertical steam
function does not
operate.
- Water drops fall
on the clothes.
- Sediments and
particles fall from
the base plate
during ironing.
Possible Reasons
- Connection is bad.
- Temperature dial
is set to minimum
range.
- No sucient water
in the reservoir.
- Steam dial is set
to 0.
- This function
might have been
used too frequently
in a short time.
- Lid of the water
reservoir is not fully
closed.
- Water in the
reservoir is too
calcareous.
Solution
- Check the plug and wall
outlet.
- Turn the temperature dial to
the steam mark.
- Fill water in the reservoir up to
the MAX line.
- Turn the steam dial to the
steam mark.
- The base plate might not be
hot enough. Anti-drip system
might be operating. Turn the
temperature dial to the steam
mark. Lay the iron in vertical
position and wait until its base
plate heats.
- Continue to horizontal ironing
and wait before using this
function again.
- The base plate might not
be hot enough.Turn the
temperature dial to the steam
mark. Lay the iron in vertical
position and wait until its base
plate heats.
- Close the lid properly.
- Use the self-clean function
once or more. Fill the reservoir
with soft water next time.
PROBLEMS AND SOLUTIONS
9
Table of contents
Languages:
Other MIGEL Iron manuals


