Mikropor Mia Air MIKROPOR-MIA-102 User manual

AIR PURIFIER
USER MANUAL
www.mia-air.com


Dear Customer,
Thank you for purchasing the Mia Air Air Purifier. The product you have
purchased has been designed to serve you without problems for a long time.
To use the high-quality Mia Air Air Purifier eectively and safely, that has
been manufactured to high standards, please read the user manual to its full
extent.
Please keep this manual in a safe place for further use.

CONTENTS
PURPOSE OF USE 3
SAFETY 3
DEVICE SPECIFICATIONS 4
TECHNICAL SPECIFICATIONS 4
DEVICE COMPONENTS 5
OPERATING INSTRUCTIONS 6
DISPLAY 7
REMOTE CONTROL 8
NEW DEVICE ADDING SCREEN 9
OPERATION RULES 11
DEVICE MAINTENANCE AND CONTROLS 12
REPLACING THE ACTIVE CARBON AND HEPA FILTER 13

3
PURPOSE OF USE
SAFETY
It is used to provide air that has been purified of dust, particles and disturbing smells. MIA AIR can be used in
all environments in which healthy air is required such as hospitals, workplaces, homes, schools etc.
Please make sure you read this manual before starting the device.
To decrease the risk of electrocution, injury and fire, take notice of the following warnings.
* Work on electrical components must only be conducted by authorized service technicians!
* Ensure that the power supply is disconnected prior to working on this device!
* It may cause danger if the device is used out of its purpose by non-qualified people! Pay attention
to user qualifications!
* So as not to damage the device, do not use the device without filters!
• Start the device in accordance with the voltage and frequency values on the device label. Starting the
device with a voltage and frequency other than the indicated values may damage the device and form the
risk of electrocution.
• Ensure that all electrical cables located outside the device are secure against sustaining damage. Do not
start the device if there is a problem with a cable or the grid connection.
• Do not start the device without installing all components.
• Turn the device off if you will not be using it for a longer time.
• Turn your device off when you are going to clean, maintain or change the filter on your device.
• Do not start your device in areas in which there is a danger of explosion.
• Ensure that the air intake and outlet are clear.
• Do not place external items in the device.
• Do not cover the device in course of operation.
• Do not start your device with wet or damp hands.

4
Power Supply 220-240 V, 50 Hz and 110-130 V, 60 Hz
Energy Consumption 25-105 W
Measurements (NET) 66 x 38 x 38 cm / Packing: 74 x 44 x 44 cm
Weight 16 / 18 kg
Air Volume 160-900 m/hr ve 94-530 cfm
Sound Level (Auto Mode) <60 dB (A)
Fan Motor Recurvate fan centrifuge, with heat control, Suitable for continuous use
Control Mode Auto, Turbo, Economical, Silent, Manuel
Air Intake Double sided on the unit
Air Outlet Mia Air Diuser
Casing Material Impact Resistant ABS
Air Sensors VOC, PM1 / PM2.5 / PM10, CO, Temperature, Humidity
Replace Filter Indicator LED light on the device and MIA AIR mobile application
Remote Control Can be remote controlled by mobile devices
Wi-Fi Connection 2,4 Ghz Wi-Fi band, with 802.11 b / g / n router
Active Carbon & HEPA Filter Specifi-
cations
Pre-Filter, Activated Carbon Filter,
HEPA H13 (standard) ≥ %99,99 @ ≥ 0,3 m
HEPA H14 (optional) ≥ %99,999 @ ≥ 0,3 m
Product Colors Red, White, Anthracite
DEVICE SPECIFICATIONS
TECHNICAL SPECIFICATIONS
Mia Air reduces the amount of dust and particles in its operating environment with the air filtration principle.
The fan takes air in through the front filter and diverts it into the carbon filter and from there to the HEPA filter.
The filtered air passing through the diuser provides and ensures clean and purified, and thus healthy air
conditions.

5
DEVICE COMPONENTS
Fan
Air Diuser
UV
Front Filter
Control Panel
Air Intake Panel
Air Intake Sensors
· Touch screen
· Power Supply Plug
· Power Supply Socket, Fuse
Hepa and Active
Carbon Filter

6
OPERATING INSTRUCTIONS
Supply electricity to the device only after attaching the power supply socket. Open the fuse located under
the device. Press the On/O button. The device will start to work. The fan control is carried out in five dierent
modes.
Silent Function: The fan control is done automatically in order to operate at the lowest sound level according
to the air quality index measured by the device. The device can be switched to silent function by pressing the
“mode” button.
Turbo Function: Fan control is done automatically in a way to respond to the pollution in the fastest way
without seeking sound comfort according to the air quality index measured by the device. The device can be
turned to the turbo function by pressing the “mode” button.
Economic Function: Fan control is automatically performed by the device according to the air quality index
measured by the device, low noise level and best energy eiciency. The device can be brought to economic
function by pressing the “mode” button.
Auto Function: Fan control is done automatically according to the air quality index measured by the device,
so that both energy saving, sound comfort and cleaning performance will be optimum. The device can be
turned into auto function by pressing the “mode” button.
Manual Function: Fan control is performed by the user. There are six dierent speeds where air volume can
change manually. The device can be changed to manual function by pressing the “mode” button. Press the
up arrow button on the right to increase the speed and press the down arrow button on the left to decrease
the speed.
Turbo Function
Economic Function
Auto Function
Manual Function
ON/OFF Butonu
Silent Function
7
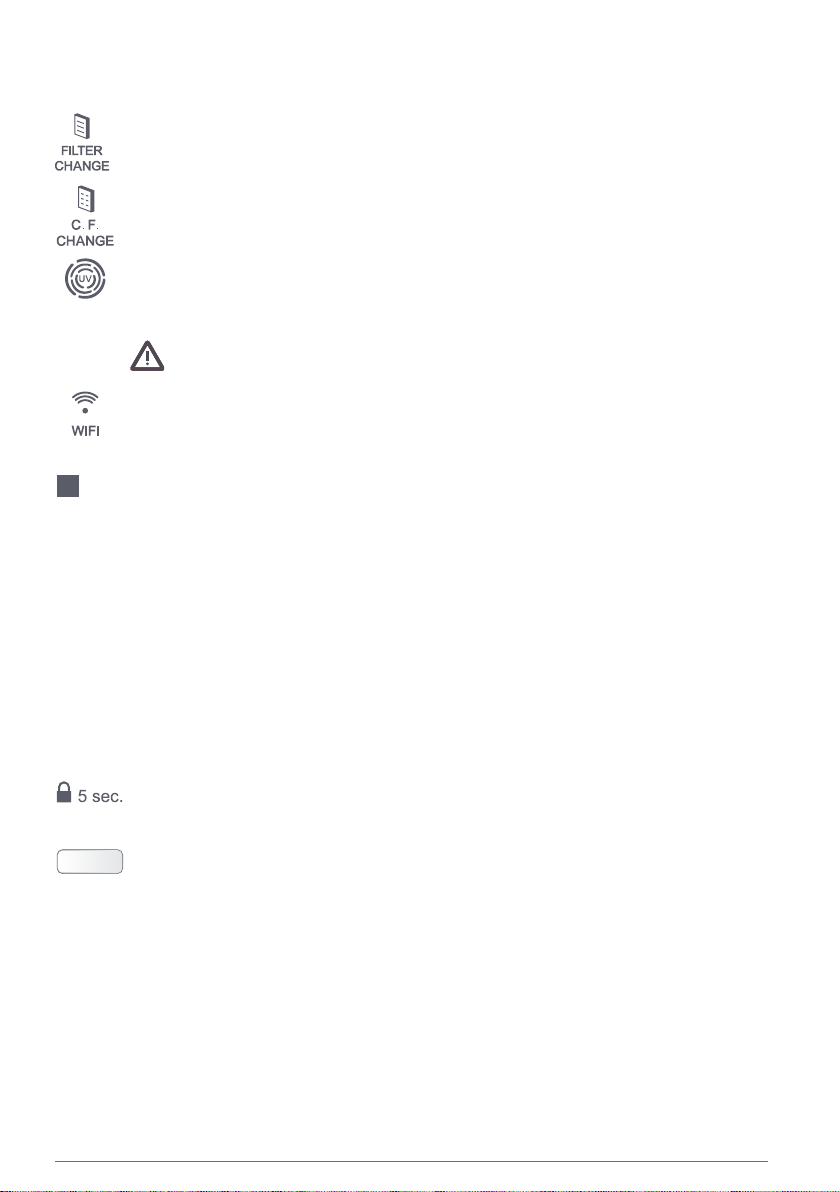
DISPLAY
The display value can be changed with the up arrow button on the right in other positions except for the
manual function. There are 3 dierent display positions.
AQI : Indicates the air pollution in the environment, air quality index.
VOC : Shows the VOC value in the environment in ppbx10.
PM2.5 : Shows the PM2.5 value in the environment as µg/m.
The device indicator shows at which stage during the position change while in manual function. When the
position change is over, the position value (pm2.5 or VOC) continues to be shown.
Key lock is activated by holding down the down arrow key for 5 seconds and all keys are locked.
In order to unlock the key, it must be held down for 5 seconds without releasing the down arrow key.
Air Quality Indicator: It shows the air quality in the environment.
Filter Change Indicator: The indicator light turns on when it is time for the filter to be changed.
After the filter replacement, reset is provided from Mia Air mobile application.
Carbon Filter Change Indicator: The indicator light turns on when it is time for the filter to be
changed. After the filter replacement, reset is provided from Mia Air mobile application. (Optional)
UV Light: It keeps the minimum level by working in specified intervals by killing microorganisms
that can cause disease in the air. The indicator light turns on when the UV light is operating.
(Optional)
UV rays are dangerous for eyes and skin.
Wi-Fi display: White light turns on when the device is connected to the internet. If the device is
not connected to the internet, the red light is on.

8
REMOTE CONTROL
The Mia Air mobile application allows you to control your air purifier from anywhere around the world.
Depending on the properties of your smart phone and service parameters some functions may not be
supported. The Mia Air mobile application is suitable for the following devices:
• ANDROID (ICS 4.12 Jellybean or higher versions)
• iOS (6.0 or higher versions - iPhone 4S or later)
Before connecting the Mia Air mobile application:
A Wi-Fi router must be installed in range of the device for the Mia Air mobile application to be used.
Wi-Fi router properties:
2,4 GHz Wi-Fi (Network security; on, WEP, WPA and WPA2)
Compatible with 802.11 b / g / n router on the network band.
Ensure that you have an available Wi-Fi password.
During installation, the air purifier, the wireless router and the mobile device must be 10 meters close to each
other. A weak connection between the air purifier, the wireless router and the mobile device may prevent
installation. Before connection, the Smart Network Connection must be temporarily deactivated. It may be
activated after connection is completed.
Main Screen: It is the screen that all data transmitted over the Internet is viewed and the device is remotely
controlled.
List of Devices
Area that devices added to the application
are listed, and device selection is made.
The application allows access to multiple
devices.
Add New Device
The screen used to add new devices.
Mode Buttons
Control buttons which could be used to
switch between modes.
Settings
Screen which device’s options are set.
Power Button
Button used to switch the device on and o.
Fan Status Indicator
When the filter needs to be replaced, the
filter status bar changes into an order
button.
Fan Level Indicator
Screen which shows the fan level according to
the mode that device is operating on.
Sensor Indicators
Area showing sensor data and filter

9
NEW DEVICE ADDING SCREEN
1. Screen 2. Screen
New device adding process needs to be for one time
to be able to connect your device to the Internet.
When your device is switched on, an access point
called mikropor_air_XXXXXXX broadcasts for three
minutes. Once you have connected to this access
point with your mobile device, it will automatically
switch to the settings screen.
The screen that the device is set in installation mode.
When you connect to your device’s Wi-Fi network,
this screen enables you to connect your device to
your mobile application. Device information setting
is managed on this screen.
Device Name
It comes up automatically when the device is connected, and it can be updated.
Back Button
When clicked, it opens the device page.
SID and Password
The wireless network required for your device to send data over the Internet.
Choose Wi-Fi – Wi-Fi Password
Mia automatically scans active Internet connections and puts the strongest
connection at the top of the list. The password for the wi-fi network that Mia will
be connected must be entered here.
Device Serial
The area in which the serial number is entered by the user. It must be in
Pxxxxxxxxxxx format and the same character length. The serial number sticker is
placed on the device.
Privacy Policy Checkbox
It is the permission box needs to be checked so that the device can send data
over the Internet.
Next-Taste
The button that enables you to move on to the next screen after completion of
the settings.

10
3. Screen Settings Screen
The screen that enables you to complete the settings
and reset the device with automatically adjusted
new settings.
The screen to adjust the settings of the device
selected in the main screen.
Turn On Mia Air
Enables you to restart the device the settings of which have been completed and
return to the main menu.
Notification Button (Click Here)
Allows access to the mail screen through which you can send a notification
to the manufacturer; the application may show a dierence depending on the
model of the mobile device used.
Filter Order Screen (Order New Filters)
The screen is activated when the filter needs to be replaced and turns into an
order button that guides you when you click on it.
Order Button (Order New Filter)
Directs you to the mail screen through which you can order filters; the application
may show a dierence depending on the model of the mobile device which has
been used.
Reset Filter Life
Resets the filter counter after the replacement of filter in the device.

11
OPERATION RULES
• Ensure that the power plug is correctly inserted into the socket. Use
appropriate energy supply values. Wrong energy supplies may cause a
fire or electrocution.
• Ensure that the power cord is not damaged, do not excessively bend,
pull, or use while twisted.
• In addition, do not place heavy objects on the power cord, and do not let
it get stuck. If the power cord sustains damage this may lead to a fire or to
electrocution. Do not use a unit if its power cord or power plug has been
damaged or if not correctly plugged in to an electrical socket.
• You do not need to plug or unplug to turn the unit on and off; you can use
the main power button at the bottom of the device.
•Incorrect usage may lead to electrocution or a fire due to overheating.
• Place your device at least 20 cm further from the wall. Never cover the
top of the device, the air intake and outlet areas. Your device must be at a
distance of 60 cm from the objects above it.
• Do not open the lids of the device while it is in use; if opened, the device
will automatically shut down.
• Follow the periodical maintenance instructions of your device.
• The air intake and outlet must never be obstructed.
• When it is time for filter replacement, do not switch on your device; you
may switch on your device only after the filter has been replaced.
• Maintenance work that requires the opening of the outer casing must
only be carried out by authorized service personnel.
• Repairs for any malfunction that may occur must only be carried out by
the authorized service personnel.
• This device may be used by children over 8 years old, people lacking
physical, sensorial, or mental skills and people lacking experience and
knowledge ONLY IF they are supervised or if they are given instructions
and if they understand the inherent dangers. Children should not play with
the device. Cleaning and user maintenance should not be carried out by
unsupervised children.

12
Unplug the device before replacing the filters.
• Checking and replacing the front filters should be done monthly by the user. The duration of the filters
depends on the frequency of use and the level of dirtiness in the area where the product is being used.
Checking and Replacing the Front Filters
Unplug the device before cleaning.
• The general cleaning of the system is carried out daily by the user.
• The cleaning of the outer casing should be done daily with a
slightly damp soft cloth that does not leave moisture.
• It should be paid attention that no moisture enters
the inside surface.
• Abrasive cleaning materials should not be used.
DEVICE MAINTENANCE AND CONTROLS
General Cleaning of the System
Periodic Fuse Control and Switch Replacement
• If the power cord is damaged, the cable should only be changed by
the manufacturer, a service agency of the manufacturer or by a qualified
personnel to prevent any danger.
Please conduct the Fuse Control and Replacement when the fuse switch is turned on but not running
and your device is connected to the power outlet.
Please make sure that your device is turned off before conducting the Fuse Control and Replacement.
A- Please disconnect the power cord from the power outlet.
B- Open the fuse box and remove the broken fuse carefully.
C- Please install the spare fuse in the fuse box.
Please make sure that the Ampere rating of the Fuse does not exceed 4 Amps to prevent fire risk.
D- Close the fuse box and insert the power cord plug into the power outlet.
A B C D

• Open the air intake lids and observe the filter condition. If there is a thick layer of dust on the front filters that
means the filters are full. (1a)
• Wash and dry the front filter. (2a)
• Clean the inner area where the front filters fit in with a dry cloth and replace the cleaned filter. (3a)
• Ensure that the filter is undamaged and dry before replacing it.
REPLACING THE ACTIVE CARBON AND HEPA FILTER
Unplug your device before replacing the filter.
• The filter must be replaced when the replace filter indicator light is illuminated. The duration of the filters
depends on the frequency of use and the level of dirtiness in the area where the product is being used.
• Open the air intake caps. If the front filter is dirty, clean and replace it.
• Remove the filled HEPA filter and replace with a new filter. Make sure the filter is undamaged and dry before
replacing it.
• When changing the filters use personal protective equipment such as gloves and masks. Used filters may
contain hazardous materials and particles. If used inappropriately they may disperse into the environment
and cause illness and health risks.
• Do not forget that filters must not be disposed of with household waste. Unusable filters must always be
disposed of in a correct and safe manner!
1a 2a 3a
www.mia-air.com •mia@mia-air.com
www.mikropor.com

14
1. OSB. Büyük Selçuklu Caddesi No: 4 06935, Sincan – ANKARA / TURKEY
Tel +90 312- 267 07 00 Faks +90 312- 267 05 52

www.mia-air.com
MANUAL DE USUARIO
DE PURIFICADOR
DEL AIRE

Estimado Cliente,
Gracias por comprar Mia Air Compact Purificador de Aire El producto que
ha comprado fue diseñado a fin de servir durante mucho tiempo, sin ningún
problema.
Con el fin de utilizar de manera segura y eficiente Mia Air Compact
Purificador de Aire de alta calidad, el cual fue producido para satisfacer los
requisitos más exigentes, asegúrese de leer el manual de usuario.
Mantenga este manual en un lugar seguro para futuras referencias.

CONTENIDO
PROPÓSITO DE USO 19
SEGURIDAD 19
CARACTERÍSTICAS DEL DISPOSITIVO 20
ESPECIFICACIONES TECNICAS 20
PARTES DEL DISPOSITIVO 21
PUESTA EN MARCHA DEL DISPOSITIVO 22
INDICADOR 23
CONTROL REMOTO 24
PANTALLA AGREGADA AL DISPOSITIVO NUEVO 25
NORMAS A SEGUIR DURANTE EL USO 27
MANTENIMIENTO Y CONTROLES DEL DISPOSITIVO 28
REEMPLAZO DEL CARBON ACTIVADO Y FILTRO HEPA 29
Table of contents
Languages:
Other Mikropor Air Cleaner manuals


