MilDef RW14 User manual

Mobile Workstation
RW14
User’s Guide
○
BC

I
Notice
The company reserves the right to revise this publication or to change its
contents without any notice. Information contained herein is for reference only
and does not constitute a commitment on the part of the manufacturer or any
subsequent vendor. They assume no responsibility or liability for any errors or
inaccuracies that may appear in this publication nor are they in anyway
responsible for any loss or damage resulting from the use (or misuse) of this
publication.
Any of the software described in this manual is sold or licensed "as is". Should
the programs prove defective following purchase, the buyer (and not the
manufacturer, its distributor, or its dealer) assumes the entire cost of all
necessary servicing, repair and any incidental or consequential damages
resulting from any software defects.
Brand and product names mentioned in this publication may or may not be
copyrights and/or registered trademarks of their respective companies. They
are mentioned for identification purposes only and are not intended as an
endorsement of that product or its manufacturer.
Copyright© 2020, MilDef Crete Inc. All rights reserved.
Trademarks
All other brand and product names are trademarks or registered trademarks of
their respective companies.

II
Radiation Exposure Statement
This equipment complies with FCC radiation exposure limits set forth for an
uncontrolled environment. This equipment should be installed and operated
with minimum distance 20cm between the radiator & your body.
RF exposure warming
This equipment must be installed and operated in accordance with provided
instructions and antenna(s) used for this transmitter must be installed to
provide a separation distance of at least 20 cm from persons and must not be
co-located or operating in conjunction with any other antenna or transmitter.
End-users and installers must be provided with antenna installation
instructions and transmitter operating conditions for satisfying RF exposure
compliance.
Regulatory Information/ Disclaimers
Installation and use of this workstation must be in strict accordance with the
instructions included in the user documentation provided with the product. Any
changes or modifications (including the antennas) made to this device that are
not expressly approved by the manufacturer may void the user’s authority to
operate the equipment.
The manufacturer is not responsible for any radio or television interference
caused by unauthorized modification of this device, or the substitution of the
connecting cables and equipment other than manufacturer specified. It is the
responsibility of the user to correct any interference caused by such
unauthorized modification, substitution or attachment. Manufacturer and its
authorized resellers or distributors will assume no liability for any damage or
violation of government regulations arising from failing to comply with these
guidelines.

III
Federal Communications Commission regulatory compliance
This device complies with part 15 of the FCC Rules. Operation is subject to the
following two conditions: (1) This device may not cause harmful interference,
and (2) this device must accept any interference received, including
interference that may cause undesired operation.
The device has been tested in accordance to FCC regulation Part 15 Subpart
B, Subpart C, Subpart E and found the test results indeed meet the limitation
of the relevant test standard(s) listed below:
FCC PART 15B § 15.10915.107 CLASS B
FCC SUBPART C § 15.247 (2018-10)
FCC SUBPART E § 15.407 (2018-10)
Note:
This equipment has been tested and found to comply with the limits for a class
B digital device, pursuant to part 15 of the FCC Rules. These limits are
designed to provide reasonable protection against harmful interference in a
residential installation. This equipment generates uses and can radiate radio
frequency energy and if not installed and used in accordance with the
instructions, may cause harmful interference to radio communications.
However, there is no guarantee that interference will not occur in a particular
installation. If this equipment does cause harmful interference to radio or
television reception, which can be determined by turning the equipment off and
on, the user is encouraged to try to correct the interference by one or more of
the following measures:
Reorient or relocate the receiving antenna.
Increase the separation between the equipment and receiver.
Connect the equipment into an outlet on a circuit different from that to
which the receiver is connected.
Consult the dealer or an experienced radio/TV technician for help.
Important:
Changes or modifications to this product not authorized by MilDef could void
the electromagnetic compatibility (EMC) and wireless compliance and negate
your authority to operate the product.
In order to maintain compliance with FCC regulations, compliant peripheral
devices and shielded cables must be used with this equipment.

IV
CE Declaration of Conformity
The device is hereby confirmed to comply with the requirements set out in the
Council Directive on the Approximation of the Laws of the Member States
relating to Electromagnetic Compatibility Directive (2014/30/EC) and Complies
with the essential requirements of Article 3 of the R&TTE 2014/53/EC
Directive, if used for its intended use and that the following standards have
been applied:
1. Safety
Applied Standard(s):
IEC 62368-1: 2014/COR1:2015
EN 62368-1: 2014/A11:2017
2. Health
Applied Standard(s):
EN 62311 (2008)
3. Radio Frequency Spectrum Usage
Applied Standard(s):
EN 303 413 V1.1.1 : 2017-06
EN 300 328 V2.1.1 : 2016-11
EN 301 893 V2.1.1 : 2017-05
4. Electromagnetic Compatibility Directive (2004/108/EC)
Applied Standard(s):
EN 55032 (2015A1: 2019)
EN 55024 (2010A1: 2015)
EN 301 489-1:V2.2.3 (2019-11)
EN 301 489-17:V3.1.1 (2017-02)
EN 301 489-19: V2.1.1 (2019-04)
EN 55032-2 (2013)

V
Power Conservation
This workstation consumes less power compared to conventional consumer
workstations. The power consumption may be further reduced by properly
configuring the Power Management Setup.
It is recommended that the power saving features be enabled even when not
running on battery power. Power Management features can conserve power
without degrading system performance.
Power Safety
There are specific power requirements for your workstation:
Only use an approved AC adapter designed for this workstation.
There is a 3-prong grounded plug for the AC adapter. The 3rd prong is an
important mechanism for ensuring product safety. Please do not neglect
the importance of this mechanism. If you are unable to access a
compatible outlet, please hire a qualified electrician to install a compatible
outlet for you.
When unplugging the AC power cord, please make sure to disconnect the
cord by pulling from the plug head instead of pulling from the wire to
prevent wire damage.
Make sure the power outlet and any other extension cord(s) you use can
support the total current load of all the connected devices.
Before cleaning the workstation, please make sure it is disconnected from
any external power source.
Warning
Before any upgrade procedures, make sure the power is turned off, and
all the cables are disconnected. Also, it is advisable to remove your
battery to prevent your workstation from accidentally turning on.

VI
Battery Precautions
Only use batteries designed for this workstation. Using incompatible
battery types may cause explosion, leakage or damage to the workstation.
Do not remove the battery from the workstation while the workstation is
powered on.
Do not continuously use a battery that has been dropped, or that appears
damaged (e.g. bent or twisted) in any way. Even if the workstation is able
to continuously work with a damaged battery, the circuit damage may
occur and possibly cause fire.
Always use the charger designed for this workstation to recharge the
battery. Incorrect recharging may cause the battery to explode.
Do not try to repair a battery by yourself. For battery service or
replacement, please contact with your service representatives.
Please dispose damaged battery promptly and carefully. Explosion or
leakage may occur, if the battery is improperly handled or discarded.
Notice:
For safety, charging will stop if the internal temperature of the battery is out of
range (<0°C; >50°C), while discharging if the internal temperature of the
battery is detected over 65°C. Please note that charging could have stopped
before the ambient temperature reaching these boundaries because the
internal temperature of the battery does not equal to the ambient temperature.
Battery Disposal & Caution:
The product that you have purchased contains a rechargeable battery.
The battery is recyclable. At the end of its service life, under various
state and local laws, it may be illegal to dispose of this battery into the
municipal waste stream. Check with your local solid waste officials for
details in your area for recycling options or proper disposal. Danger of
explosion may possibly occur, if the battery is incorrectly replaced.
Replace only with the same or the equivalent battery recommended by
the manufacturer. Discard the used battery according to the
manufacturer’s instructions.

VII
Environmental Information, Material Safety & Recycling
All materials used in the manufacturing of this equipment are recyclable or
environmentally friendly. Please recycle the packing materials in accordance
with local regulations at the end of the product's service life.
Notice:
The equipment may contain insignificant amount of hazardous
substances for health and environment below control level.
To avoid spreading such substances into the eco system and to minimize
the pressure on the natural environment, you are encouraged to reuse or
recycle most of the materials in a safe way after an end of the product life.
For more information on collection, reuse and recycle of materials, please
consult local or regional waste administrations for more information. You
can also contact your dealer for more information on the environmental
details of the equipment.
The symbol of the crossed out wheeled bin indicates that the product
(electrical and electronic equipment) should not be placed in municipal
waste. Please check local regulations for disposal of electronic products.

TABLE OF CONTENTS
TABLE OF CONTENTS................................................................8
CHAPTER ONE - GETTING STARTED......................................10
UNPACKING ...............................................................................................10
QUICK OPERATION....................................................................................10
APPEARANCE OVERVIEW ............................................................................12
CHAPTER TWO - OPERATING INFORMATION .......................18
WORKPLACE..............................................................................................18
RUGGEDNESS............................................................................................18
WORK WITH POWER BUTTON ......................................................................19
OPERATING SYSTEM ..................................................................................20
BOOT UP AND POST..................................................................................21
SHUT DOWN...............................................................................................22
SLEEP/HIBERNATE ....................................................................................22
KEYBOARD ................................................................................................23
LED INDICATORS .......................................................................................24
MANAGING SOLID STATE DRIVE (SSD)........................................................24
RTC.........................................................................................................25
SYSTEM MANAGER.....................................................................................26
SETTING WAKE ON LAN.............................................................................29
SMART CARD READER (OPTIONAL)..............................................................30
CHAPTER THREE - MANAGING POWER.................................31
AC ADAPTER.............................................................................................31
BATTERY...................................................................................................32
BATTERY RECALIBRATION...........................................................................34
POWER CONSERVATION .............................................................................35
SUPPORTING ACPI ....................................................................................35
CHAPTER FOUR - BIOS SETUP...............................................36
MAIN MENU ...............................................................................................36
ADVANCED MENU.......................................................................................37
CPU Configuration Sub-Menu......................................................................39
PCH-FW Configuration Sub-Menu ...............................................................40
Trusted Computing Sub-Menu.....................................................................40
RF Device Control Sub-Menu.......................................................................41
EC Thermal Control Sub-Menu ....................................................................41
AC In Boot Control Sub-Menu......................................................................42
USB Power Control Sub-Menu.....................................................................42
Battery Recalibration Sub-Menu..................................................................43
IT8786 Super IO Configuration Sub-Menu...................................................44
Intel ® BIOS Guard Technology Sub-Menu...................................................45
Network Stack Configuration Sub-Menu .....................................................45
CSM Configuration Sub-Menu .....................................................................46

Intel ® I210 Gigabit Network Connection Sub-Menu...................................46
Intel ® Ethernet Connection (7) I219-LM Sub-Menu ...................................47
CHIPSET MENU..........................................................................................48
PCH-IO Configuration Sub-Menu .................................................................48
SECURITY MENU........................................................................................49
HDD Security Configuration Sub-Menu .......................................................50
Security Boot Sub-Menu..............................................................................52
BOOT MENU ..............................................................................................53
SAVE &EXIT MENU....................................................................................54
CHAPTER FIVE - DRIVERS AND APPLICATIONS...................55
CHAPTER SIX - SPECIFICATIONS...........................................56
PLATFORM.................................................................................................56
PROCESSOR..............................................................................................56
CHIPSET....................................................................................................56
MEMORY ...................................................................................................56
GRAPHICS .................................................................................................56
DISPLAY ....................................................................................................56
STORAGE ..................................................................................................57
KEYBOARD ................................................................................................57
TOUCHPAD ................................................................................................57
FAN ..........................................................................................................57
I/O PORTS.................................................................................................58
POWER .....................................................................................................59
CASE ........................................................................................................59
ENVIRONMENTAL........................................................................................60
CERTIFICATIONS ........................................................................................60
SYSTEM UNIT DIMENSIONS AND WEIGHT......................................................60
MATERIALS AND RECYCLING .......................................................................60
CHAPTER SEVEN - OPTIONAL DEVICES................................61
GRAPHICS .................................................................................................61
COMMUNICATION........................................................................................61
MEMORY ...................................................................................................61
TRUST PLATFORM MODULE (TPM2.0).........................................................62
COM 3/4 ADDITIONAL SERIAL PORTS..........................................................62
BVA &SURGE PROTECTOR MODULE ..........................................................62
SMART CARD READER................................................................................62
MULTI BATTERY CHARGER (MCRW)...........................................................63
CHAPTER EIGHT - MAINTENANCE AND SERVICE.................64
CLEANING..................................................................................................64
TROUBLESHOOTING....................................................................................64
RMA SERVICE...........................................................................................65

Chapter One - 10
Getting Started
Chapter One - Getting Started
Unpacking
The following components are along with your workstation. If there is any
missing or damaged, please notify the dealer immediately.
Workstation Unit
AC Adapter
AC Power Cord
Utility DVD
Quick Guide
Handle
Chapter One - 11
Getting Started
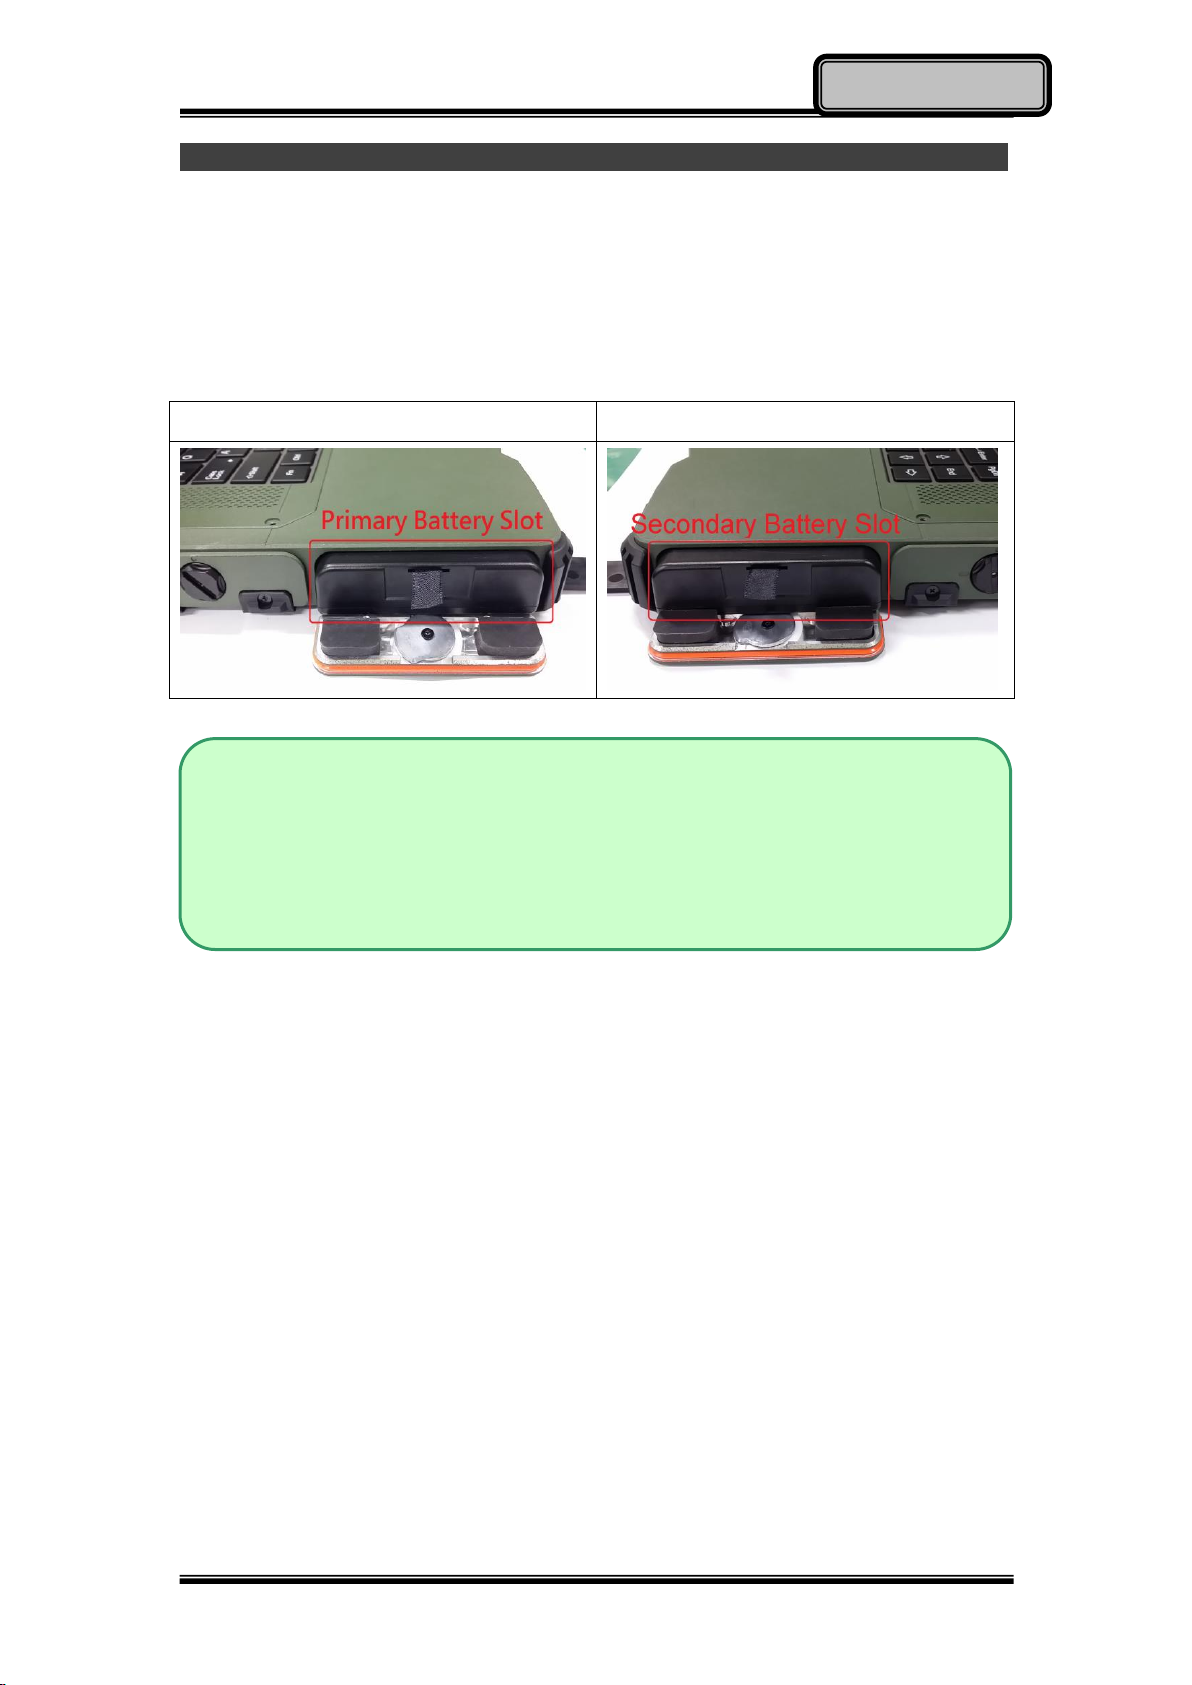
Quick Operation
Open the battery cover, insert the battery, and secure the battery cover by
tightening the screw.
Connect the AC adapter with the workstation and start charging the
battery for at least 10 minutes.
Turn ON the workstation by pressing the power switch.
Primary Battery (Left Side)
Secondary Battery (Right Side)
Note:
It is recommended to have the battery fully charged at the first time
for the best battery performance.
Drivers or applications installation may be necessary for further
operation.
Chapter One - 12
Getting Started
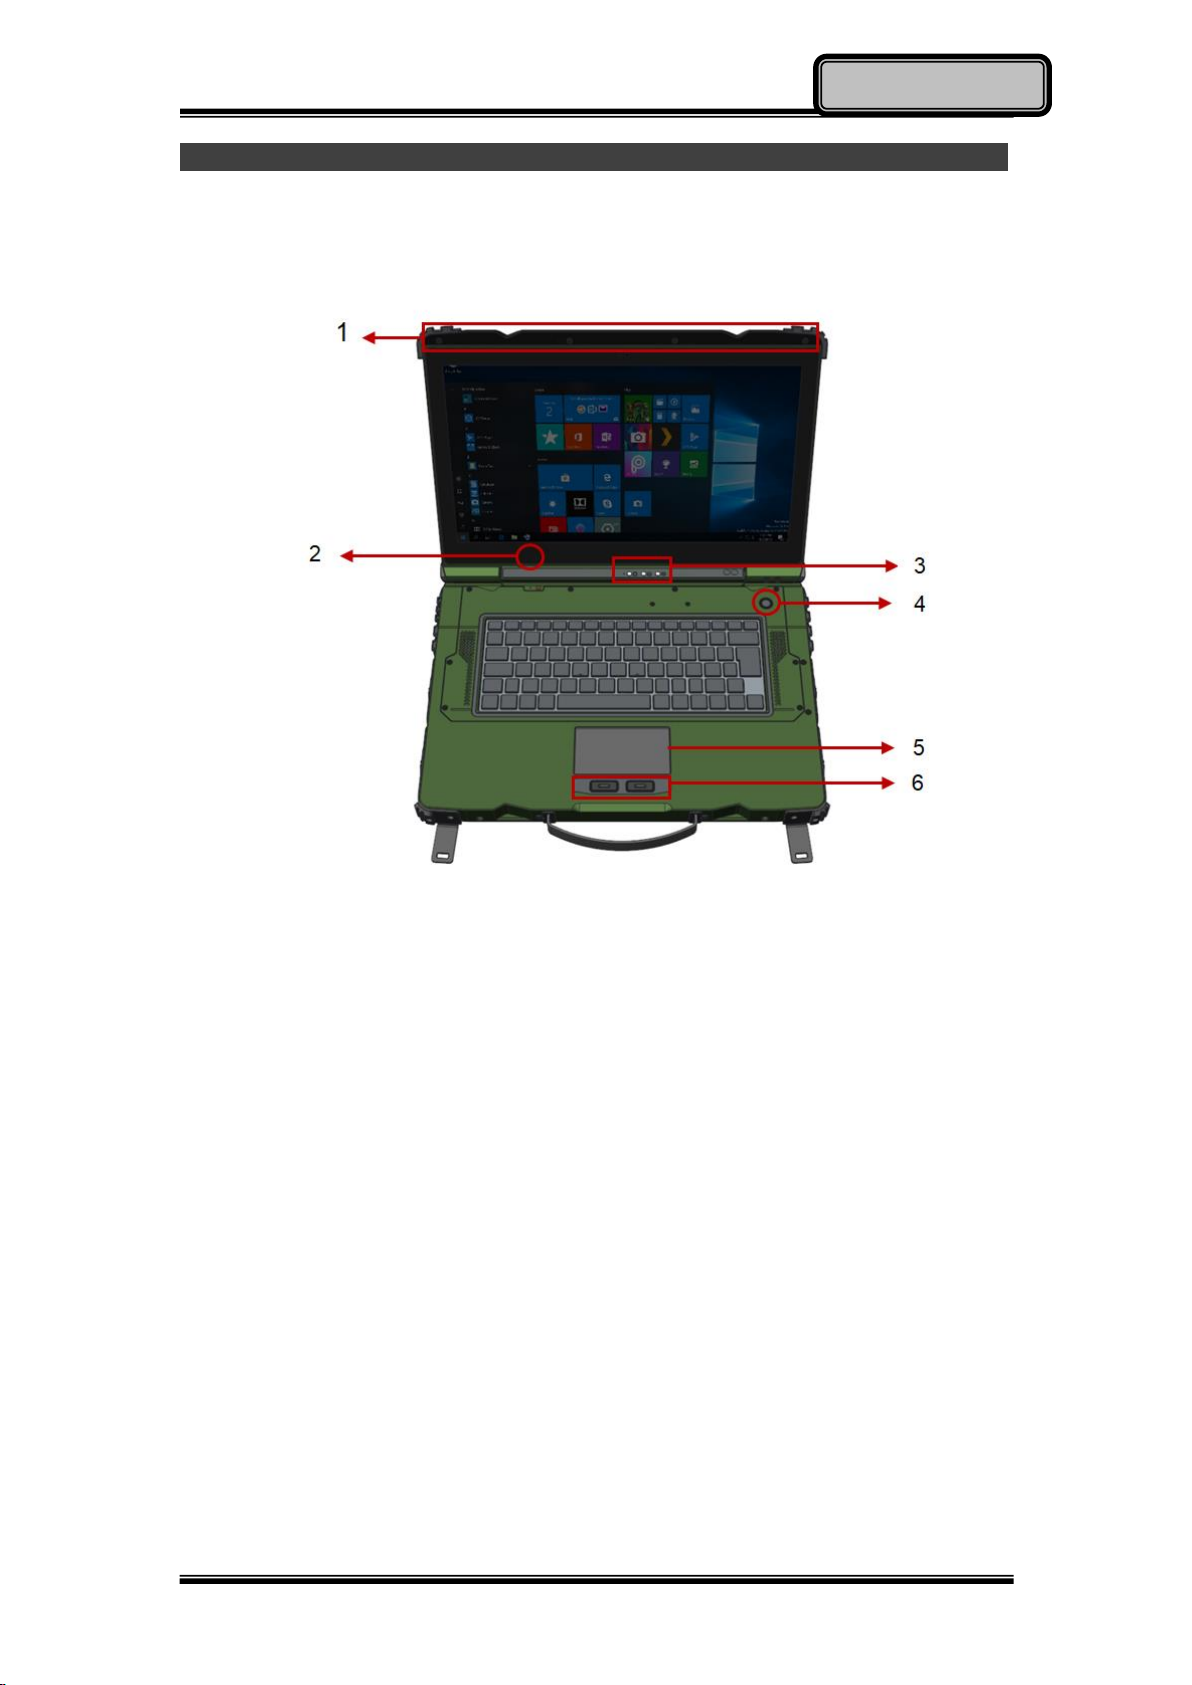
Appearance Overview
Display and Base
1. Embedded Antennas (Optional): GPS, WiFi/ Bluetooth x 2
2. Optional Embedded Digital Mic
3. LED Indicators
4. Power Button (Black)
5. Touchpad
6. Left-click and Right-click

Chapter One - 13
Getting Started
Right View
1. 2nd Battery
2. Optional 3rd SATAIII SSD
Optional 4th SATAIII SSD
3. USB3.1 Gen. 2 x 2
4. Optional GLAN x 1
5. GLAN x 1

Chapter One - 14
Getting Started
Left View
1. Audio/Line-in/Microphone x 1
2. USB 3.1 Gen. 2 x 1
3. USB 3.1 Gen. 2 x 1 (Fast Charging)
4. Standard 1st SATAIII SSD
Optional 2nd SATAIII SSD
5. Primary Battery

Chapter One - 15
Getting Started
Rear View
1. DC-In Conn. (Military 2 pin conn.)
2. Display port
3. VGA port
4. Serial DB9 x 2 (COM1~2)
5. Optional Serial DB9 x 2 (COM3~4)
6. Kensington Lock

Chapter One - 16
Getting Started
Front View
1. Optional Smart Card Reader

Chapter One - 17
Getting Started
Bottom View
1. 2nd FAN
2. 1st FAN
3. D/U port

Chapter Two - 18
Operating Information
Chapter Two - Operating Information
Workplace
A clean and moisture-free environment is preferred. Make room for air
circulation. Remember to avoid areas from:
Sudden or extreme changes in temperature.
Extreme heat.
Strong electromagnetic fields (near television set, motor rotation area,
etc.).
Dust or high humidity.
If it is necessary to work in a hostile environment, please regularly maintain
your workstation by cleaning dust, water, and etc. to keep it in an optimal
condition.
Ruggedness
This workstation is designed with rugged features such as vibration, shock,
dust, and rain/ water protection. However, it is still necessary to provide
appropriate protection while operating in harsh environments.
The workstation is also designed to withstand rainfall from top with mild wind
blowing only. Please keep the keyboard facing up, i.e. normal operating
direction, to maintain water resistance. NEVER immerse the unit in water, or
spray water at an upside-down system. Doing so may cause permanent
damage.
All connectors could be corroded if being exposed to water or moisture.
Corrosion is accelerated if the power is ON. Please take proper water-resistant
measures for cable connections. The DC jack and cables are sealed and may
be operated with water splashing while attached. All port covers should be in
place when no cable is attached.

Chapter Two - 19
Operating Information
Work with Power Button
The device is equipped with a heater kit to enable work under low temperature.
The heater will heat up the LCD to the temperature for booting up the system.
Also, the heater will constantly monitor LCD temperature. Once the
temperature becomes lower, the heater will heat up again to maintain the
temperature for operation.
Note:
The device will boot up once you press the power button.
When ambient temperature is under 5 °C (the default setting for your
workstation), the system may not boot up immediately. System will beep
with Heater LED light flashing orange to indicate that the heater is in
operation. After heating for 5 minutes, the system will be forced to boot up
automatically.
In emergency situations, you can skip the heating process by pressing
and holding the power button for 9~11 seconds then release. The speaker
will beep with a special sound to signify that the heating process has been
skipped (Please note that not all devices are guaranteed to work properly
in this case).
Press the power button again during the heating process will shut down
the computer.
The following is a list of functions associated with your workstation’s power
button:
1. Press and hold for 9 ~ 11 seconds:
The system will skip heating process and force boot up.
2. Press and hold for 5 ~ 8 seconds:
Enable/Disable the sound of Heater.
3. Press and hold for 4 seconds under OS:
Shut down the system.
4. Press the power button for functions including:
a. Power on the system.
b. Force Shut Down.
c. Sleep/Hibernate (Dependent on OS settings).
Table of contents
Other MilDef Desktop manuals


