Milky FJ 10 User manual
1
de BETRIEBSANLEITUNG
OPERATING INSTRUCTION
NOTICE D’UTILISATION
en
fr
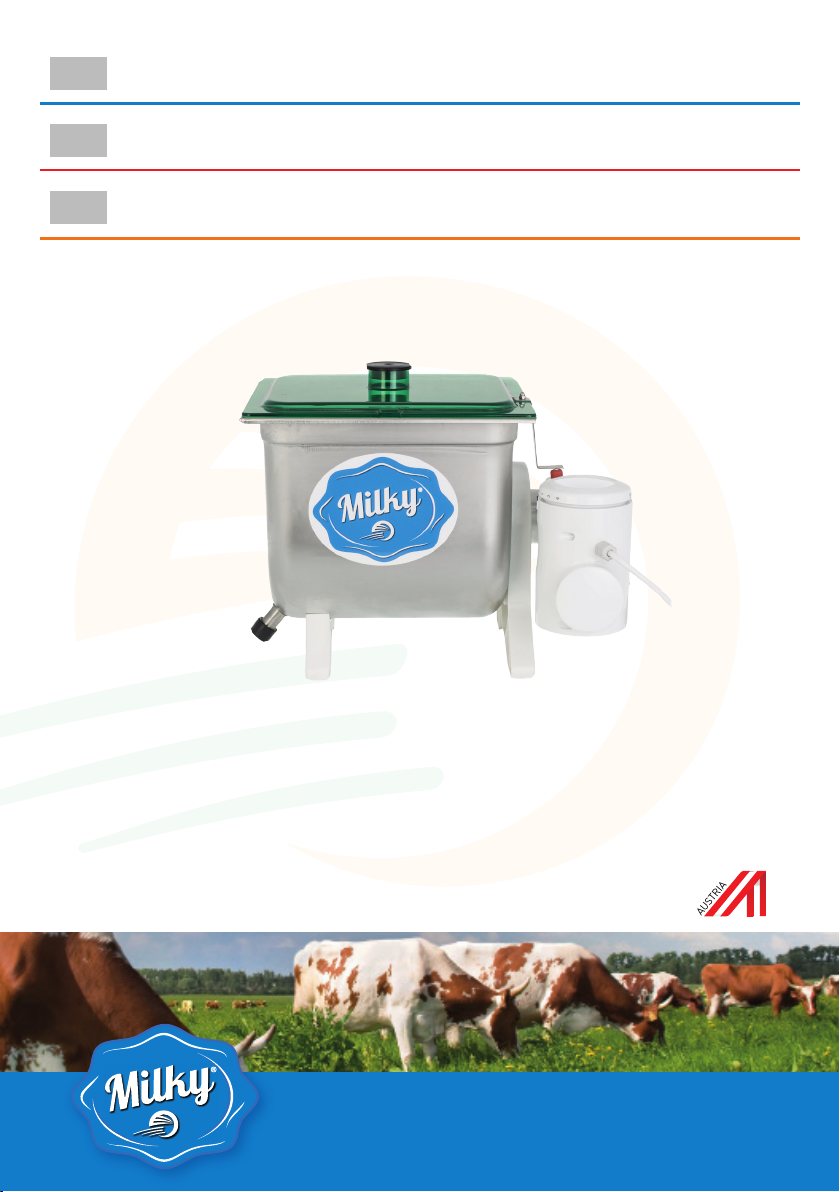
BUTTERMASCHINE FJ 10
BUTTER CHURN FJ 10
MACHINE À BEURRE FJ 10
230 V - Type 13208
115 V - Type 13208-115
JANSCHITZ GmbH |Eisenstraße 81 | A-9330 Althofen
T: +43 4262-2251-0 | F: +43 4262-2251-13

de INHALTSVERZEICHNIS
Sicherheitshinweise
Technische Daten
Stellung des Geräts
Rahm
Butterherstellung
Reinigung der Buttermaschine
Garantie
Garantieausschlüsse
Seite
3
4
4
4
4 - 5
5
5
5
Lieber Käufer!
Wir sind sicher, Sie werden mit dem Kauf unseres Produktes, dass Ihnen lange
dienen wird, zufrieden sein.
Danke für Ihr Vertrauen!
Stand: Dezember 2018

3
ALLGEMEINE SICHERHEITSEMPFEHLUNGEN
DIE BUTTERMASCHINE MILKY FJ 10 IST EIN KÜCHENGERÄT UND WIRD ZUR
HERSTELLUNG VON BUTTER AUS MAXIMAL 3,8 LITER RAHM GEBRAUCHT.
VOR GEBRAUCH DIE SICHERHEITSVORSCHRIFTEN AUFMERKSAM DURCHLESEN.
NACH DEM GEBRAUCH UND VOR DER REINIGUNG DES GERÄTS DEN STECKER
AUS DER STECKDOSE HERAUSZIEHEN.
DAS GERÄT VON KINDERN FERNHALTEN.
DAS GERÄT NUR MIT DEM DECKEN BETÄTIGEN.
DEN ANTRIEB/MOTOR VOR WASSER UND STARKER FEUCHTIGKEIT SCHÜTZEN.

4
Item Buttermaschine FJ 10
Betriebsspannung (V/Hz) 230/50, 120/60
Motorleistung (W) 550
Rührwerkgeschwindigkeit 30, 60, 90, 150
Aufnahmefähigkeit (l) 1 - 3,5
Nettogewicht (kg) 8,2
Schutzklasse (ip) 23
TECHNISCHE DATEN
STELLUNG DES GERÄTS
Den Karton öffnen, den Container herausnehmen und das Produkt auf eine saubere
Fläche stellen. Öffnen Sie den Decken und entnehmen sie die Antriebseinheit. Vor jedem
gebrauch den Container, die Abdichtung und den Deckelstöpsel mit reinem Wasser abwa-
schen.Die nasse Abdichtung und den Stöpsel wieder an den Container anbringen.
Die Schüssel mit Rahm (max. 3,8 Liter) füllen. Die Antriebseinheit auf den Containeransatz
aufsetzen. Bringen Sie den Deckel so an, dass der Deckelhebel auf den Sicherheitsschalter
drückt, der sich am Gehäuse der Antriebseinheit befindet. Den Stöpsel auf den Deckel
drücken. Stecken Sie den Netzstecker in die Steckdose. Das Gerät ist nun betriebsbereit.
RAHM
Zur Qualitätsrahmherstellung ist jedoch die Vorreifung des Rahmes erforderlich. Die opti-
male Rahmreifung Dauer drei Tage (keinesfalls weniger als 1 Tag) – im Sommer zwischen
5°C und 8°C und im Winter zwischen 8°C und 10°C. Die Butterqualität hängt sehr stark
von der Vorbereitung des Rahmes ab. Der Rahm kann vorpasteurisiert werden. Der Rahm
kann im Container des Butterfasses reifen, dabei soll die Deckelöffnung frei sein.
BUTTERHERSTELLUNG
Vor jedem Gebrauch des Butterfasses die Schüssel mit kaltem Wasser reinigen.
Die Schüssel befüllen:
• Normal: 1-3,5 Liter Rahm
• Maximal: 3,8 Liter Rahm
10% bis 40% des ganzen Containervolumens dürfen gefüllt werden.
Die Rahmtemperatur vor der Butterherstellung sollte zwischen 12°C und 15°C liegen.
Nachdem die Buttermaschine zusammengesetzt wurden und der Container mit Rahm ein-
gefüllt wurde (max. 3,8 Liter), sollte die Arbeit vorangehen. Gewöhnlicherweise werden am
Anfang höhere Drehungen des Rührwerks gewählt – Schalterlage 3 oder 4. Mit dieser Ge-
schwindigkeit wird der Rahm geschlagen. Bei der Butterherstellung soll die Geschwindig-
keit niederer sein - Schalterlage 2 oder 1. So wird die Butter geknetet und gewaschen. Die
Butterherstellung dauert, bei richtiger Vorbereitung des Rahmes, rund 20 Minuten. Dann
wird das Rühren beendet und die Buttermilch ausgegossen. Durch die Deckelöffnung wird
kaltes Wasser hinzugegeben und das Rührwerk wieder auf Lage 2 oder 1 eingeschaltet.

5
So wird die Butter gewaschen. Dieser Vorgang kann mehrmals wiederholt werden. Der
Deckel des Butterfasses darf dabei nicht abgenommen.
Wenn die Butter fertig ist, den Stecker aus der Steckdose herausziehen und den Deckel
abnehmen. Dazu entfernen Sie zuerst den schwarzen Gummi der mitten im Deckel sitzt.
Damit kommt Luft in den Behälter und Sie können über die so entstandene Öffnung leicht
den Deckel abheben. Keinesfalls sollten Sie versuchen den Deckel seitlich über die Sicher-
heitsfeder abzunehmen. Sie beschädigen damit sowohl die Feder, als auch den Deckel.
Dann die Antriebseinheit in der Kehrrichtung abnehmen. Das Rührwerk, das sich in der
Schüssel befindet, in die Richtung der Antriebseinheit schieben (Bild 2). So kann das Rühr-
werk ausgezogen werden. Es kommt gewöhnlich vor, dass die Butter in einem Klumpen
am Rührwerk klebt
Gründe dafür, warum die Butter nicht in vorgesehener Zeit gewonnen wird:
• Zuviel Rahm in der Schüssel
• Falsche Rahmtemperatur bei der Buttergewinnung
• Falsches Rahmreifungsverfahren, normalerweise zu kurz
• Zu geringer Fettgehalt im Rahm
REINIGUNG DER BUTTERMASCHINE
Der Motor darf nicht unter fließendes Wasser oder mit nassen Tüchern gereinigt werden.
Nach Bedarf mit einem feuchten Tuch abwischen. Die Antriebseinheit gründlich mit einem
Tuch trockenwischen. Der Container wird unter heißem Wasser mit etwas fließendem
Reinigungsmittel gereinigt. Die Abdichtung und der Stöpsel werden auch unter heißem
Wasser gewaschen. Dabei soll die Abdichtung nicht gedehnt werden. Der Deckel mit dem
Stöpsel wird unter warmem Wasser (max. 50°C) mit etwas fließendem Reinigungsmittel
gereinigt.
GARANTIE
Wir erklären hiermit
• dass das Gerät während der Gewährfrist fehlerfrei funktioniert wird, soll es entspre-
chend seinem Zweck und der Gebrauchsanleitung bedient werden.
• dass wir auf Ihren Wunsch jegliche auftretende Defekte, die in der Gewährfrist vorkom-
men, kostenlos beheben.
GARANTIEAUSSCHLÜSSE
• bei der Nichtbeachtung der Gebrauchsanleitung
• für Reparaturen von unbefugten Personen
• beim Einbau nicht origineller Ersatzteile
• bei Defekten, die auf mechanische Schläge und Flussigkeitseindrang auf elektrische Teile
beruhen.
Nachbesserungen innerhalb Garantiezeit:
Für alle Nachbesserungen innerhalb Garantiezeit brauchen Sie eine richtig ausgeschriebe-
ne Rechnung des Verkäufers.

6
en CONTENT
General safety recommendations
Technical Specifications
Placing
Cream
Production of Butter
Cleaning of the Butter Churn
Warranty
Warranty is not valid in following cases
Page
7
8
8
8
8 - 9
9
9
9
Dear Customer!
We are sure that our butter churn will be a helpful tool and we believe, that it will
serve you for a long time.
Thank you very much for trusting into MILKY.
Version: December 2018

77
GENERAL SAFETY RECOMMENDATIONS
THE BUTTER CHURN IS A HOUSEHOLD APPLIANCE FOR DOMESTIC USE ONLY AND
IS USED FOR MAKING BUTTER FROM MAX. 3,8 LITER OF CREAM.
BEFORE ANY INSTALLATION AND USE, PLEASE READ THIS USER MANUAL CA-
REFULLY AND FOLLOW THE INSTRUCTIONS.
AFTER USING IT AND BEFORE CLEANING THE DEVICE HAS TO BE DISCONNEC-
TED FROM ELECTRICITY.
CHILDREN ARE NOT ALLOWED TO USE THE DEVICE.
PROTECT THE POWER UNIT AGAINST WATER AND HIGH HUMIDITY.
DEVICE CAN WORK ONLY WHEN THE COVER IS IN PLACE.

8
Item Butter Churn FJ 10
Operating voltage (V/Hz) 230/50, 120/60
Motor power (W) 550
Rotation speed 30, 60, 90, 150
Recommended Capacity (l) 1 - 3,5
Net weight (kg) 8,2
Protection type (ip) 23
TECHNICAL SPECIFICATIONS
PLACING
Place the card board box on a table and take out the container and place it on a clean and
dry place. Open the cover and take out the power group, remove the packaging. Wash the
container, mixer and cover with water. This procedure has to be made before every use.
Clean the container, mixer, cover and sealing clip with a dry cloth. Put the cover on its
place in direction, that hand of cover is on the security switcher on the housing of the dri-
ving group. Place the black rubber cork on the cover. Put the sealing clip into the rubber
outflow and the butter churn is ready to use.
CREAM
For producing qualitative butter, it needs adequate physical ripening. Time for optimal
ripening is three days (in no case less than 1 day). Ripening temperature in summer is 5°C
to 8°C, in winter time 8°C to 10°C. The cream can be stored in the container of the butter
churn.
PRODUCTION OF BUTTER
The container has to be cleaned with water before being filled with cream.
Container filling:
• normally: 1 liter – 3,5 liter of cream
• maximum: 3,8 liter of cream
The container fills from 10% to 40% of the full volume of the container.
The optimal cream temperature before processing should be between 12°C and 15°C. If
the temperature is less than 12°C the max. capacity of cream is 3 liters.
When the butter churn is assembled and filled with adequate prepared cream (max. 3,8
liters) you can start to work with it. Usually in at the beginning of production it is recom-
mended to take high speed of mixer – switcher on position 4 or 3. Low speed is used for
kneading of butter – switcher position 1 or 2.

9
With the right prepared cream, time for producing the butter is approximate 20 minutes.
When the butter is finished, stop mixing. Empty the buttermilk through the outflow on the
bottom part of container. Close the outlet with the clip and add cold water in the contai-
ner through the hole in the cover. Start mixing on speed 1 or 2 for a few minutes. Water
gets white color. Empty this water through the outlet. This treatment cleans (taste of
fermentation) and cools the butter. This process can be done several times.
After that, open the cover and remove the driving group in opposite direction like it is
assembled. For this please take away first the black rubber, which is situated in the middle
of the cover. Air comes now inside the container and you can take away easier the cover
through this opening. Never try to take away the cover on the side by using the safety
spring. In this case you damage the cover and the safety spring as well.
Hold the mixer and turn it in direction of driving holder. In this way the mixer is free, and
it can be removed from container. The butter usually stays on the mixer or stays in lump
in container.
Reasons for a longer duration of the butter production process:
• Too much cream in the container (level of cream must be under axe of mixer)
• Temperature of cream is too high or too low (should be between 12°C and 15°C)
• Preparation of the cream is not correct (temperature and ripening time are wrong)
• Too low content of fat in the cream (in sour cream -32% in sweet cream - 45 % fat)
CLEANING OF THE BUTTER CHURN
It is prohibited to clean the driving group with water of wet duster. Clean the body with a
dry and soft towel. The container is cleaned with hot water, best is to add liquid detergent.
The container washer is cleaned with hot water, take care that you do not extend it.
Cover with black rubber cork is cleaned with warm water (max 50 °C), add some liquid
detergent.
WARRANTY
We declare, that:
• butter churn FJ 10 will work perfectly in warranty time, if it will be used in accordance
with purpose of device.
• we will remove all defects on device in warranty time if necessary
WARRANTY IS NOT VALID IN FOLLOWING CASE
• if instructions for use are not considered
• if reparation is done by non-authorized personal
• if non original spare parts are build in
• damage, which is made for mechanical beat, or if water comes in the driving group.
Reparations in warranty time:
All repairs in warranty time can be enforced only with correctly full-filled bill from seller
where this product was bought.

10
fr SOMMAIRE
Consignes de sécurité
Données techniques
Position de l’appareil
Crème
Fabrication du beurre
Nettoyage de la machine à beurre
Garantie
Exclusions de garantie
Page
11
12
12
12
12 - 13
13
13
13
Cher acheteur !
Nous sommes sûrs que vous serez satisfaits de l’achat de notre produit qui vous
servira pendant longtemps.
Merci de faire confiance à Milky.
Version: décembre 2018

1111
CONSIGNES DE SÉCURITÉ
LA MACHINE À BEURRE MILKY FJ 10 EST UN APPAREIL DE CUISINE ET SERT À PRO-
DUIRE DU BEURRE À PARTIR D’UN MAXIMUM DE 3,8 LITRES DE CRÈME.
LIRE ATTENTIVEMENT LES CONSIGNES DE SÉCURITÉ AVANT UTILISATION.
APRÈS UTILISATION ET AVANT DE NETTOYER L’APPAREIL, DÉBRANCHEZ-LA DE
LA PRISE MURALE.
TENIR L’APPAREIL HORS DE PORTÉE DES ENFANTS.
PROTÉGEZ LE VARIATEUR/MOTEUR DE L’EAU ET D’UNE FORTE HUMIDITÉ.
UTILISEZ L’APPAREIL UNIQUEMENT AVEC LE PLAFOND.

12
Item Butter Churn FJ 10
Tension de fonctionnement (V/Hz) 230/50, 120/60
Puissance du moteur (W) 550
Vitesse de l’agitateur 30, 60, 90, 150
Capacité d’absorption (l) 1 - 3,5
Poids net (kg) 8,2
Classe de protection (ip) 23
DONNÉES TECHNIQUES
POSITION DE L’APPAREIL
Ouvrez le carton, retirer le contenant et placer le produit sur une surface propre.
Ouvrez les plafonds et retirez l’unité d’entraînement. Avant chaque utilisation, lavez le
récipient, le joint et le bouchon du couvercle avec de l’eau propre. Replacez le joint humi-
de et le bouchon sur le récipient. Remplir le bol de crème (max. 3,8 litres). Placez l’unité
d’entraînement sur la fixation du conteneur. Installez le couvercle de manière que le levier
du couvercle appuie sur l’interrupteur de sécurité situé sur le boîtier de l’unité motrice.
Enfoncez la fiche sur le couvercle. Insérez la fiche secteur dans la prise de courant L’appa-
reil est maintenant prêt à fonctionner.
CRÈME
Toutefois, la pré-maturation de la crème est nécessaire à la production d’une crème de
qualité. La durée optimale de maturation de la crème est de trois jours (en aucun cas mo-
ins d’un jour) - entre 5°C et 8°C en été et entre 8°C et 10°C en hiver. La qualité du beurre
dépend beaucoup de la préparation de la crème. La crème peut être pré-pasteurisée.
La crème peut mûrir dans le récipient du tonneau de beurre, l’ouverture du couvercle doit
être libre.
FABRICATION DU BEURRE
Nettoyez le bol à l’eau froide avant chaque utilisation du tonneau à beurre.
Remplissez le bol :
• Normal : 1-3,5 litres de crème
• Maximum : 3,8 litres de crème
De 10 % à 40 % du volume total du contenant peut être rempli.
La température de la crème avant la production de beurre doit être comprise entre 12°C
et 15°C. Après le montage de la machine à beurre et le remplissage du récipient avec de la
crème, (max. 3,8 litres), le travail doit commencer. Les rotations plus élevées de l’agitateur
sont généralement sélectionnées au début - position de commutation 3 ou 4. La crème est
battue à cette vitesse. Dans la production de beurre, la vitesse doit être plus basse - posi-
tion 2 ou 1. C’est ainsi que le beurre est malaxé et lavé. La production du beurre prend en-
viron 20 minutes si la crème est bien préparée. Ensuite, on arrête de remuer et on verse
le babeurre. L’eau froide est ajoutée par l’ouverture du couvercle et l’agitateur est remis
en marche en position 2 ou 1.

13
C’est ainsi que le beurre est lavé. Cette procédure peut être répétée plusieurs fois. Le
couvercle du baril de beurre ne doit pas être enlevé. Lorsque le beurre est prêt, retirez le
bouchon de la prise et retirez le couvercle. Enlevez d’abord le caoutchouc noir au milieu
du couvercle. Cela permet à l’air d’entrer dans le contenant et vous pouvez facilement
soulever le couvercle de l’ouverture. Ne tentez en aucun cas d’enlever le couvercle latéra-
lement à l’aide du ressort de sécurité. Cela endommagera à la fois le ressort et le couver-
cle. Retirez ensuite l’unité d’entraînement dans le sens inverse. Poussez l’agitateur dans
la cuve en direction de l’unité d’entraînement (Fig. 2). Cela permet d’extraire l’agitateur. Il
arrive souvent que le beurre adhère à l’agitateur en morceaux.
Raisons pour lesquelles le beurre n’est pas produit dans les délais prévus :
• Trop de crème dans le bol
• Température de la crème incorrecte pendant la production du beurre
• Mauvais processus de maturation de la crème, normalement trop court
• Trop faible teneur en matières grasses dans la crème
NETTOYAGE DE LA MACHINE À BEURRE
Le moteur ne doit pas être nettoyé sous l’eau courante ou avec des chiffons humides. Si
nécessaire, essuyer avec un chiffon humide. Essuyez soigneusement l’unité d’entraîne-
ment avec un chiffon. Le récipient est nettoyé sous l’eau chaude avec un peu de détergent
courant. Le joint et le bouchon sont également lavés à l’eau chaude. Le joint ne doit pas
être tendu. Le couvercle avec le bouchon est placé sous l’eau chaude (max. 50°C) avec un
peu de détergent courant.
GARANTIE
Nous déclarons par la présente
• que l’appareil fonctionnera parfaitement pendant la période de garantie s’il doit être
utilisé conformément à son utilisation et à son mode d’emploi.
• qu’à votre demande, nous réparerons gratuitement tout défaut survenu pendant la
période de garantie.
EXCLUSIONS DE GARANTIE
• le non-respect du mode d’emploi pour les réparations effectuées
• par des personnes non autorisées
• lors de l’installation de pièces de rechange non d’origine
• en raison de défauts provoqués par des chocs mécaniques et par la pénétration de liqui-
des dans des pièces électriques.
Réparations pendant la période de garantie :
Pour toutes les réparations effectuées pendant la période de garantie, vous avez besoin
d’une facture correctement établie par le vendeur.

14

15
16
Janschitz GmbH
Eisenstrasse 81
9330 Althofen
AUSTRIA
Tel.: +43 4262 2251-0
Fax: +43 4262 2251-13
Email: office@janschitz-gmbh.at
www.janschitz-gmbh.at
This manual suits for next models
2
Table of contents
Languages:
Other Milky Kitchen Appliance manuals


