Mille Rolfe 134474 User manual

WOOD FIRE PIZZA OVEN
134474

IMPORTANT INFORMATION
WARNING!
PLEASE READ THESE INSTRUCTIONS CAREFULLY BEFORE ASSEMBLY AND USE. FAILURE TO FOLLOW
THESE INSTRUCTIONS COULD RESULT IN SERIOUS INJURY OR DAMAGE TO YOUR HOME AND/ OR
GARDEN.
READ AND FOLLOW ALL INSTRUCTIONS.
RETAIN THESE INSTRUCTIONS FOR FUTURE REFERENCE.
• For Outdoor Use Only. DO NOT use indoors. Place in a well-ventilated area.
• DO NOT use gasoline, kerosene alcohol or any other explosive fuel.
• DO NOT touch metal parts of oven until it has completely cooled to avoid burns.
• DO NOT use the oven unless it is completely assembled and all parts are securely fastened and tight-
ened.
• NEVER leave oven unattended when lit.
• ATTENTION! This oven will become very hot, do not attempt to move it during operation.
• WARNING! DO NOT wear loose clothing around an oven while in use or hot.
• WARNING! Keep children and pets away!
• NEVER take out the pizza stone while in use.
• Always place the oven on a level surface and far away from combustibles and children.
• DO NOT move the oven once the oven is lit.
• DO NOT use the oven in high wind.
• NEVER dismantle this oven while in use or hot.
• The oven should be heated up at least 30 min prior to the rst cooking on the oven.
• DO NOT use the oven on plastic / wooden / glass table.
• Only use pellets intended for use in cooking. Recommend using EN plus AI wood pellets.
• Do not use the barbecue in a conned and / or habitable space e.g. houses, tents, caravans, motor
homes, boats. Danger of carbon monoxide poisoning fatality.
• Do not allow food other than Pizza or Bread Dough to contact the stones.
• Stones are fragile and can break if dropped. Handle with care.
SELECTING LOCATION
WARNING!
• DO NOT use oven indoors.
• This oven is for outdoor use only and should be placed on a rm, level surface. The oven should be located in an open area with good
ventilation. Use in unventilated areas can endanger your life.
• Combustible or ammable material should NEVER be used or stored within 36 inches of your oven.
• DO NOT use this oven in a fully or partially enclosed area such as a garage, breeze way, carport, porch or under a surface that can catch
re.
• Always make sure the oven is fully extinguished and completely cool before applying any covers (not included) OR storing away,
remember pellet can remain hot for sometime and could reignite under certain conditions.
• CAUTION! NEVER STORE an oven indoors unless ALL pellets and ash have been thoroughly removed and thrown away outdoors, and all oven
surfaces have been cleaned and are cool, as otherwise this could lead to re/and or emissions or poisonous gases that could cause death.
• CAUTION! Do not use spirit or petrol for lighting or re-lighting! Use only natural re lighters.
• Pouring ammable liquids onto embers will cause spurts of ames or explosions.
• Do not add pellet soaked in lighter uid to the re.
• DO NOT use knives or pizza cutters or any sharp tools on the pizza stone.
• DO NOT immerse the hot pizza stone in water or other liquids. This might cause cracks on the pizza stone.
1

2
PARTS LIST
Please check parts against the list below before assembling re burner. Take a few moments
to familiarise yourself with the contents. Check that all holes are clear of paint before assembly.
1
2
3
4
5
6
7
8
9
10
11
12
13
14
15
16
17
18
19
20
21
22
23
24
25
26
27
28
29
30
31
32
1Chimney cap x 1
2Chimney x 1
3Chimney damper x 1
4Damper handle x 1
5Fire bowl x 1
6Thermometer x 1
7Thermometer
washer
12 Door washer x 4
13 Hex nut x 4
14
Door metal handle x 2
15 Bakelite handle x 3
16 Door tube x 2
17 Pin x 4
18 Door tube cap x 4
19 Pin clip x 4
20 Vent fuel door x 1
21 Fuel door x 1
22 Pizza stone x 1
23 Cooking grill x 2
24 Charcoal grill x 2
25 Ash tray x 1
26 Wheel leg x 1
27 Leg connector x 2
28 Long leg x 1
29 Bottom tray x 1
30 Wheel axle x 1
31 Wheel x 2
32 Hub cap x 2
10 Food door x 1
11 Door latch x 2
x 1
8Thermometer
nut x 1
9Fire bowl handle x 1

Assembly
3
Assemble the bottom tray (29) to the long
leg (28) and the wheel leg (26) using 8
M5x12mm bolts (AA), then tighten all bolts
securely.
Assemble the 2 leg connectors (27) to the
long leg (28) and the wheel leg (26) using 8
M5x12mm bolts (AA), hand tighten the
bolts only.
Preparation Before Assembling
Before beginning assembly of this grill, make sure all parts are present (see Part List on page 5 and Hardware
Contents below). If any part is missing or damaged, DO NOT attempt to assemble the pr oduct.
Assembly Instructions
12
26
28
27
26
28
29
Tools Required
2 pt Phillips
Screwdriver
HardwarePack Components
Part No Name Part Description Quality
AA
BB
CC
DD
M5x12mm 26pcs
M5x15mm 2pcs
M6x20mm 2pcs
M10 2pcs
Bolt
Lock nut
Adjustable Wrench
Bolt
Bolt
AA
AA
AA
AA
AA
AA

4
Assembly Instructions
Remove hub caps (32) from wheels (31).
Insert wheel axle (30) through both holes in
wheels legs (26). Attach wheels (31) to the
wheel axle (30) using 2 M10 (DD). Tighten
the lock nuts securely. Reattach the hub
caps (32) to the wheels (31).
Assemble the Fire bowl handle (9) to the
re bowl (5) using 2 M6x20mm bolts (CC),
tighten the bolts securely.
Assemble the bakelite handles (15) onto
the door metal handles (14) .
4
3
6
5
14
14
15
15
32
31
DD
30
5
9
26
Assemble the chimney cap (1) to the
chimney (2) using 3 M5x12mm bolts (AA),
tighten the bolts securely.
1
2
CC
AA AA
AA

5
Assembly Instructions
8
7
10
9
Place the ash tray (25) between the re
bowl and trolley.
25
Assemble the chimney (2) onto the
Fire bowl (5) using 3 M5x12mm bolts (AA),
tighten the bolts securely.
2
5
Assemble the re bowl (5) onto the trolley
using 4 M5x12mm bolts (AA), tighten the
bolts securely.
5
Assemble the chimney air vent adjustor
holder (4) onto the chimney air vent adjus-
tor (3) using 2 M5x15mm bolts (BB),
tighten the bolts securely.
3
4
BB
AA
AA
AA

6
Assembly Instructions
11
Place the pizza stone (22) onto the cooking
grill (23).
22
23
12
Place the charcoal grills (24) into the bottom
of re bowl (5), place the cooking grills
(23) into the top of re bowl (5).
23
24
5
13
N o te : u s e o nly o r igina l p a r ts . T his w ill p r o te c t y our w a r r a nty c o ve r a ge f or p a r ts r e p la c e d
u nd e r w a r r a nty .

1. Make sure the assembly instructions have been followed correctly.
2. Set the oven up in a suitable position, on a level surface away from areas likely to catch re.
The base of the oven will get hot so ensure it stands on a suitable non-combustible, heat-resistant
surface.
7
INSTRUCTIONS FOR USE
Lighting
1. Make sure the door is on and don’t take it o unless you need to add or remove the food.
2. Fill the fuel grate (Part J) with wood pellets and one natural re lighter.
3. Light the re lighter and slide the tray & grate (Parts H & J) in to rear of the pizza oven.
4. Make sure the starter pellets are fully alight before adding more pellets via the hopper (Part K).
5. Maintain a pellet level according to your cooked food and your needed temperature through-
out the cooking session.
Preheating
6. Preheat your pizza stone (Part R) in pizza oven before baking the pizza in at least 500(260), or
as hot as your oven goes. The hotter the better! Normally, it takes around 20 minutes to preheat
your pizza stone (Part R) .
Extinguishing
7. Allow the oven to burn through remaining pellets and cool naturally for at least 60 minutes. While
wearing heatproof gloves, carefully remove the fuel tray (Part H) . Never expose the oven to water
while it’s hot.
8. Shake the ash into a large metal bucket of water. Do not submerge.
CLEANING AND CARE
1. Clean the pizza stone (Part R) after every use.
2. Do not clean the pizza oven nor the pizza stone (Part R) in a dishwasher.
3. Do not allow the pizza stone (Part R) to soak in or rinse with water as it absorbs and stores water.
Otherwise there is a risk of cracking and breaking during the heating process.
4. Scrape o surface residue with a plastic spatula. Use a brush with a little hot water if necessary.
Finally, damp wipe thoroughtly and dry naturally.
5. Store the product in a dry place where it cannot fall down.
BEFORE USE

OVEN SAFETY HINTS
1. Stand your oven on a safe, level surface, away from ammable items such as wooden fences
or over-hanging tree branches. NEVER USE your oven indoors or in conned areas.
2. DO NOT use petrol, paran, methylated spirit or lighter fuel. Only use natural re lighters.
3. Once lit DO NOT move your oven or leave it unattended.
4. Keep children and pets a safe distance from the oven.
5. Keep a re extinguisher or re blanket handy.
6. During use the oven will become hot, so only handle door etc with an oven glove.
7. Ensure that the oven has completely cooled before removing the ash.
8
FOOD COOKING INFORMATION
Please read and follow this advice when cooking on your grill.
- ALWAYS wash your hands before and after handling uncooked meat and before eating.
- ALWAYS keep raw pizza away from cooked pizza.
- Before cooking ensure pizza stone are clean and free of old food residues
- Ensure all pizza is cooked thoroughly before eating.
- CAUTION-eating raw or under cooked pizza can cause food poisoning.
So always ensure it is well-cooked.
- After cooking on your oven always clean pizza stone cooking surfaces.
alcohol
or
fuel
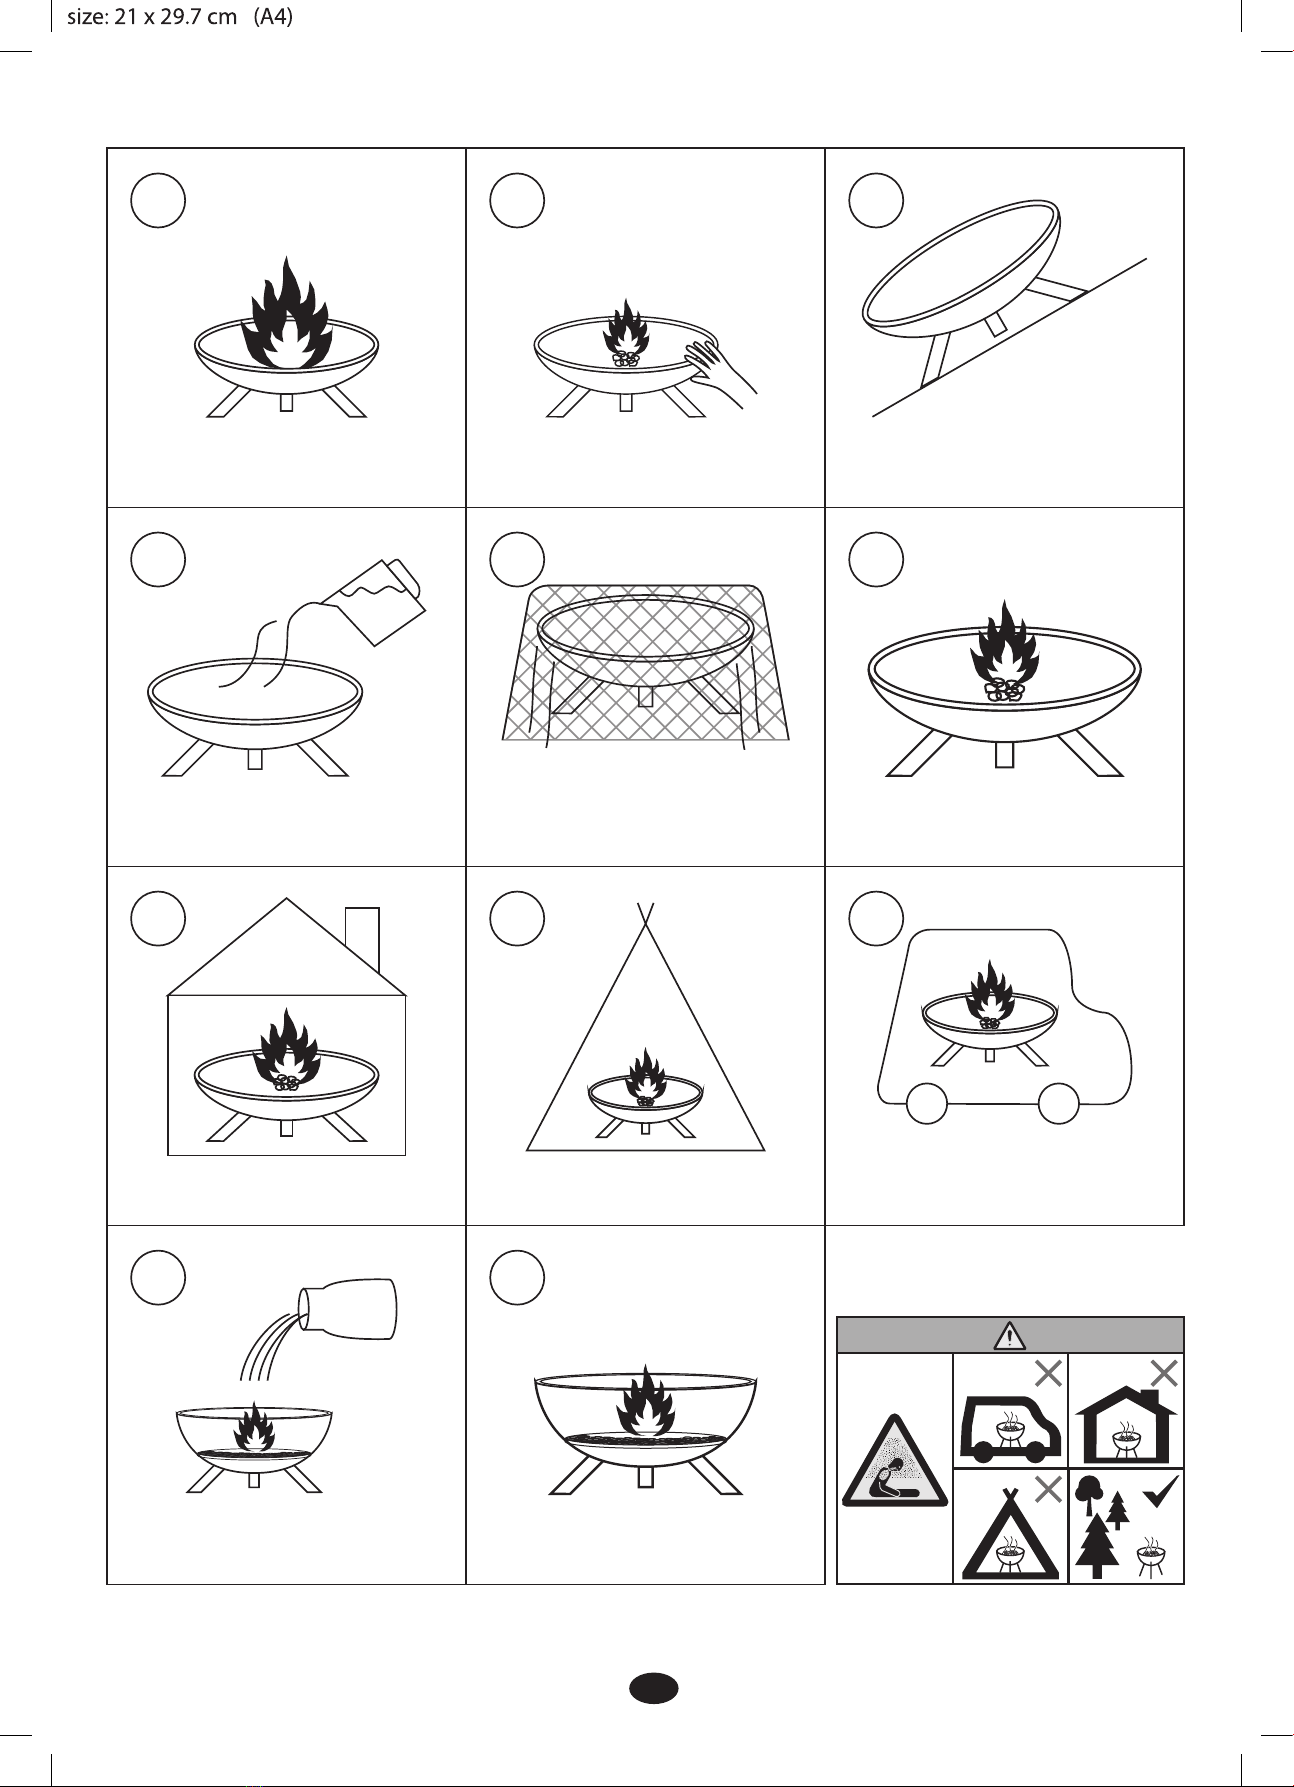
×
KEEP FIRE UNDER CONTROL
×
DO NOT TOUCH
HOT!
×
USE ON A FLAT EVEN
SURFACE
×
DO NOT EXTINGUISH
WITH WATER
√
COVER UP WHEN NOT IN USE
√
ONLY USE RECOMMENDED
PELLETS
×
NEVER USE INDOORS
×
NEVER USE IN TENTS
×
NEVER USE IN VEHICLES
× ×
DO NOT TOUCH OR MOVE THIS ITEM
WHILST IN USE OR STILL HOT. RISK
OF INJURY.
9
ONLY USE RECOMMENDED NATURAL
FIRE LIGHTERS WITH THIS PRODUCT. DO
NOT USE ALCOHOL OR OTHER FUELS
Table of contents


