MILZ PRODUKTE RING User manual

@
MILZRIMCKETTE
Montage
Montaggio Mounting
-----------------
®
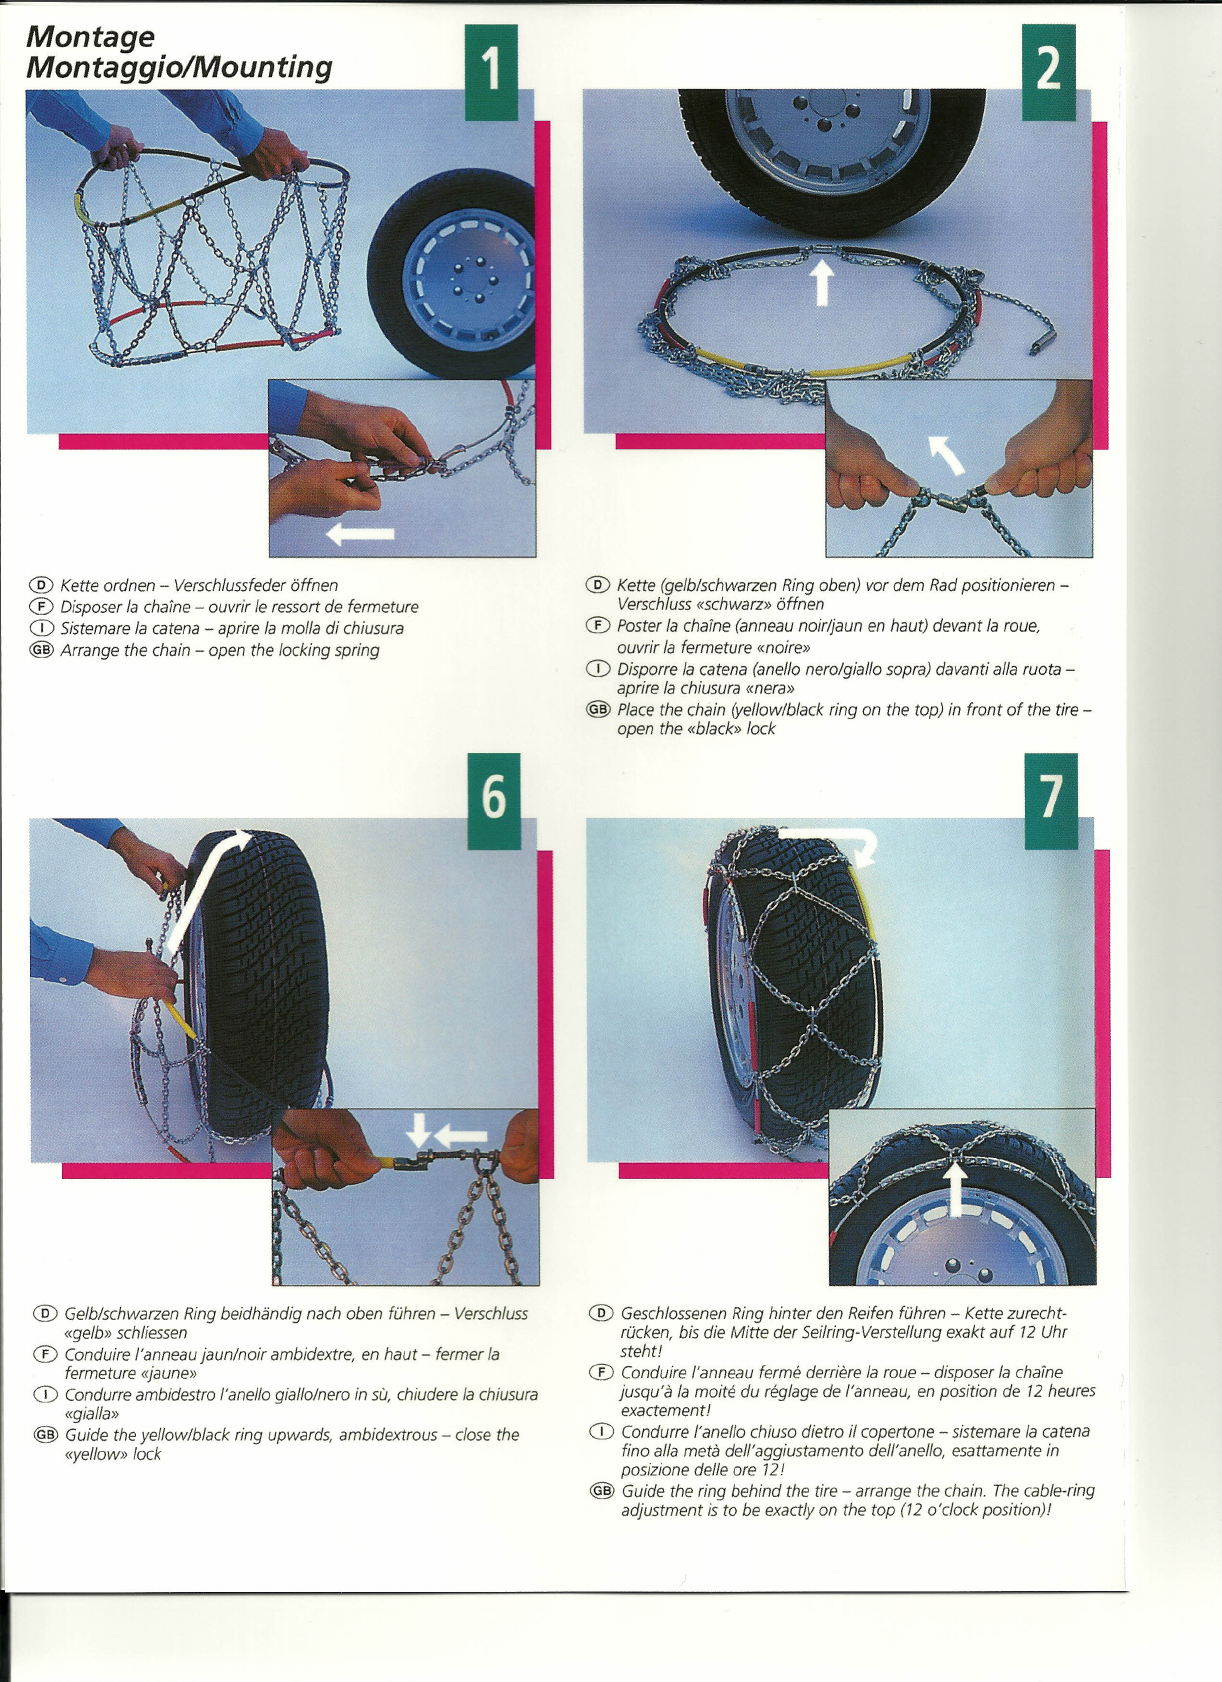
Kette ordnen - Verschlussfeder öffnen
CD
Oisposer la chaine - ouvrir le ressort de fermeture
CD
Sistemare la catena - aprire la molla di chiusura
@
Arrange the chain - open the locking spring
®
Gelb/schwarzen Ring beidhändig nach oben führen - Verschluss
«gelb» schliessen
CD
Conduire /'anneau jaun/noir ambidextre, en haut - fermer la
fermeture «jaune»
CD
Condurre ambidestro /'anello giallo/nero in sC ,chiudere la chiusura
«gialla»
@
Guide the yellow/black ring upwards, ambidextrous - c ose the
«yellow» lock
®
Kette (gelb/schwarzen Ring oben) vor dem Rad positionieren -
Verschluss «schwarz» öffnen
CD
Poster la chaine (anneau noirljaun en haut) devant la roue,
ouvrir la fermeture «nolre»
CD
Oisporre la catena (anello nero/giallo sopra) davanti alla ruota -
aprire la chiusura «ners»
@
Place the chain (yellow/black ring on the top) in front of the tire -
open the «bleck» lock
®
Geschlossenen Ring hinter den Reifen führen - Kette zurecht-
rücken, bis die Mitte der Seilring-Verstellung exakt auf
12
Uhr
steht
CD
Conduire I'anneau ferme derriere la roue - disposer la cheine
jusqu'a la
tnott«
du reglage de I'anneau, en position de
12
heures
exactement
CD
Condurre I'anello chiuso dietro il copertone - sistemare la catena
fino alla meta dell'aggiustamento dell'anello, esattamente in
posizione delle ore
12
@
Guide the ring behind the tire - arrange the chain. The cable-ring
adjustment is
to
be exactly on the top
(12
o'clock position)

®
Geöffnete Kette hinter dem Rad herumschieben - Verschluss
«schwarz» schliessen
®
Pousser la chaine ouverte autour, de dettiere la roue en avant
fermer la fermeture <moire»
CD
Spingere la catena aperta intomo da dietro la ruota - chiudere
la chiusura «nere»
@
Push the open chain around, from behind the tire - close the
«biec)» lock
®
Spannkette durch gegenüberliegenden Bügel führen - Verschluss-
feder einhängen. Naeh 10 Metern Fahrt nachspannen - Spann-
kette muss nun durch beide Bügel geführt werden
®
Conduire la ehalne de tension
a
travers de Ia boucJe envers, suspen-
dre le ressort de fermeture. Apres 70
m
de parcours, tendre de
nouveau, la ehalne de tension doit iHre conduite
a
travers tous les
deux les boueles terminales
CD
Condurre la catena di tensione attraverso /'anello terminale di
fronte, agganciare la molla di chiusura. Dopo 70
m
percorsi, strin-
gere di nuovo - la catena di tensione dev'essere condotta
attraverso tutti e due gli anelli terminali
@
Guide the tension chain through the opposite bow - hook the
closing spring. Remove your car 10 meters and tighten again -
now guide the tension chain through both bowst
®
Geschlossene Kette zurückdrehen, bis gelbe Plastikteile vor dem
Rad liegen
®
Toumer en sens envers la charne fermee jusque les
pieces
en
plastique jaune se trouvent devant la roue
CD
Girare in sense opposto la catena chiusa, finche i pezzi di plastica
gialla si trovano davanti alla ruota
@
Turn back the closed chain until the yellow plastic parts lie in
front of the tire
®
Falls zu eng oder zu weit: Seilring «rot» beidseitig verstellen
(gleiche Nummer )
®
En cas qu'elle soit trop courte ou trop longue: Regler /'anneau
«rouqe» ambidextre (Jememe numerot)
CD
Nel caso che sia troppo stretta
0
troppo larga: Regolare /'anello
«rosse» ambidestro
(10
stesso numero )
@
In case it may be too short or too long: Adjust the «red» cable-
ring on either side (same number )
®
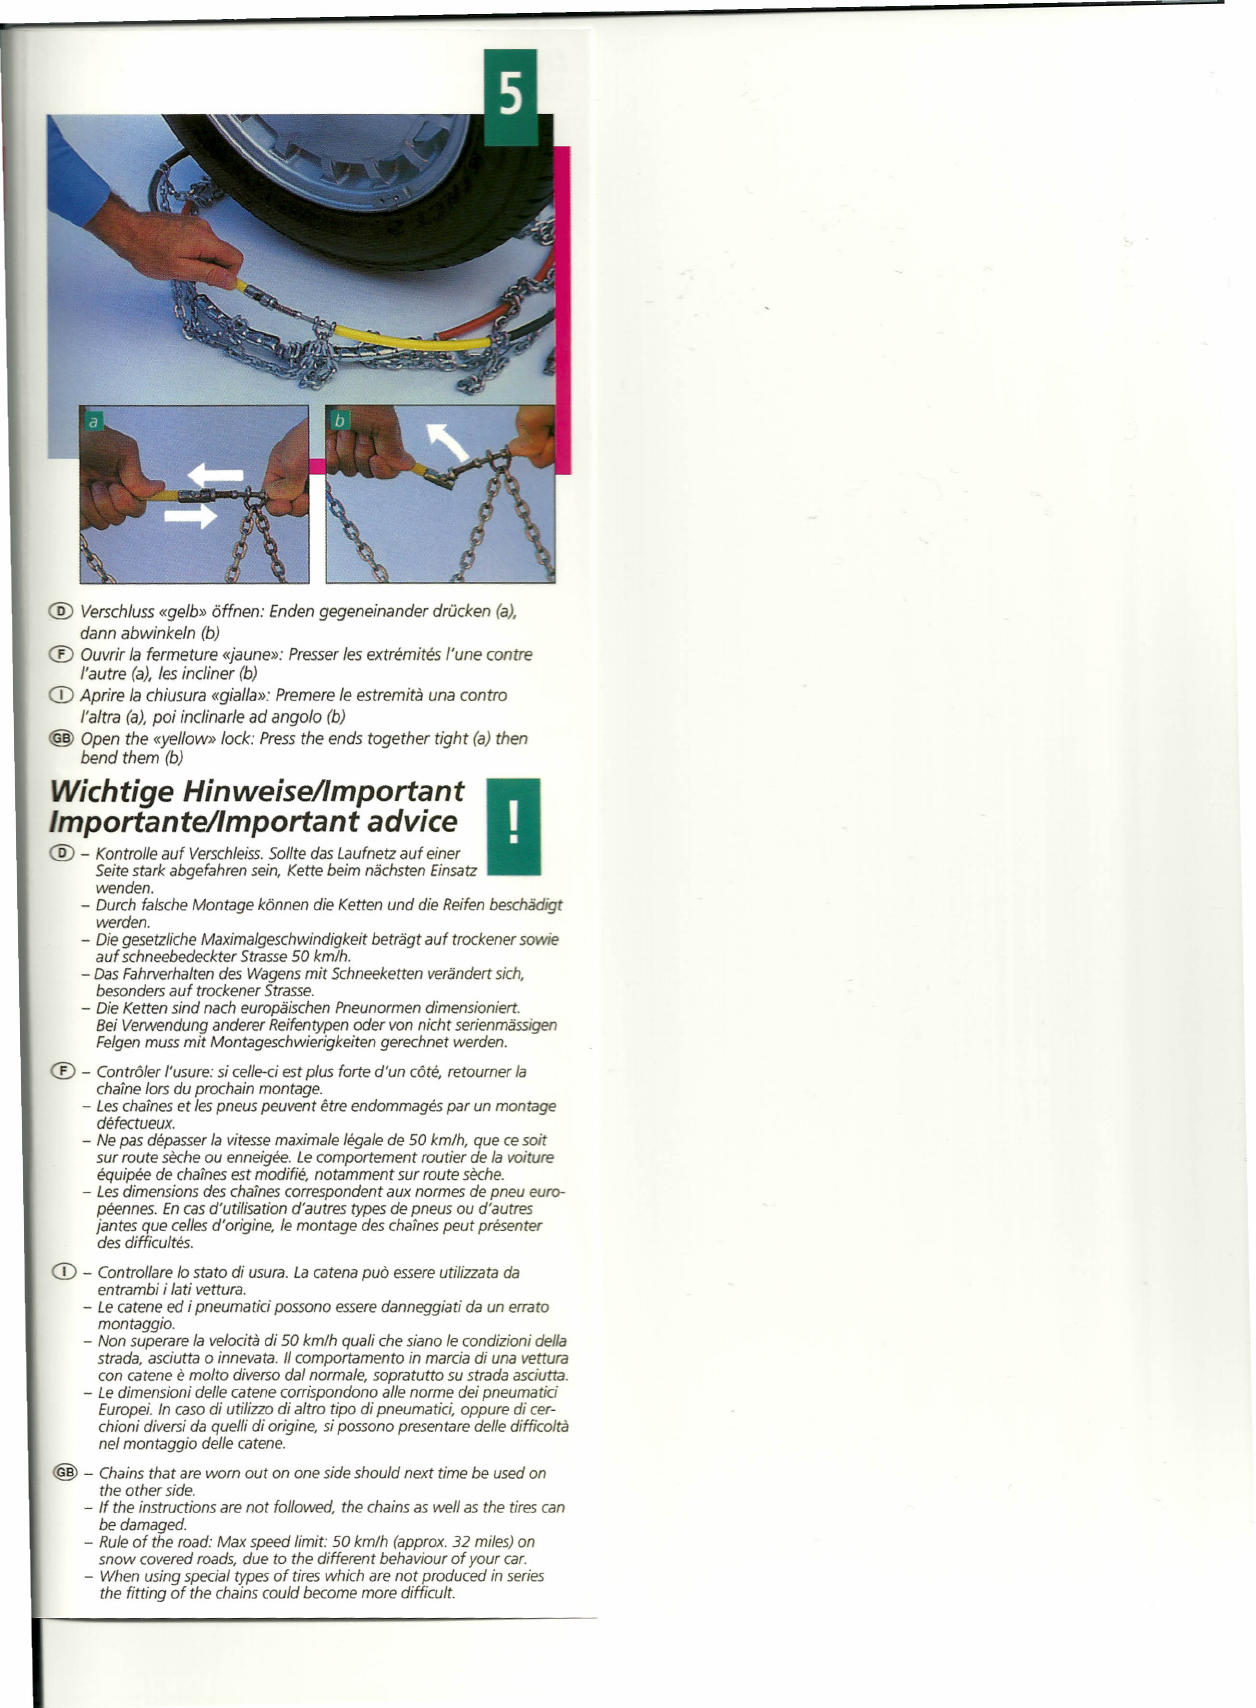
Verschluss «gelb» öffnen: Enden gegeneinander drücken (a),
dann abwinkeln (b)
CD
Ouvrir la fermeture «jaune»: Presser les extremites I'une contre
I'autre (a), les incliner (b)
CD
Aprire la chiusura «gialla»: Premere le estremita una contro
I'altra (a), poi inclinarle ad angola (b)
@
Open the «yellow» lock: Press the ends together tight
(a)
then
bend them (b)
Wichtige Hinweise lmportant
Importante lmportant advice
®-
Kontrolle auf Verschleiss.Sollte das Laufnetz auf einer
Seite stark abgefahren sein, Kette beim nächsten Einsatz
wenden.
- Durch falsche Montage können die Ketten und die Reifen beschädigt
werden.
- Die gesetzliche Maximalgeschwindigkeit beträgt auf trockener sowie
auf schneebedeckter Strasse
50
km/h.
- Das Fahrverhalten des Wagens mit Schneeketten verändert sich,
besonders auf trockener Strasse.
- Die Ketten sind nach europäischen Pneunormen dimensioniert.
Bei Verwendung anderer Reifentypen oder von nicht serienmässigen
Felgen muss mit Montageschwierigkeiten gerechnet werden.
CD -
Contraler I'usure: si celle-ci est plus forte d'un cate, retourner la
chaine lors du prochain montage.
- Leschaines et lespneus peuvent etre endommages par un montage
aetectoeu».
- Ne pas deoesserla vitessemaximale legale de
50
km/h, que cesoit
sur route seche ou enneigee. Lecomportement routier de la vonure
equipee de chaines est
tnoditie
notamment sur route
secb«
- Lesdimensions des chaines correspondent aux normes de pneu euro-
peenne; Encasd'utilisation d'autres types de pneus ou d'autres
jantes que celles d'origine, le montage des chainespeut ptesente«
des difficultes.
CD -
Controllare 10stato di usura. Lacatena PUDessereutilizzata da
entrambi i lati vettura.
- Lecatene ed i pneumatici possono esseredanneggiati da un errata
montaggio.
- Non superare la velocita di
50
km/h quali ehe siano le condizioni della
strada, asciutta
0
innevata. 11comportamento in marcia di una vettura
con catene
e
molto diverse dal normale, sopratutto su strada asciutta.
- Ledimensioni delle catene corrispondono alle norme dei pneumatid
Europei. In caso di utilizzo di altro tipo di pneumatici, oppure di cer-
chioni diversi da quelli di origine,
si
possono presentare delle difficolta
nel montaggio delle catene.
@ -
Chains that are worn out on one side should next time be used on
the other side.
- If the instructions are not followed, the chains
as
weil
as
the tires can
be damaged.
- Ruleof the road: Max speed limit:
50
km/h (approx.
32
miles) on
snow covered roads, due
to
the different behaviour of your car.
- When using special types of tires which are not produced in series
the fitting
of
tbe chains could become more difficult.
Demontage Demontage
Smon taggio/Remo val
®
Rangieren, bis Verschlussfeder auf
3
oder 9
öffnen
®
Msnceuvre: jusque Jeresscxt de
fennetl6e
de
3
ou
9
heures -
0tMir
Ja
rh;~;n.:.
'*'
CD
Manovrare finche JamoIJa
ore
3
0
9 -
aprire Ja
ca
ena
tensione
@
Manoeuvre the locking spring
be
on
3
a
9
o'dod
c•••••••--...,
open the tension chain
®
Gelb/schwarzen Ring hinter dem
Rei.fet;iJa-.or:;:i:i':.'en
Verschluss «gelb» öffnen
®
Tirez /'anneau jaune/noir en avan oe
fermeture «jeune»
CD
Tirare /'anello giallo/nero da dietTO Ja
gialla
@
Pull back the yellow/black ring
from
«yellow» lock
::
®
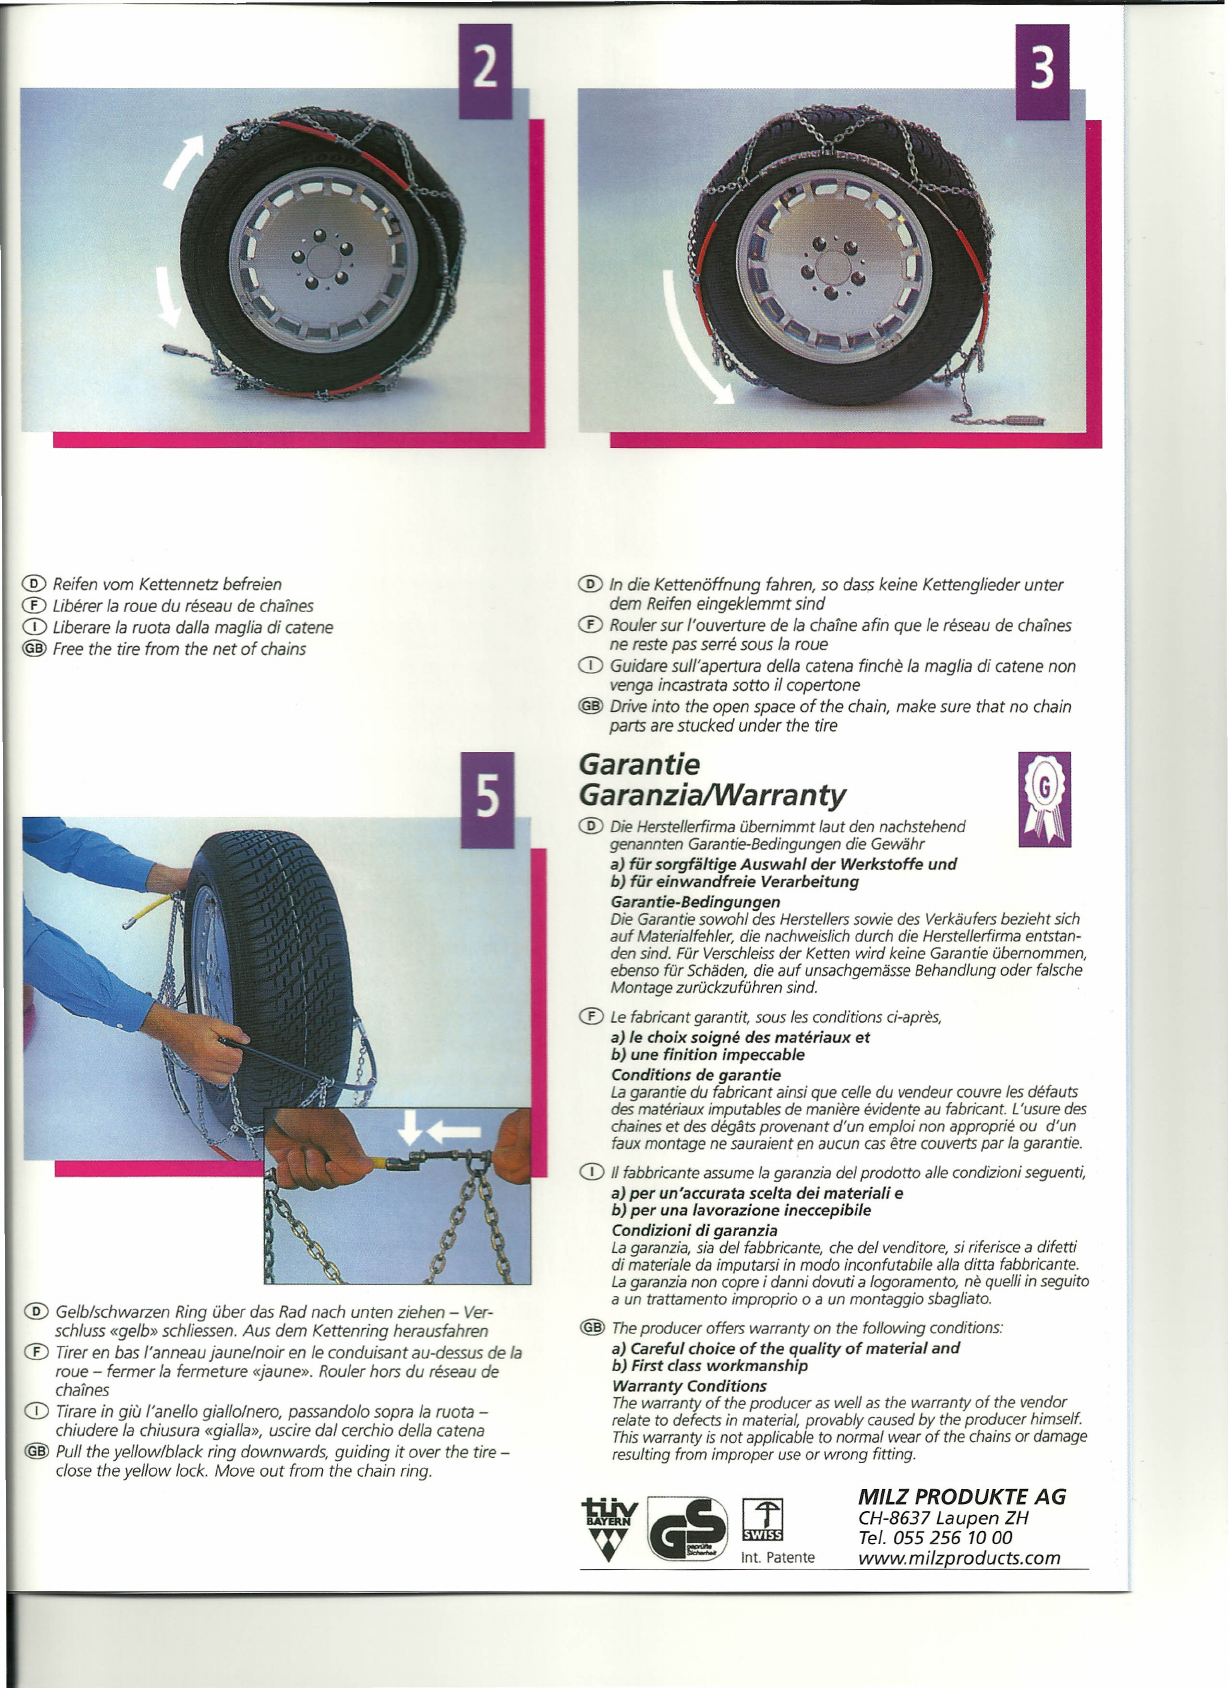
Reifen vom Kettennetz befreien
®
Liberer la roue du reseeu de chaines
CD
Liberare la ruota dalla maglia di catene
@
Free the tire from the net of chains
®
Gelb/schwarzen Ring über das Rad nach unten ziehen - Ver-
schluss «gelb» schliessen. Aus dem Kettenring herausfahren
®
Tirer en bas I'anneau jaune/noir en le conduisant au-dessus de la
roue - fermer la fermeture «jaune». Rouler hors du teseeu de
chalnes
CD
Tirare in giu l'snello giallo/nero, passando/o sopra la ruota -
chiudere la chiusura «gialla», uscire dal cerchio della catena
@
Pull the yellow/black ring downwards, guiding it over the tire -
close the yellow lock. Move out from the chain ring.
®
In die Kettenöffnung fahren, so dass keine Kettenglieder unter
dem Reifen eingeklemmt sind
®
Rouler sur I'ouverture de la chalne afin que le reseeu de chaines
ne teste pas setre sous la roue
CD
Guidare sull'apertura della catena finche la maglia di catene non
venga incastrata sotto il copertone
@
Drive into the open space of the chain, make sure that no chain
parts are stucked under the tire
Garantie
GaranzialWarranty
®
Die Herstellerfirma übernimmt laut den nachstehend
genannten Garantie-Bedingungen die Gewähr
a)
für sorgfältige Auswahl der Werkstoffe und
b) für einwandfreie Verarbeitung
Garantie-Bedingungen
Die Garantie sowohl des Herstellers sowie des Verkäufers bezieht sich
auf Materialfehler, die nachweislich durch die Herstellerfirma entstan-
den sind. Für Verschleiss der Ketten wird keine Garantie übernommen,
ebenso für Schäden, die auf unsachgemässe Behandlung oder falsche
Montage zurückzuführen sind.
®
Le fabricant garantit, sous les conditions ci-epres,
a)
le ehoix soigne des materiaux
et
b) une finition impeccable
Conditions de garantie
La garantie du fabricant ainsi que celle du vendeur couvre les deieuts
des materiaux imputables de maniere evidente au fabricant. L'usure des
chaines et des degäts provenant d'un emploi non approprie ou d'un
faux montage ne sauraient en aucun cas etre couverts par la garantie.
CD
/I fabbricante assume la garanzia dei prodotto alle condizioni seguenti,
a)
per un'accurata seelta dei materiali
e
b) per una lavorazione ineccepibile
Condizioni di garanzia
La garanzia, sia dei fabbricante, ehe deI venditore, si riferisce adifetti
di materiale da imputarsi in modo inconfutabile alla ditta fabbricante.
La garanzia non copre i danni dovuti alogoramento, ne quelli in seguito
aun trattamento improprio
0
aun montaggio sbagliato.
@
The producer offers warranty on the following conditions:
a)
Careful choice of the quality of material and
b) First dass workmanship
Warranty Conditions
The warranty of the producer as weil as the warranty of the vendor
relate to defects in material, provably caused by the producer himself.
This warranty is not applicable to normal wear of the chains or damage
resulting from improper use or wrong fitting.
MILZ PRODUKTE AG
CH-8637 Laupen ZH
Tel. 055
256
10
00
www.milzproducts.com
Table of contents


