Hellberg Local 446 User manual

User manualUser manual 6-9 Uputstvo za upotrebuUputstvo za upotrebu 66-6966-69
GebrauchsanweisungGebrauchsanweisung 10-13 Упатство за користењеУпатство за користење 70-73
Manuel d’utilisationManuel d’utilisation 14-17 Инструкции за потребителяИнструкции за потребителя 74-77
GebruiksaanwijzingGebruiksaanwijzing 18-21 Instrucţiuni utilizareInstrucţiuni utilizare 78-81
Instrucciones de usoInstrucciones de uso 22-25 Інструкція користувачаІнструкція користувача 82-85
Instruções do utilizadorInstruções do utilizador 26-29 KasutussuunisedKasutussuunised 86-89
Istruzioni per l’usoIstruzioni per l’uso 30-33 Lietošanas instrukcijaLietošanas instrukcija 90-93
Οδηγίες ΧρήσηςΟδηγίες Χρήσης 34-37 Naudotojo instrukcijaNaudotojo instrukcija 94-97
Kullanıcı talimatlarıKullanıcı talimatları 38-41 BrugsanvisningBrugsanvisning 98-101
Návod na použitíNávod na použití 42-45 BruksanvisningBruksanvisning 102-105
Návod na obsluhuNávod na obsluhu 46-49 Brukermanual 106-109
Instrukcja obsługiInstrukcja obsługi 50-53 KäyttöohjeKäyttöohje 110-113
Felhasználói útmutatóFelhasználói útmutató 54-57 NotendaleiðbeiningarNotendaleiðbeiningar 114-117
Uporabniška navodilaUporabniška navodila 58-61 Инструкция по эксплуатацииИнструкция по эксплуатации 118-121
Korisničke uputeKorisničke upute 62-65 مادختسالاتاميلعتمادختسالاتاميلعت 122-125
FR
ES
DE
NL
PT
IT
TR
CZ
SK
PL
HU
SL
HR
MK
UA
EE
GR
LV
LT
DK
SE
NO
SR
FI
IS
RU
SA
RO
BG
EN
Local 446

A
A1
A3
A2
A. Parts
B. Accessories and spare parts
B:1 B:2 B:3 B:4
B:5 B:6
A4
A8
A5
A13
A14
A16 A15
A9
A11
A17
A18
A12
A6
A7
A7
A10
B:8B:7

C1
C. Fitting and adjustment
D. Change of hygiene kit
C3
C2
C4
B. Accessories and spare parts
B:9 B:10 B:11 B:12
ca.1 cm
TALK
TALK

E. Approval & Technical data
Radio standard: PMR 446 MHz (EU)
Channel separation: 12,5 kHz
Modulation: FM
Number of Ch.: 16
Sub channel coding: CTCSS
Number of Sub channels: 38
Transmit power: 150/50/10 mW ERP
Range: 3 km line of sight
Receiver sensibility: Typical -120 dBm
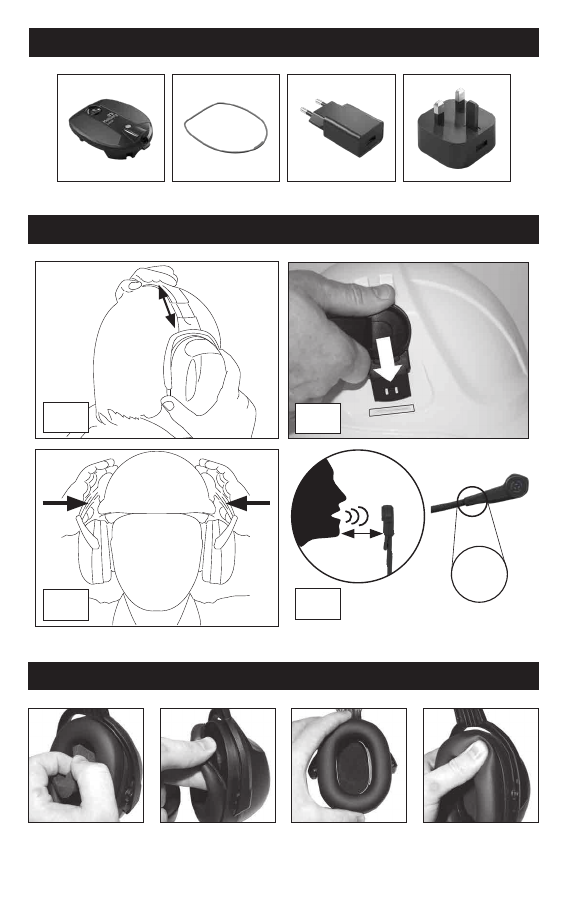
Power supply: 2 x AA user replaceable 1,2-1,5 V
Included Batteries: 2 x NiMh 2600 mAh
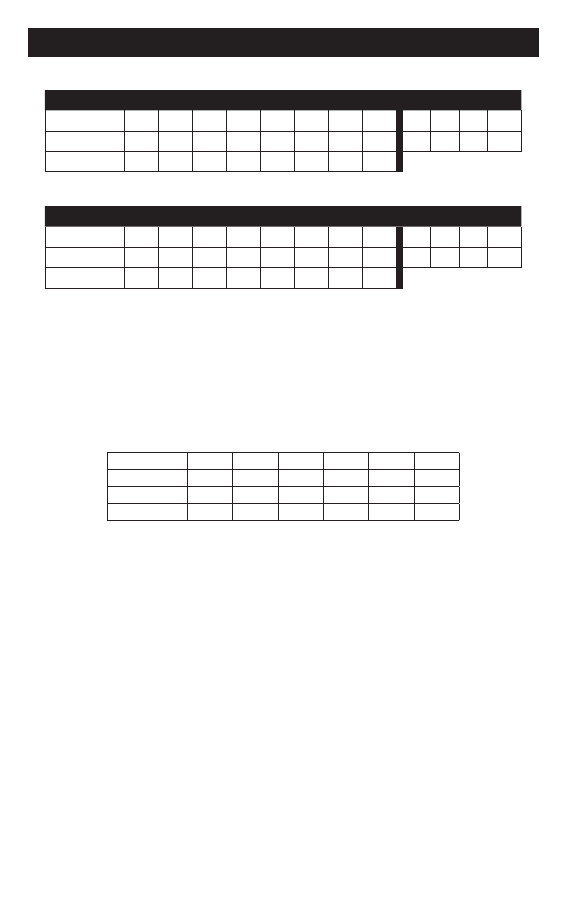
Weight: 513 g Headband, 547 g Helmet Mount
Battery operation time: 12 hours normal operation
Battery standby time: 20 hours
Battery charging time: Up to 5 hours
Water and dust resistance: IP 56
Approvals/Compliance: EN 352, RED, ROHS, REACH, WEEE
Operating temperature: -20 to +55°C
Certication and Monitoring: PZT GmbH, Bismarckstrasse 264 B, 26389 Wilhelmshaven, Germany
Notied Body: 1974E8, Notied by ZLS
Tested and certied toE3:
PPE regulation (EU) 2016/425 and applicable parts of European standards:
EN 352-1:2020 (Headband)
EN 352-3:2020 (Helmet Mount)
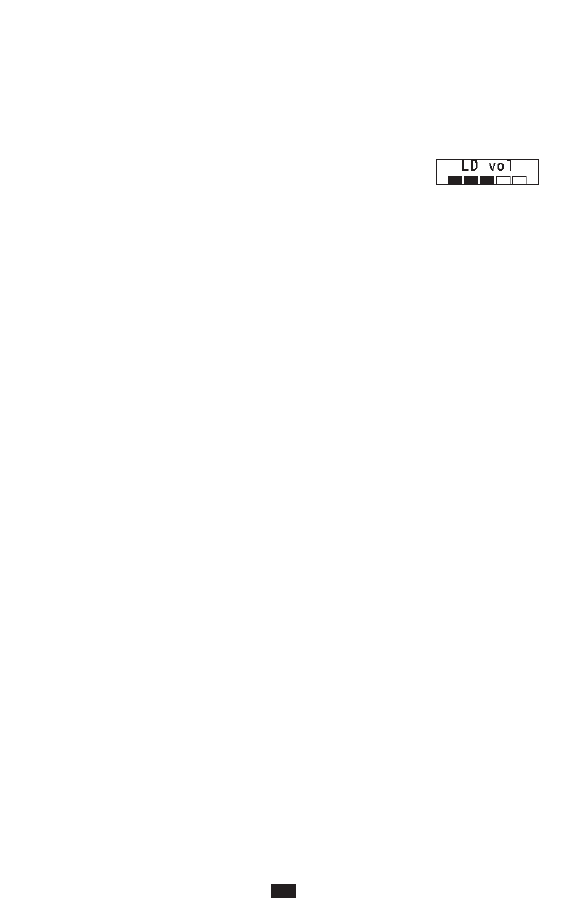
EN 352-4:2020 (Level Dependent)
EN 352-6:2020 (Headset Prole max SPL is below 82dB(A))
Criterion level EN 352-4 H= 112,7 dB, M= 110,5 dB, L= 97,1dB
Max. SPL EN 352-6, 79,6 dB(A) at -12,5 dBm
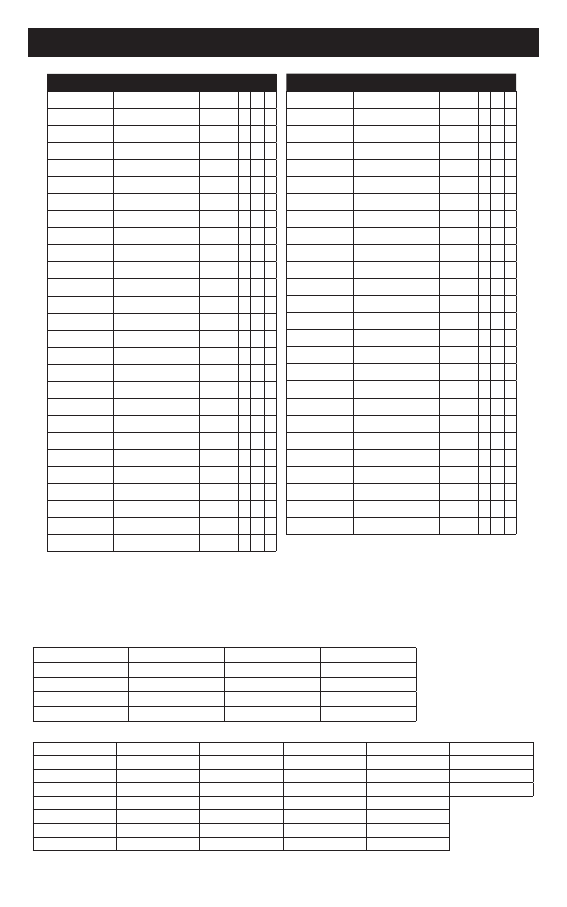
85101-001 Local 446 Helmet MountE2, Weight 547 gE4, EN 352-3:2020E3
Freq. Hz 63 125 250 500 1000 2000 4000 8000 H M L SNR
Mean att.E5 18,6 18,5 21,4 23,7 33,4 35,6 37,8 38,9 35,5 28,2 23,0 30,9
Std. dev.E6 3,9 3,7 1,9 2,5 2,9 2,8 2,5 4,6 1,7 1,4 1,2 1,3
APVE7 14,7 14,8 19,5 21,2 30,5 32,8 35,3 34,3 34 27 22 30
85001-001 Local 446 HeadbandE1, Weight 513 gE4, EN 352-1:2020E3
Freq. Hz 63 125 250 500 1000 2000 4000 8000 H M L SNR
Mean att.E5 18,5 19,1 21,7 26,2 36,6 36,1 35,6 36,5 35,3 30,0 24,0 32,1
Std. dev.E6 3,7 3,3 2,6 2,8 3,1 5,1 4,1 4,3 3,4 2,4 2,3 2,5
APVE7 14,8 15,8 19,1 23,4 33,5 31,0 31,5 32,2 32 28 22 30
Radio Equipment Directive (RED) 2014/53/EU (Europe)
NEMKO Norway, Notied Body: 0471E8
English is the language examined by Notied Body. English has interpretive precedence.
Input level (dBm) -37,5 -32,5 -27,5 -22,5 -17,5 -12,5
Mean (dB) 52,9 57,0 61,7 66,8 71,9 77,0
StDev (dB) 2,8 2,9 2,8 2,8 2,8 2,6
Mean + StDev 55,7 59,8 64,6 69,6 74,7 79,6

G. Approved helmet combinations*
*Secure Passives Series, Electronics Models; Local, Xstream, React, Active, Relax
Supplementary helmet list according to EN 352-3
Certication and Monitoring: PZT GmbH, Bismarckstrasse 264 B, 26389 Wilhelmshaven, Germany
Notied Body: 1974E8, Notied by ZLS
Sub channels CTCSS (Continuous Tone Coded Squelch System)(Hz) E13
Radio Channels (MHz)E12
Ch Frequency Ch Frequency Ch Frequency Ch Frequency
1 446.0062 5 446.05625 9 446.10625 13 446.15625
2 446.01875 6 446.06875 10 446.11875 14 446.16875
3 446.03125 7 446.08125 11 446.13125 15 446.18125
4 446.04375 8 446.09375 12 446.14375 16 446.19375
Ch Frequency Ch Frequency Ch Frequency Ch Frequency Ch Frequency Ch Frequency
1 67.0 8 88.5 15 110.9 22 141.3 29 179.9 36 233.6
2 71.9 9 91.5 16 114.8 23 146.2 30 186.2 37 241.8
3 74.4 10 94.8 17 118.8 24 151.4 31 192.8 38 250.3
4 77.0 11 97.4 18 123.0 25 156.7 32 203.5
5 79.7 12 100.0 19 127.3 26 162.2 33 210.7
6 82.5 13 103.5 20 131.8 27 167.9 34 218.1
7 85.4 14 107.2 21 136.5 28 173.8 35 225.7
Manufacturer Helmet model Adapter S M L
Auboueix Iris 2 30 mm x x
Bjornklader Balance AC 30 mm x x
Centurion Concept Euro 30 mm x x
Centurion Nexus 30 mm x
Cerva Alpin worker 30 mm x x
Cresto Crown 30 mm x x
Cresto Crown Electro 30 mm x x
Cresto Crown MIPS 30 mm x x
Guardio Armet Mips 30 mm x x
Irudek Ekain 30 mm x
Irudek Oreka 30 mm x
Irudek Stilo 300V 30 mm x x
Irudek Stilo 600V 30 mm x x
JSP EVO 2 30 mm x
JSP EVO 3 30 mm x
JSP MK 7 30 mm x x
JSP Evolite 30 mm x
KASK HP 30 mm x
KASK Plasma Work 30 mm x
KASK Primero 30 mm x x x
KASK Quantum 30 mm x
KASK Super Plasma 2 30 mm x
KASK Zenit X 30 mm x x
MSA V Guard 30 mm x
MSA V Guard 500 30 mm x
MSA V Guard 930 30 mm xx
MSA V Guard 950 30 mm xx
Manufacturer Helmet model Adapter S M L
Petzl Strato 30 mm x x
Petzl Strato Vent 30 mm x x
Petzl Vertex 30 mm x x
Petzl Vertex Best 30 mm x x
Petzl Vertex ST 30 mm x x
Petzl Vertex Vent 30 mm x x
Schuberth Electrician 80 30 mm x
Singing Rock Flash Access 30 mm x x
Singing Rock Flash Aero 30 mm x x
Singing Rock Flash Industry 30 mm x x
Stein Sovos 30 mm x x
Sundström SR 570 30 mm x
Uvex Pheos 30 mm x x
Uvex Pheos Alpine 30 mm x x
Vallfirest VF2 30 mm x
Zekler Zone 30 mm x x
Zekler Zone Electro 30 mm x x
Zekler Zone Mips 30 mm x x
Zero Pinnacle Exo Vent 30 mm x x
Zero Pinnacle Exo Volt 30 mm x x
Zero Pinnacle Exo Volt 2 30 mm x x
Zero Pinnacle Zertec Vent 30 mm x x
3M Peltor G2000 30 mm x
3M Peltor G3000 30 mm x x
3M SecureFit X5000 30 mm xxx
3M SecureFit X5500 30 mm xxx

6
Local
WARNING!
This hearing protector is intended to protect the wearer from hazardous noise levels when tted in accordance with this user
instruction. Any other use is not intended and therefore not permitted. It is important that the instructions for use are followed.
Failure to do so could result in a drastic decrease of the noise attenuation and may lead to serious injury.
Read these user instructions carefully!
•The hearing protector must be worn at all times in noisy environments to provide full protection! Only 100% wear time provides
full protection.
•Do not remove the headset to change settings in a noisy environment. Use menu system with guide voice while wearing the
headset.
•The audibility of warning signals at a specic workplace may be impaired due to over-protection, when using a hearing
protector with too high a noise attenuation performance in relation to the noise environment.
•When using hearing protection with entertainment audio features, remember to adjust the volume when working in noisy
environments so that any warning signals etc. can be heard.
•In some individuals, excessive sound pressure from earphones and headphones may cause hearing loss.
•This hearing protector features the level-limiting of audio signals from the speakers to a maximum of 82 dB(A) at the ear.
•Do not use this product in a potentially explosive atmosphere.
•This product may be adversely aected by certain chemical substances. Further information should be sought from the
manufacturer.
•Ensure that the hearing protectors are regularly inspected for serviceability.
•The earmu is provided with safety related audio input. The user should check correct operation before use. If distortion or
failure is detected the user should refer to the manufacturers advice for maintenance and charging of the battery.
•The hearing protector’s noise attenuating properties can dramatically decrease when used with, for example, thick eyeglass
frames, ski masks/balaclavas, etc.
•Use of perspiration/hygienic protection over the sealing rings can reduce the hearing protector’s noise attenuation properties.
•Earmus, and in particular cushions, may deteriorate with use and should be examined at frequent intervals for cracking and
leakage.
•Immediately discard the product if it shows any signs of cracking or damage.
•Hygiene kit should be changed at least twice a year. Make sure you choose the correct hygiene kit for your hearing protector.
•Clean the product with mild soap. You must be sure that the detergent you use does not irritate the skin. Do not dip the product
in water.
•The hearing protector must be stored in a dry, clean environment out of direct sunlight, e.g. in its original packaging.
•Ensure battery condition and state of charge to ensure capacity is sucient throughout a critical task. Battery capacity may
deteriorate over time.
•Ensure matching conguration by testing communication before commencing critical task
•Note, on communication radio, only one unit can transmit at the same time. A unit can not receive a message while
transmitting.
•Ensure that the used radio frequencies are license-free or obtain a license in the region you operate.
FITTING & ADJUSTMENT
Brush away all hair from your ears and place the earmus over your ears so they t comfortably and snugly. Ensure your ears
are completely enclosed by the earmus and that you have an even pressure around your ears.
Headband (pic. C1)
Adjust the headband size so that it rests lightly against the crown of your head.
Helmet mount (pic. C2, C3)
Push the hearing protectors’ helmet attachment into the helmet slot until it locks into position. Place the hearing protectors over
your ears and press inwards until you hear a click. Adjust the hearing protectors and helmet so they t comfortably.
Boom microphone (pic. C4)
The boom microphone (A:6) should be placed approximately 1 cm from the mouth for best noise suppression and clear speech
intelligibility. Make sure the microphone is facing the mouth, with the TALK text imprint towards the mouth. Attach the Windshield
(B:3) for use in windy environments.
USER INSTRUCTIONS FOR TWO WAY COMMUNICATION
Charge the headset prior to rst use! See Charging section of the user manual.
Operation
Power ON/OFF: Press and hold the on/o button(A14) for 4 seconds. To transmit on the congured channel, press and hold
the PTT button(A16). If the VOX is activated just speak into the microphone. Press the LD button(A15) to turn the LD function
ON/OFF.
Conguration
•Conguration can be done both wearing the headset and with the headset in your hands.
Warning! Never remove the hearing protection when exposed to noise.
•All navigation and conguration of settings are guided by and conrmed with voice messages.
•By default, the display shows a home screen with radio channel and sub channel as well as function
icons and a battery indicator.
•By default, the up and down buttons (A13 >) (A12 <) change the radio volume
•Press on/o to enter the menu
•Navigate through settings with up/down buttons
•Press on/o to enter edit mode of the selected setting
•Use up/down to change value
•Conrm and exit the setting with on/o
Instruction manual
EN US CA

7
•The menu system returns to the home screen automatically after 10 seconds of inactivity, or manually with a long press on the
on/o button
Menu items
<Channel> Set the radio channel, <1-16*> (*might vary per region)
<Sub Ch> Set the sub channel for selective squelch (if activated, only transmissions with a matching sub channel will be
heard) <OFF, 1-38>
<VOX> Set the VOX threshold. A lower threshold means a weaker mic signal activates transmission <OFF, 1, 2, 3, 4,
MAX>
<Sidetone> Set volume of your own voice to be heard in the headset when transmitting, <1, 2, 3, 4, MAX>
<Battery> The guide voice reads the battery status
Level-dependent “Active listening” function
Press the LD button (A15) to switch the level-dependant function ON. A voice message conrms the
function and a symbol will show on the display home screen. The volume is adjustable in 5 levels(1,
2, 3, 4, MAX). Adjust the volume by pressing the LD button until you reach your desired volume level. The level will be indicated
with a voice message and on the display. Press and hold the LD button to switch the Level-dependent function OFF. The
headset remembers your last volume setting the next time you switch ON the headset or the level-dependant function.
For use in windy environments it is recommended to t the two included windshields (B:6). Remove the peel o lm and t the
windshield perfectly centered over the Level Dependant microphones (A7).
This hearing protector is provided with level-dependent attenuation. The wearer should check correct operation before use. If
distortion or failure is detected, the wearer should refer to the manufacturers advice for maintenance and charging of the battery.
Warning! The output of the level-dependent circuit of this hearing protector may exceed the external sound level.
Radio Volume
The volume of the incoming radio can be congured with the up and down buttons (A13 >) (A12 <). The volume is adjustable
in 5 levels (OFF, 1, 2, 3, 4, MAX). The Radio can be turned OFF by turning the volume down, press and hold the down button
when on volume level 1. A radio o notication will be heard with 10 minute intervals. To turn the radio ON increase the radio
volume.
PTT (Push To Talk)
Press and hold the PTT button (A16) to transmit on the selected radio channel. Release the button to stop transmitting.
Radio channel (frequency)
Se table E:12 for available channels and frequencies. When two (or more) radios are congured on the same channel, they can
communicate with each other.
Sub channel (selective squelch)
Using sub channels enables multiple groups to use the same radio channel without disturbing each other. When activated,
transmissions are coded with the sub channel and only received messages on the same sub channel will be heard. A unit with
sub channel turned OFF will hear transmissions from all sub channel groups. Sub channel grouping is achieved with sending
units overlaying a tone to the transmitted audio which receiving units can detect and open the selective squelch. See table E:13
for available sub channels and their tone frequencies.
VOX (Voice Operated Transmission)
When the VOX is activated, radio transmission is automatically started when the speech signal from the microphone is above a
certain level (threshold). Double press the PTT button or use the menu to enable/disable the VOX and set the desired threshold
(OFF, 1, 2, 3, 4, MAX). A lower threshold allows a weaker speech signal to activate transmission. A higher threshold might be
needed when the background noise is higher to prevent false triggering of transmission. When enabled, a VOX symbol is shown
on the display home screen. Also when VOX is enabled the PTT button can be used to manually control transmission.
Note, for reliable VOX triggering and clear communication the microphone needs to be correctly rotated and approximately 1
cm from your mouth.
Sidetone
Playback of the transmitted audio in the headset (1, 2, 3, 4, MAX). Conrms that transmission has been triggered and helps the
user to speak at normal levels.
Battery
Voice prompt announcing the battery level o the device. (LOW(0-20%),MED(20-80%,(HIGH(80-100%)).
Advanced menu
When the display is in its home screen, press and hold both the up and the down buttons to enter the advanced menu
<TX allow> Sets when transmission is allowed. <always, channel free>
<TX power> Set the radio’s transmitting power, <LO, MED, HI>
<Voice> Deactivate voice prompts for navigation and settings, <ON, OFF>
<Version> Version and serial number
<Squelch> Set the squelch threshold, <1, 2, 3, 4, MAX>
<Reset> Reset settings to factory default. Conrm with up or down button.
TX allow (busy channel lockout)
TX allow congures when radio transmission is allowed from the headset. The setting aects transmissions triggered by the PTT
button as well as the VOX functionality. Two descending tones are given as feedback when transmission is prevented. TX allow
can be congured in the following settings:
Always: transmission is always allowed
Channel free: transmission is allowed if the channel is free
TX power
Sets the power at which the headset transmits the radio signal (LO, MED, HI). Higher power can extend the range or improve
reception for others in challenging environments. Lower power uses less battery when transmitting and extends operating time.

8
TX power is automatically reduced from HI to LO if battery status is running low. HI TX power is not recommended when using
Alkaline batteries due to reduced operating time.
Voice
Selects if voice prompts are activated (ON,OFF).
Version
Displays product serial number and product revision.
Squelch (radio noise suppression)
Noise from the radio reception is blocked when the incoming signal is below the set squelch threshold (1, 2, 3, 4, MAX). A lower
setting can increase the radio range but might open up for more noise.
Reset
Resets device to factory default settings.
Battery save function
The headset has built in battery save function that turns the headset o when not used. When no movement has been detected
for 10 minutes the headset tuns o, otherwise it turns of after 2 hours of inactivity.
Low battery warning
When the battery power is decreasing and approximately 10% of operation remains, a voice prompt “battery low” will be heard
in the headset. The batteries should then be charged as soon as possible. The headset will turn OFF when the batteries are
drained.
Replacement of batteries
Unscrew the thumbscrew (A18) that secures the battery pack (A17). Remove the battery pack
from the earcup. Replace batteries, take note of battery orientation. The headset can run on both
rechargeable (HR6 NiMh) or disposable batteries of AA type 1.5V. Alkaline batteries only for short
term use due to reduced operating time. Make sure you only use specied battery types. Warning!
If other battery types than specied are used, risk of explosion may occur. Dispose used batteries
according to local regulations. Be careful and make sure the sealing gasket is in place around the
edge of the battery pack compartment on the headset. Reinserts the battery pack making sure the
bottom protruding part is inserted in its sleeve. Gently tighten the thumbscrew.
Charging of batteries
Never connect a charger to the headset if disposable batteries are used. Charge rechargeable batteries prior to rst use.
For safety reasons, all headset functions are automatically switched OFF when charging.
The battery pack/headset will charge when connected to a USB power supply. Only use a charger that is approved to local
directives for electronic devices. Use the USB charge cable supplied with the headset (B:4). Check that the charge cable is
correctly connected to the charging socket (A8). The batteries must be inserted prior to inserting the charge cable.
Power supply specications: Output DC 5V 1000 mA (Limited Power Source - LPS).
When charging, the LED (A11) will ash green. When the batteries are fully charged, the LED changes to solid green.
LED will ash green with high frequency if there is an error detected when charging.
Disconnect the charger cable when batteries are fully charged.
Important!
Use AA NiMh re-chargeable batteries as included or with similar performance.
Never use batteries with more than 1,5volt.
Never leave the battery pack/headset unattended when charging.
Do not use the headset when the batteries are charging.
Only use a power supply and cable as specied by the manufacturer.
Only charge the batteries at room temperature (10-25°C, (50-77°F)).
Do not disassemble, crush or expose the batteries to extreme heat or re.
If storing the unit for a longer time remove the batteries from the battery pack.
If these instructions are followed, the product is unlikely to present any hazards within the meaning of EN 60950-1.
Parts (pic. A)
A1: Thermoplastic headband
A2: Thermoplastic helmet attachment
A3: Replaceable foam liner
A4: Replaceable foam lled plastic ear cushions
A5: Replaceable foam lled head cushion
A6: Boom microphone
A7: Level-dependent microphones
A8: Charging socket
A9: Socket for boom-microphone
A10: Display
A11: LED
A12: Volume DOWN and decrease setting
A13: Volume UP and increase setting
A14: On/O button
A15: Level dependent button
A16: PTT button
A17: Battery pack
A18: Battery pack thumb screw

9
Accessories and spare parts (pic. B)
B:1. Hygiene kit: 99403-001
B:2. Sweat absorbers: 99900-001
B:3. Windshield boom microphone: 16999-001
B:4. USB charging cable Local: 39927-001
B:5. Boom microphone: 16982-001
B:6. Windshield level dependent microphones: 1059-001
B:7. Spare headband electronic: 26046-915
B:8. Spare helmet arm (pair): 26108-910
B:9. Battery pack AA: 17004-001
B:10. Battery pack gasket: 17112-001
B:11. Charger EU: 17193-001
B:12. Charger UK: 17193-007
Change the hygiene kit (pic. D)
•Remove the old foam liner (A3) and insert the new
•Pull o the old ear cushion (A4)
•Centre the new ear cushion over the hole
•Press with a nger along the outside of the ear cushion until it attaches all around the edges
•Pull o the old head cushion (A5) and insert the new
Approval and technical data (E)
E:1) Headband
E:2) Helmet mounted
E:3) Tested and certied to (standards)
E:4) Weight
E:5) Mean attenuation
E:6) Standard deviation
E:7) Assumed Protection Value
E:8) Tested by (notied body)
E:9) Headband force
E:10) Size: S, M & L
E:11) Additional technical data
E:12) Radio channel frequencies
E:13) Sub tone channel frequencies
Approved helmet combinations
These earmus attached to head protection and/or face protection devices shall be tted to, and used only with, the carriers(s)
listed in table G.
G:1) Manufacturer
G:2) Model
G:3) Adapter
Earmus complying with EN 352-3 are of medium size range or small size range or large size range. Medium size range
earmus will t the majority of wearers. Small size range or large size range earmus are designed to t wearers for whom
medium size range earmus are not suitable.
Hereby, Hellberg Safety AB declares that the hearing protector Local 446 is in compliance with PPE regulation EU 2016/425
and the RED Directive 2014/53/EU. The full text of the EU declaration of conformity is available at: www.hellbergsafety.com/
declaration-of-conformity
For manufacturing date, see the date clock on the inside of the ear cup. Expected lifetime of product, excluding its batteries, is 5
years. Serial number is placed on label on the bottom of the ear cup.
This product is covered by the Waste Electrical and Electronic Equipment Directive (WEEE) 2012/19/EU.
Do not dispose of your product as unsorted municipal waste. Batteries must be disposed of in accordance with national
regulations. Use local recycling system for electronic products.
UKCA
PPE regulation 2016/425 as brought into UK Law and amended.
UK Approved Body, SATRA Technology Center Limited, 0321. RED Directive 2014/53/EU and Radio Equipment Regulations
2017.
Importer UK: HULTAFORS GRUOP, Unit N3, Gate 4, Meltham Mills Ind Estate, HD9 4DS Holmrth, UK
Approved Body UK: SATRA Technology Centre, Wyndham Way, Telford Way, Kettering, Northamptonshire, NN16 8SD, UK
UKCA declaration of conformity is available at: www.hellbergsafety.com/declaration-of-conformity

23/09 Print no: 17659_rev4
Hellberg Safety AB
Stakebergsv. 2 443 61 Stenkullen
info@hellbergsafety.se hellbergsafety.com
Other manuals for Local 446
1
This manual suits for next models
4
Other Hellberg Protection Device manuals