MIMAKI J0487 User manual

MIMAKI ENGINEERING CO., LTD.
D203440-10
Introduction.....................................................................................................................2
Caution ............................................................................................................................2
DISCLAIMER OF WARRANTY............................................................................................................2
On this operation manual.....................................................................................................................2
Attention ..............................................................................................................................................2
Safety precautions .........................................................................................................3
Symbols...............................................................................................................................................3
Installation of this option...............................................................................................5
Installation location ..............................................................................................................................5
Part name and function..................................................................................................6
Overall .................................................................................................................................................6
SMALL ROLL W / CENTR. ..................................................................................................................7
PLAITED HU1800................................................................................................................................8
Operation panel ...................................................................................................................................9
About media................................................................................................................. 12
Available media size ..........................................................................................................................12
Set a media................................................................................................................... 13
Plaited media.....................................................................................................................................13
Roll media .........................................................................................................................................18
Print out........................................................................................................................ 21
For the plaited media .........................................................................................................................21
For roll media.....................................................................................................................................23
User maintenance........................................................................................................ 25
Troubleshooting .......................................................................................................... 25
The tension bar rises up / falls even when the folding bar is adjusted ................................................25
Specifications .............................................................................................................. 26
SMALL ROLL W / CENTR. ................................................................................................................26
PLAITED HU1800..............................................................................................................................26
Option – J0487
SMALL ROLL W / CENTR.+ PLAITED HU1800
Operation Manual

2
Introduction
Thank you for purchasing the “SMALL ROLL W / CENTR. + PLAITED HU1800” option for the ML Tiger-1800B
series color inkjet printer.
PLAITED HU1800 is an option for the ML Tiger-1800B series that allows the folded fabric media to be set on
the printer main unit.
By using the included SMALL ROLL W / CENTR. , it is also possible to use a roll media.
Caution
DISCLAIMER OF WARRANTY
THIS LIMITED WARRANTY OF MIMAKI SHALL BE THE SOLE AND EXCLUSIVE WARRANTY AND IS IN
LIEU OF ALL OTHER WARRANTIES, EXPRESS OR IMPLIED, INCLUDING, BUT NOT LIMITED TO, ANY
IMPLIED WARRANTY OF MERCHANTABILITY OR FITNESS, AND MIMAKI NEITHER ASSUMES NOR
AUTHORIZES DEALERS TO ASSUME FOR IT ANY OTHER OBLIGATION OR LIABILITY, OR MAKE ANY
OTHER WARRANTY, OR MAKE ANY OTHER WARRANTY IN CONNECTION WITH ANY PRODUCT
WITHOUT MIMAKI’S PRIOR WRITTEN CONSENT.
THE SAME SHALL APPLY WHEN MIMAKI WAS ADVISED OF THE POSSIBILITY OF SUCH DAMAGES.
IN NO EVENT SHALL MIMAKI BE LIABLE FOR SPECIAL, INCIDENTAL OR CONSEQUENTIAL DAMAGES,
OR FOR LOSS OF PROFITS OF DEALER OR CUSTOMERS OF ANY PRODUCT.
On this operation manual
This manual describes the operation and maintenance of “SMALL ROLL W / CENTR. + PLAITED”
(hereinafter referred to as this option).
Read and fully understand this operation manual before using this option. It is also necessary to keep this
operation manual on hand.
Make arrangement to deliver this operation manual to the person in charge of the operation of this option.
You can also download the latest manual from our website.
Attention
Although this operation manual has been carefully prepared for your easy understanding, please do not
hesitate to contact your local distributor or our sales office if you have any inquiry.
The contents of this operation manual are subject to change for improvement without notice.
Reproduction of this manual is strictly prohibited.
© Mimaki Engineering Co., LTD.
All Rights Reserved.Copyright

3
Safety precautions
Symbols
In this document, symbols are used for explaining the contents of cautions on operation. The symbol to be
displayed differs depending on the caution content. Understand the meaning of each symbol and use this unit
safely and correctly.
Example of symbol
Description
Warning
Failure to observe the instructions given with this symbol
can result in death or serious injuries to personnel. Be
sure to read it carefully and use the printer properly.
Caution Failure to observe the instructions given with this symbol
can result in minor or medium injuries to personnel.
General Warning This symbol indicates that the items shown need to be
noted. Specific notes are drawn in the figure .
General Mandatory
Action
This symbol indicates that the action shown must be
executed. Specific instruction is drawn in the figure .
General Prohibition
This symbol indicates that the action shown is
prohibited. Specific action that is prohibited is drawn in
the figure .
Important Contains important information you need to know when
using this option. Use as a reference for operations.
Hint Useful information is given with this symbol. Use as a
reference for operations.
Reference
This symbol indicates the reference page for related
contents. Click the text to display the corresponding
page.
4
Warning on use
Warning
The set of power cables provided with this option is for use with this option only, and cannot be used
with other electrical devices. Do not use any power cables other than the ones provided with this
option. Otherwise, it could cause a fire or electric shocks.
Take care not to damage, break or work upon the power cable. If a heavy material is placed on the
power cable, or if it is heated or pulled, the power cable can break, thus resulting in a fire or electric
shocks.
Avoid using in humid places. Also, do not splash water on this option. Otherwise, a fire, electric
shocks, or product breakdown may result.
Use of this option under an abnormal condition where it produces smoke or strange smell can result in
a fire or electric shocks. If such an abnormality is found, be sure to turn Off the power switch
immediately and unplug the cable from the wall outlet. Check first that this option no longer produces
smoke, and then contact your distributor or our sales office for repair. Never repair this option by
yourself, as it is dangerous.
Never disassemble or modify this option. It could cause electric shocks or breakage.
Do not use extension cables. Otherwise, it could cause a fire or electric shocks.
Keep the power plug prong clear of any foreign object such as a piece of metal. Failure to do so may
result in a fire or electric shocks.
Do not plug too many leads into a single socket. Otherwise, it could cause a fire or electric shocks.
If the power cable is damaged, exposed core wire, disconnection, etc., contact your service
representative for replacement. If used as it is, it may cause a fire or electric shocks.
Do not handle the power plug with wet hands. It could cause electric shocks.
Grasp by holding the plug itself when removing the power plug from wall outlet, and never hold by the
cable. Holding and pulling the cable may damage the cable, leading to a fire or electric shocks.
Do not use this option with the voltage other than the indicated one. Otherwise, it could cause a fire or
electric shocks.
Do not use this option with the power frequency other than the indicated one. It could cause a fire or
electrical shocks.
Do not place your fingers or other parts of your body close to the dangerous moving parts.
If a foreign object such as a small piece of metal or a liquid such as water gets inside this option, turn
off this option. After that be sure to unplug the power plug from the outlet and consult your, service
representative. If used as it is, it may cause a fire or electric shocks.
Do not use the combustible spray or flammable solvent nearby or inside of this option. Otherwise, it
could cause a fire or electric shocks.
Do not put a vase, flowerpot, glass, cosmetics, medicine, container which water was in, or small metal
thing in the top and near this option. When some spills over or enters inside of this option, it could
cause a fire or electric shocks.

5
Installation of this option
Installation location
This option is a Tiger-specific option kit for the ML Tiger-1800B series (hereinafter referred to as the printer
main unit) that enables use of folded fabric media.
The space required when this option is mounted on the printer main unit is shown below.
Determine the installation location in consideration of the size when this option is mounted on the printer main
unit and the space required for printing.
1,500 mm or more
1,500 mm or more
1,500 mm or more
(5,250 mm)
(2,200 mm)
Printer main unit
SMALL ROLL W / CENTR.
PLAITED HU1800
Height: 3,500 mm or more
6
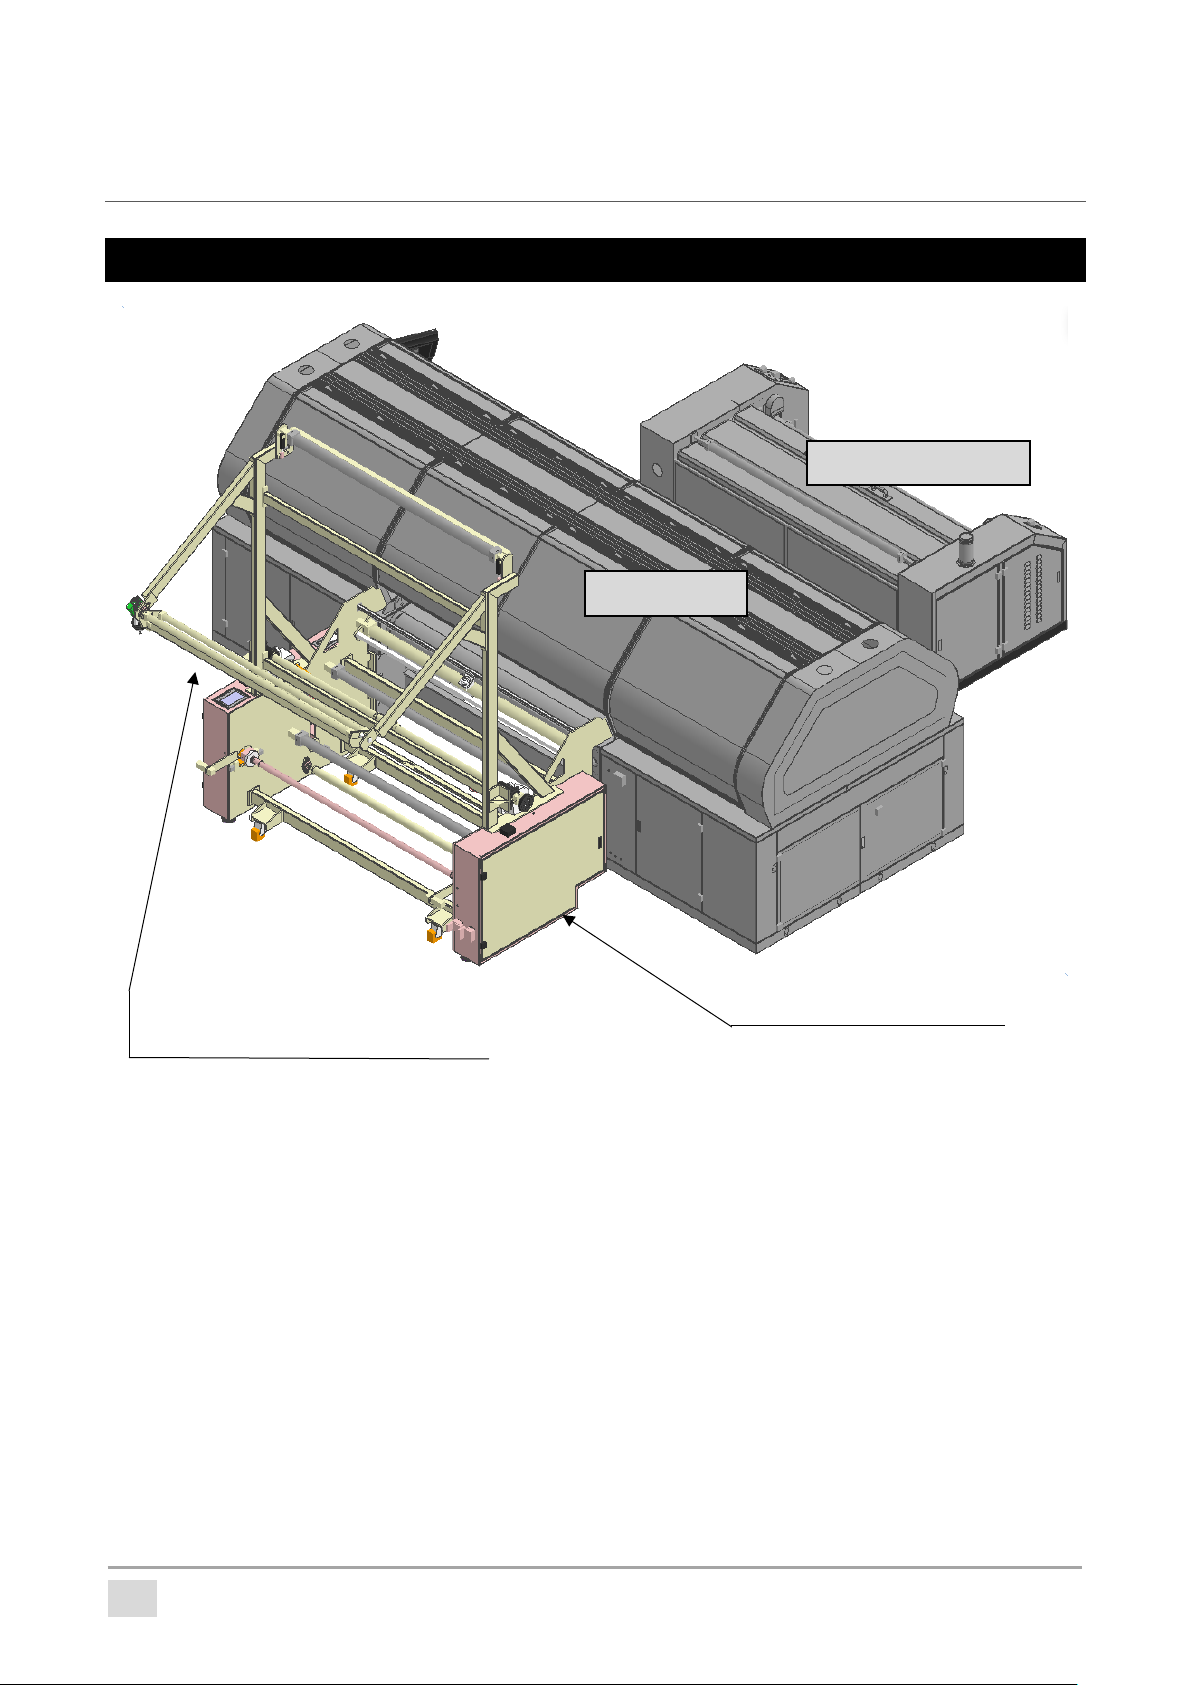
Part name and function
Overall
The equipment included in this option is as follows.
SMALL ROLL W / CENTR.···· 1 unit
PLAITED HU1800 ··············· 1 unit
DRYERJET for FABRIC
Printer main unit
SMALL ROLL W / CENTR.
Feed the roll media
PLAITED HU1800
Feed the folding media
7
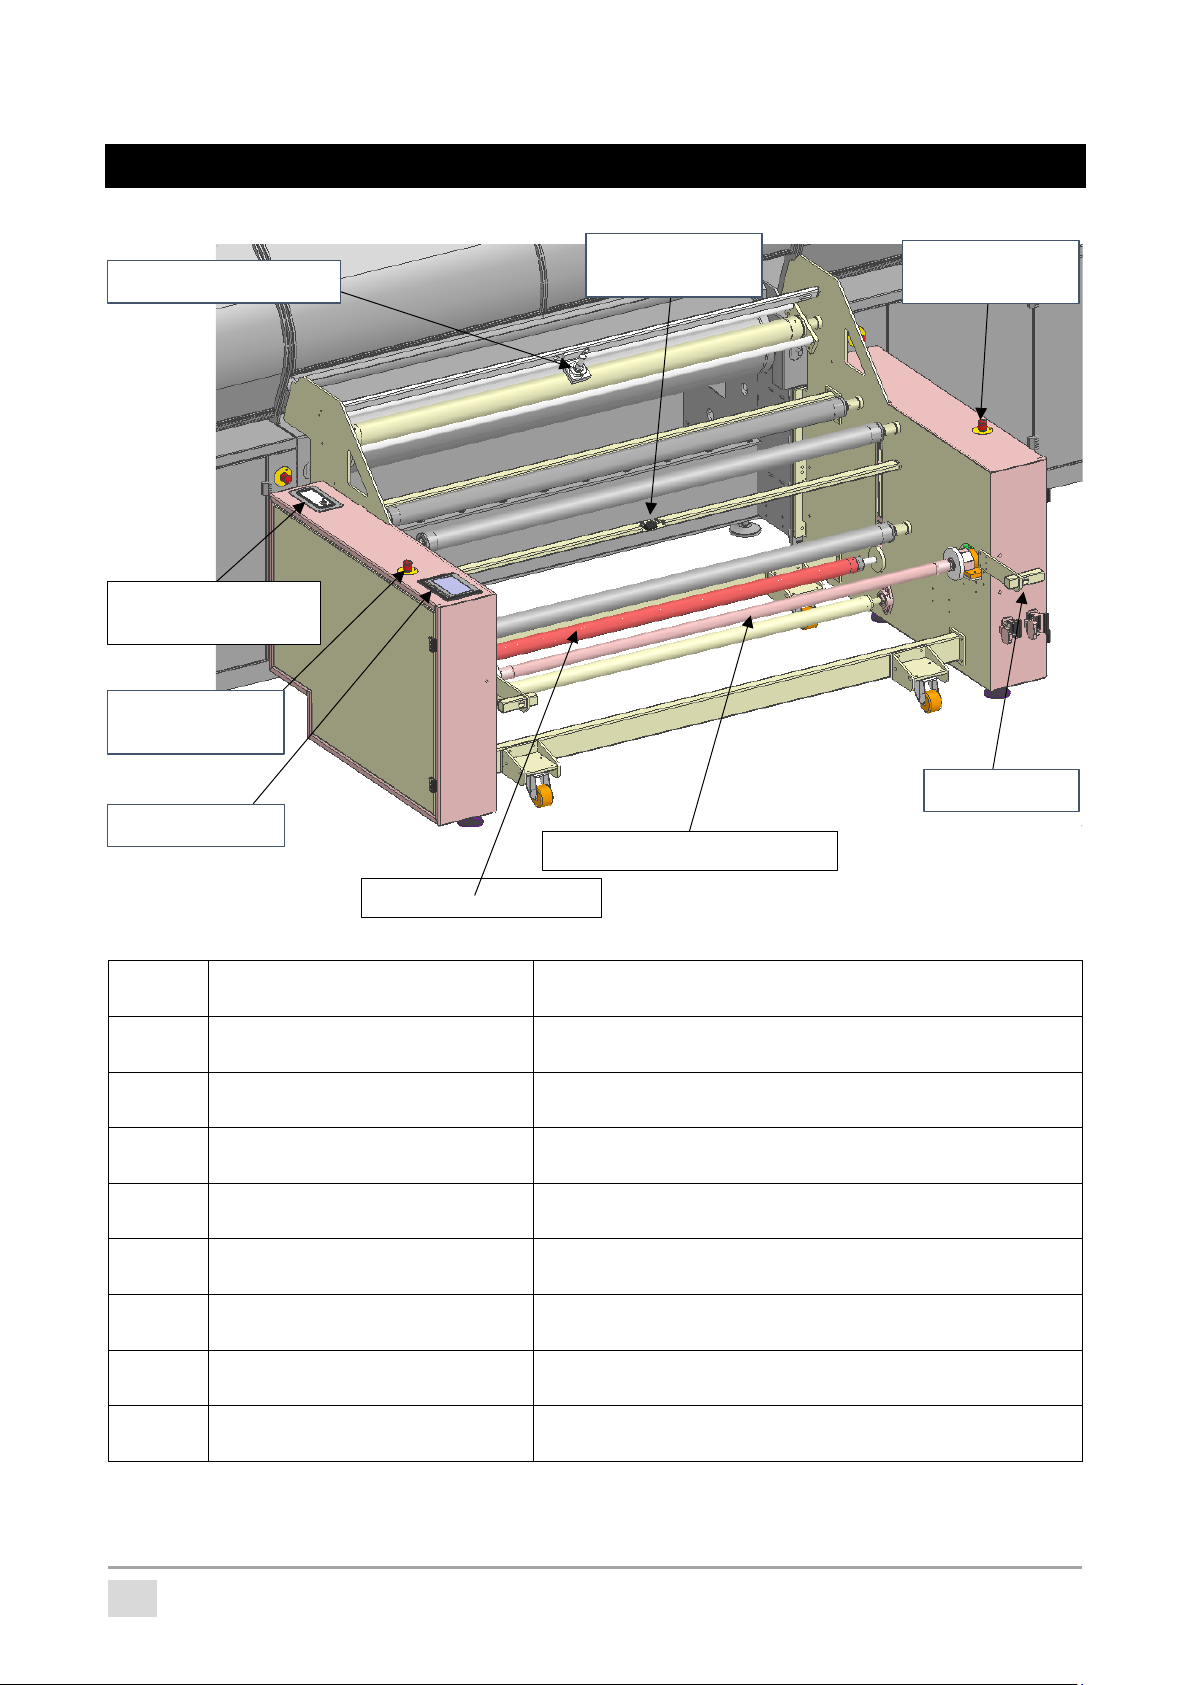
SMALL ROLL W / CENTR.
No. Name Function
1 Seam detection sensor A sensor that detects media seam.
2
Setting panel of the seam
detection sensor
It is a controller of the seam detection sensor.
Normally not operated.
3 Emergency stop button Button to stop this option in case of emergency.
4 Operation panel
This panel is used to operate the start / stop and
Automatic / Manual switching of this option.
5 Tension bar
Move up and down to automatically and optimally
adjust the media tension.
6 2 inch paper core set shaft Shaft for attaching a 2 inch paper core.
7 Beam sensor
This option and the printer main unit stops when light
is shaded.
8 Media end detection sensor A sensor that detects when the media has ended.
6. 2 inch paper core set shaft
4. Operation panel
7. Beam sensor
5. Tension bar
3. Emergency
stop button
1. Seam detection sensor
2. Setting panel of the
seam detection sensor
3. Emergency
stop button
8. Media end
detection sensor
8
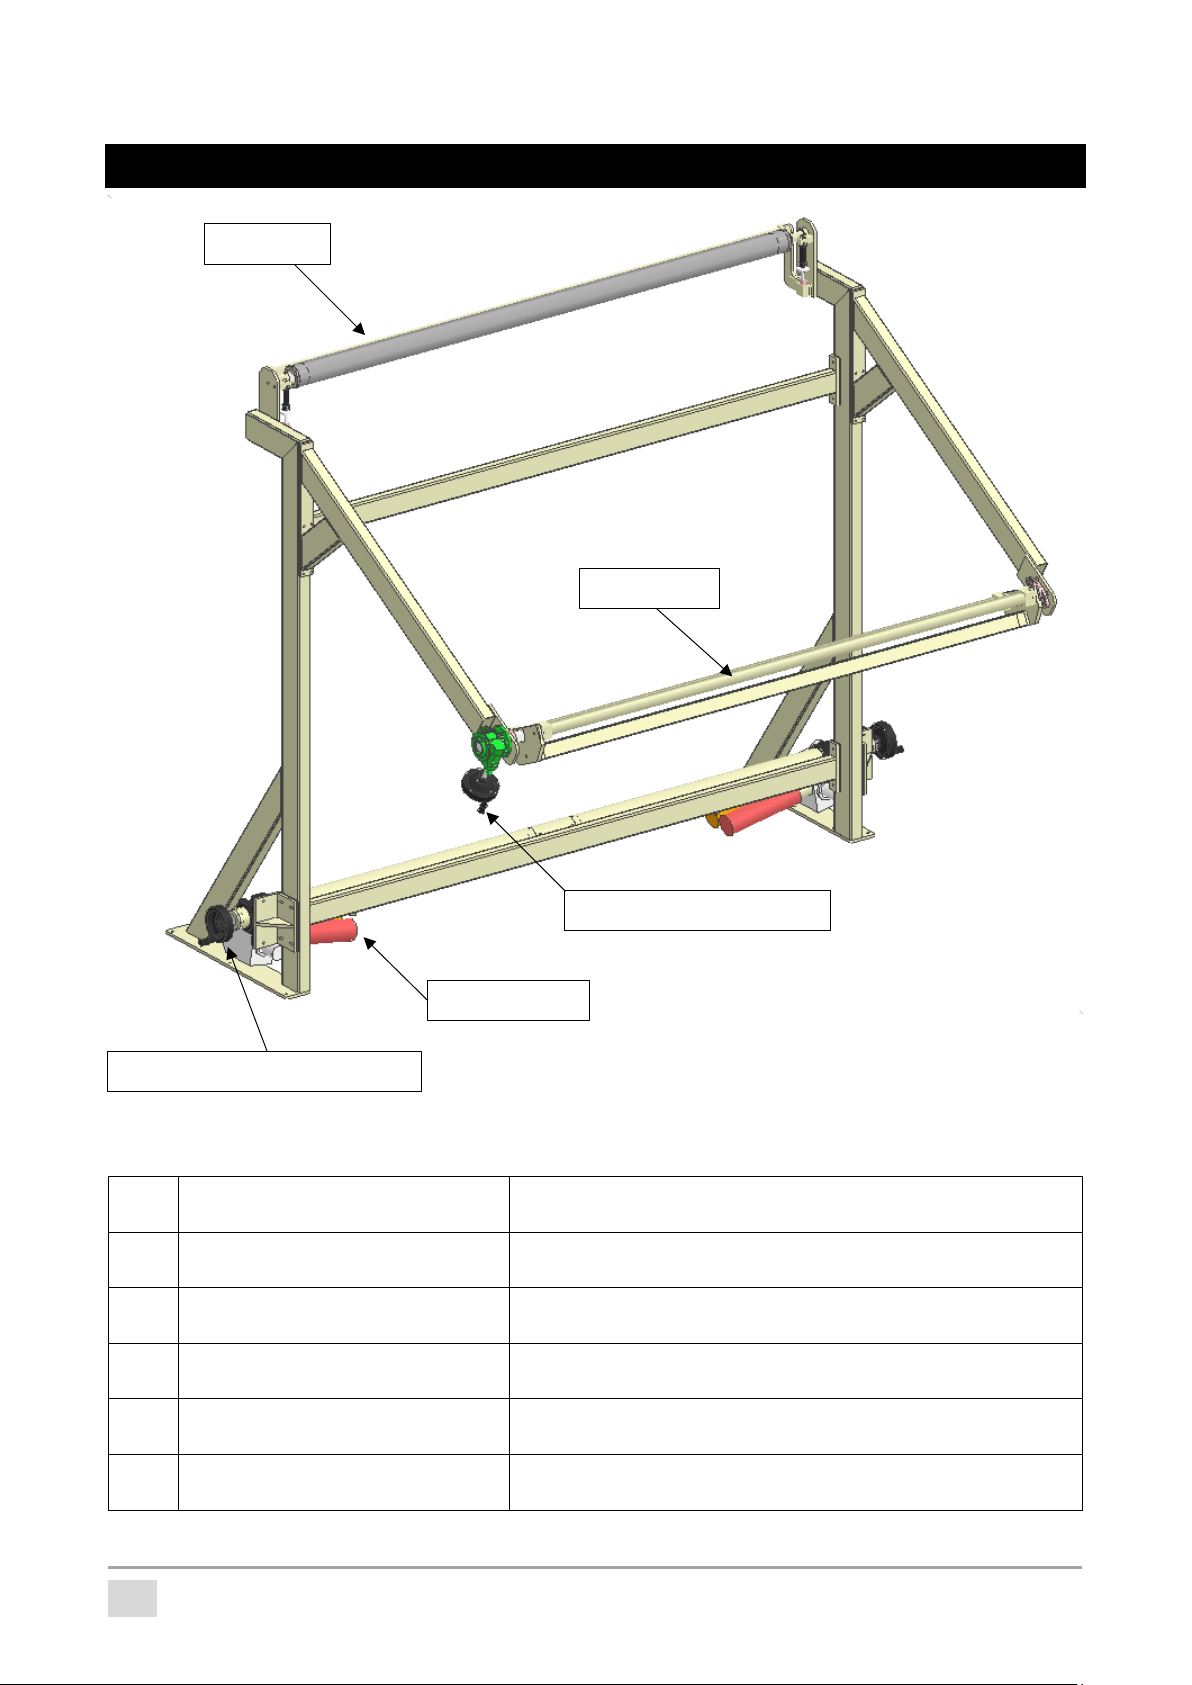
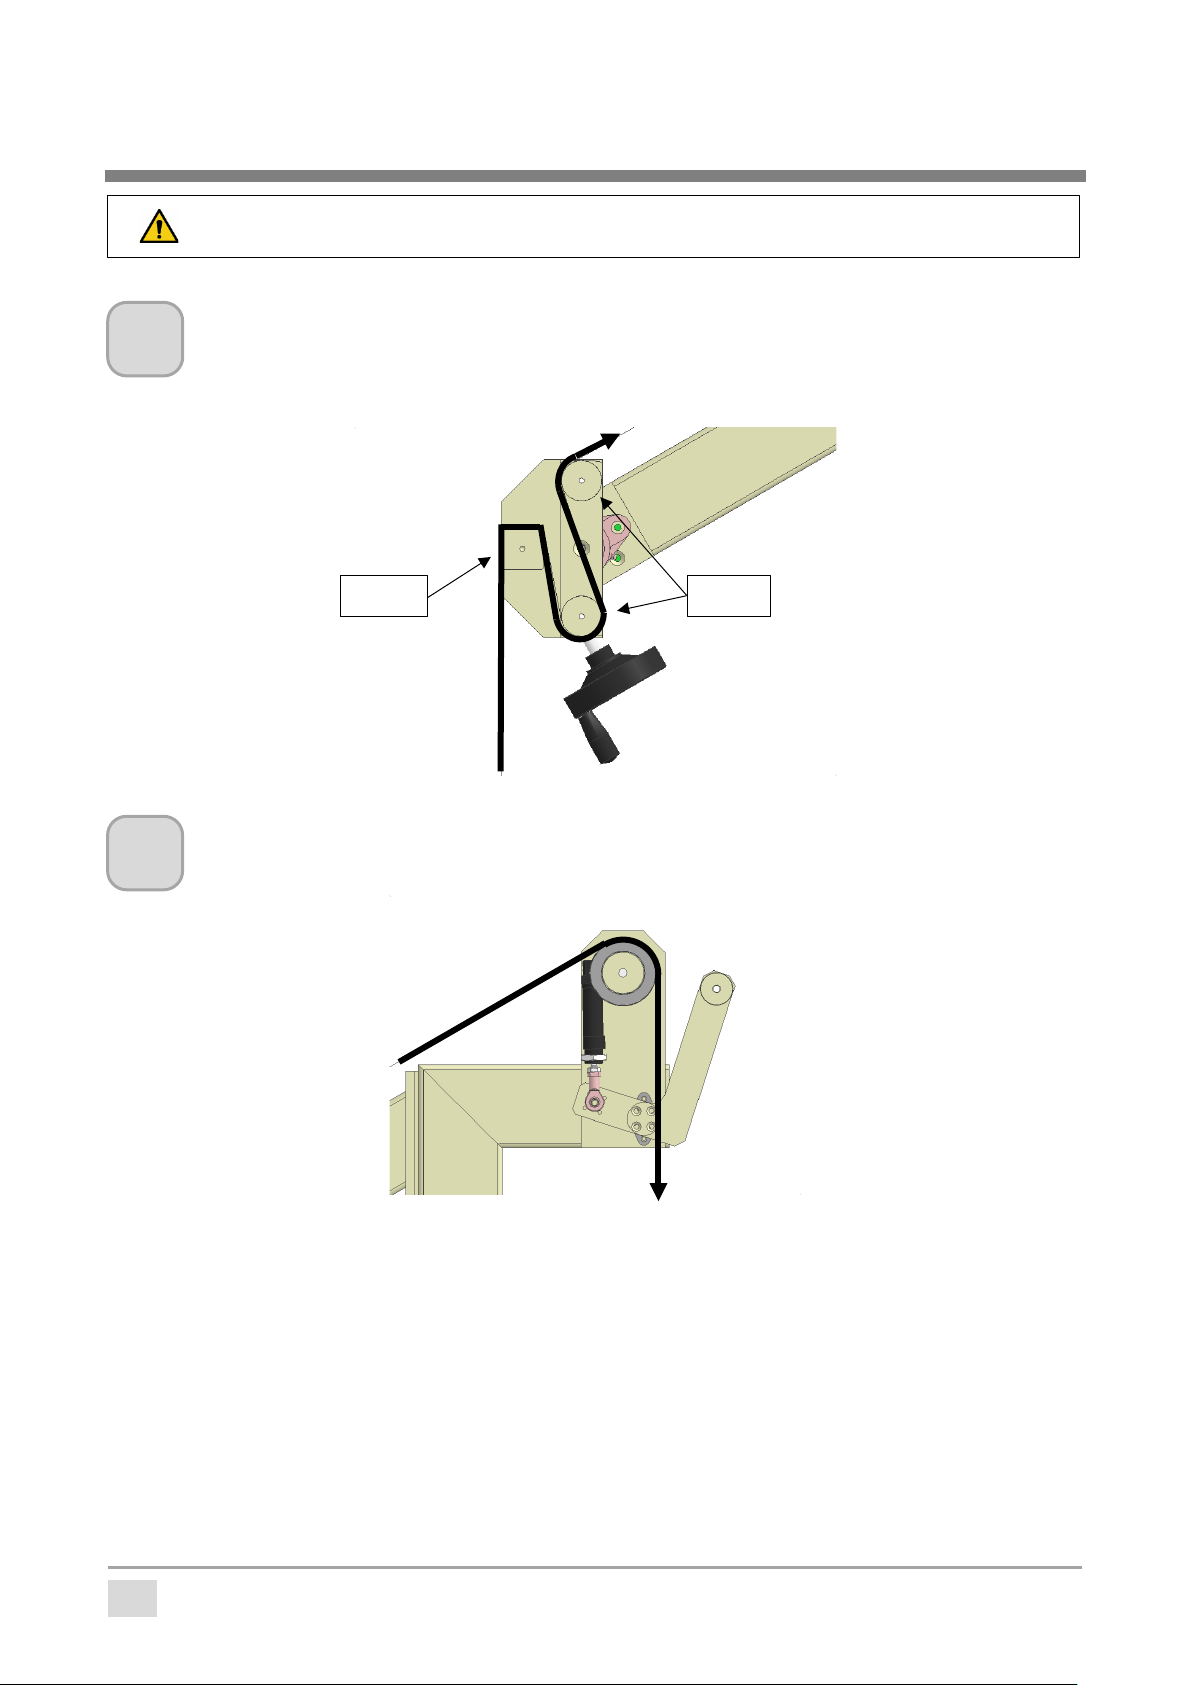
PLAITED HU1800
No. Name Function
1 Pinch bar
Opens and closes in synchronization with the tension
bar. Tension the media.
2
Centering unit adjustment
handle
Handle to adjust the position of the centering unit.
3 Folding bar Folding bar for applying tension to media.
4 Tension adjustment handle Handle to change the angle of the folding bar.
5 Centering unit Unit for centering media.
1. Pinch bar
2. Centering unit adjustment handle
3. Folding bar
4. Tension adjustment handle
5. Centering unit

9
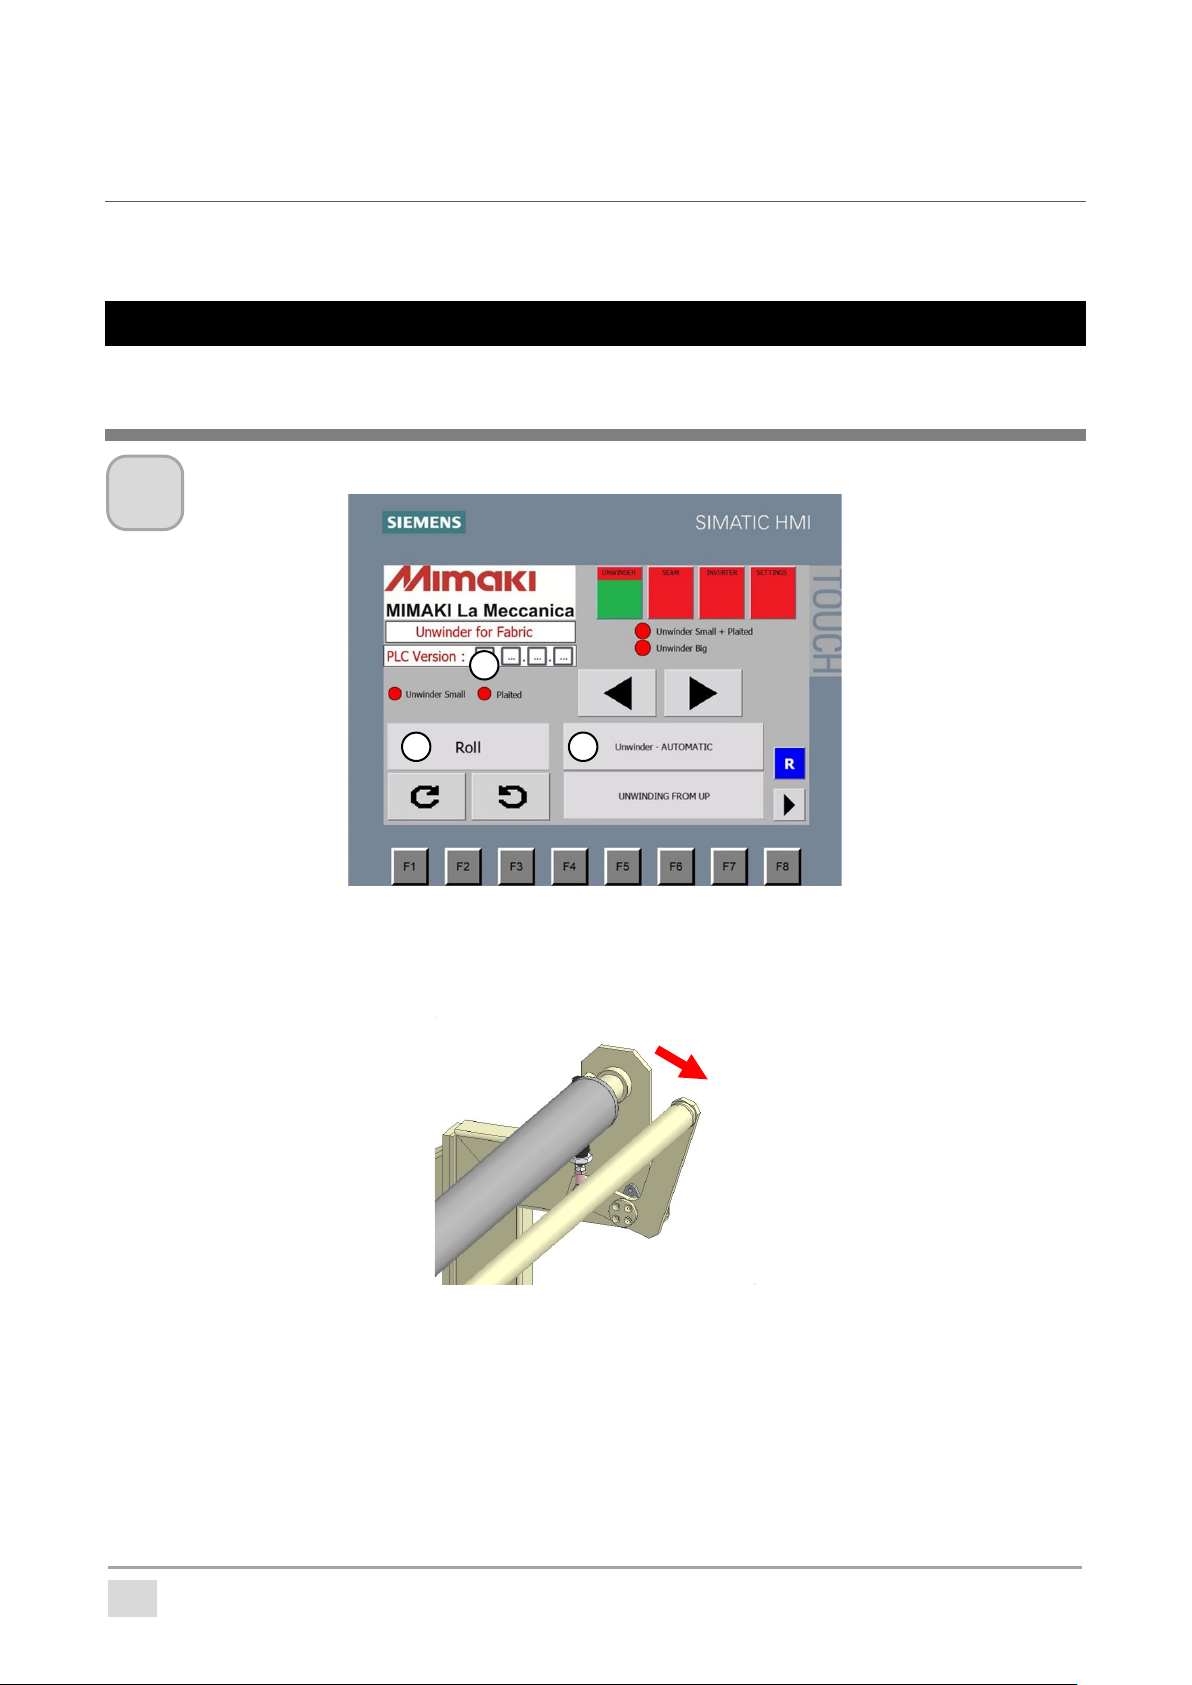
Operation panel
Startup screen
Name
Function
UNWINDER Operation screen of SMALL ROLL W / CENTR.
SEAM Settings related to the seam detection sensor.
INVERTER
It is a setting related to another option, BIG ROLL UNWINDER HU1800
(Option-J0485). Not covered in this manual.
SETTING Language setting
You can switch between English and Italian.
Main menu
The screen changes to each of the following screens.
Item with a green button are currently active.

10
UNWINDER screen
Page 1
Page 2
To page 1
Roll removal button
Printer main unit
belt by manual button
ON: Media end detection enabled
OFF: Media end detection disabled
Roll / Plaited
switch button
Error history display
(When an error occurs)
To page 2
Error reset
Face out winding /
Face in winding
switch button
Automatic /
Manual
switch button
Manual rotation button
Valid only in manual mode

11
SEAM screen
When a seam is detected, the specified amount is fed and printing stops in the pause state.
To resume printing, feed the seam out of the scan area and then press the Restart button.
After seam detection
feed amount setting (*)
Distance from the start of printing
to the alarm after seam detection
(display only)
Distance from the start of printing
to detect the seam (display only)
Seam detection enable / disable button
ON: Function enabled
OFF: Function disabled

12
About media
This section describes the available media size and how to handle them.
Available media size
Maximum media width
1,890 mm
Minimum media width
500 mm
Media thickness 5 mm or less
For SMALL ROLL W /
CENTR.
Media outside diameter
400 mm or less
Media weight
100 kg or less
Media inner diameter
2 inch (
paper core
)
Printing surface Both face in and face out are possible
Printing speed Based on the printer main unit
13
Set a media
This section mainly describes changes to the media setting method that are caused by using this option. For
the basic media setting method in the printer main unit, refer to the operation manual of the printer main unit.
Plaited media
Set the plaited media in this option.
Preparation
Setting the operation panel.
1. Set the Roll / Plaited switch button to “Plaited”.
2. Check that the “Plaited”lamp is green.
3. Set the Automatic / Manual switch button to “Unwinder-MANUAL”.
4. The pinch bar at the top of this option opens automatically.
1
1
3
2
14
Set of media
Pass the media through the folding bar.
Pass the media through the folding bar as shown.
The direction of the folding bar can be changed by rotating the tension adjustment handle.
Pass the media through pinch bar.
Pass the media through the pinch bar as shown in the diagram.
1
Use a stepladder, etc. for work at height, and be careful not to fall.
Square
Round
2
15
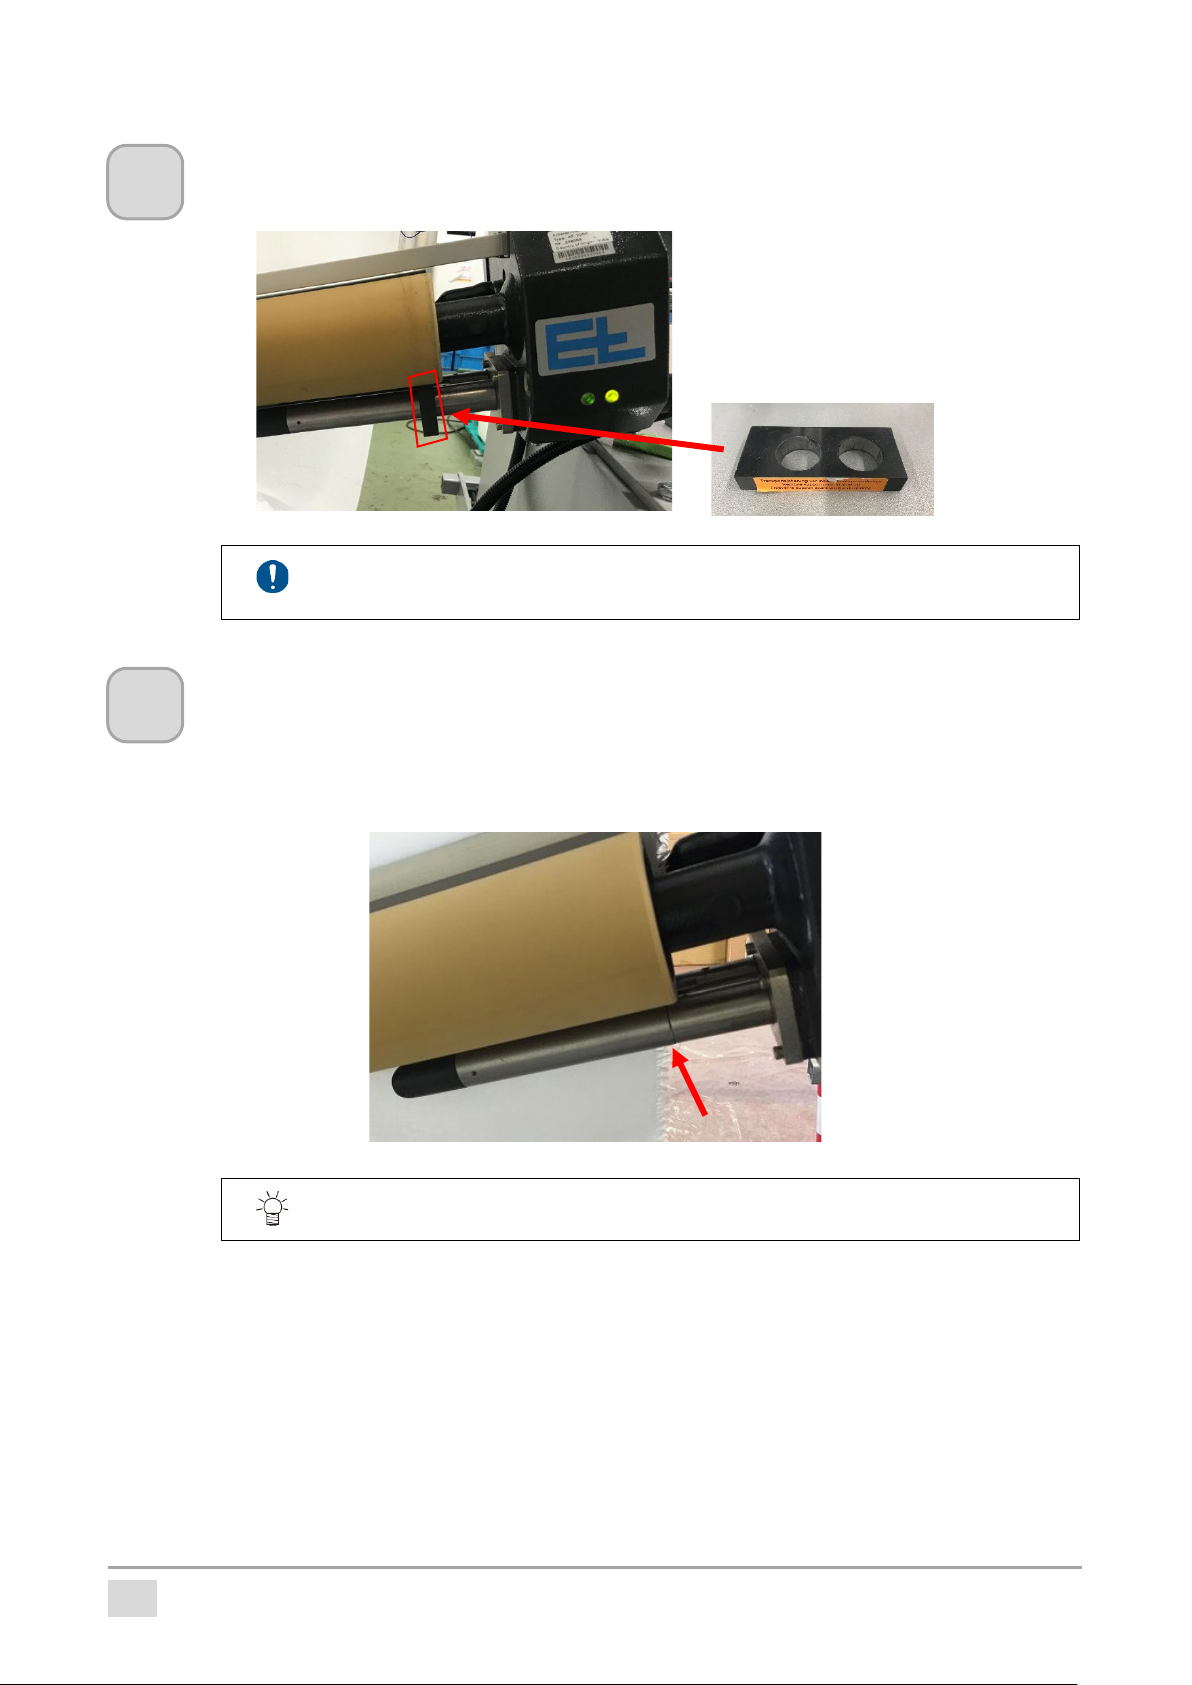
Remove the sensor cover.
Pull the sensor cover of the centering unit straight inward and remove it.
Temporarily adjust the width of the centering unit.
Turn the centering unit adjustment handle to temporarily adjust the position of the centering unit according
to the width of the media.
Measure the width of the media with a measure etc. so that the vertical line of the sensor below the
centering unit matches the edge of the media.
3
The final adjustment is performed while flowing the media.
4
When not using the centering unit, be sure to return the sensor cover to its original
position (the lamp changes from red to green).
16
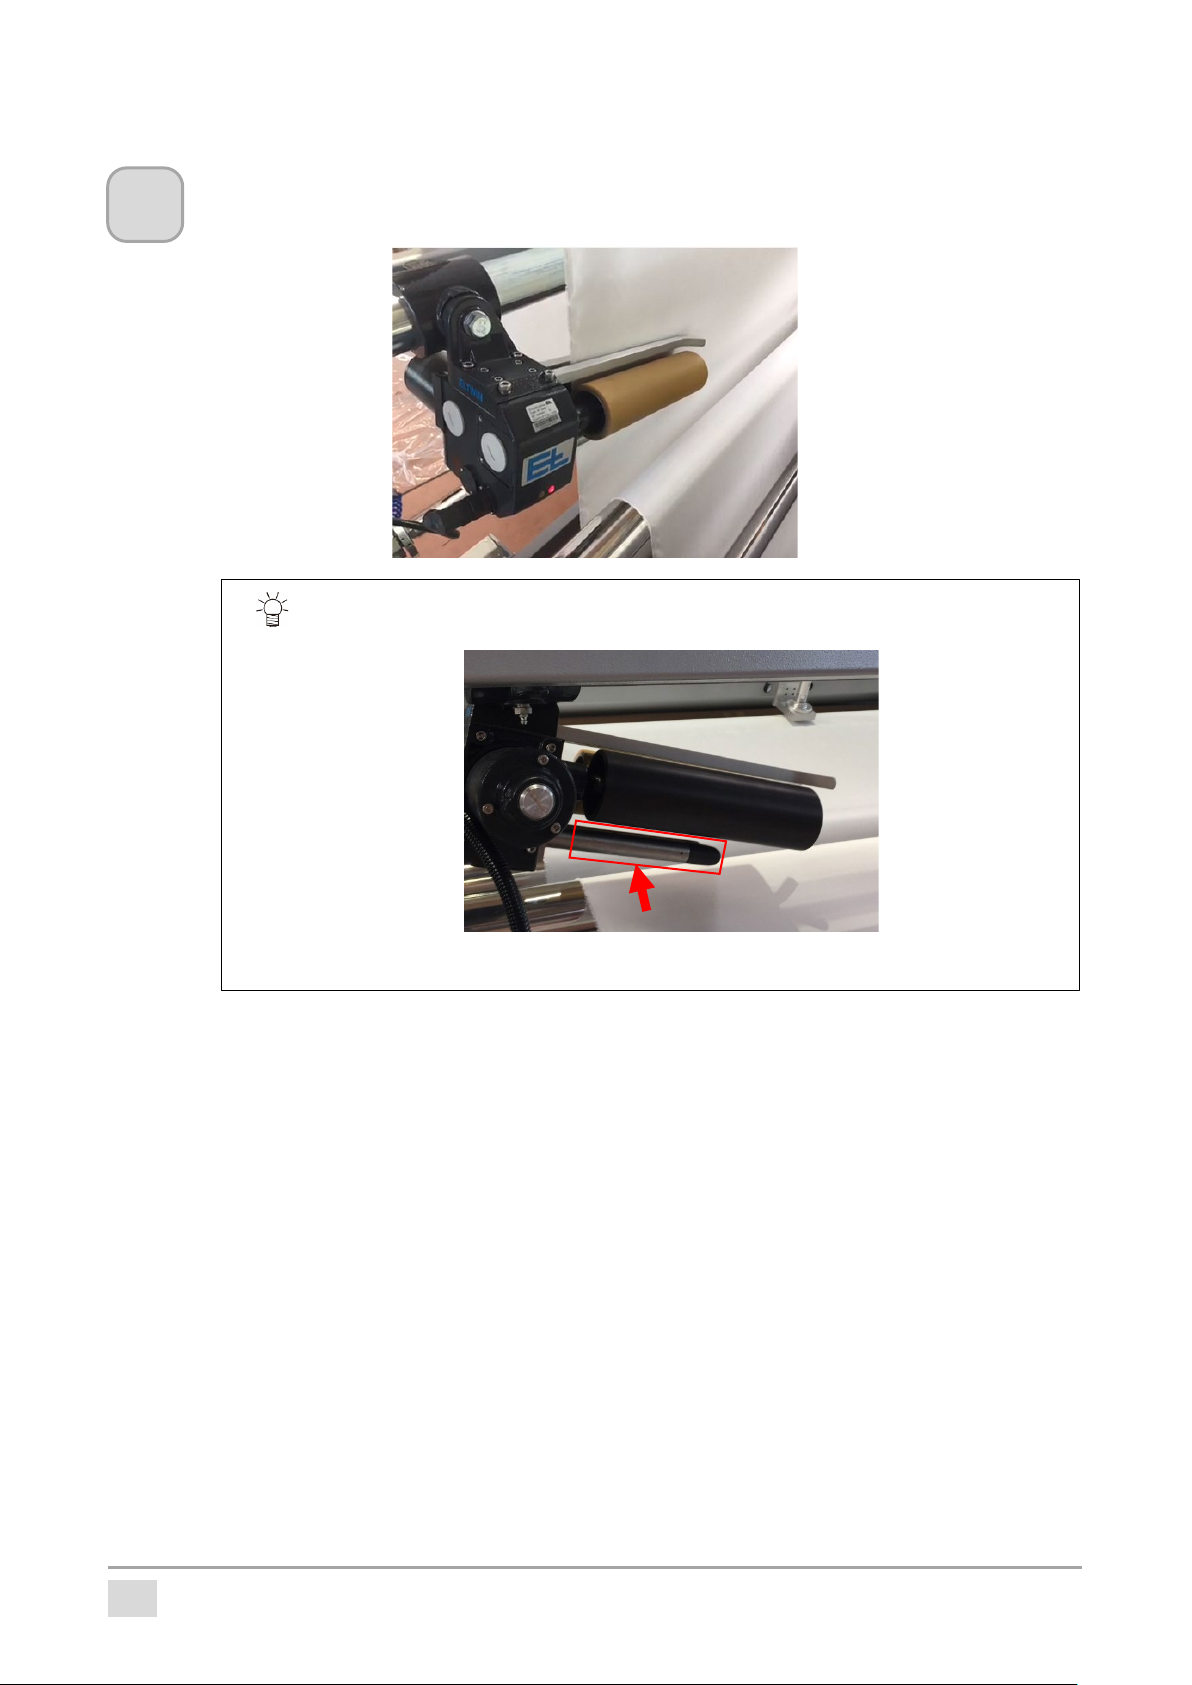
Pass the media through the centering unit.
Pass the media between the black roller and the amber roller of the centering unit.
5
The sensor may react when the media is passed, and the roller may move. If the sensor
part is shaded with paper, you can work with the roller open.
When media setting is completed, remove the shading paper.
17
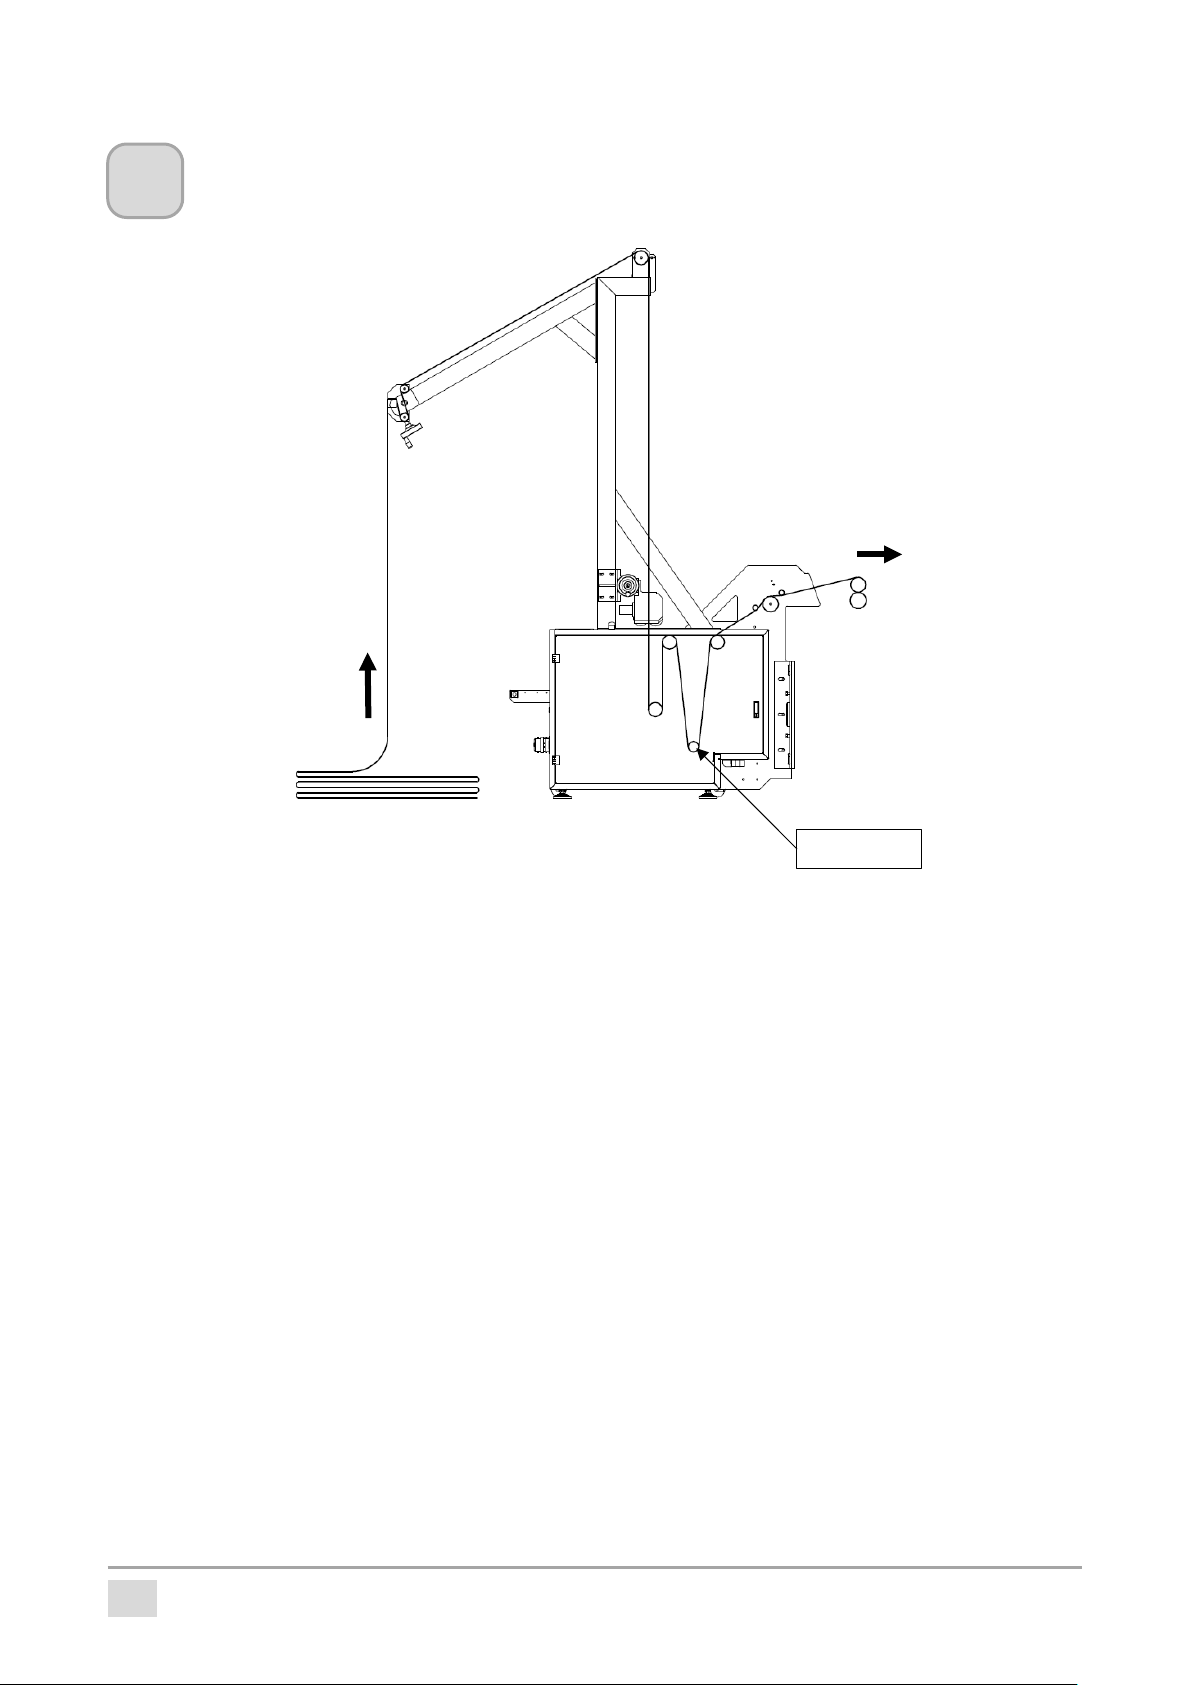
Pass the media through SMALL ROLL W / CENTR.
Insert the media into SMALL ROLL W / CENTR. as shown.
6
Tension bar

18
Roll media
Set the roll media wound on the paper core in SMALL ROLL W / CENTR.
Preparation
Setting the operation panel.
1. Set the Roll / Plaited switch button to “Roll”.
2. Confirm that the “Unwinder Small”lamp is green.
3. Set the Automatic / Manual switch button to “Unwinder-MANUAL”.
Set of media
Operate the operation panel.
Press “Roll Discharge” button on the second page of the operation panel UNWINDER screen.
The 2 inch paper core set shaft rotates and can be removed.
1
1
Note that the red part is different from that of plaited media.
Because roll media is heavy, use a lift or work with two or more people.
1
3
2

19
Remove the air shaft.
Open the disc-shaped support and remove the shaft.
Set the shaft on the media, and attach the shaft to the SMALL ROLL W / CENTR.
Close the disc-shaped support.
Secure media.
Inject air into the shaft with the supplied air gun to fix the media and shaft.
Pass the media (when not using the centering unit).
2
3
4
Tension bar

20
Pass the media (when using the centering unit).
The way to pass the media to the pinch bar and centering unit is the same as for the folding media.
5
Face in cannot be set.
Tension bar
Table of contents
Other MIMAKI Printer Accessories manuals


Popular Printer Accessories manuals by other brands

Epson
Epson T603B00 Material safety data sheet

Lexmark
Lexmark N8050 user guide

Intermec
Intermec EasyCoder 501 SA installation instructions

Canon
Canon Color Network Printer Expansion Kit-C1 INSTALLATION PROCEDURE

Honeywell
Honeywell Intermec PC Series instructions

Seiko Epson
Seiko Epson SJIC11 instruction manual


