MIMAKI JFX550 Series User manual
MIMAKI ENGINEERING CO., LTD.
https://mimaki.com/
https://japan.mimaki.com/
English
Japanese
Foreword ........................................................................2
Safety Precautions ........................................................3
Warning labels ...............................................................5
About installing this machine .......................................6
Name of Each Part .........................................................7
MPC Screen Explanation ..............................................8
Fill ink in the ink tank and charging .............................9
When auto-charging fails ............................................13
Replace the waste ink tank with new one .................14
Replacing consumables ..............................................16
Tank Calibration ...........................................................22
Ink tank warning appears ............................................25
はじめに ........................................................................28
安全にお使いいただくために ........................................29
警告ラベルについて ......................................................31
本装置の設置について ...................................................32
各部の名称 .....................................................................33
MPC 画面について ........................................................34
インクの補充とチャージ ...............................................35
オートチャージができなかった場合 .............................39
廃インクタンクの交換 ...................................................40
消耗品の交換 .................................................................42
タンクキャリブレーション ............................................49
インクタンクに異常が発生したら .................................52
D203668-10
OPT-J0534
3L ink supply option
3Lインク供給オプション
JFX550/600 Series

2
Foreword
Congratulations on your purchase of the 3L ink supply option.
This operation manual
• This manual explains the operation of the 3L ink supply option.
• Read and fully understand this operation manual before using this machine. It is also necessary to keep this operation
manual on hand.
• Make arrangements to deliver this operation manual to the person in charge of the operation of the 3L ink supply option.
• Although this operation manual has been carefully prepared for your easy understanding, please do not hesitate to con-
tact your local distributor if you have any inquiry.
• The contents of this operation manual are subject to change for improvement without notice. Please note.
• You can also download the latest operation manual from our website.
CAUTION
THIS LIMITED WARRANTY OF MIMAKI SHALL BE THE SOLE AND EXCLUSIVE WARRANTY AND IS IN LIEU OF ALL
OTHER WARRANTIES, EXPRESS OR IMPLIED, INCLUDING, BUT NOT LIMITED TO, ANY IMPLIED WARRANTY OF MER-
CHANTABILITY OR FITNESS, AND MIMAKI NEITHER ASSUMES NOR AUTHORIZES DEALERS TO ASSUME FOR IT ANY
OTHER OBLIGATION OR LIABILITY, OR MAKE ANY OTHER WARRANTY, OR MAKE ANY OTHER WARRANTY IN CON-
NECTION WITH ANY PRODUCT WITHOUT MIMAKI'S PRIOR WRITTEN CONSENT.
IN NO EVENT SHALL MIMAKI BE LIABLE FOR SPECIAL, INCIDENTAL OR CONSEQUENTIAL DAMAGES, OR FOR LOSS
OF PROFITS OF DEALER OR CUSTOMERS OF ANY PRODUCT.
Reproduction of this manual is strictly prohibited.
© 2022 Mimaki Engineering Co., Ltd.
All Rights Reserved.Copyright
3
Safety Precautions
Symbols
In this document, symbols are used for explaining the contents of cautions on operation. The symbol to be displayed differs
depending on the caution content. Understand the meaning of each symbol and use this machine safely and correctly.
Examples of Symbols
Cautions on Installation
Meaning
WARNING Failure to observe the instructions given with this symbol can result in death or seri-
ous injuries to personnel. Be sure to read it carefully and use the printer properly.
CAUTION Failure to observe the instructions given with this symbol can result in minor or
medium injuries to personnel.
GENERAL WARNING This symbol indicates that the items shown need to be noted. Specific notes are
drawn in the figure.
GENERAL MANDATORY
ACTION This symbol indicates that the action shown must be executed. Specific instruction is
shown in the illustration.
GENERAL PROHIBITION This symbol indicates that the action shown is prohibited. Specific action that is pro-
hibited is shown in the illustration.
IMPORTANT Important notes for the use of this unit are given with this symbol. Refer to the opera-
tion.
HINT Useful information is given with this symbol. Refer to the operation.
REFERENCE This symbol indicates the reference page for related contents. Click the text to dis-
play the corresponding page.
Caution
Do not install in the following locations
• A location exposed to direct sunlight.
• On an inclined surface.
• A location that vibrates.
• A location exposed to a direct air flow from an air con-
ditioner, etc.
• Around a location where fire is used.
• A location where the temperature or humidity
changes significantly. (The recommended usage
environment differs depending on the connected
printer. Confirm by referring to the operation manual
of the printer)

4
Ink or Any Other Liquid Used with the Machine
Warning
• Take steps to prevent leakage into natural water systems or domestic wastewater. Some constituents are toxic to aquatic
life.
Caution
• Be sure to read the safety data sheet (SDS) before use. https://mimaki.com/supply/sds/
• Pay close attention to ventilation and be sure to wear safety glasses, gloves, and a mask when handling ink, maintenance
liquid, waste ink, or other solutions used with this machine. Leaking ink may adhere to the skin or get into the eyes or
mouth.
• Do not subject the Ink bottle to strong shocks or violent shaking. Do not attempt to refill the ink. Leaking ink may adhere to
the skin or get into your eyes or mouth..
• Do not disassemble the Ink bottle. Leaking ink may adhere to the skin or get into your eyes or mouth.
• Avoid storing this product in locations accessible to children.
• When disposing of the product, contact an industrial waste disposal operator or dispose of the product in accordance with
the local laws and regulations.
• Do not touch the metal parts of the ink IC chip. Static electricity may damage the ink IC chip, and dirt or damage may make
the ink IC chip unreadable.
5
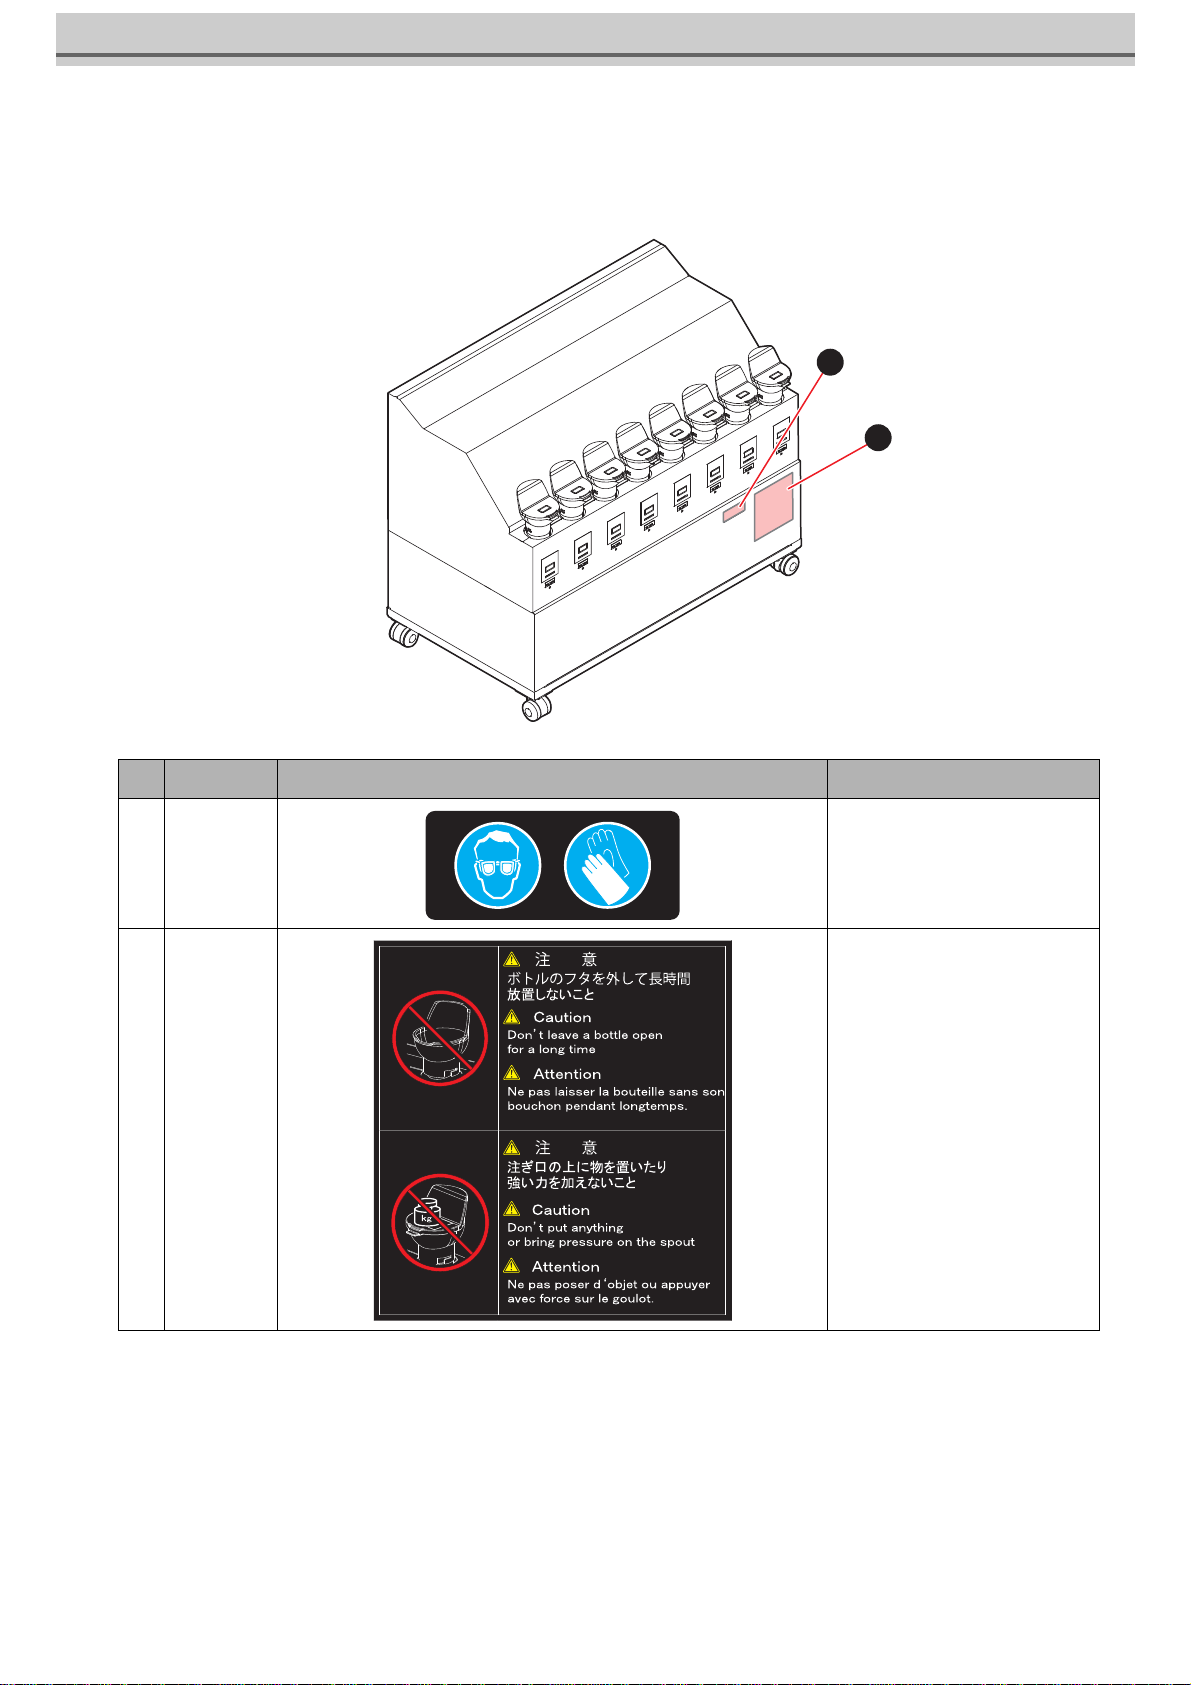
Warning labels
Warning labels are stuck on the machine. Be sure to fully understand the warning given on the labels.
If a warning label is illegible due to stains or has come off, purchase a new one from a distributor or our sales office.
No. Order No. Label Description
1 M903330 Be sure to wear the safety glasses
and gloves.
2 M912560
2
1
6
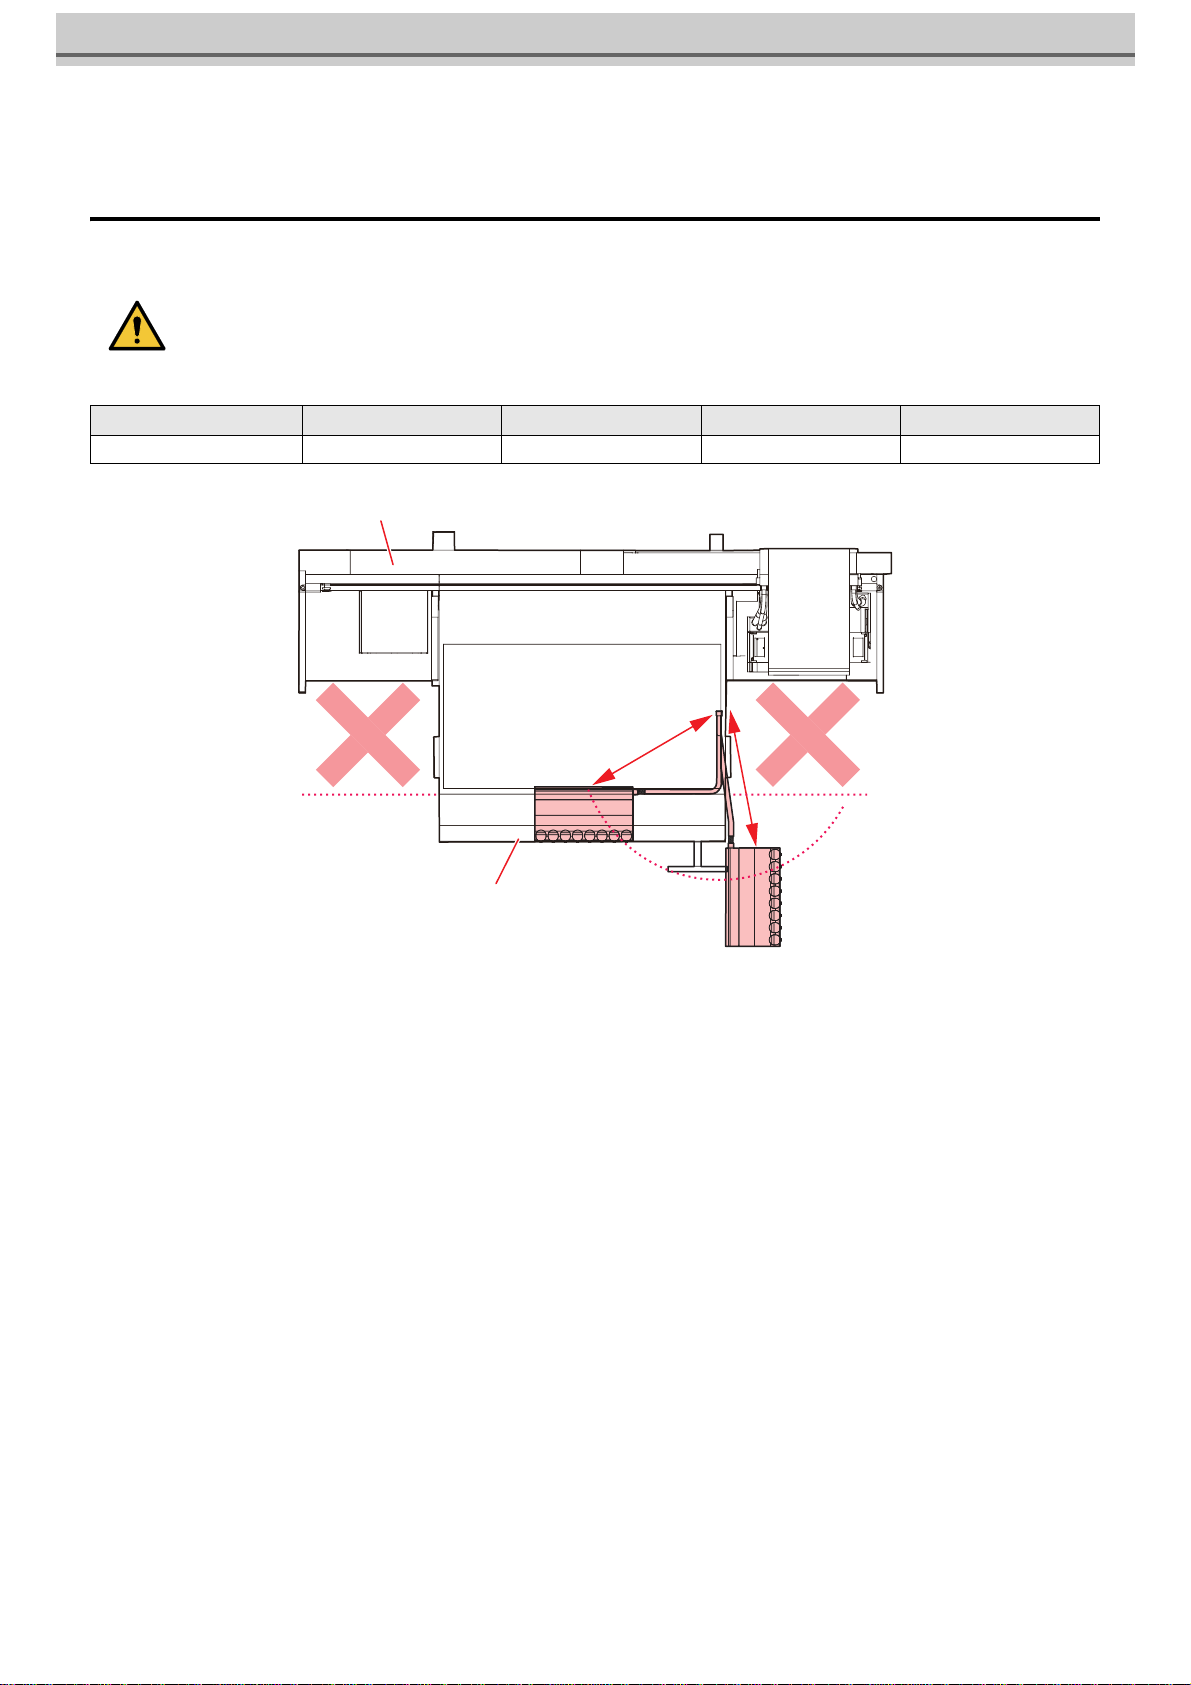
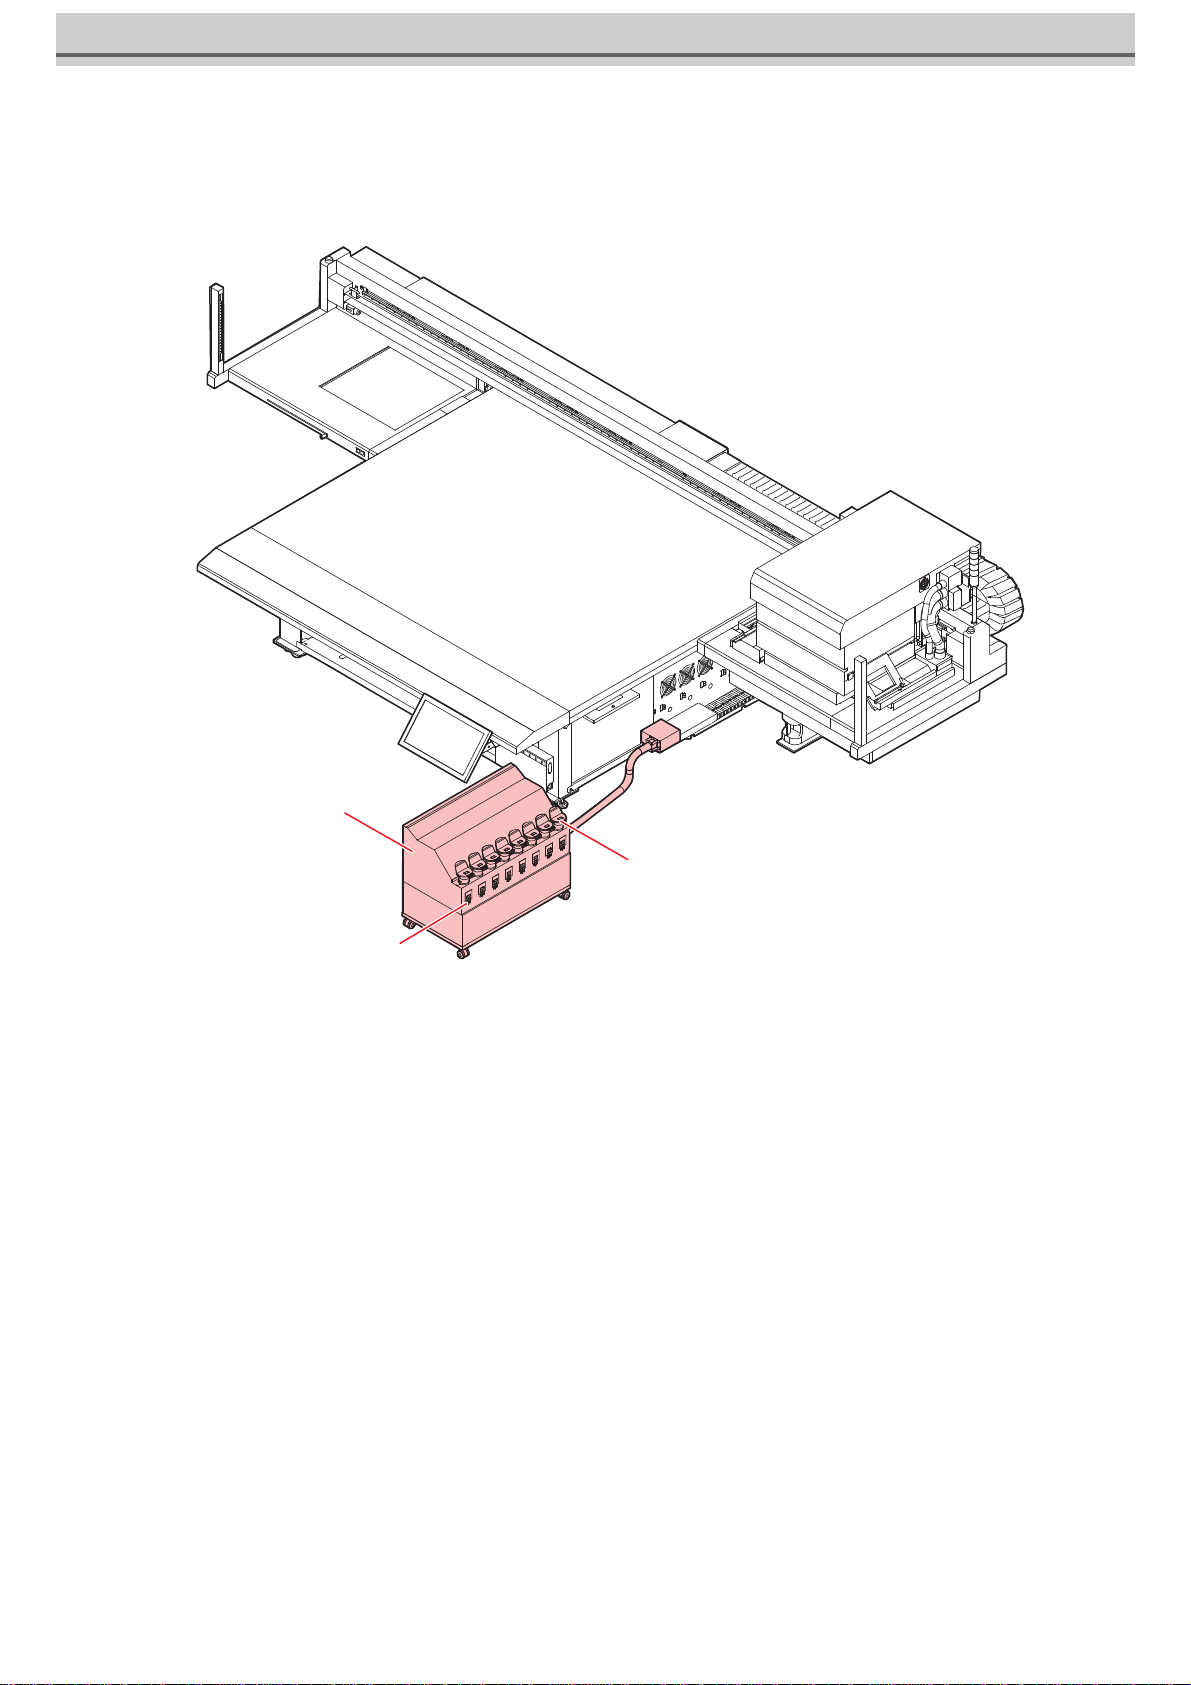
About installing this machine
Where to Install This Machine
Install within about 3 m or less from the bottom of the front cover or from the main unit connecting part.
• Do not install the unit in the Y-bar movable space. Any contact between the Y-bar and the 3L ink
supply option may result in a significant accident.
Item Width Depth Height Weight
3L ink supply option
950mm or less 520mm or less 750mm or less 60kg or less
Duct length:
about 3m
Y-bar
Front cover
7
Name of Each Part
Ink tank
IC slot
3L ink supply option
8
MPC Screen Explanation
This section describes the MPC screen display when using the 3L Ink supply option.
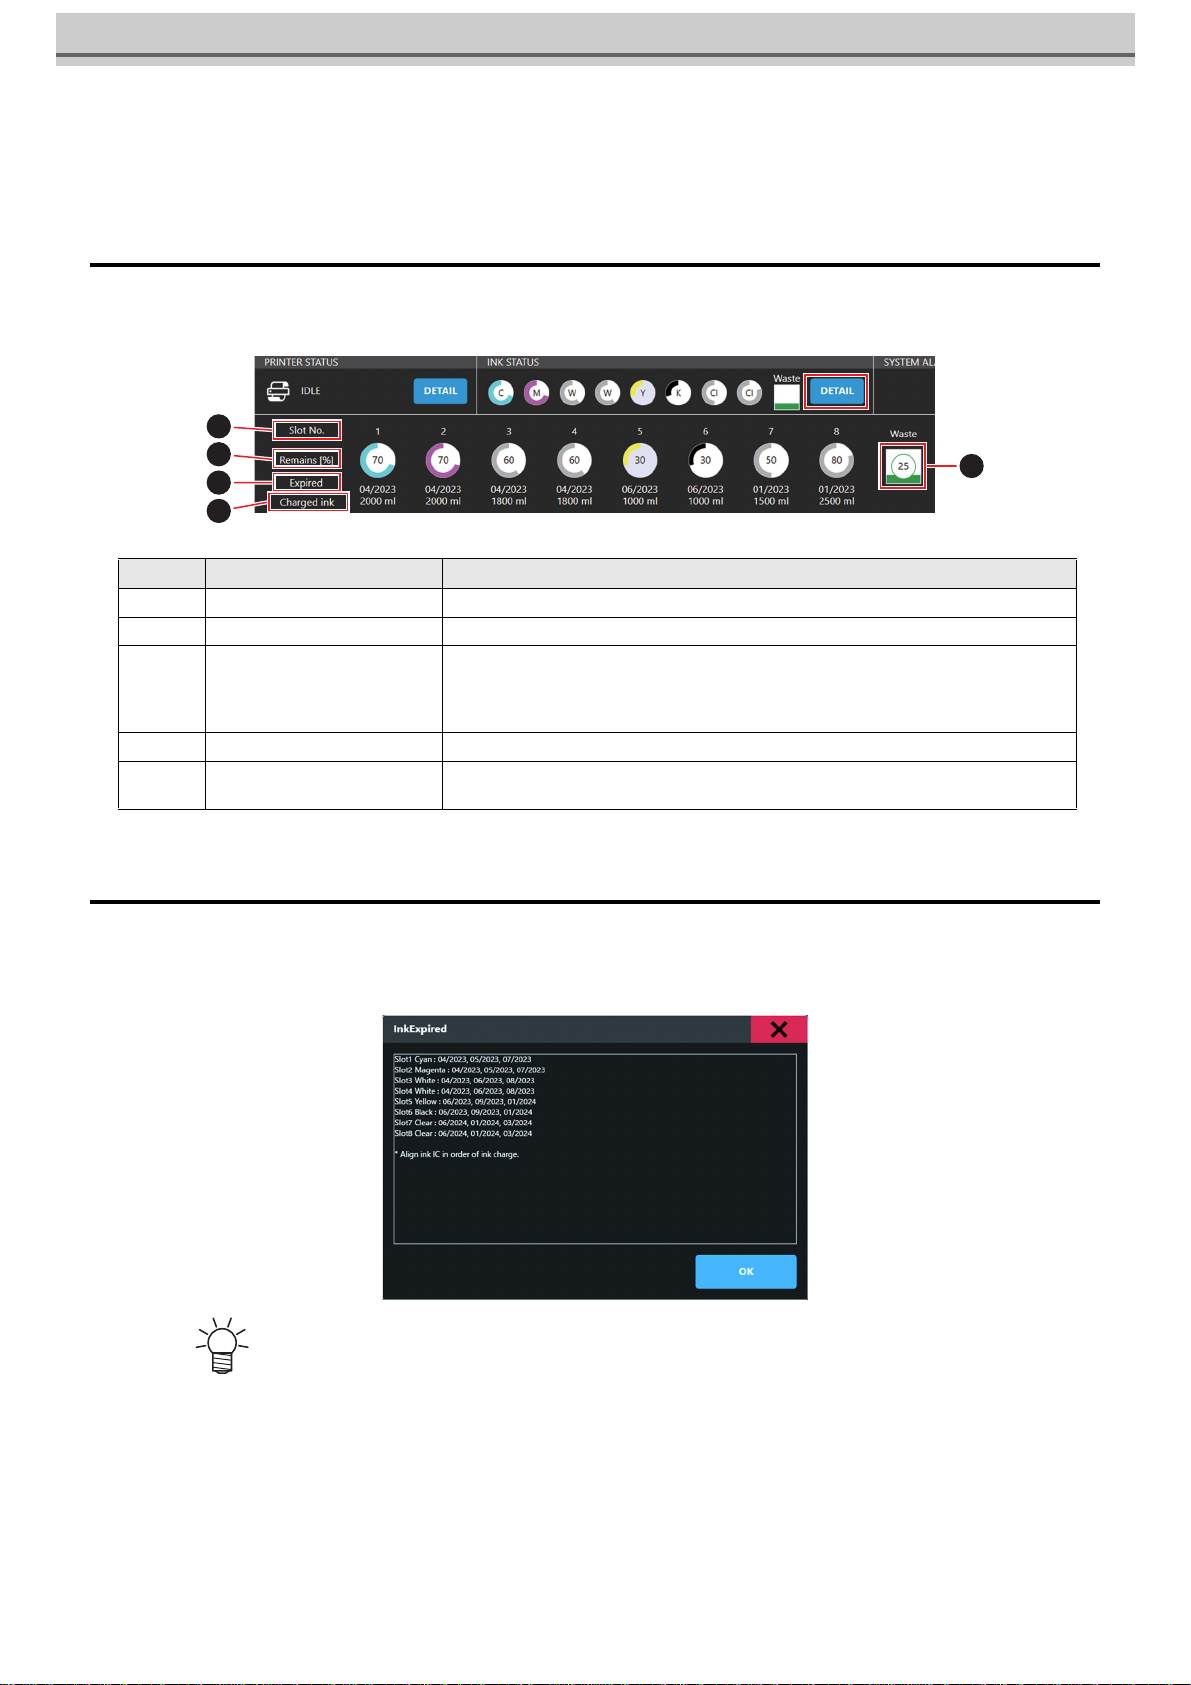
About INK STATUS (detail section)
The status of each ink can be checked from [DETAIL] in INK STATUS displayed at the top of the MPC.
About Ink Expiration Date
The expiration date of all ink ICs registered in each ink slot can be displayed and confirmed from the MPC
screen [System] > [System Information] > [Ink Expired].
No. 項目 内容
1
Slot No. • Displays the No. of the slot in which each ink tank is set.
2
Remains • Displays the amount of ink remain in each ink tank.
3
Expiry date
• When using 3L ink supply, the first expiration month/year among the expiration dates
registered in each slot is displayed.
(e.g.) If 04/2023, 02/2023, and 09/2023 are registered, "02/2023" will be displayed
on the screen.
4
Charged ink quantity • Displays the amount of ink charged for each ink.
5
Status of waste ink tanks • Displays the amount of waste liquid in the waste tank (tank utilization).
• The same is displayed when the 3L ink supply is not used.
• In each slot, expiration dates are displayed in the order in which the ink IC expiration dates were registered, from
left to right.
(e.g.) If the ink IC expiration dates are registered as 04/2023, 02/2023, and 09/2023 in that order, "Slot** color :
04/2023, 02/2023, 09/2023" will be displayed on the UI.
5
1
2
4
3
9
Fill ink in the ink tank and charging
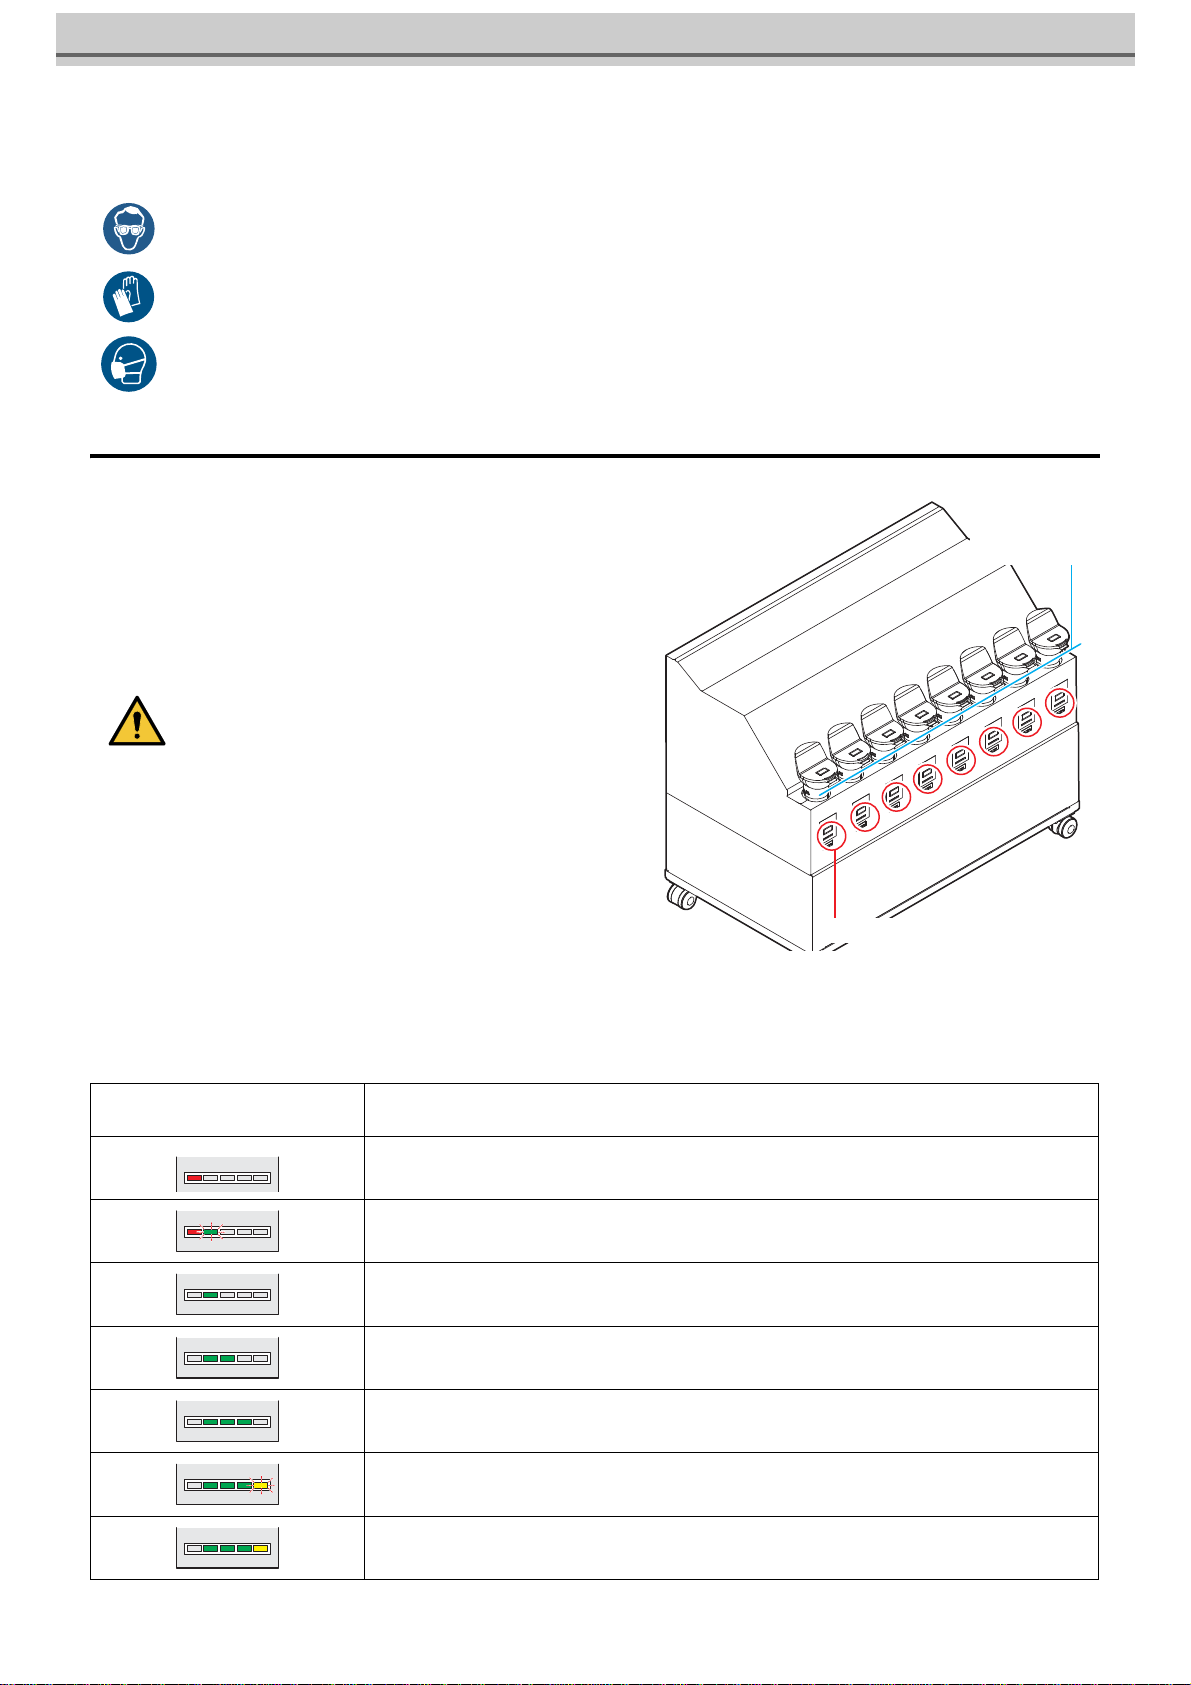
Rough standard for adding ink
You can check the current amount of ink in the ink tank of this
machine (rough standard) with the ink remaining amount indicator
below the ink tank.
The way to check the ink remaining amount indicator and the ink
remaining amount are as below.
In addition, when this machine enters into the status of [Ink Near
END] or [Ink End], the display indicate it.
• Pay close attention to ventilation and be sure to wear safety glasses, gloves, and a mask when handling ink, maintenance liq-
uid, waste ink, or other solutions used with this machine. Leaking ink may adhere to the skin or get into the eyes or mouth.
• Notes before adding ink
Check the following before adding ink. Failure to do so
could require all of the ink inside the ink supply unit to be
discarded.
• Type of ink
• Color of ink
• Expiration date of ink
Check both expiration dates of the ink contained in the ink
bottle for refilling and the ink tank of this machine. Check
the label for the expiration date of the ink bottle.
The remaining ink level and expiration dates can be
checked by tapping [INK STATUS]>[Details] on the touch
panel.
• Notes when adding ink
Be careful not to drip ink on the IC chip and slot area.
Status of ink remaining amount indicator
Status of ink amount and
Current ink amount 1
Ink end/Ink tank none
Ink remain : 300cc less than
Ink near end/
Ink remain : 500cc less than 2
Ink remain : 400 to 1L and less than
Ink remain : 1L to 2Land less than
Ink remain : 2L to 2.5L and less than
Ink full/
Ink remain : 2.5L to 3.2Land less than
Ink over/ Ink remain : 3.2L or more3
Ink remaining amount indicator
Line of mouth
for adding ink
10
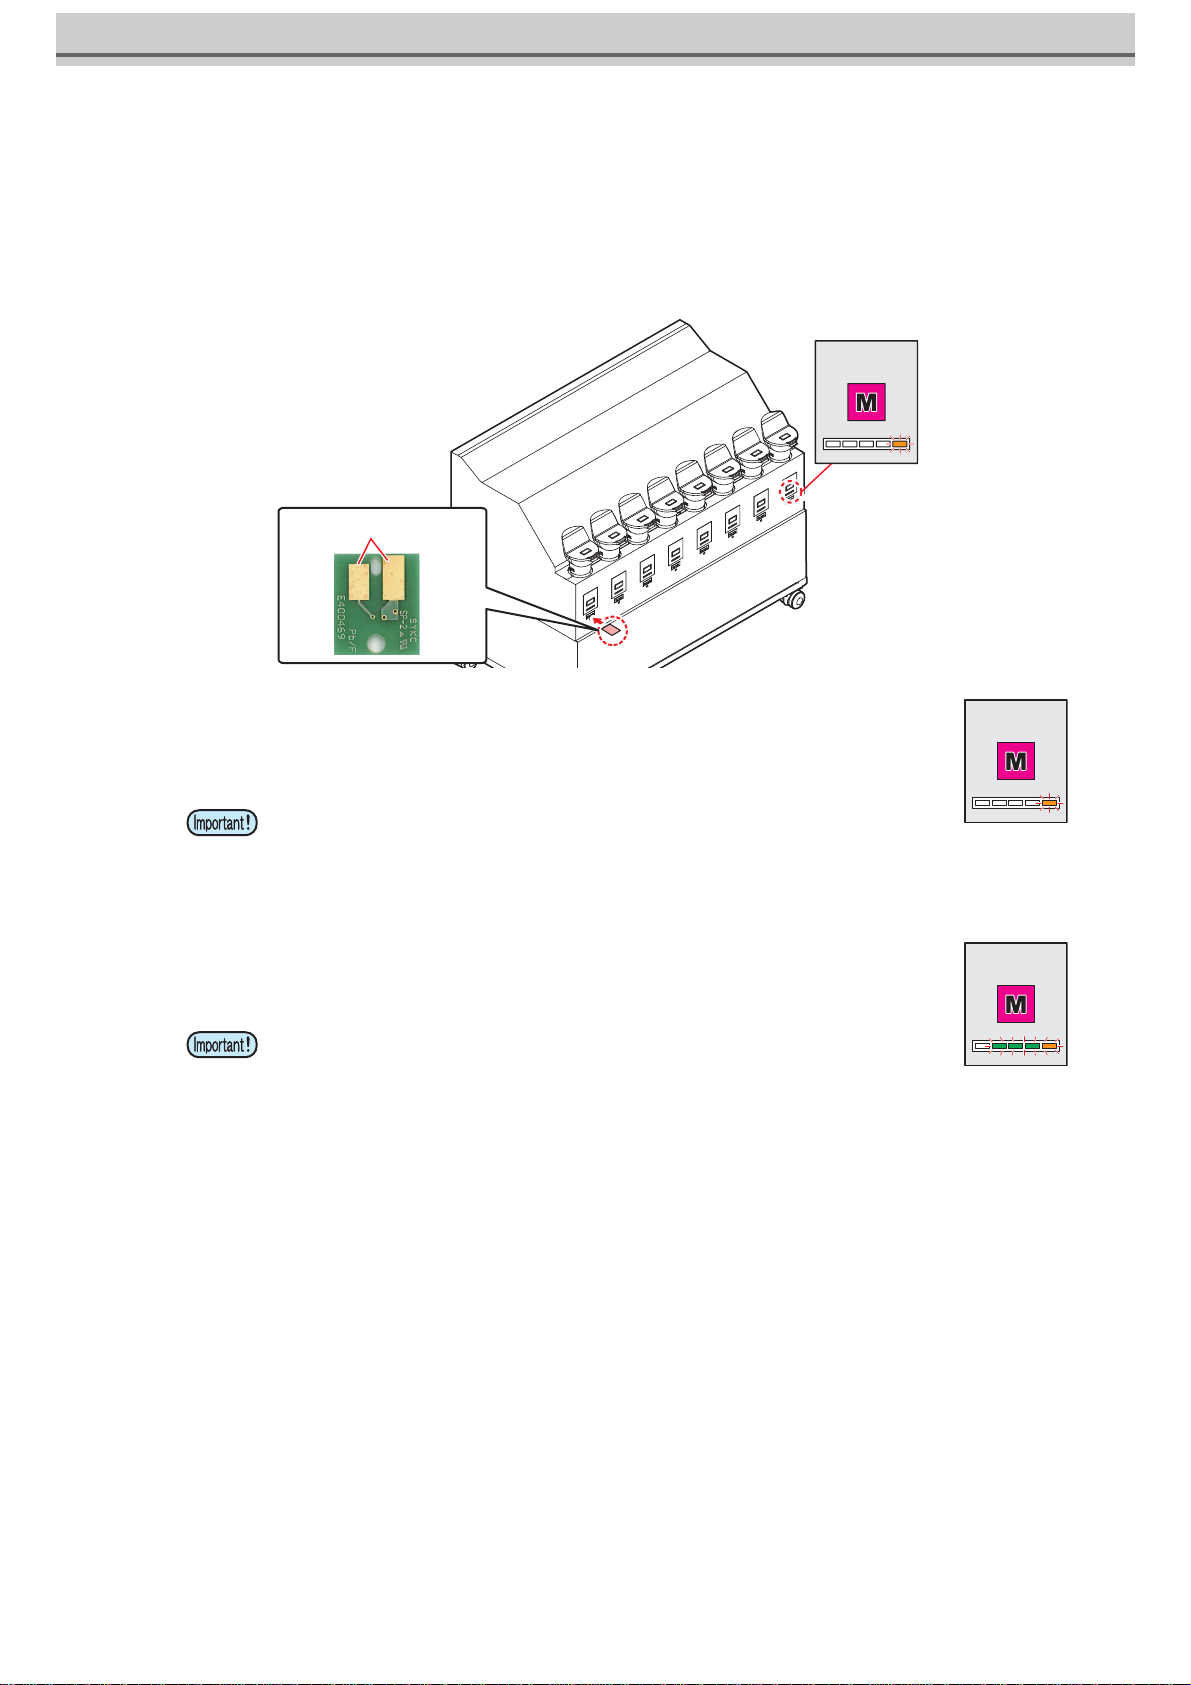
1Insert the IC chip included with the 3 liter ink bottle.
• When you insert the IC chip, the ink remain lamp lights orange and a buzzer sounds.
• Insert the IC chip with the metal part facing rear side and down. If you insert the wrong side by accident, it causes faulty or
damage of the IC chip.
• Do not touch the metal part of the IC chip. It may break the IC chip by static, or may cause read error by stain or flaw.
2IC chip charging starts automatically.
• The information on the IC chip,such as ink volume and expiration date, is loaded and managed
by the printer.
• The ink remain lamp flashes orange.
3When charging is complete, remove the IC chip.
• When charging is complete, the ink remain lamp will flash orange and green, and a buzzer will
sound.
1. The ink remaining amount indicator is only rough standard. For ink filling, it is recommended to check the liquid level from the mouth for adding ink.
2. “INK NEAR END” at 500cc and“INK END” at 300cc.
3. The ink tank set in this unit can replenish the ink by up to 3.6L, but there is a possibility that ink would spill from the mouth for adding ink. When the orange lamp is lit,
please do not replenish the ink.
• Be sure to charge the IC chip whenever ink is added. Otherwise, the
printer will be unable to manage the ink information.
• Do not remove the IC chip or turn off the printer during charging. Doing
so will prevent the information on the IC chip from being charged
correctly.
• After charging is complete, be sure to remove and dispose of the IC
chip. Do not reuse IC chips.
• If the error message “INVALID INK CHARGE”appears on the display
• Charging was not possible for one or more of the following reasons:
(1) Faulty IC chip
(2) When the remaining charge amount, that is managed by the
machine, is greater than or equal to three liters
(3) Attempting to charge ink that has passed its expiration date
• For more information about errors, press the [ENTER] key in Local.
• To retry charging, select the "Ink Charge"maintenance function.
Ink remain
lamp
Metal part facing rear side
Ink remain lamp
Ink remain lamp

11
4Take out the ink bottle, and slowly shake it twenty times and more.
• To prevent ink from leaking when you shake it, wear gloves and cover the ink bottle cap with apaper towel etc. Being in
that status, slowly shake it twenty times and more by flowing ink.
5Remove the cap of the ink tank.
• First, cover the cap with a waste cloth etc. to prevent your hands
from getting dirty and then remove it.
6While checking the ink remaining amount
indicator, add ink.
• Depending on the ink type, aluminum sheet adheres to the bottle
top surface. In such a case, remove it with a cutter.
• While checking the ink remain lamp avobe the ink tank, add ink.
For details, refer to P.9 "Rough standard for adding ink"
7Attach the ink tank cap firmly.
• Attach the cap firmly.
• Before shaking it, check that the cap is firmly closed.
• If you shake it too strong, it may cause ink leakage. Therefore,
perform this carefully.
• If the remaining amount of ink is less, ink in the bottle cannot
be beaten enough. Tilt the ink bottle until it becomes vertical.
Repeat this
Cover with paper towel firmly and shake ink slowly
Cap

12
About IC chip
• The marking on the ink IC chip indicates the color information.
When [INK NEAR END] is displayed.
Ink levels are low. We recommend refilling with new ink to charge the ink as soon as possible. Note that ink may run out during
printing.
You can check which Ink bottle must be replaced in INK STATUS on touch panel.(Refer to "INK STATUS" in Chapter 3 "Setting
(MPC)" of the Operation manual.)
When [INK END] is displayed
The ink has run out. Charge the ink by refilling with new ink.
About ink expiration date
The shortest expiration date of charged ink bottles (up to four additional bottles) will be the usage date for the entire ink.
The ink expiration date is indicated on the Ink bottle. Expired ink may cause ejection failures or alter the color tone. Printing is possible even
if the ink has passed its expiration date. Nevertheless, we recommend replacing with new ink or using up as quickly as possible.
Example: When the expiration date is April 2022
• May: Replace with new ink or use up as quickly as possible. Printing is possible.
• June: Replace with new ink or use up as quickly as possible. Printing is possible.
• July: Printing is not possible.
• Insert the ink IC chip contained in the ink package. The ink IC chip stores information such as the ink color, remaining amount,
and expiration date. Printing is not possible if a wrong IC chip is inserted.
• Removing and inserting ink IC chips may result in the display of a SYSTEM ALARM message.
Clear the alarm if printing is not possible after inserting a new ink IC chip.(Refer to Chapter 3 "Clearing Alarms" in the Opera-
tion Manual.)
• Pay close attention to ventilation and be sure to wear safety glasses, gloves, and a mask when handling ink, maintenance liq-
uid, waste ink, or other solutions used with this machine. Leaking ink may adhere to the skin or get into the eyes or mouth.
Color of ink Indication mark
Cyan (one blue circle)
Magenta (one red circle)
Yellow (one yellow circle)
Black (one black circle)
Light cyan
(two blue circles)
Light magenta (two red circles)
White (One white circle)
Clear (two white circles)
Primer (Three white circles)
IC chip.
Mark indication position

13
When auto-charging fails
To charge the ink when “INK EXPIRATION” and “INK EXPIRATION 1MONTH” errors occur, follow this procedure.
1From MENU on the touch panel, tap [MAINTENANCE].
• The Maintenance menu is displayed.
2Tap [Ink supply option] > [Ink charge].
• The dialog appears.
3Tap [OK].
• Ink charge executes.
4When the following dialog appears, remove the ink IC chip from the charged tank
and insert it again.
• When you insert the IC chip, the ink remain lamp lights orange and a buzzer sounds.
• Insert the IC chip with the metal part facing rear side and down. If you insert the wrong side by accident, it causes faulty or
damage of the IC chip.
• Do not touch the metal part of the IC chip. It may break the IC chip by static, or may cause read error by stain or flaw.
5After inserting the IC chip, tap [Complete].
6When [Exec CLEAR ALARM] dialog appears, and tap [OK].
• Execute CLEAR ALARM.
7Tap [Finish].
• An error “INK EXPIRATION” “INK EXPIRATION 2MONTH” appears, all ink in the ink tank will need to be disposed and
replaced with new ink.
Be careful when charging ink with a short expiration date.
• Do not remove the IC chip or turn off the printer during charging.
Doing so will prevent the information on the IC chip from being
charged correctly.
• The remaining ink level and expiration dates can be checked by
tapping [INK STATUS]>[Details] on the touch panel.
IC chip inserting
port
Metal part
facing rear side
14
Replace the waste ink tank with new one
Ink used during head cleaning and other processes is collected in the waste ink tank at the lower right of the product.
The machine counts the amount of ink discharged. Once a specified value is reached, “0604 CHECK WASTE BOTTLE” will
appear in SYSTEM ALARM on the touch panel. Use this as a guide for replacing the waste ink tank.
Replacing the Waste Ink Tank
1From MENU on the touch panel, tap [MAINTENANCE].
• The Maintenance menu is displayed.
2Tap [Other maintenance] > [Replace waste ink tank].
3Tap [OK] .
• It will be the state in which the replacement can be made.
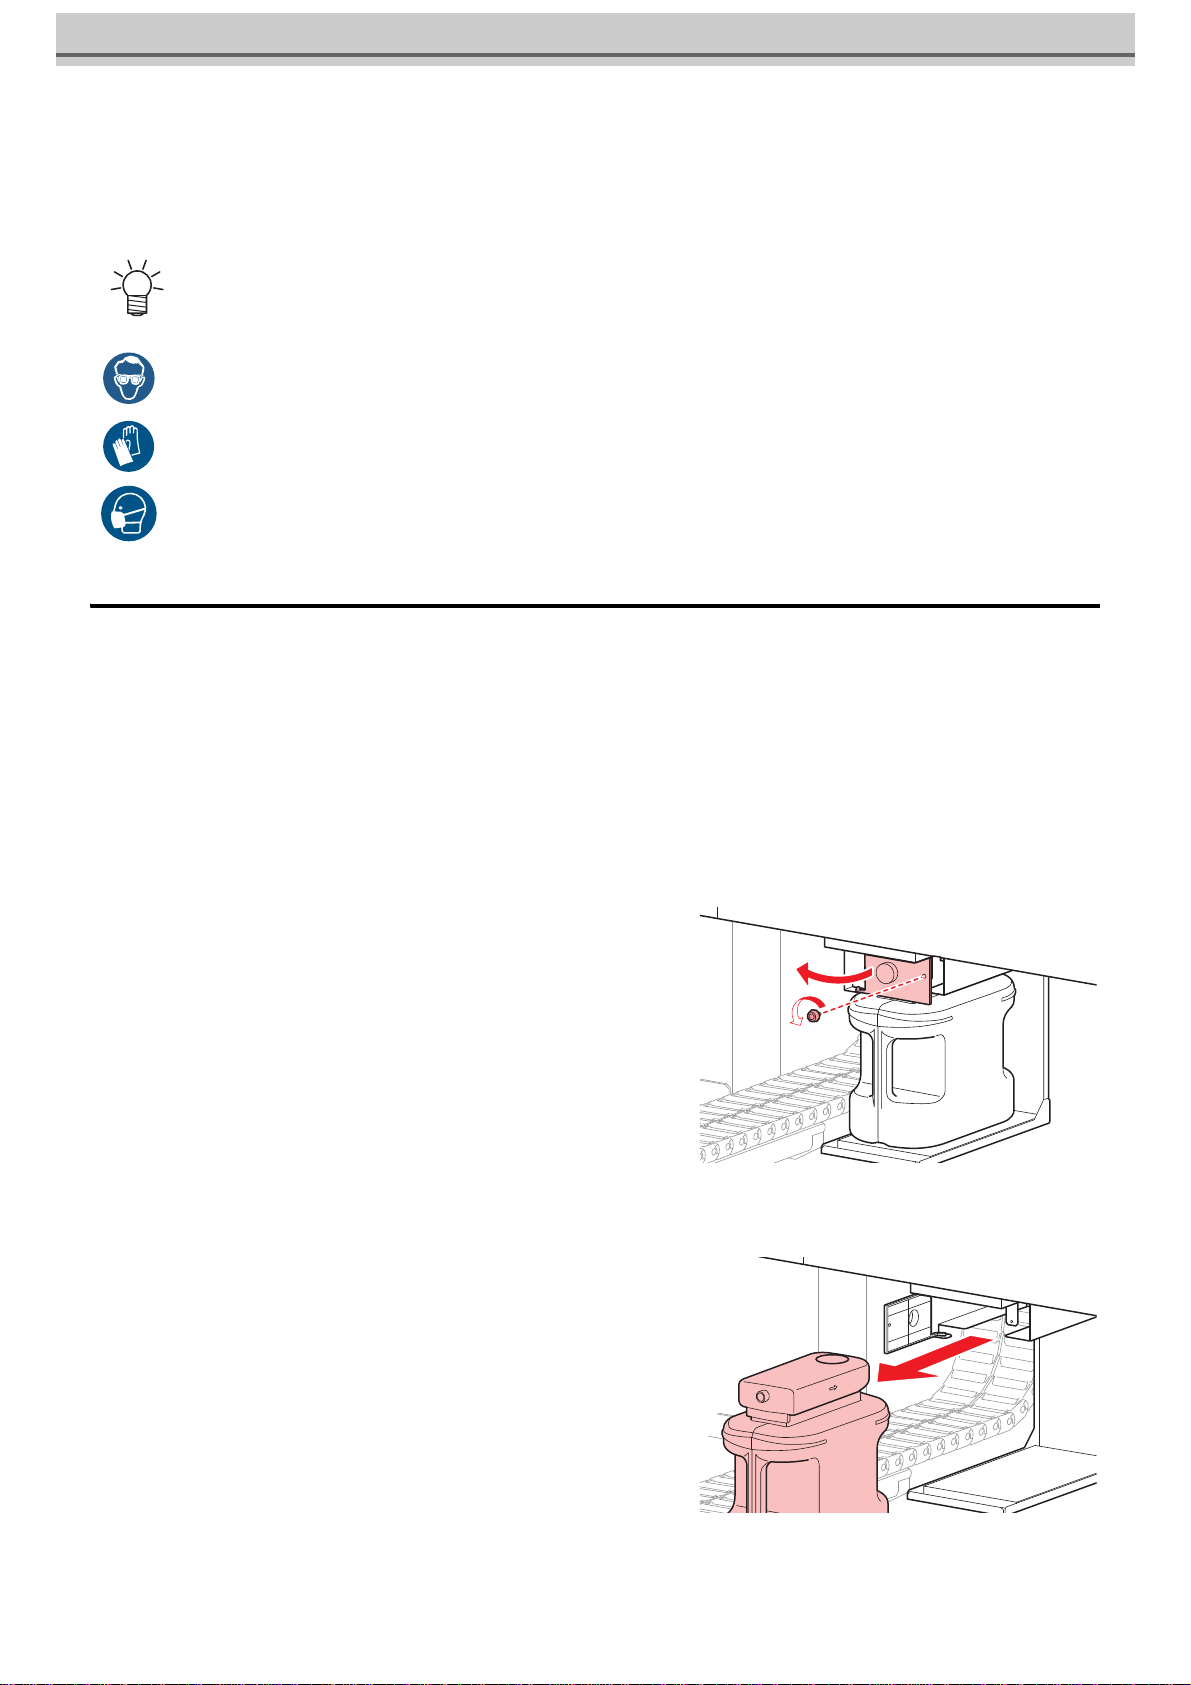
4Open the waste ink tank guard.
• Remove the screw to open the waste ink tank guard.
5Grasp the handle of the waste ink tank and slide out.
• For a 2.6-liter tank, the preset level is 80 % (2.1 liters).
• Continuing to use the product without disposing of the waste ink may result in waste ink overflowing from the waste ink tank.
Visually check ink levels in the waste ink tank about once a week.
• Pay close attention to ventilation and be sure to wear safety glasses, gloves, and a mask when handling ink, maintenance liq-
uid, waste ink, or other solutions used with this machine. Leaking ink may adhere to the skin or get into the eyes or mouth.
15
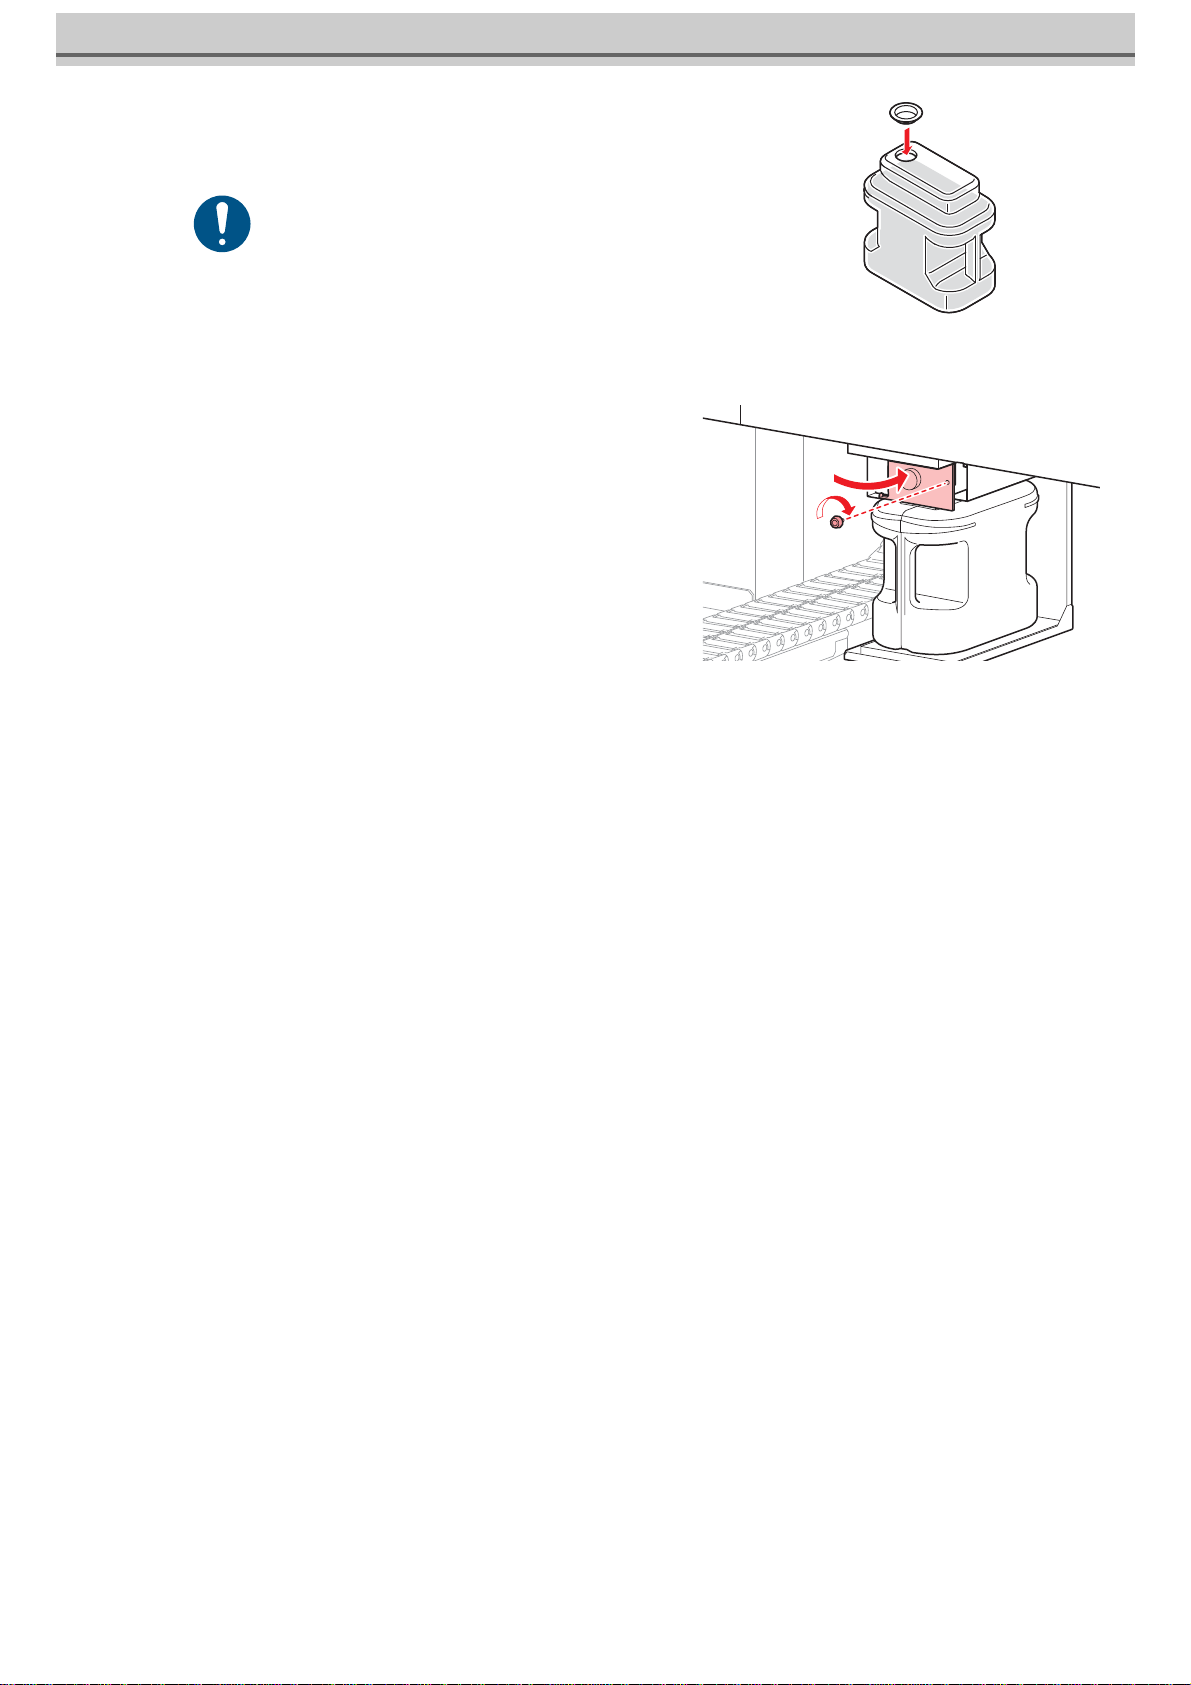
6Attach the cap to the removed waste ink tank, and
use tape to prevent leakage of waste ink.
7Install a new waste ink tank.
8Close the waste ink tank guard.
9Tap [Complete] once replacement is complete.
• The waste ink level will be reset.
10When [Exec CLEAR ALARM] dialog appears, and tap [OK].
• Execute CLEAR ALARM.
11Tap [Finish].
• When disposing of the product, contact an industrial waste
disposal operator or dispose of the product in accordance with
the local laws and regulations.
16
Replacing consumables
Replace the ink tank
To keep the ink in good quality in the ink tank, you need to replace the ink tank annually. When an appropriate warning message
appears, be sure to replace tank in the following procedure:
1From MENU on the touch panel, tap [MAINTENANCE].
• The Maintenance menu is displayed.
2Tap [Ink supply option] > [Replace waste ink tank].
• The dialog appears.
3When complete, tap [OK].
4Select a desired ink tank to replace, and tap [OK].
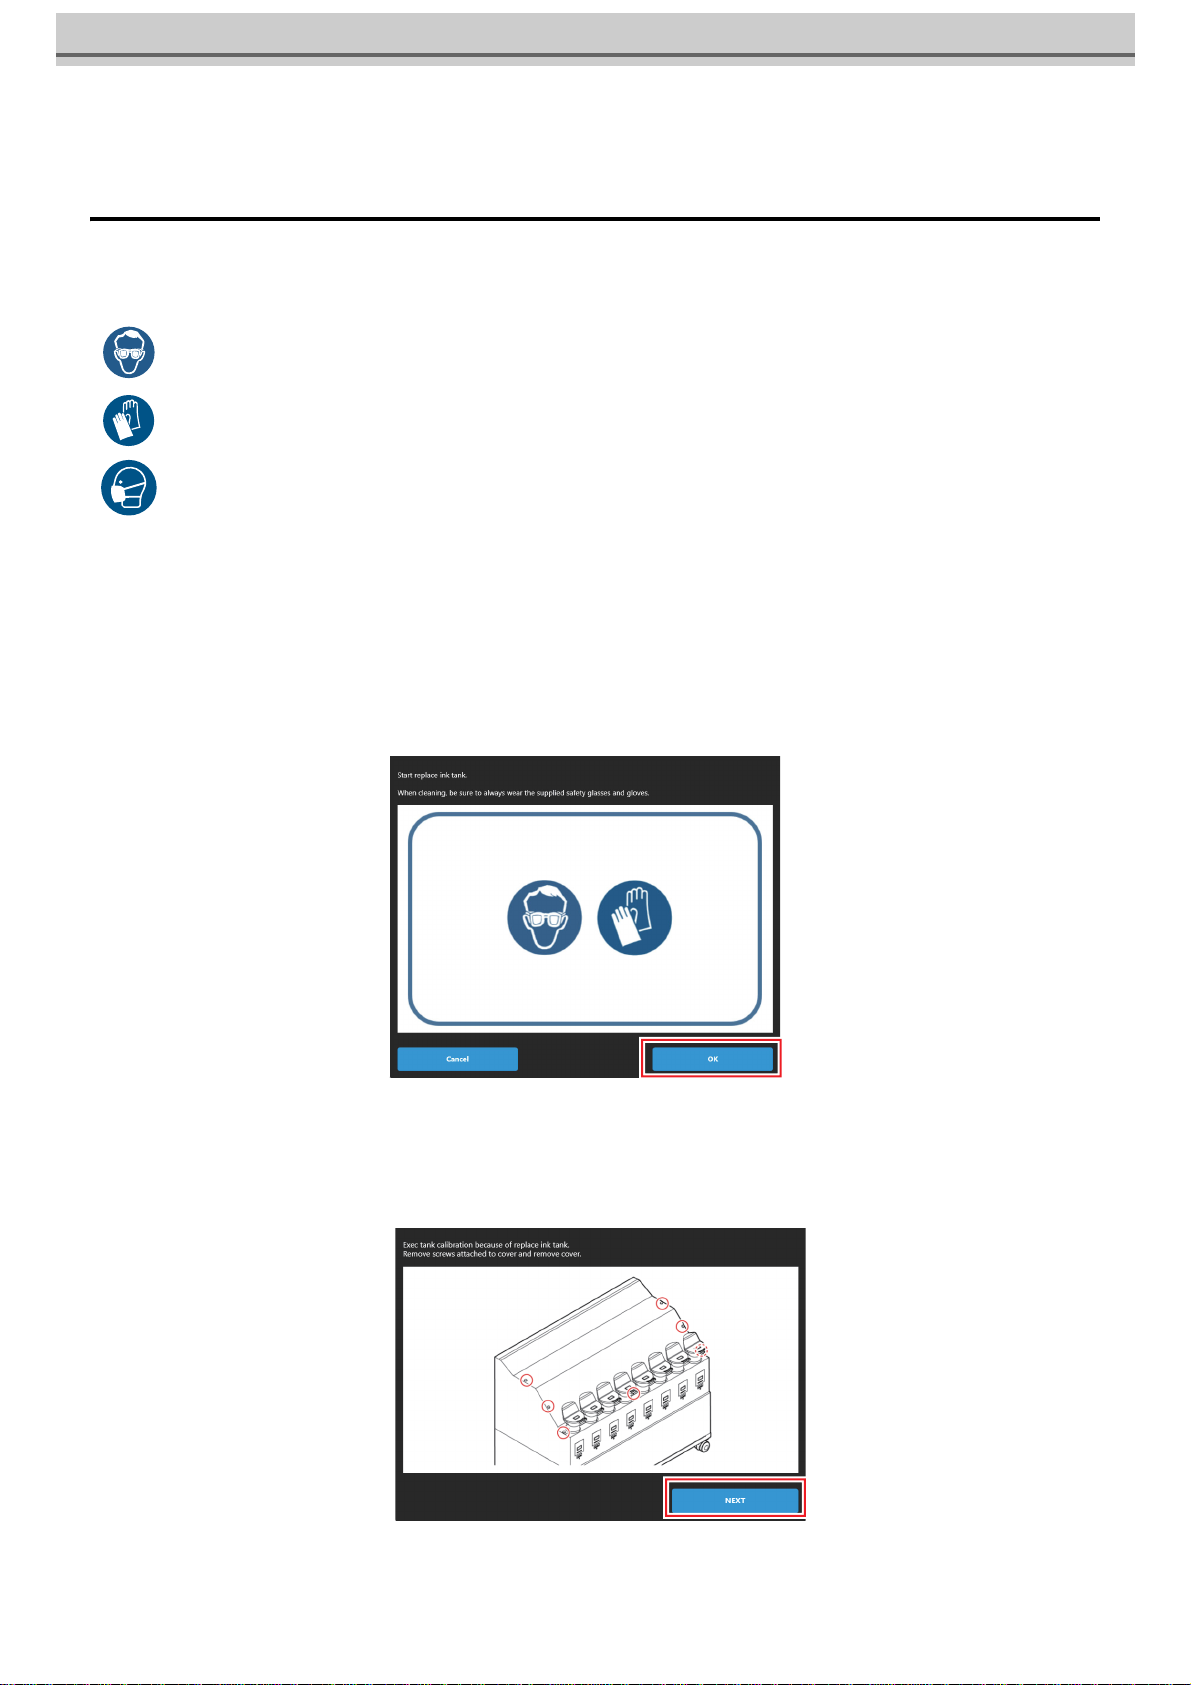
5When the following dialog appears, remove the ink tank cover.
• Remove the screws (7 places) that is attached to the ink tank cover, and remove the cover.
• Pay close attention to ventilation and be sure to wear safety glasses, gloves, and a mask when handling ink, maintenance liq-
uid, waste ink, or other solutions used with this machine. Leaking ink may adhere to the skin or get into the eyes or mouth.

17
6Remove the cover, and tap [NEXT].
7Remove the ink tank in the selected slot.
(1) Press the protrusion on the lid of the ink tank and remove the lid.
(2) Tilt the ink tank to the front and remove.
・Please be careful not to bend the tube by tilting a tank too far.
(3) Wipe the tube that is attached to the lid with the waste cloth etc., put the tube on the outside of the balance.
8Tap [NEXT].
• Automatically starts calibration.
9Dispose the ink in the removed ink tank.
10When the following dialog appears, place the 1kg weight (5 pcs. of 200 g
weights) in the center of the dish of the balance.
11Tap [NEXT].
• Peform the correction processing.
• When disposing of the product, contact an industrial waste
disposal operator or dispose of the product in accordance with
the local laws and regulations.
• Please put the weight in the center of the dish of the balance.
If you put weight on the edge of the dish, it will cause to increase the error of the remaining amount detection.
• During the correction process, please do not give vibration to the Ink supply option. There is a possibility to fail the correction
process.
• If the correction processing fails, the wizard will stop. Start again at the beginning.

18
12When the correction processing is finished successfully, remove all the weights
on the dish of the balance.
13Replace the new ink tank.Tap [Complete].
• Cover the surrounding area with waste cloth for protection against dirt before changing the ink tank.
14When [END replacing progress for selected tank.] dialog appears, and tap
[END].
15When [Exec CLEAR ALARM] dialog appears, and tap [OK].
• Execute CLEAR ALARM.
16When the following dialog appears, and tap [END].
17When the following dialog appears, attach the cover and tap [Next].
18Tap [Finish].
19
19Refill with new ink refer to P.9 "Fill ink in the ink tank and charging"
Discard the expired ink
If the expired ink is continued to use, it may cause a reduction of print quality and a failure of the machine.
Once ink exceeds its expiration date, please promptly exchange it with the following procedure.
1From MENU on the touch panel, tap [MAINTENANCE].
• The Maintenance menu is displayed.
2Tap [Ink supply option] > [Dispose expired ink].
• The dialog appears.
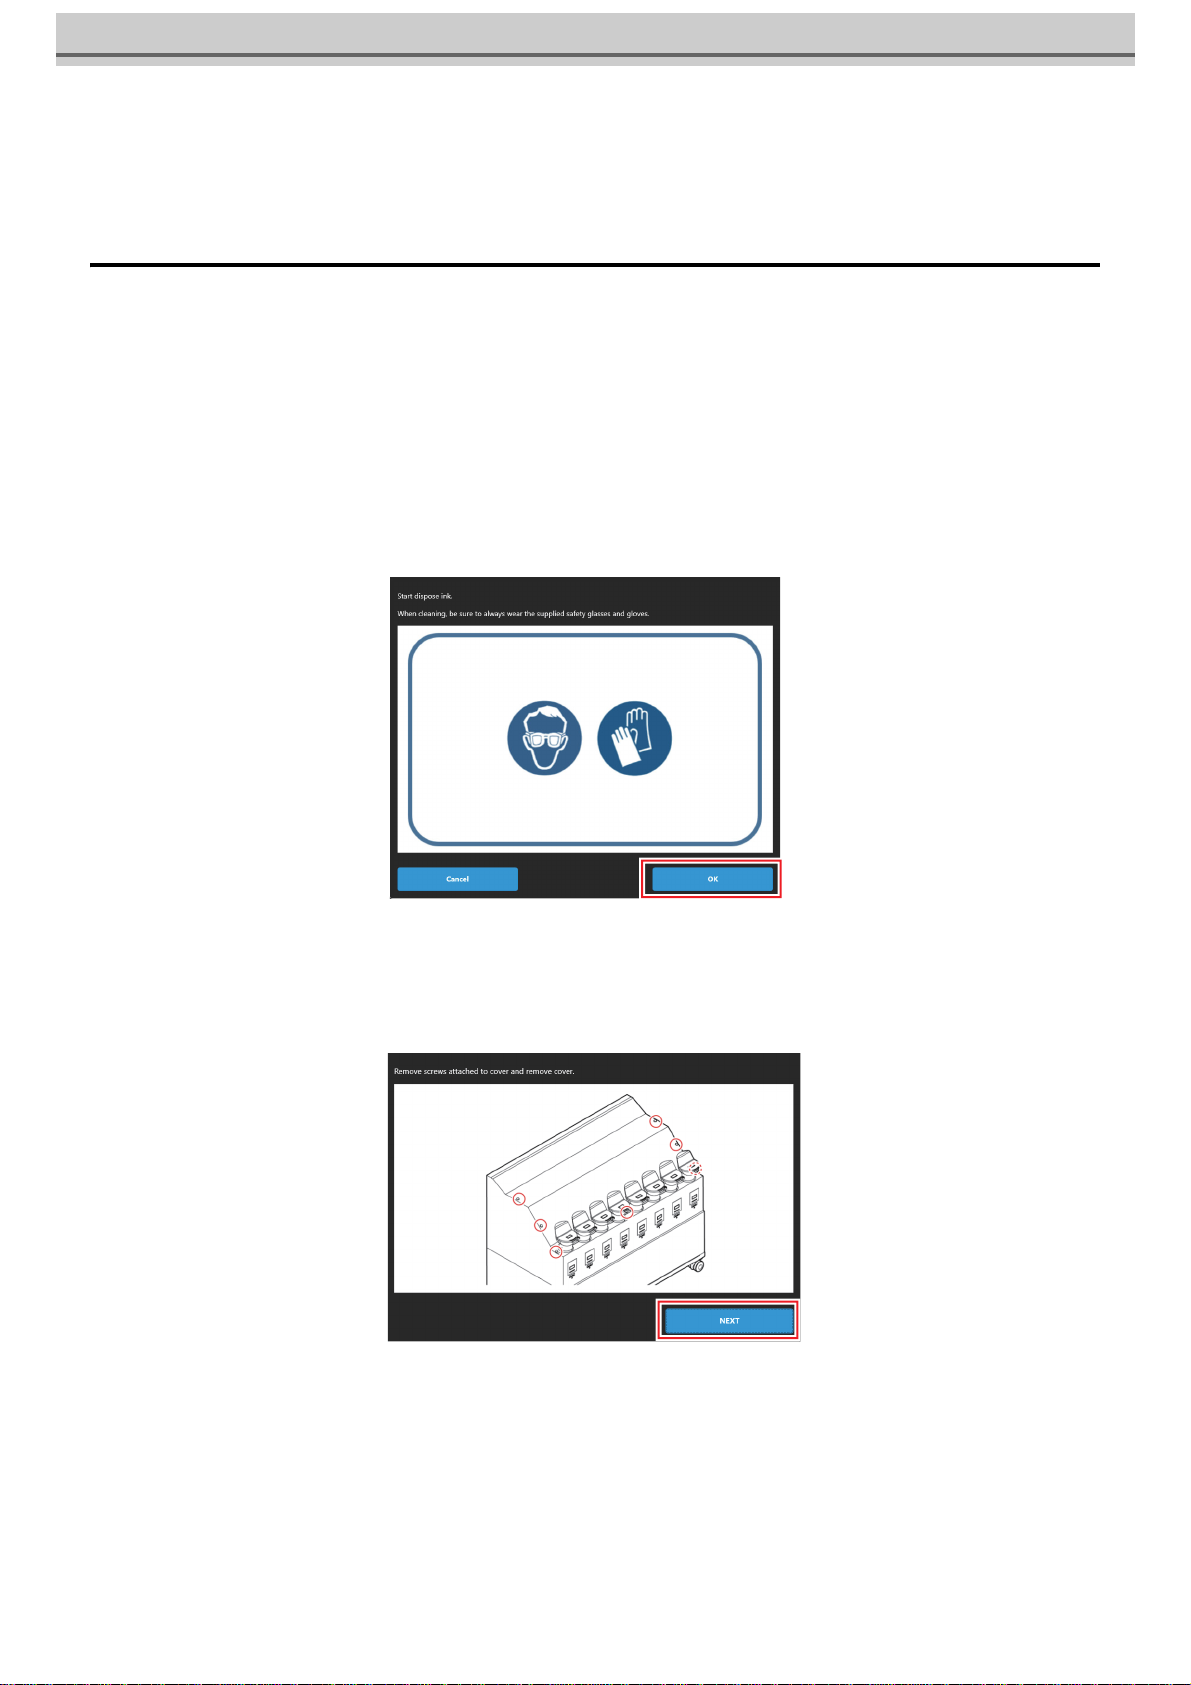
3When complete, tap [OK].
4Select a desired ink tank to replace, and tap [OK].
5When the following dialog appears, remove the ink tank cover.
• remove the screws (7 places) that is attached to the ink tank cover, and remove the cover.
6Remove the cover, and tap [NEXT].

20
7Remove the applicable ink tank.
(1) Press the protrusion on the lid of the ink tank and remove the lid.
(2) Tilt the ink tank to the front and remove.
・Please be careful not to bend the tube by tilting a tank too far.
(3) Wipe the tube that is attached to the lid with the waste cloth etc., put the tube on the outside of the balance.
8Tap [NEXT].
9Dispose the expired ink inside the ink tank.
10Set the ink tank removed in step 7, and tap [Complete].
11When [Exec CLEAR ALARM] dialog appears, and tap [OK].
• Execute CLEAR ALARM.
• When disposing of the product, contact an industrial waste
disposal operator or dispose of the product in accordance with
the local laws and regulations.
This manual suits for next models
1
Table of contents
Other MIMAKI Printer Accessories manuals


Popular Printer Accessories manuals by other brands


Star Micronics
Star Micronics TSP800 Series install guide

Citizen
Citizen CBM-202PC Series user manual

Canon
Canon Color imageCLASS MF8170c installation instructions

Codonics
Codonics Virtua 1VCX-LR833 Technical brief

Roland
Roland DU2-64 Supplementary manual

TonerRefillKits
TonerRefillKits ReChargX RX126 instructions