MingTai SUN8-II User manual

Steam Sterilizer
Operation Manual
Please read the manual carefully, operate it according to the manual
strictly, and avoid any hazard!
This manual applies to SUN8-Ⅱ、SUN12-Ⅱ、SUN16-Ⅱ、SUN18-Ⅱ、
SUN23-ⅡSteam Sterilizer
File No:MTQM/C1-7.5.1-05-02/II-A(E) 12
REV1607ER

Content
1、General Introduction ……………………………………….1
2、Application Scope ………………………………………….1
3、Tech. Parameter…………………………………………….1
4、Diagram Specification ………………………………………2
5、Installation …………………………………………………..3
6、Packing accessory..................................................……..5
7、Display and keypad description....................................……..5
8、Emergency Condition……………………………………….8
9、Maintenance and Service……………………………………9
10、Transportation and Storage…………………………………11
11、Attention………………………………….........................12
Appendix:
1、Steam loop(Work Description)
2、Circuit diagram of sterilizer
3、BD test method

1
Steam Sterilizer
1.General Introduction
This Steam Sterilizer is a precision instrument specializing in the operation
occasion in need of simple, fast and efficient sterilization by the doctor or his/her
assistants, and the doctor shall take the responsibility for such work.
This Steam Sterilizer is specially designed for the occasions in use of frequent
sterilizations. It is equipped with the microprocessor for intelligent control and
man-machine interface for convenient operation. With the distinctions in
displaying parameter and condition actively, evaluating malfunction automatically,
shutting off for self-protection automatically in case of excessive temperature and
pressure, this type Steam Sterilizer is reliable product in sterilizing.
2.Application Scope
This machine can be applied in sterilizing for the tooth device, operation device,
Sanitary Material and other heat-resisting articles existing in the Dept. of Stomatology,
Ophthalmology and lab.
This product is not suitable for leakproofness. not resistant to high temperature
products,the sterilizer max temperature is 138 .0℃.
This product is not suitable for liquid sterilizing.
3.Tech. Parameter
Chamber size of the Steam Sterilizer(Diameter X Depth) 8L…170mmX310mm
Chamber size of the Steam Sterilizer (Diameter X Depth) 12L…200mmX360mm
Chamber size of the Steam Sterilizer (Diameter X Depth) 16L…230mmX360mm
Chamber size of the Steam Sterilizer (Diameter X Depth) 18L…249mmX355mm
Chamber size of the Steam Sterilizer (Diameter X Depth) 23L…249mmX460mm
Rated Voltage………………………………………230~, 50Hz
Rated Power………………………………………1800VA 2300VA
1
Air Filter
2
Safety valve
3
Air outlet
4
Power
socket
5
Fuse
6
Distilled
water outlet
7
Used water
outlet
8
Filter of
chamber
9
Switch
10
Distilled
Water inlet

2
Sterilizing (Pressure/temp.)…………………………………100-120KPa/121ºC
200-220KPa/134ºC
(Both of above are Under Standard Atmospheric pressure)
Fuse-Melting pipe……………………….. ……. …….. ………….. 250V/T 15A
Capacity of water tank………………………………………………………2L
Probable water consumption of one cycle …………………………….. . .0.4L
Environment temperature of operate……………………………………0-40ºC
Type of sterilization cycles………………………………………………Class B
Wire heat resistance level…………………………………………………70ºC
N·W 23L…………………………………………………………………53kg
N·W 18L…………………………………………………………………48kg
N·W 16L…………………………………………………………………47kg
N·W 12L…………………………………………………………………46kg
N·W 8L………………………………………………………………… 44kg
4.Diagram Specification
Symbol
Meaning
CAUTION
Warning: dangerous voltage
CE MARKING, with notified body number 0197
WEEE MARKING
MANUFACTURER
DATE OF MANUFACTURE
AUTHORISED REPRESENTATIVE IN THE EUROPEAN
COMMUNITY
SERIAL NUMBER
CONSULT INSTRUCTIONS FOR USE
Earthing

3
5.Installation
5.1 Remove the packing
Dismantle thin film, open the packing,get the equipment from the packing
Hauling precautions:
·forbid lift up door
·forbid lift up legs of machine
·forbid Rollover or upside down
·Hauling sketch map is as follows:
5.2 The air-cooling window attached to the exterior surface of the Steam Sterilizer
shall be non-clog by dust or articles, and the Steam Sterilizer shall working in the
proper air flowing environment,and no dangerous flammable and explosive gas.
Equipment normal working conditions:
environment temperature:+5~+40℃
Relative humidity:≤85%
barometric pressure:70kPa~106kPa
minimum brightness: 215±15 lx,
5.3 The Steam Sterilizer shall be installed on the horizontal working base. Put
machine on the table, refer to specifications, table must be able to bear the weight
of the machine. The clearance between the outside of Steam Sterilizer and the
around articles shall be 10cm as retained, and the top surface shall be 20cm
retained. Used to exhaust or drain.
5.4 The 2 front feet of Steam Sterilizer can be adjusted the height, please ensure
the front of machine slightly higher than the back.
5.5 The machine will be hot during working time, keep it away from any
combustible materials!
The equipment must be far away from flammable items

4
5.6 After placing the Equipment
Check whether the power supply is in conformity with the requirements: 230 ~, 5
0 hz, voltage fluctuation range±10%, power supply ≥2300 VA.
In order to ensure the safety of the person and equipment, must be equipped a
ground wire,the equipment casing and the ground wire of the control cables must
be connected to external ground wire reliable .
Must use the attached plug, do not change it.
The equipment must be reliable grounding.
Must use distilled water
Attention!
Through poor conditions of the electrical MAINS, shortly voltage drops can appear when
starting the EQUIPMENT. This can influence other equipment (eg. Blinking of a lamp).
If the MAINS-IMPEDANCE Zmax 0.114OHM, such disturbances are not expected.
(In case of need, you may contact you local supply authority for further information.)
Hinweis!
Beim Anlaufen (Starten) dieser Ausrüstungen kann ein kurzzeitiger Spannungseinbruch
auftreten, insbesondere bei schlechter Netzqualität. Diese Einbrüche können andere
Geräte beeinflussen (z.B. Flimmern einer Lampe). Bei einer Netzimpedanz Zmax 0.114
OHM sind solche Störungen nicht zu erwarten. (Bitte kontaktieren Sie Ihre lokales
Energieversorgungsunternehmen für weitere Informationen).
PREPARATION BEFORE OPERATION
Before operation, please connect well to the power source. Connect the power
source hole under the back left side of the Steam Sterilizer and the power socket
by the attached plug. Press the green switch right bottom corner of the front side,
when the indicator light is on, it means that Steam Sterilizer get through with the
electric power, and the process then is in initialization status and showing “LD”
being on the screen. At this time the Steam Sterilizer is not heating.

5
6. Packing Accessory
1.
Draining pipe
1 pc
2.
Mesh tray
2-3 pcs
3.
Plug
1 pc
4.
Bracket
1 pc
5.
Manual holder
1 pc
6.
Fuse
2 pcs
7.
Operation manual
1 pc
8.
Measuring cup
1 pc
9.
Sealing ring
1 pc
7. Display and keypad description
7.1 Control Panel
1) Pressure display
Display on time the air pressure inside the
chamber. Unit:KPa
2) Temperature display
Display on time the temperature inside the cavity.
Unit: ºC
3) Status/ Error code number display
Applied for displaying kinds of status of the
autoclave during its working time. See more details
in “Appendix working status display form”.
When alarm occurs to the autoclave, the digital
pipe of the display will show the alarm code
number, the user can find out the malfunction
part.(Once the malfunction occurring to the
autoclave, please contact the service
center or distributor immediately).
4) UNWRAPPED button
It’s used to the sterilization
choice especially for the unwrapped
devices. The working temperature
is 121ºC or 134ºC.
After having been selected, its indicator
light is on.
5) WRAPPED button
It’s used to be the sterilization choice especially for

6
the wrapped devices. The working temperature is 121ºC or 134ºC.
After having been selected, its indicator light is on.
6) COTTON button
It’s used to be the sterilization choice especially for the cotton yarn devices. The
working temperature is 121ºC.
After having been selected, its indicator light is on.
7) PLASTIC button
It’s used to be the sterilization choice especially for the plastic and the rubber
devices. The working temperature is 121ºC.
After having been selected, its indicator light is on.
8) button
It’s used to be the choice especially for the working temperature. There are two
working temperature for choice: 121ºC or 134ºC, whose light will on after being
selected.134ºC could not be selected for COTTON and PLASTIC system.
9) START/STOP button
Press down the Starting button for starting the sterilizing process;
After having been pressed down for 5 seconds of the button, it will stop the
sterilizing program.
10) Light indicator-Lack of water
It’s the light indicator for alarming the shortage of water in the distilled water tank
and reminding for filling distilled water.
11) Light indicator - waste water tank full
It’s the light indicator for alarming the full of the waste water tank, and reminding
for draining waste water.
12) READY light indicator
After closing the door, the READY lighting means can press START to working.
7.2 Fill & drain water
When you install the Steam Sterilizer for the first time, after turn on the switch,
then The machine would displaying lack of the source water. Then you need to
use the measuring cup to fill distilled water from the top inlet around 1500ml for
the first time, next time do not filling the water too full.
When the machine displaying the used water full, please drain waster water out
only after sterilizing in time.
Please clean the brass filter inside the chamber, or it would effect the pressure
releasing during the sterilization. Please clean the filter in the same time with you
draining the used water.
Note: Be sure to fill distilled water .
1. Before filling the distilled water, you must turn on the switch of the power!
2. Please fill the distilled water only after finish working!

7
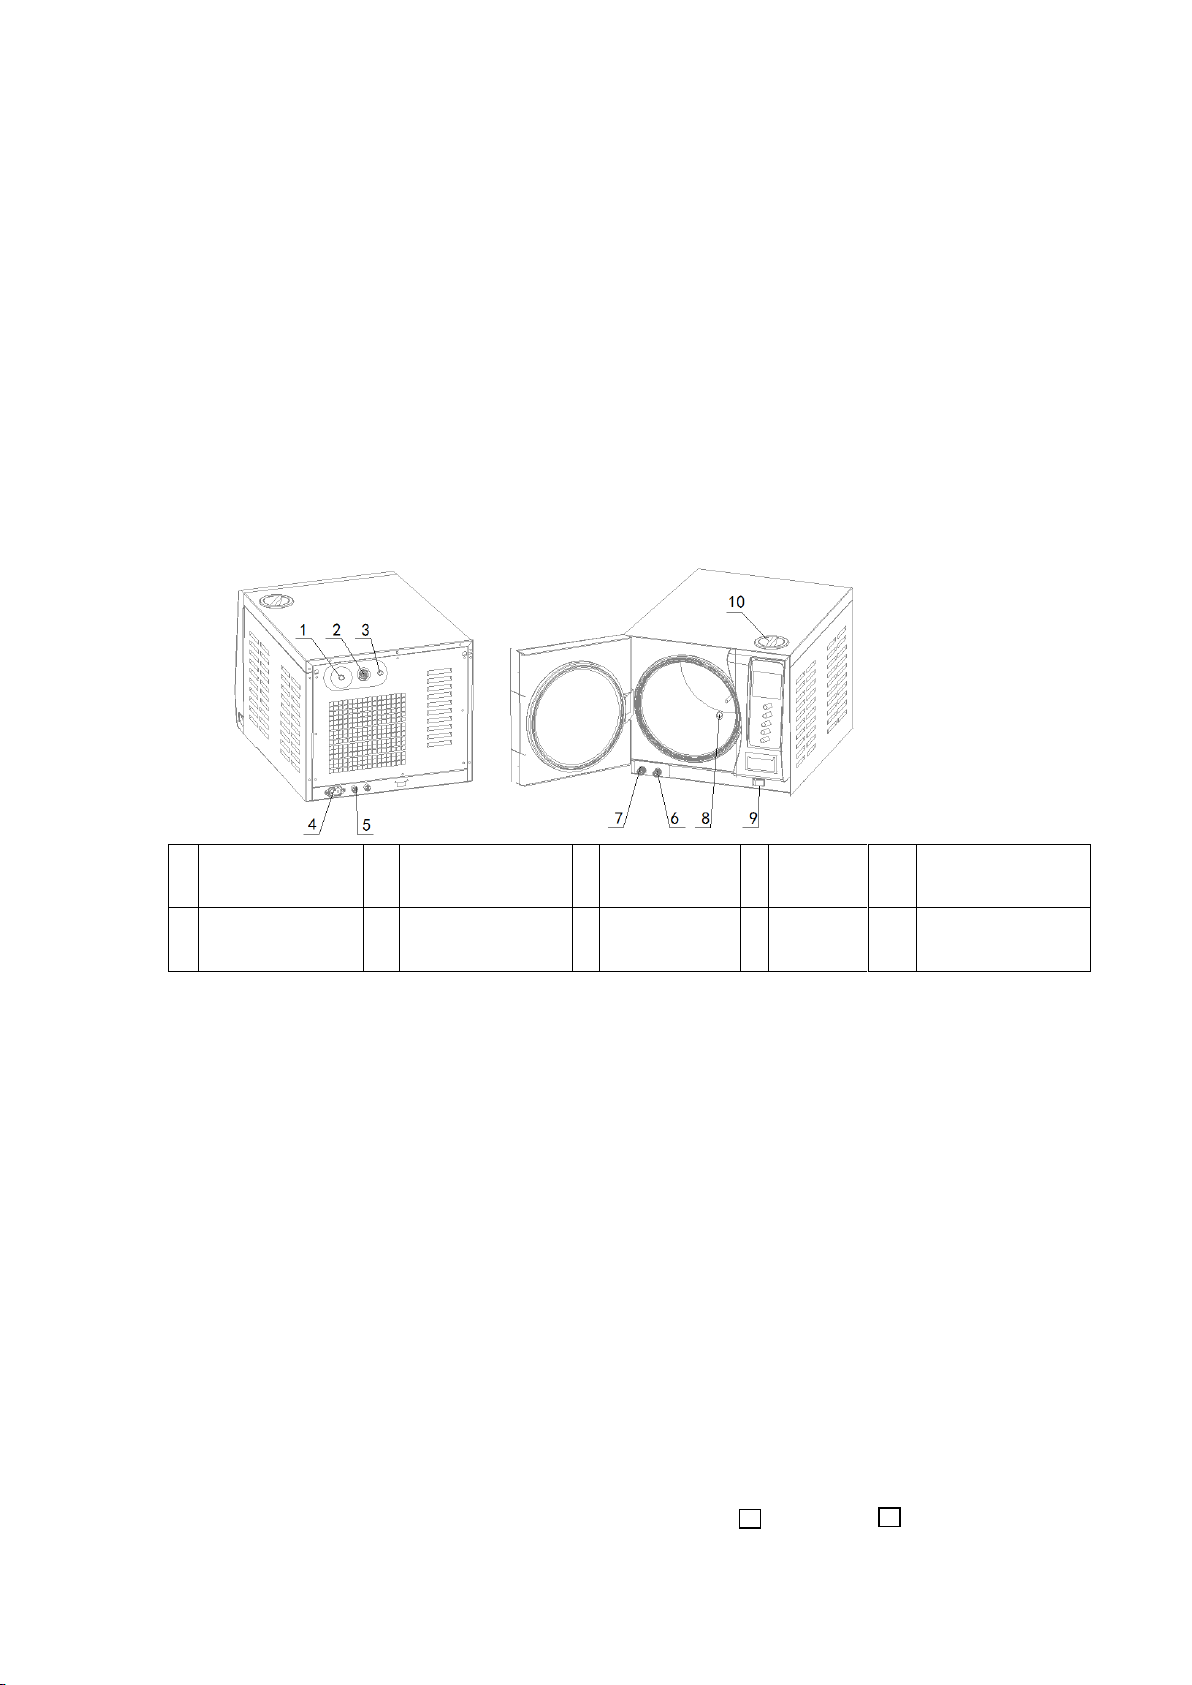
7.3 Function description
Vacuum sterilizer divided into the following process: preheating process;the
vacuum step-up process; sterilization process; exhaust drying process; the
pressure balance process.
7.3.1 preheating process:
Select the program firstly, then close the door, press start button to enter the
preheating process,electrify heated steam generator heater reaches 100 ℃,
electrify heated the chamber wall heater to set temperature 50 ℃.
7.3.2 vacuum process:
Chamber wall temperature to 50 ℃, when the steam generator temperature
reaches 100 ℃, into the vacuum heating process, open the vacuum selection valve,
exhaust valve (normally on) and start the vacuum pump, 300 seconds later Close
the vacuum selection valve, exhaust valve (normally on) and the vacuum pump to
stop pumping the vacuum. Pot inlet valve intermittent pumping power, as steam
generator to generate steam. If the system is set up one pre-vacuum, the pressure
rise to +50 kPa until the pot stops pumping, open the drain valve to drain the
exhaust 0.0kPa to close drain valve, intermittent steam generator to pump water to
generate steam, when the pot the temperature reaches the set value, the end of the
vacuum and transferred to sterilized itinerary. If the system is set three times
pre-vacuum, then when the pressure inside the chamber rise to +50kPa ,end the
first pulse. Start the pump again, begin the second pre-vacuum process.
7.3.3 Sterilization process:
This trip is insulation packing process, when the pot temperature dropped to the
set sterilization temperature of +0.5 ℃ , the pump starts pumping water to the
steam generator, the pot temperature rise to the set sterilization temperature of
+0.9 ℃ ,open the exhaust exhaust valve, allowing the pot temperature is kept
between the set sterilization temperature +0.3 ℃ to the set sterilization
temperature +0.9 ℃.
7.3.4 Exhaust drying process:
When the sterilization time, reduced to zero, into the exhaust stroke dry, open the
drain valve to drain the pressure reduced to +0.0then the vacuum pump to start.
When the drying time only 3 minutes ,open the intake valve to vacuum drying.
7.3.5 Pressure equilibrium process:

8
When the drying time is reduced to zero, turn off the exhaust, dry intake valve
opens, so that the pressure to achieve and external balance, open the automatic
doors, complete sterilization.
7.3.6 Sterilization program is as follows:
1
2
3
4
5
6
134℃
UNWRAPPED
121℃
UNWRAPPED
134℃
WRAPPED
121℃
WRAPPED
121℃
COTTON
121℃
PLASTIC
Sterilizing
temperature
134℃
121℃
134℃
121℃
121℃
121℃
Sterilizing
pressure
210
110
210
110
110
110
Vacuum times
1
1
3
3
3
1
Sterilizing
time
4
20
4
20
20
20
Drying time
15
20
15
20
20
20
7.4 Emergency exit, Long press the start key 5 s, Machine will out of sterilization procedures,
meanwhile "EC" alarm
7.5 After sterilization, use handheld we provide accessories to take devices
Must use handheld to take things, prevent burns!
8. Emergency Condition
During the working time, the Steam Sterilizer will automatically alarming, then
release pressure, stop heating and display the error code (The definition of the
error code is as the below table: error code and resolving method ). It would
ensure the safety of the operator if the emergency occur.
Any emergency happen, please check the warning code table for resolving the
according malfunctions. If not possible to resolve, please contact the dealers. We
will try our best to provide help to you in short time.
After the alarm, The machine can't work, Long press the start key, can unlock
alarm.
Must wait for the pressure display “0 Kpa” can open the door,
there will be set aside heat and residual hot water, Operator also need keep
away from it , prevent burns!

9
Error code and resolving measures
NO
Code
display
Alarm Tone
Malfunction content
Resolving Measures
1
E1
long "du"
Fault of temperature
sensor inside the chamber
Inspect if anything effected the
sensor or wire not connecting well
or sensor was broken
2
E2
long "du"
Pressure over 240 KPa
Inspect pressure sensor or vacuum
pump working
3
E3
long "du"
Fault of temperature sensor outside
the chamber
Inspect the temperature sensor
outside of the chamber
4
E4
long "du"
Super high inner temperature when
pressure rising
Inspect inside temperature sensor
or pressure sensor
5
E5
long "du"
Pressure releasing slowly
Inspect the filter inside the chamber
keep it clean and no jam
6
E6
long "du"
Problem of door switch or door
being opened when working
Inspect door switch or if door
handle were revolved to the
right MAX position
7
E7
long "du"
Fault of temperature senor on steam
generator
Inspecting the temperature sensor
on steam generator
8
E8
long "du"
Fail on pressure rising
Inspect water flowing road and
steam leaking.
9
EH
long "du"
Steam generator not heating
Inspect connecting wire or
resistance of steam generator
10
EF
long "du"
Pressure not over than 0 KPa
Inspect water pump/steam generator
11
EL
long "du"
Pressure not over than 20 KPa
Inspect if electric valve causing
steam leak, or replace water pump
12
Eo
long "du"
Pressure not over than 65 KPa
Inspect if the water pump working
weakly. Or replace it
13
E9
long "du"
Fail on keeping pressure and
temperature
Inspect the steam leaking
14
EC
long "du"
The process interrupted artificially
Long press the start key, can unlock
alarm.
9. Maintenance and Service
Shut off the power before service or components’ replacement, and the
service or replacement work shall be done by the technician.
Working environment minimum brightness to 215 + 15 lx.

10
9.1 Clean the top water tank by disinfectant or alcohol once a week.
9.2 Disinfect and clean the interior surface of the Steam Sterilizer chamber
monthly.
9.3 Replace the fuse.
Fuse Type: 250V,15A
Check the parameters of new fuse is correct .
1) Before change the fuse, turn off the power, and must pull out the plug.
2) Revolve the fuse base by counter-clockwise by screwdriver to bring out the
melting fuse to be replaced;
3) Replace the new fuse and reset the fuse base on the original position, then use
the screwdriver to fasten the base by clockwise.
4)Check the correctness of the data of the new fuse replaced.
9.4 Clean the sealing ring periodically
The operator shall clean the sealing ring periodically for avoiding the influence to
the seal caused by the dust/dirt left due to the long period use. Use the smooth
cloth with distilled water to wipe the surface of the sealing ring or sealing cap
gently. The user shall discharge the sealing ring for further cleaning or
replacement if the air-leaking problem can not be resolved after the above process
(The user shall discharge the sealing ring periodically for cleaning and inspection
as recommendation by the supplier).
9.5 The replacement work for sealing ring
Tool: One flat screwdriver (No sharp edge at the head)
1) One hand catches the lip of the sealing ring, the other hand insert the
screwdriver into the clearance between the sealing ring and the door for raise up
the sealing ring.
2)After raising up part of the ring, you can use hand to draw the whole ring out.
Wash its groove after drawing out the ring and pay attention to see whether it’s
spoiled or not in consideration of the necessity of replacement.
3)Put back the ring to the original door groove after cleaning. Most Important: the
inset work must be done equably to the groove During the installation, the laid
four equal points of the ring must be inserted to the groove firstly, later for the
same work for the remaining segments of the ring. After finishing, press the
sealing ring equally by the force of hand.
4)Note: The inner circle of the ring may be raised up when insert the ring into the
groove. Please press it to the groove by using the screwdriver carefully.
Shut off the power and cooling the Steam Sterilizer sufficiently before inserting
the ring for avoiding scald.
9.6 Check the safety valve
In order to prevent the safety valve in the blocking state, Under normal use, allow
the steam pressure release through it once a month.
1)operation sterilizing procedure

11
2)When the pressure in the sterilizer reaches 100 kpa,Pull rings on safety
valve, make the safety valve open,about 2S, if steam jet, the safety valv
e work is normal. Ifnot, the safety valve need for effective inspection or
replacement
Pull rings on safety valve will steam jet, It is best to use tools such
as screwdriver when pull. Do not use finger directly, Operator also need ke
ep away from it , prevent burns!
Replace the safety valve:
This operation is limited to the professionals
1) Loosen the set screws of the safety valve, take the safety valve down f
rom the panel,
2) replace with a qualified safety valve (must provide by manufacturers).
3) Test a sterilization process
The machine maintenance and replacement of electrical components must cut
off power supply first. And only the manufacturer or professional person
designated by the manufacturer can operate
10. Transportation and Storage
10.1 The preparatory work before
transportation and storage:
Shut off the power, draw out the plug and cool the Steam Sterilizer down.
10.2 Draining
Empty the water storing tank after the machine become colling; use the pipe
packing together with the machine, connecting to the valve showing in the above
picture 4 or 3, 4 is the water exiting mouth for used water collecting tank, 3 is the
water exiting mouth of the distilled source water storing tank. Revolving the
water exit button by anticlockwise direction so as to release the water.
10.3 The Steam Sterilizer shall be transferred and stored with the below
conditions:
Ambiance temperature: -40ºC -+55ºC
Relative humidity: <85%
Atmospheric pressure: 500HPA-1060HPA
Note: Do not drag or drop during transportation.

12
11. Attention
ATTENTION
1. The Steam Sterilizer must be placed on the horizontal working base.
2. Must use the distilled water for the purpose of lasting the operation life of the
Steam Sterilizer.
3. There shall be no clog to the air cooling window on the outer surface of the
Steam Sterilizer.
4. The object apparatus to be sterilized shall be placed on the device plate with
enough clearance retained in favor of the air circulation inside the sterilizing
room.
5. Empty the water inside the cooling water collecting tank frequently. Usually,
the cooling water collecting tank shall be emptied once the water storing tank
emptied.
6. The door handle must be buttoned up before working.
7. Don’t open the door of Steam Sterilizer before seeing the “0” kPa displayed
on the pressure indicator.
8. Not be too closed to the door of the Steam Sterilizer in case of scald when
open the door.
9. Shut off the power before discharging/installing the sealing ring, and the work
shall be carried out after further sufficient cooling in case of scald.
10. Don’t drag or drop the Steam Sterilizer during relocation period of the Steam
Sterilizer.
11. The protecting ground shall be reliable.
12. Equipment must be used away from the magnetic field.
13.The device end of life must be for processing scrapped in accordance
with the local environmental protection laws and regulations.
14.Such as power failure occurs during the working, need to disinfect the
equipment out, it must be open the door 2 minutes later.
15.The equipment must be far away from flammable items.
16. The equipment must be reliable grounding.
17.Must use the attached plug, do not change it.
18.This product is not suitable for leakproofness. not resistant to high temperature
products,the sterilizer max temperature is 138 .0℃.
19.This product is not suitable for liquid sterilizing.

13
Appendix:
1、Steam loop(Work Description)

14
2、Circuit diagram of sterilizer

15
3、Vacuum test and "B&D" test methods
Vacuum test: connecting well the pressure meter(if necessary) from the backing
test connector, turn on the power by the green switch, close the door, keeping
press the temperature choice button around 10s, the board would displaying "nn",
and then it would start the vacuum testing automatically. After vacuum pulse, it
would holding the vacuum status and end by displaying "Ed".
B&D test: when put the test material onto the tray inside the chamber firstly, turn
on the power by the green switch, close the door, keeping press the
"UNWRAPPED" button around 10s, When the board displaying "bd", then press
start/stop button, the autoclave would start the BD test automatically and end by
displaying "Ed".
Ningbo Mingtai Medical Instrument Co., Ltd
Yunzhen Road, Industrial Zone, Yunlong Town, Yinzhou,
Ningbo City, China
Tel: +86-0574-88320096;Fax:+86-0574-88320098
Shanghai International Holding Corp. GmbH (Europe)
Eiffestrasse 80, 20537 Hamburg, Germany
Tel: +49-40-2513175 Fax :+49-40-255726
This manual suits for next models
4
Table of contents
Other MingTai Laboratory Equipment manuals
Popular Laboratory Equipment manuals by other brands

Specac
Specac ARROW Quick start manual

Biobase
Biobase BK-HS32 user manual

Spicer Consulting
Spicer Consulting SC28 user manual

Endress+Hauser
Endress+Hauser Analytik Jena PlasmaQuant MS Series Service manual

THORLABS
THORLABS MFF101 user guide

Thermo Scientific
Thermo Scientific DensityPRO-T installation guide