Mini Jumbotron MACROTRON 32 User manual

© The Mini Jumbotron Company, LLC
THE MACROTRON 32 - INSTALLATION INSTRUCTIONS

© The Mini Jumbotron Company, LLC
PLAY-BY-PLAY
PLEASE TAKE YOUR TIME WITH THE INSTALLATION AND ASK SOMEONE TO HELP WITH ANY
HEAVY LIFTING REQUIRED IN THESE INSTRUCTIONS.
WE TALKIN’ ABOUT PRACTICE: WE RECOMMEND PERFORMING A PRACTICE INSTALL ON A
TABLE BEFORE ATTEMPTING TO MOUNT THE MINI JUMBOTRON TO THE CEILING. THIS
PRACTICE INSTALL WILL RESULT IN A SMOOTHER CEILING INSTALL AS IT OFFERS AN
OPPORTUNITY TO DIAL IN THE MOUNTS, ATTACH THE SEAL & VELCRO TO THE TVS, MOUNT
LIGHTING, AND TIDY UP CORDS. IT IS MUCH EASIER TO MAKE THESE TWEAKS NOW BEFORE
THE MINI JUMBOTRON IS CEILING MOUNTED.
DURING ALL STEPS, PLEASE PROTECT THE MINI JUMBOTRON SO IT DOES NOT SCRATCH.
Before enjoying your Mini Jumbotron, you will need to assemble its guts. No guts, no glory.
Here is the play-by-play:
STEP 1: Find a sturdy table close to an electrical outlet for testing. Please protect the base of the Mini
Jumbotron and place it on the table. Insert the non-threaded end of the quad mount pole into the silver
flange of the base. Tighten the 2 flange screws using a 3/16th Allen Key so that the pole does not spin. As
you tighten the 2 flange screws to the pole please be sure the pole remains straight and plumb.
Note: Tightening the flange screws unevenly, or too tightly, may make the pole sit crooked.
STEP 2: Assemble the top metal frame. Watch Frame Assembly video on instructions page.

© The Mini Jumbotron Company, LLC
STEP 3: Assemble the Quad TV Mounting System using the appropriate hardware.
STEP 4: Attach each Pole Bracket (C) to each Dual Arm Assembly (A) using three ¾” bolts and nuts.
E (x 4)
Top Bolt
A (x 2)
Dual Arm Assembly
B (x 4)
VESA Plate
& 16 TV Screws
C (x 2)
PoleBracket
& Bolts
F (x 1)
CeilingMount
& Bolts
G (x 1)
6 mm Allen Key
D (x 1)
Pole
NOTE: Various sized TV screws & other hardware may be included. Not all hardware included may be used.

© The Mini Jumbotron Company, LLC
STEP 5: Attach both Dual Arm Assemblies (A) to the Pole (D) about 1” above the silver flange
using the remaining 4 long bolts, lock washer and nut. Tighten the 4 bolts equally and securely so
that the brackets permanently grip the pole and to prevent the mounts from sliding down the pole.
Be careful not to overtighten or you may snap the bolts.
STEP 6: Attach the VESA Plates (B) to the back of each TV using the appropriate sized screws.
Once you find the correct screws, attach the VESA Plate (B) to the back of each TV using 4 washers, 4
screws and the screwdriver side of the included 6 mm Allen Key (G).

© The Mini Jumbotron Company, LLC
STEP 7: Put each assembled TV with the attached VESA Plate (B) onto each Arm Assembly (A).
Ensure stability and then insert the Top Bolt (E) to hold each TV in place.
STEP 8: Adjust the gas spring tension to your personal preference using the 6 mm Allen Key (G). You
may also adjust the tilt tension using 6 mm Allen Key (G).
Insert the 6 mm Allen Key (G) into the adjusting hole and turn clockwise (-) to reduce gas spring
tension, suitable for lighter screens. Insert the 6 mm Allen Key (G) into the adjusting hole and turn
counter-clockwise (+) to increase gas spring tension, suitable for heavier screens. Please take note
it may take numerous turns for gas spring tension adjustment.

© The Mini Jumbotron Company, LLC
Helpful Tips:
Each TV should be centered on their side of the base and should rest on the foam strip with the
TV remote sensor visible.
The bottom corners of your TVs should be set back just enough so that the Velcro on the bottom of
your corner plexi-glass pieces will connect with the Velcro that is in each corner of the base.
The top of each TV should be angled 10-15 degrees towards the floor. You will know they’re at the
right angle once you add the Mini Jumbotron frame as the frame should rest on top of the 4 TVs.
STEP 9: Grab someone to help you with this next step. Lift up the Mini Jumbotron metal frame and
place the center silver flange of Mini Jumbotron frame over the top of the pole. Before lowering the frame,
please make sure the TVs are angled correctly so that the seal on the bottom of the Mini Jumbotron frame
will rest flat on top of all 4 TVs. Be careful not to scratch the TVs by making sure the TVs are in the
appropriate angled position before lowering the frame.
STEP 10:Once your frame is resting level on top of your TVs, and no gaps exist between the frame and
the TVs, you may tighten the flange screws of the Mini Jumbotron frame. As you tighten the flange screws
please be sure the frame remains level and that there are no gaps between the top of the TVs and the
frame.
Note: Sometimes tightening the flange screws in the wrong order, unevenly, or too tightly makes the frame
sit crooked creating gaps above the TVs. The TVs will hold up the frame so you don’t need to tighten the
flange screws too tightly.
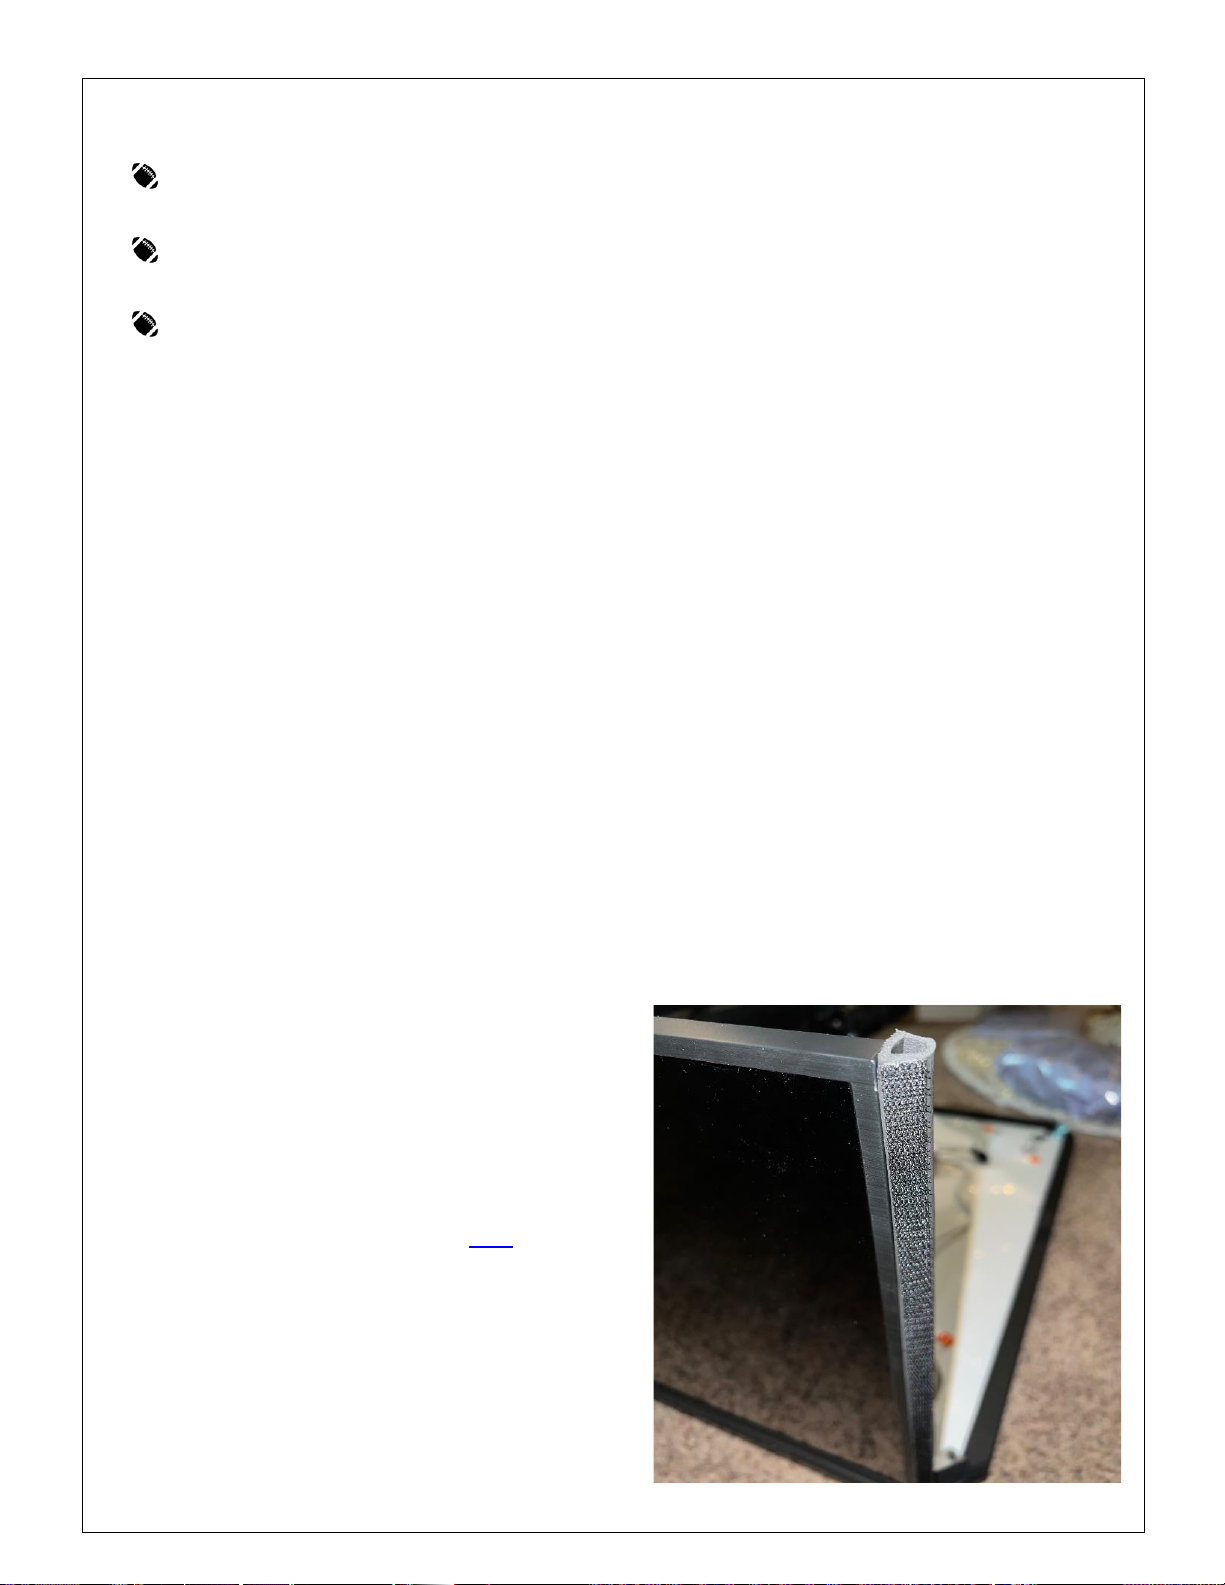
STEP 11: PLEASE TAKE YOUR TIME WITH THIS NEXT STEP. The 4 plexi-glass corner pieces will be
held in place by both the Velcro on the metal Mini Jumbotron frame as well as the provided seal and
Velcro that you will add to both sides of each TV. The seal and Velcro will also help eliminate any gaps
between the TVs and the plexi-glass. Before starting this step you may want to text fit the plexi-glass so
you have a good idea of where to put the seal and Velcro. See picture for ideal placement of both.
•You may notice that one side of the seal is more
angled than the other. You’ll want to apply the
seal so that it forms a 45 degree angle.
•When applying the seal, keep the seal relatively
flat with the front of the TV so that it doesn’t
stick out in front of the TV more than 1/8”. Try
not to allow the seal adhesive to show either.
Take your time. If you mess up and need to
order more seal you can do so here.
•Apply pressure to the seal on the side of the
TVs and give the adhesive 15 minutes to
adhere before applying the Velcro. Then apply
the Velcro and give the Velcro time to adhere as
well.

© The Mini Jumbotron Company, LLC
STEP 12: Attach the corner plexi-glass pieces and adjust the TVs as necessary to get everything looking
good. When you feel all four corners are in the right place you may tighten the TV mount angles.
STEP 13: Consider adding LED strip lighting to the very top of the metal Mini Jumbotron frame to serve as
ceiling accent lighting. Any Walmart, Target, Amazon, Lowes, etc. sells LED strip lighting and this will be
the best opportunity to affix LED strip lights before the Mini Jumbotron is raised to the ceiling.
Use alcohol wipes to clean the top of the frame before affixing any LED strip.
Keep the strip about 1.5” away from the front edges of the metal frame. This will help hide the strip
from being seen when your Mini Jumbotron is mounted. Ceiling accent lights looks best when the
strip is not visible.
STEP 14: You may also want to consider mounting the provided internal LED lights to the metal bracket
that sits between the metal Mini Jumbotron frame and the silver flange that attaches to the pole. Take care
not to interfere with where the bungee cords are hooked on top of this metal bracket and where the
bungee cords connect to each corner of the base.
STEP 15: Let’s go ahead and plug everything in and see how it all works. Try to keep the cords as short
and tidy as possible. This is a good opportunity to download any related lighting apps and configure your
lights. Please refer to the lighting manuals for instructions on which apps to download and how to set up
your LED lights. Information on the recessed lighting is on the final pages of these instructions.
ALRIGHT ROOKIE –PRACTICE IS OVER. IT’S TIME TO MOUNT THIS BABY!
Securely fasten the ceiling mount to the ceiling. Make sure it installed in a location and in a manner
that will support the total weight of your Mini Jumbotron.
Remove the plexi-glass and unplug everything. Raise the metal Mini Jumbotron frame an inch or so
off the tops of the TVs so that you can remove the TVs.
Two Installation Options:
OPTION 1 (Probably the wiser and safer option):
1. Remove the metal Mini Jumbotron frame and the TV mounts from the pole.
2. Loosen the flange screws on the base to free the pole. Lift the pole and screw the pole into your
ceiling mount.
3. Lift the metal Mini Jumbotron frame and raise it onto and push it up the pole as high as you can.
Then tighten the flange screws. (You will lower the frame later onto the TVs but for now let’s push it
up out of the way).
4. Reattach the TV mounts.

© The Mini Jumbotron Company, LLC
OPTION 2 (Your wife will remind you that you should have and still can choose option 1):
1. Grab a buddy. Tell him about Option 1. If he said “screw that” you found the right helper for this.
2. Loosen the flange screws on the base to free the pole. Lift the pole, frame and mounts all together
as one solid unit and screw the pole into your ceiling mount.
Re-attach the base. It will be helpful to use the bungee cords here. Tighten the flange screws and
make sure the base remains level.
Re-install the 4 TVs, make sure they rest on the seal of the base and are angled properly.
Plug in everything.
Now lower the metal Mini Jumbotron frame so it rests on the 4 TVs and tighten the flange screws.
Attach the Velcro plexi-glass panels. When you’ve got it looking good and something displaying on
the TVs please text a brief video and pics to 623-606-6176. Congratulations and thank you!
ENJOY YOUR MINI JUMBOTRON!
PS: If you have any tips on how I can improve the product or installation please let me know. Thank you!
Table of contents
Other Mini Jumbotron TV Mount manuals