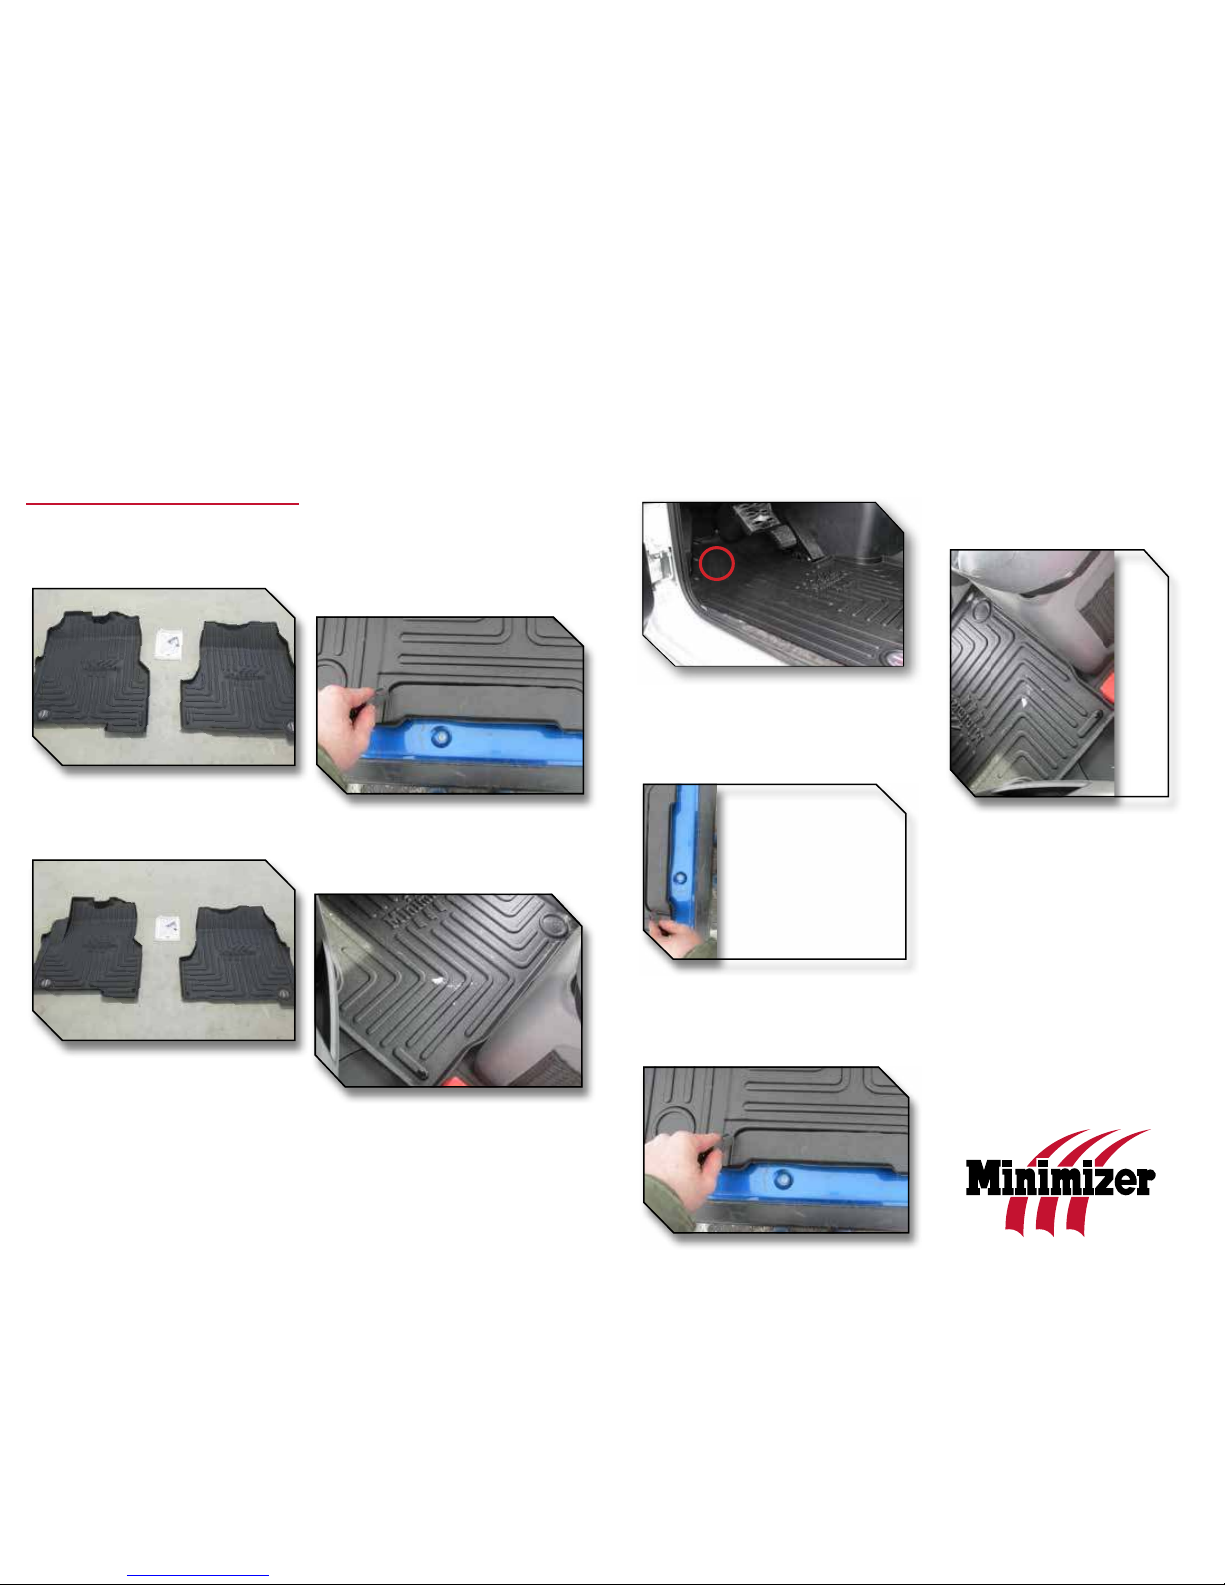
a) Use a #3 Phillips screwdriver to remove the
mounting screw from the the molded plastic
transmission cover that is mounted to the floor.
Refer to Figure 5 for mounting screw identifica-
tion. Some trucks may be retrofitted with a ¼”
hex bolt instead of a Phillips machine screw. If
this is the case use a 7/16” socket and ratchet to
remove the bolt.
b) Locate the retention hook, ¼” machine screw,
and poly spacer shown in Figure 6. Insert the
screw through the hole in the retention hook and
place the black poly spacer on the bolt below the
hook.
c) Insert the hook assembly through the
transmission cover and tighten using a #3 Phillips
screwdriver. Orient the floor mat hook so it points
straight toward the gearshift as shown in Figure 7.
9. Install the driver side floor mat and engage it
into the retention hook. If the position of the seat
base is nonstandard or the truck is equipped with
aftermarket seats it may be necessary to trim
the rear portion of the driver or passenger mat
to fit. There is a raised rib molded into the driver
and passenger mat to contain liquids and act as
a trim guide. Use a sharp utility knife as shown
in Figure 8 to trim the material and cut along the
outside of raised rib preserving the rib for liquid
containment.
10. Pull the driver side floor mat to the left to
confirm that the retention hook is fully engaged
and securely fastened to the floor. If the hook is
not functioning properly or the mat cannot be
securely installed, do not use a Minimizer floor
mat on the driver side of the vehicle.
11. FAILURE TO PROPERLY INSTALL THE RETENTION
HOOK FOR THE DRIVER SIDE FLOOR MAT MAY ALLOW
THE MAT TO SHIFT, WHICH MAY INTERFERE WITH
PROPER FUNCTIONING OF THE VEHICLE’S PEDALS,
POTENTIALLY RESULTING IN LOSS OF CONTROL
OFTHE VEHICLE AND SERIOUS INJURY OR DEATH.
Minimizer floor mats are specifically designed
for certain vehicles and may be used safely
only with those vehicles. VERIFY THAT THE
MAKE, MODEL, AND YEAR OF THE VEHICLE IN
WHICH YOU ARE INSTALLING THE FLOOR MATS
ARE IDENTIFIED BELOW AS BEING COMPATIBLE
WITH THE MINIMIZER FLOOR MATS YOU HAVE
SELECTED.
PETERBILT FLOOR MAT KIT SPECIFICATIONS:
• Kit FKPB5B shown in Figure 1 is compatible
with Peterbilt 357,378,379,385 trucks built from
5/2004 through the model year 2005.
• Kit FKPB6B shown in Figure 2 is compatible
with Peterbilt 357, 377, 378, 379, 385 trucks
built prior to 5/2004.
• Trucks equipped with a factory thermos
holder require hand trimming of the center mat.
A raised trim line is molded into the floor mat to
use as a guide and for liquid containment.
INSTALLATION INSTRUCTIONS:
1. Remove other floor mats from the vehicle
before installing Minimizer floor mats.
2. Install the Minimizer floor mats right side up,
with the Minimizer logo visible.
3. Each Minimizer floor mat is contoured to fit a
particular location in the vehicle and may be used
safely only in that location.
4. The Minimizer floor mat package contains one
driver mat, one passenger mat and one center
mat.
5. Verify if the truck is equipped with a factory
thermos holder between the driver and passenger
seat as shown in Figure 3. If no thermos holder is
present, install the center mat so the logo reads
from left to right when facing forward in the cab.
If the truck is equipped with a thermos holder, use
a utility knife to trim the red shaded portion of the
center mat as shown in Figure 4.
6. For cases where a fire extinguisher is mounted
behind the driver seat, the left rear corner of the
center mat shaded in yellow may be trimmed to
allow for clearance.
7. Next install the mat for the passenger side of
the vehicle.
8. Install the retention hook to secure the driver
side floor mat from any movement. Follow installa-
tion steps a, b, and c below.
Figure 4 - Trimming Diagram
Figure 3 - Factory Thermos Holder
Figure 7 - Proper Hook Orientation
Figure 8 - Trimming for Aftermarket Seats
Figure 5 - Mounting Screw Identification
Figure 6 - Hook and Spacer Assembly
Figure 1 - KIT FKPB5B Contents
Figure 2 - KIT FKPB6B Contents