minipcr blueGel User manual

©2013-2020 Amplyus LLC.
miniPCR bio and the miniPCR bio logo
are trademarks of Amplyus LLC bluegelTM user’s guide support@minipcr.com
blueGelTM
Electrophoresis
System
User’s guide
Integrated electrophoresis and visualization system

02. support@minipcr.com
bluegelTM user’s guide
TABLE OF CONTENTS
Overview
Features
Components
Directions for use
Casting a gel
Running a gel
Document the run
Troubleshooting and maintenance
Troubleshooting
Care & maintenance
Specifications & operating conditions
03
03
04
07
07
09
10
11
11
12
13
INDEX

03. support@minipcr.com
bluegelTM user’s guide
Fast and Safe Electrophoresis
UL and CE marked 48V power supply. Automatic current shut-off when cover is not
present. Platinum and stainless steel electrodes on cover for safety. Buffer chamber
designed for maximum run rate.
Safe Blue Light Illumination
High intensity blue LED illuminator panel. Blue diffuser for even gel illumination. Amber
filter integrated in cover for direct visualization. View results within minute.
Casting System
Save on reagents: 20 ml gels and 30 ml buffer. 60 x 60 mm gel tray with one or two
rows of combs. Two double-sided combs with choice of 9 and 13 wells.
Easy to Operate and Store
Intuitive two-button operation: one for Run, one for Light. 3 x 9 inch footprint, 4 inches
high. Storage pouch included.
Fold-a-View™ Documentation Hood
A portable, foldable darkroom. Image capture even in brightly lit rooms.
CE Conformity
Mark indicates CE certification.
FEATURES
FEATURES
OVERVIEW

04. support@minipcr.com
bluegelTM user’s guide
COMPONENTS
COMPONENTS
Cover
Gel Tray
Buffer Chamber
Base

05. support@minipcr.com
bluegelTM user’s guide
Combs
Gel Tray
Casting platform
COMPONENTS (Cont.)
COMPONENTS

06. support@minipcr.com
bluegelTM user’s guide
COMPONENTS
COMPONENTS (Cont.)
Comb storage under casting platform
System includes
(1) Cover
(2) Gel trays
(1) Buffer chamber
(1) Base
(1) Casting platform
(2) Two-sided combs
(1) Power supply
(1) ClearViewTM Spray
(1) Lens cleaning cloth
(1) Fold-a-ViewTM Imaging Hood
(1) Carrying pouch

07. support@minipcr.com
bluegelTM user’s guide
DIRECTIONS FOR USE
DIRECTIONS FOR USE
CASTING A GEL
Place the gel tray inside the casting platform. Place on a level surface to ensure uniform
gel thickness.
Determine the percentage gel to make:
Place flask in microwave (~30 seconds) or on a hot plate until all the agarose is dissolved.
The agarose/buffer mix is ready when no agarose particles are visible upon swirling.
CAUTION: liquid may bubble over the mouth of the ask and cause burns. Handle with
care using protective equipment.
Let agarose/buffer mix cool for ~2-3 minutes and add 2 μl of GelGreenTM DNA stain
10,000X stock (1 μl per 10 ml of TBE). Swirl well to mix. See Appendix B for additional
DNA staining dyes that work with blueGelTM.
Weigh the desired amount of agarose according to the chart above and add it to a 100
ml size flask(or larger) containing 20 ml of 1X TBE electrophoresis buffer. Mix well by
swirling.
Tip: If pouring more than one gel, agarose and buffer quantities can be multiplied by
the number of gels to be poured. Increase heating time by ~15 sec per additional gel
and use a larger ask.
Note: if using two rows of wells (two combs) resolution will be reduced due to shorter
separation distance.
* Warning: blueGelTM is designed to work best with 0.5 to 1.0X TBE (Tris Borate EDTA)
buffer. Use of other buffers such as TAE or SB may result in impaired performance.
1 --
4 --
5 --
3 --
2 --
Size of DNA
to separate
Gel percentage
(%)
Agarose
(g)
1x TBE*
(ml)
600 bp to 12 kb 0.8 0.16 20
500 bp to 10 kb 1 0.2 20
400 bp to 7 kb 1.5 0.3 20
200 bp to 5 kb 2 0.4 20
60 bp to 2 kb 3 0.6 20

08. support@minipcr.com
bluegelTM user’s guide
DIRECTIONS FOR USE
CASTING A GEL (Cont.)
Place the comb in the top slot and pour all the agarose/buffer mix into the gel tray. To
double the well capacity add a second comb in the middle of the gel tray. Each comb
will form either 9 or 13 wells. Remove any air bubbles using a disposable micropipette tip.
Let gel stand for ~10 minutes until completely set. For faster set time place the casting
platform with the gel in a refrigerator. Do not disturb the gel during this time.
After the gel has solidified, remove comb/s gently by pulling straight upward.
Remove the gel tray from the casting platform. If a small amount of gel has formed
underneath the gel tray, wipe it off and discard it.
TIP: We recommend using gels immediately after casting. Unused gels can be kept at
ambient temperature for 5 days if they are kept moist and protected from light (place
gel inside a resealable zip bag with a paper towel saturated in running buffer, and
covered in foil). DNA gel stains differ in stability and may fade if gels are stored – refer
to the manufacturers’ recommendations.
6 --
7 --
8 --
9 --

9. support@minipcr.com
bluegelTM user’s guide
RUNNING A GEL
Place the gel tray containing a gel in the buffer chamber and place the buffer chamber
inside the blueGelTM base. The wells should be closest to the (-) end.
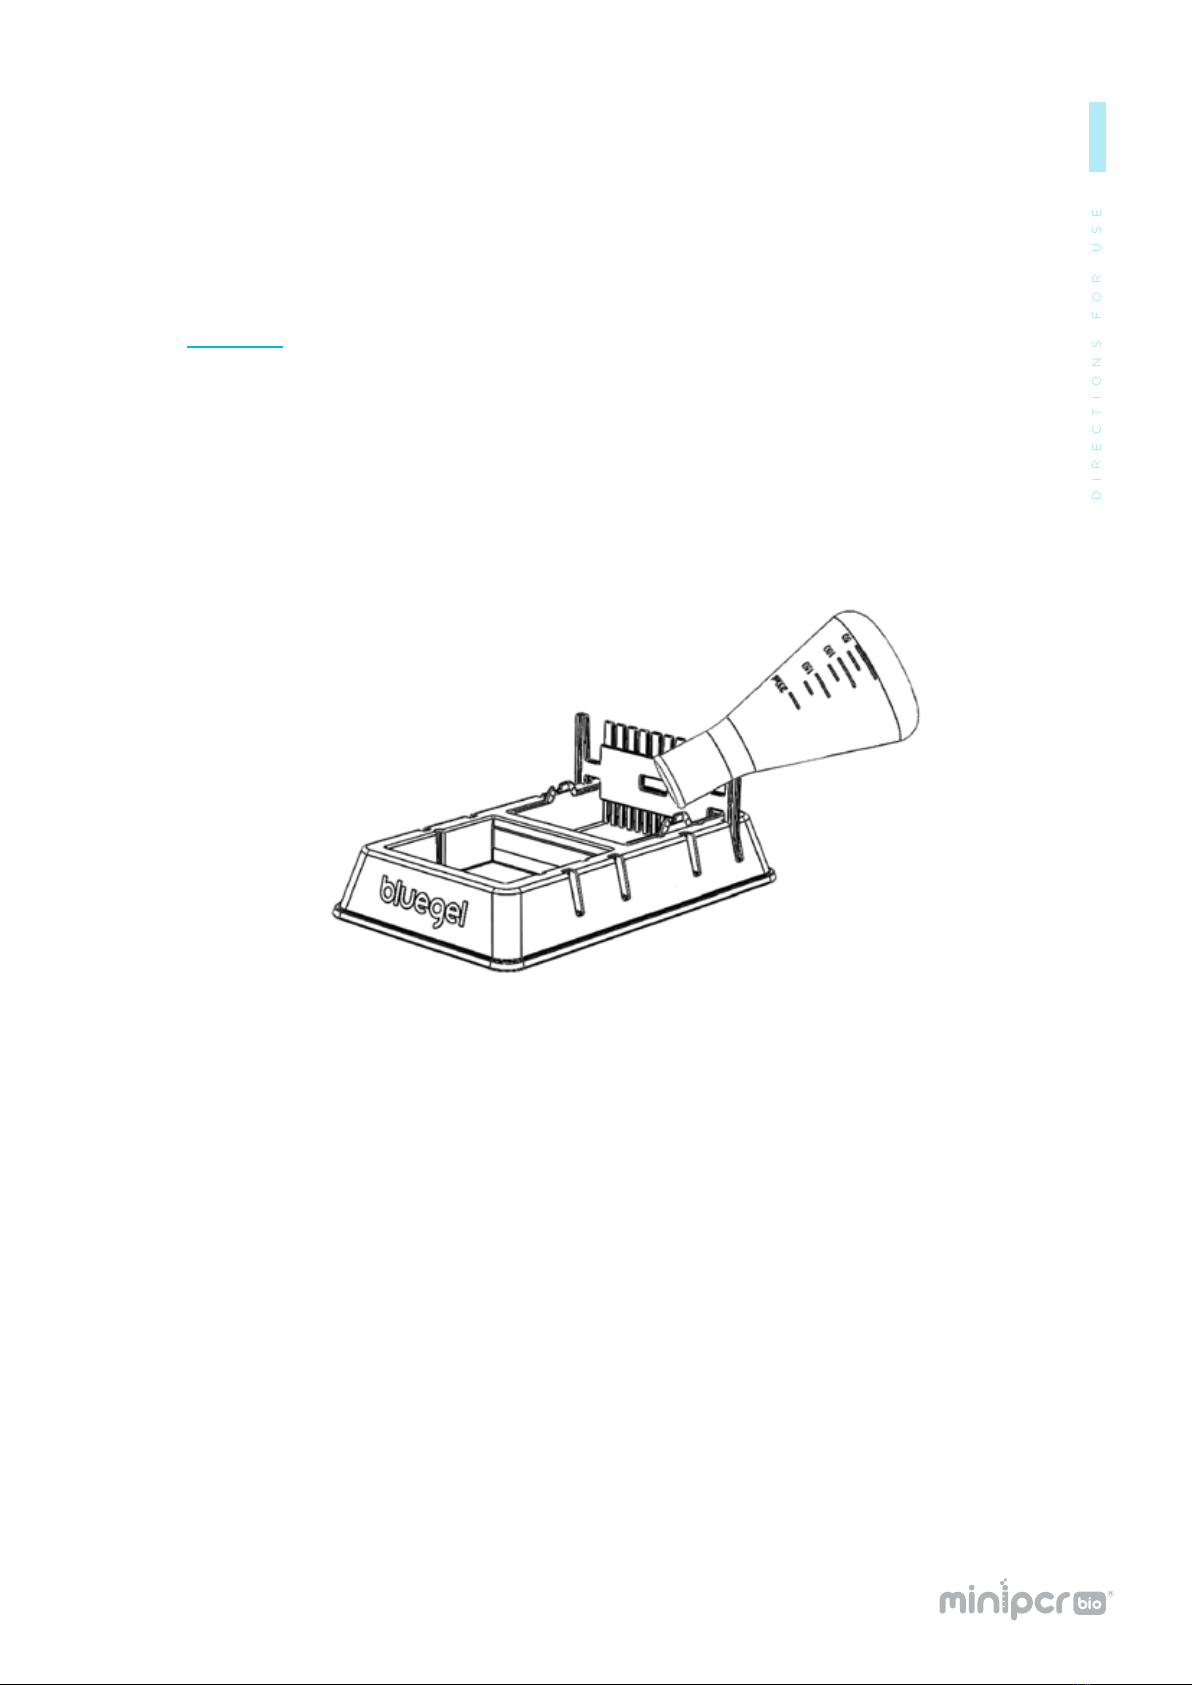
Add 30 ml of 1X TBE buffer in the buffer chamber. The buffer should just cover the
agarose gel.
CAUTION: Do not overll the gel chamber as it may overow when the cover is placed
over the gel.
Remove air bubbles (if any) trapped between the gel and the gel tray, or between the
gel tray and the buffer chamber.
Load the DNA samples in the wells using a micropipette.
9-well combs hold up to 20 μl
13-well combs hold up to 10 μl
Be careful not to puncture the gel with the micropipette tip.
Note: The DNA samples should contain loading dye.
Recommended: To prevent fogging during electrophoresis, spray one pump or less of
ClearView SprayTM inside the orange cover, between the electrodes. Spread to an even
coat using a microber cloth. Wipe gently, do not rub clean.
Place the orange cover on the blueGelTM base. The cover contains the electrodes and
will only fit in one direction, with the (+) electrode positioned to attract the negatively
charged DNA.
Press the power button to start the run. The green LED indicator located next to
the power button should light up. Small bubbles will form near the electrodes.
NOTE: For safety, the power won’t turn on if:
a. The cover is not correctly placed on the base, and electrodes are not making contact
b. There is no buffer in the buffer chamber
c. Using the incorrect buffer (too diluted or too concentrated)
At any time during the run press the lightbulb button to visualize the DNA. The
orange cover filters the excess blue light allowing easier visualization of the fluorescence
emitted by DNA.
1 --
2 --
3 --
4 --
5 --
6 --
7 --
DIRECTIONS FOR USE

10. support@minipcr.com
bluegelTM user’s guide
DOCUMENT THE RUN
DIRECTIONS FOR USE
To document turn the blue light on and take a picture
with a smartphone, tablet or other camera device.
Tip: If DNA is not easily visible, dim or turn off ambient
light. To document gels in bright ambient light, use the
supplied Fold-a-ViewTM photo documentation hood.
Pop up the Fold-a-ViewTM following the instructions
on its side and place it on the blueGelTM orange cover,
sliding it down until it ts snugly around the cover’s
edges. Place your camera on top, and align the camera
lens with the circular opening on the Fold-a-ViewTM.
If needed, softly wipe condensation off the inside of
the orange cover with the supplied lens cleaning cloth
to improve visibility.

11. support@minipcr.com
bluegelTM user’s guide
TROUBLESHOOTING
AND MAINTENANCE
TROUBLESHOOTING
TROUBLESHOOTING AND MAINTENANCE
Can’t find combs: combs are stored in the back of the casting platform.
Gel tray won’t fit inside the buffer chamber: ensure guides at the sides of the gel tray
and casting platform are aligned.
Buffer chamber won’t fit inside the base: ensure the chamber is being inserted in the
correct orientation, with the tab towards the back of the unit.
Orange cover won’t fit: ensure proper orientation.
Run won’t start (LED indicator not on): check electrode contact and alignment between
cover and base. Check that the running buffer is making contact with the electrodes.
Confirm that you are using the correct running buffer.
Condensation on cover: apply ClearViewTM before use or use lens cleaning cloth to
gently wipe off.
Gel edges shrinking after prolonged runs: ensure you are using 0.5X or 1X TBE buffer.
If you need to contact miniPCR bio:
Phone: 781-990-8PCR
Email: support@minipcr.com
Mail: 1770 Massachusetts Ave., Suite 167
Cambridge, MA 02140

12. support@minipcr.com
bluegelTM user’s guide
TROUBLESHOOTING AND MAINTENANCE
CARE & MAINTENANCE OF YOUR BLUEGEL
ELECTROPHORESIS SYSTEM
Please follow these recommendations to maintain your blueGelTM system in optimal
working condition:
Rinse the casting platform, combs, gel tray, buffer chamber and cover in distilled water
after each use. Do not wipe or handle platinum wire. Air dry.
Never submerge the blueGelTM base in water.
Do not use ethanol or organic solvents to clean parts.
Handle the buffer chamber, gel tray and cover with care to protect from scratching.
Always store blueGelTM components in the carrying pouch.

13. support@minipcr.com
bluegelTM user’s guide
TROUBLESHOOTING AND MAINTENANCE
SPECIFICATIONS &
OPERATING CONDITIONS
High Intensity blue LED panel
Input voltage 100-240V AC~47-63Hz, 0.58A Max
Output 48V DC 0.5A 24W Max
Indoor use only
Operating temperature 9°C - 30°C, max. humidity 70%
Appendix A – blueGel™ accessories and replacement parts available at
www.minipcr.com
Appendix B – DNA gel stains compatible with blueGelTM
Description Part No.
GelGreen® Agarose Tabs™ RG-1500-10
GelGreen™ DNA stain RG-1550-01
Agarose, 20g RG-1500-02
TBE Buffer, 20X RG-1502-02
blueGel™ base QP-1500-05
blueGel™ cover QP-1500-06
blueGel™ casting platform QP-1500-07
blueGel™ gel tray QP-1500-08
blueGel™ comb QP-1500-09
blueGel™ buffer chamber QP-1500-10
blueGel™ power supply QP-1500-11
blueGel™ carrying pouch QP-1500-12
blueGel™ Lens cleaning cloth QP-1500-13
Fold-a-ViewTM photo documentation hood QP-1500-14
DNA gel stain Manufacturer
GreenView Plus, GreenView Ultra Applied BioProbes
GelGreen Biotium
SybrSafe or SybrGreen ThermoFisher
EvaGreen Jena Bioscience
Table of contents
Other minipcr Laboratory Equipment manuals