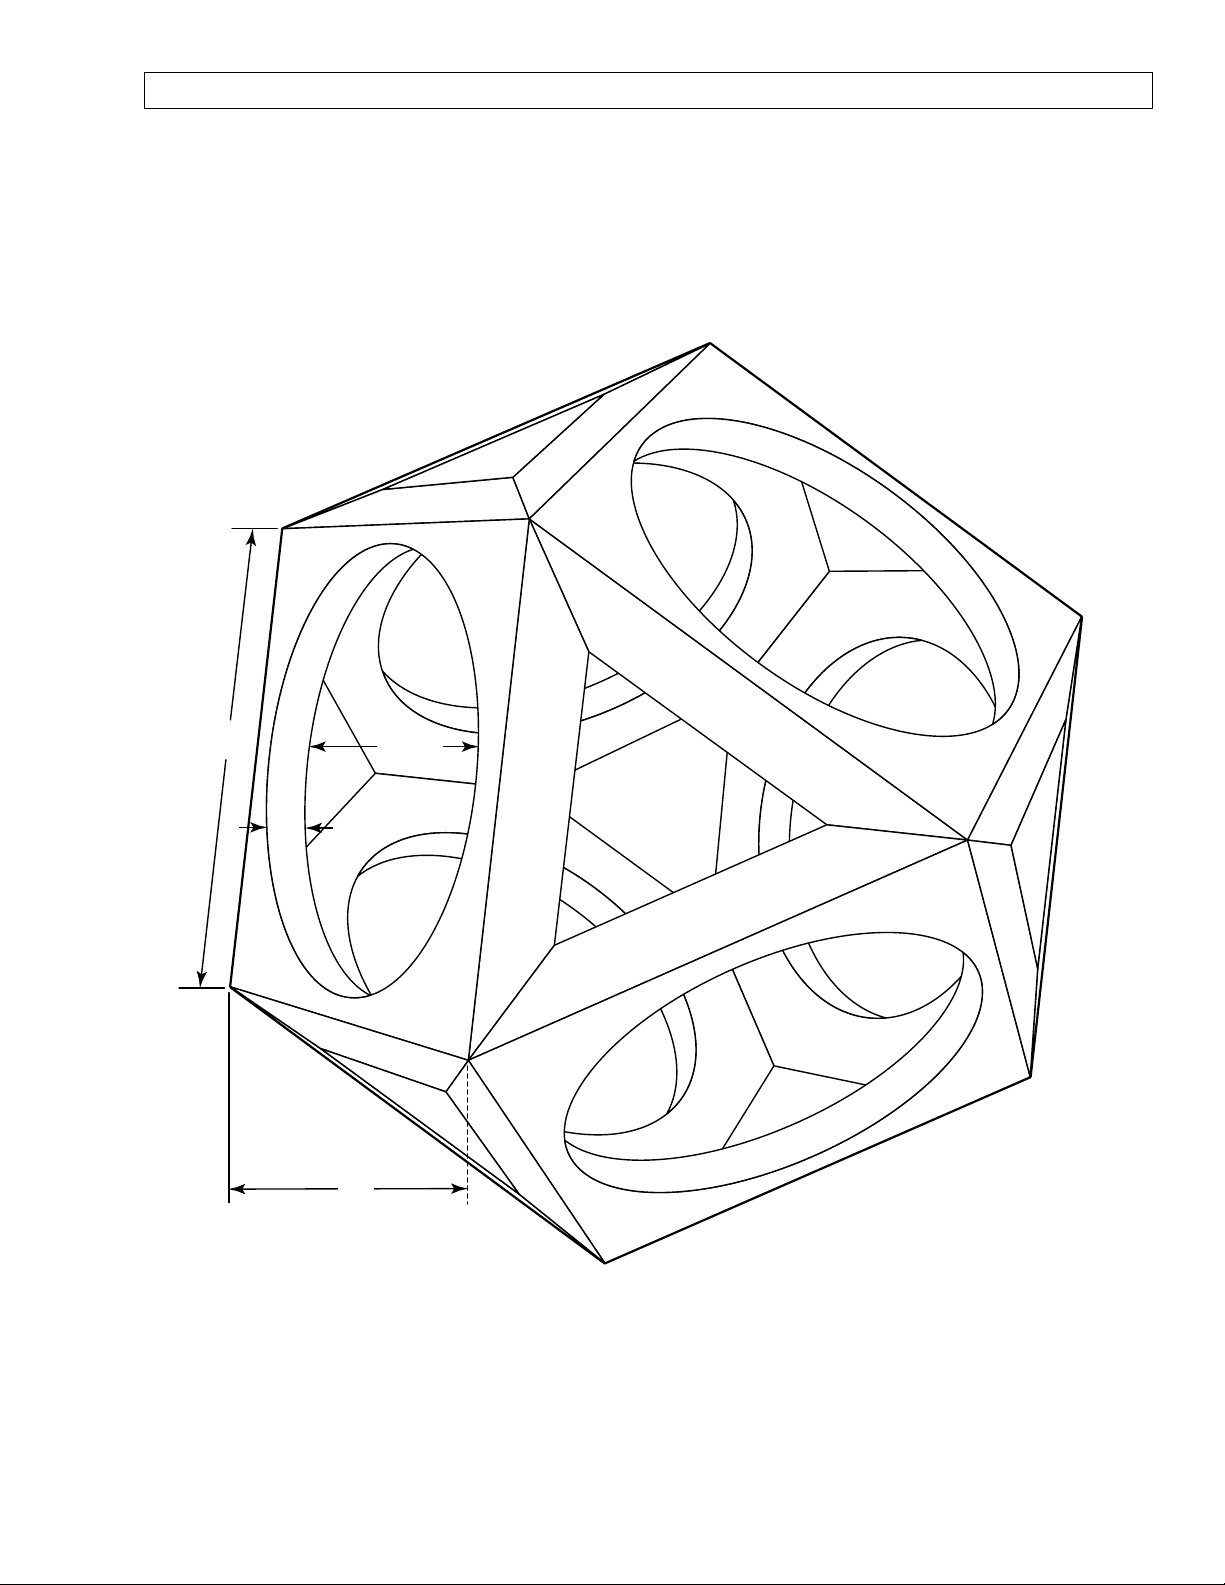
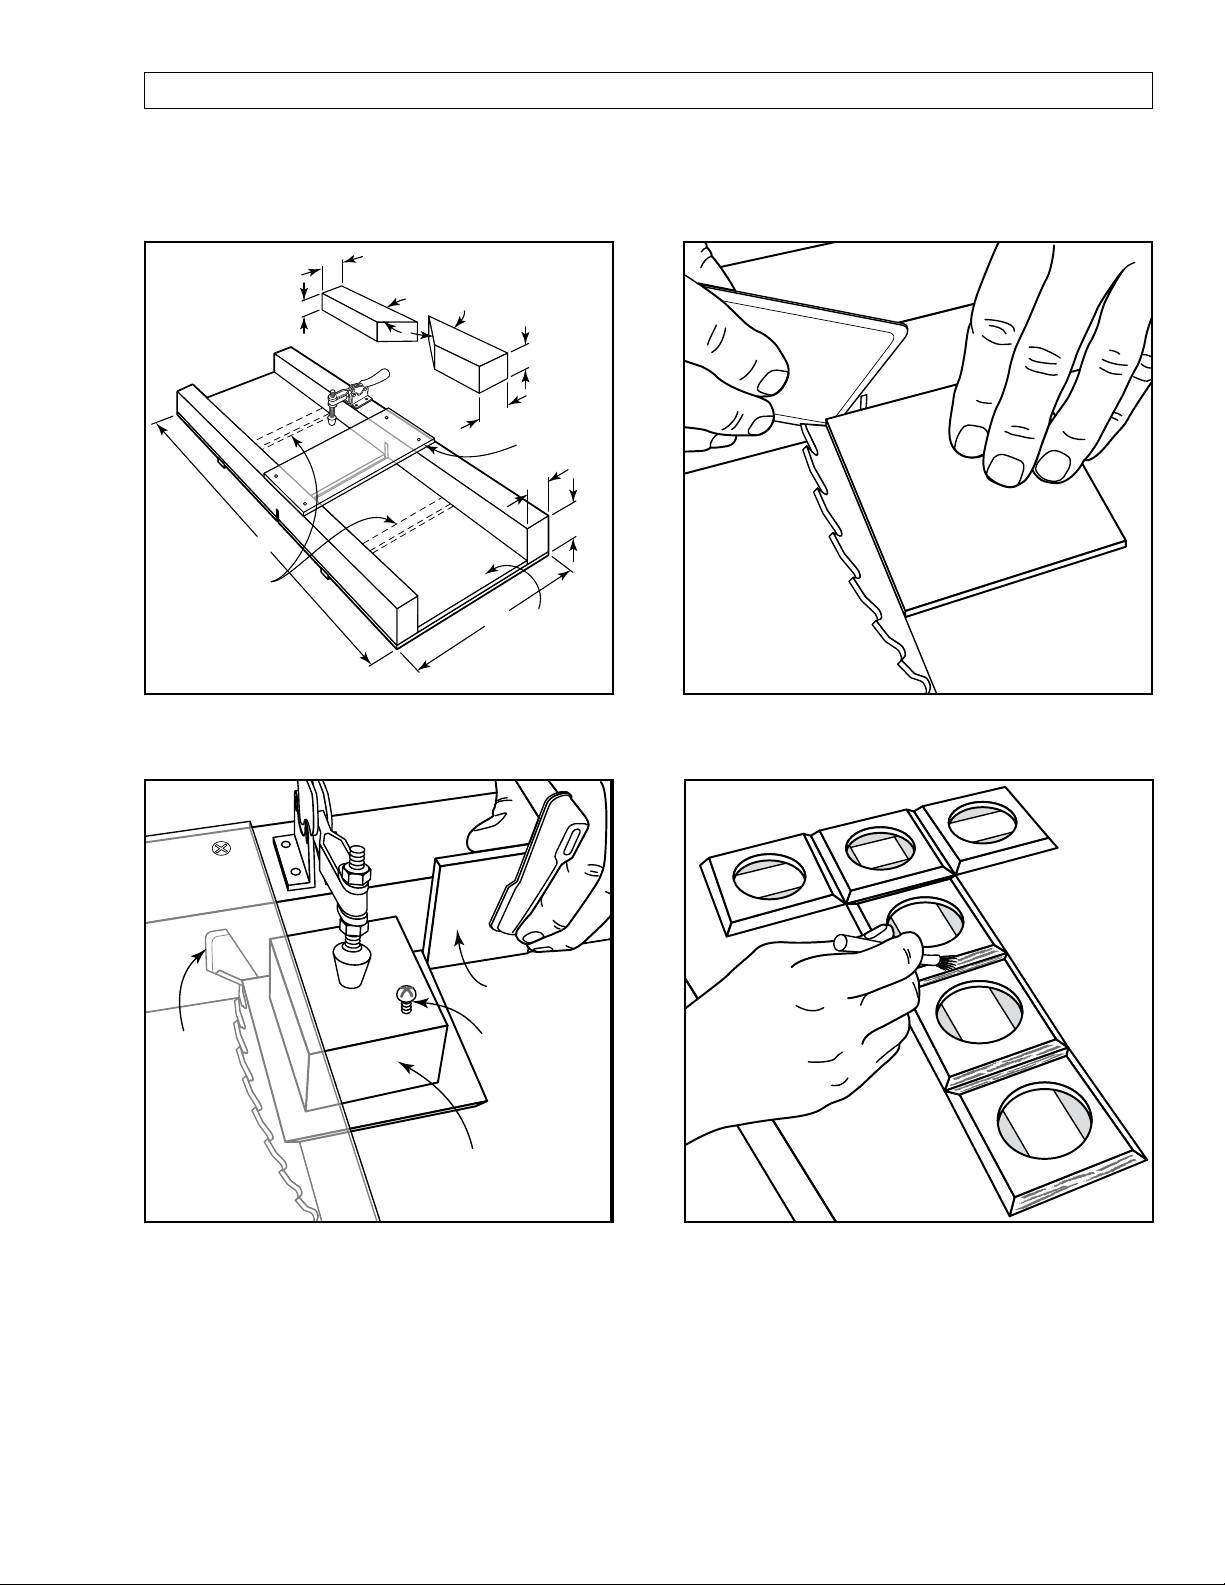
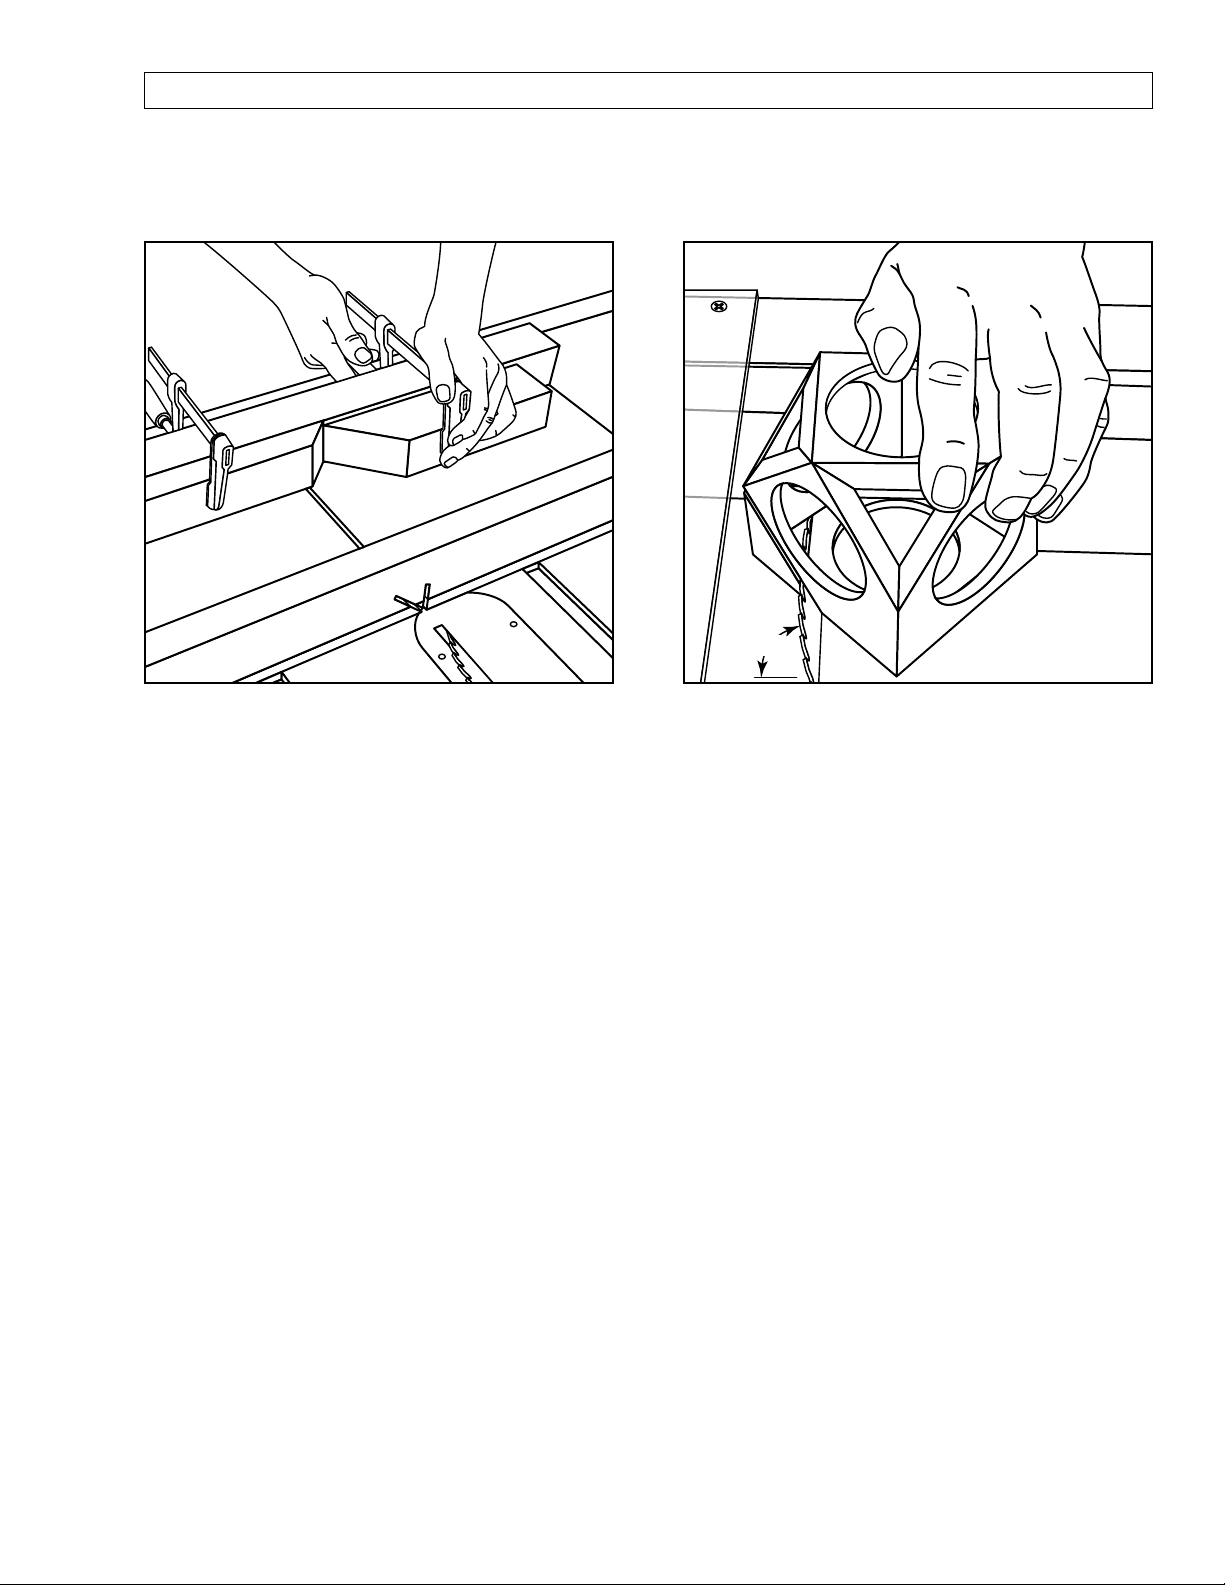
Minwax Wiffle Ball User manual

–1–
WOODWORKS: InteRmeDIate pROject 2009-2010
WIffle Ball
Here’s a project that looks like a complicated puzzle, but it’s really all about basic precision. It’s made from just six identical little hardwood
squares, all of them drilled and edge-mitered to fit together perfectly and then cut at the corners to make the final shape. Can you figure it out?
We’ll help you. Making this piece will give intermediate woodworkers the opportunity to hone their skills at cutting perfect squares and miters
as well as boring large holes. And when it’s all assembled, you’ll learn more about applying and using stains and finishes to protect the wood
and keep it looking beautiful.

–2–
CONTINUED - WOODWORKS: INTERMEDIATE PROJECT 2009-2010 WIFFLE BALL
tOOlS RequIReD
Hand Tools
– Combination or try square
– Toggle clamps
Power Tools
– Table saw
– Drill press fitted with a 2-1/8”
Forstner bit
– Random-orbit sander
Miscellaneous
– Pencil
– Tape measure
– Safety glasses
– Carpenter’s glue
– 120-, 150- and 220-grit sandpaper
– Clean, lint-free cloths
– Respirator
– Gloves for finishing
– Mineral spirits (for oil-based stains
and finishes)
– Water-filled metal container with
tight-fitting lid (for oil-based stains
and finishes)
– Minwax®Wood Finish™Stain Brush
or other good quality, natural-bristle
brush (for oil-based stains
and finishes)
– Minwax®Polycrylic Brush or other
good quality synthetic-bristle brush
(for water-based stain and finishes)
SHOppInG lISt
Wood Recommendation: White Oak
Alternate Wood: Walnut
Qty. Th. x W x L
2 1/4" x 3-1/2" x 24"
cuttInG lISt
Size & Quantity
1/4" x 3-1/2" x 3-1/2" squares, 12 total; six for testing, six for the piece
WOOD fInISHInG pRODuctS
Recommended Finish
Prep: Minwax®Pre-Stain Wood Conditioner
Stain: Minwax®Gel Stain Brazilian Rosewood
Finish: Minwax®Fast-Drying Polyurethane (Semi-Gloss)
Alternate Finish
Prep: Minwax®Water-Based Pre-Stain Wood Conditioner
Stain: Minwax®Water-Based Wood Stain Colonial Pine
Finish: Minwax®Polycrylic®Protective Finish (Gloss)

–3–
CONTINUED - WOODWORKS: INTERMEDIATE PROJECT 2009-2010 WIFFLE BALL
BefORe yOu BeGIn
Good craftsmanship begins and ends with good work habits, so make
the following steps part of your routine workshop practice. If you have
any doubts or questions about how to proceed with a project, always
discuss them with your shop instructor.
• Carefully and fully review plans and instructions before putting a
tool to the project lumber.
• Work sensibly and safely. Wear safety goggles when doing work
that creates flying chips and sawdust; wear the appropriate
respirator whenever making sawdust or working with thinners
or other solvents.
• At the end of every work session, clean up your shop area and put
away all portable tools.
cuttInG anD aSSemBly
pROceDuRe
1. Precise cuts, safely done, are essential to making the wiffle ball
(see Fig. 1). To begin, build a small crosscut sled with a fence wide
enough to support a toggle clamp (see Fig. 2).
2. Fasten two pieces of 1/4" tempered hardboard to the sled’s bottom,
centered over its slot. Butt the pieces together, then saw through the
joint while raising the table saw blade.
3. Cut 12 3-1/2" squares from the two 1/4" x 3-1/2" x 24" blanks.
Six are test pieces; the other six will make one wiffle ball. Put a
roundhead screw in the holddown block to use as a finger-hold
(see Fig. 4) and help you position the block. Add a plastic shield
to deflect sawdust (see Fig. 2).
4. Remove the sled and tilt the saw blade to 45º. For the best results,
use a 60-tooth crosscut blade for every cut on this project.
5. Remove both pieces of hardboard from the sled. Turn around the
left piece and refasten it to the sled. Cut an angled slot all the way
across it. Toss the waste piece.
6. On many contractor’s saws, the blade moves out of square when it’s
tilted. Hold a wiffle blank against the blade and fence. Tape a shim to
the fence if there’s a gap at one corner (see Fig. 3).
7. Miter all four sides of a test piece (see Fig. 4). Start with an end-
grain edge, then turn it counterclockwise as you go. Position the stop
block so that you just cut the blank’s edges but don’t shorten the
blank. Reposition the toggle clamp and plastic shield for these cuts.
8. After the miter cuts, check to assure that the piece is perfectly
square. Adjust the shim if it isn’t, then cut four more test pieces.
9. Check the angle of the miter cuts by holding the four test pieces
together. You may have to slightly adjust the blade’s tilt to make these
joints dead tight. Once you’re set, miter all six “real” pieces.
10. Drill a 2-1/8"-dia. hole in the center of each piece using a Forst-
ner bit. Make a little holding jig to lock in the piece on three sides and
ensure that it doesn’t shift during drilling. Fasten a couple of toggle
clamps to the jig sides to keep your fingers out of the way.
11. Tape four pieces together. Butt four of the squares against a
straightedge and tape them together. Add the remaining two squares to
make a T as shown in Fig. 5 and tape them to the group of four.
12. Turn over the assembly and spread glue on all the joints.
13. Fold the pieces into a cube. Put lots of short pieces of tape on the
cube to hold the joints tight. Let the glue dry overnight, then remove
the tape.
14. Add the right-hand hardboard piece and two support blocks to
the sled (see Fig. 6). Support piece A is 1-1/8" thick x 2-1/8" wide;
support piece B is 1-3/4" thick x 2-3/8" wide. Cut 45º miters on both
pieces (see Fig. 7).
15. Mark a centerline on the cube, then adjust the support boards
side-to-side on the sled fence until the centerline falls exactly on the
left side of the sled’s saw kerf. The cube should also fit tight against
both support boards.
16. Cut all eight corners to transform the cube into a wiffle ball. Set
the blade 3/8" above the sled, then rotate the cube three times, mak-
ing three cuts, to remove each corner.
StaInInG anD fInISHInG
Woodworker’s Tip: Though you may be tempted to cut short
your sanding, preparation and application time, don’t do it. These
tasks are very important steps in obtaining a high-quality finish.
Remember, it is the finish, just as much as the fit and smoothness
of the parts that will have great bearing on how people judge your
craftsmanship. To ensure an excellent result, follow the steps listed
in this section and also the instructions the finish manufacturer
puts on its products.
FINISHING TIPS
• Test the stains and finishes you are planning to use on scraps of
wood. On the back of the scrap, mark the stain/finish combination
and the type of wood. Allow all samples to dry thoroughly before
making your final finish selection. Save your samples for quick
reference on future projects.
• All stains and finishes must be allowed to dry thoroughly between
coats. Remember that drying times can vary due to humidity and
other climatic conditions.
• If you have some leftover stain or finish, wipe the can rim so that
stain or finish in the rim won’t dry out and prevent the lid from
forming a tight seal.
• Brushes used for oil-based finishes must be cleaned with mineral
spirits.
17. Sand the wiffle ball surfaces and all exposed edges, starting with
120-grit and finishing with 220-grit sandpaper. Dust off the piece and
wipe it carefully with a clean, lint-free cloth lightly dampened with
mineral spirits.
Recommended Finish
18. Before applying Minwax®Gel Stain to a hardwood or softwood,
apply Minwax®Pre-Stain Wood Conditioner following the directions
on the can.

–4–
CONTINUED - WOODWORKS: INTERMEDIATE PROJECT 2009-2010 WIFFLE BALL
19. Do the staining in two steps, starting on the interior surfaces and
then do to the exterior surfaces. Apply Minwax®Gel Stain using a
clean, lint-free cloth or natural-bristle brush. Follow the directions on
the can. Allow the Gel Stain to set for about 3 minutes, then wipe off
any excess with a clean, lint-free cloth. To achieve a deeper color, you
may apply a second coat after 8 to 10 hours, repeating the application
directions for the first coat. Allow the stain to dry for 24 hours before
applying the finish.
Woodworker’s Tip: When wiping off stain, make certain that
your last wipe with the cloth goes with the grain of the wood. This
way, any stain you might miss during wipe-off will be visually
minimized by the wood grain.
20. Apply Minwax®Fast-Drying Polyurethane following the directions
on the can. Use a good quality, natural-bristle brush. Allow the first
coat to dry overnight.
21. The next day, sand all surfaces lightly with 220-grit or finer sand-
paper using with-the-grain strokes. Dust off and wipe all surfaces with
a cloth lightly dampened with mineral spirits. Apply a second coat of
polyurethane and set the piece aside to cure overnight.
22. The following day, sand all surfaces lightly with 220-grit paper.
Dust off and wipe the piece with a cloth lightly dampened with mineral
spirits and apply the third and final coat of polyurethane.
Alternate Finish
23. Before applying Minwax®Water-Based Wood Stain to a hardwood
or softwood, apply Minwax®Pre-Stain Water-Based Wood Conditioner
following the directions on the can. Applying the conditioner will
help to ensure even absorption of stain and prevent blotchiness that
can occur with some woods. After 1 to 5 minutes, wipe off all excess
conditioner using a clean, soft cloth. Wait 15 to 30 minutes, then use
220-grit or finer sandpaper to sand off any “whiskers” raised by the
conditioner. Proceed to the staining within 2 hours.
24. Do the staining in two steps, starting on the interior surfaces and
then do to the exterior surfaces. Apply the Minwax®Water-Based
Wood Stain you’ve chosen to the wood using either a nylon/polyester
brush or a cloth. Allow stain to penetrate no longer than 3 minutes.
While stain is still wet, wipe off all excess with a clean cloth that’s been
lightly dampened with stain. Allow the piece to dry for 2 hours before
applying a second coat, if desired. Allow the piece to dry overnight
before applying the protective clear finish.
Woodworker’s Tip: Minwax®Water-Based Wood Stain is available
in 6 wood-tones, a White Wash Pickling Stain, 60 custom-mixed
colors, and 8 bold Accents™colors. This means that you are not
limited to just traditional wood colors (pine, oak, walnut, etc.).
Instead, you can pick and apply a color to complement the décor
of the room in which the bench will be placed. For this reason,
make sure you look over all of the Minwax®color charts or go
to minwax.com before making your final selection.
25. After allowing the piece to dry overnight, apply Minwax®
Polycrylic®Protective Finish following the directions on the can.
Stir the can contents thoroughly before starting and periodically
repeat the stirring during your work session.
26. Working a small area at a time to maintain a wet edge, apply the
first coat. Work quickly and make the final strokes in each newly
finished section using with-the-grain brushstrokes.
27. Allow the finish to dry a minimum of 2 hours. Then sand lightly
with 220-grit or finer sandpaper wrapped around a soft backup block.
Thoroughly dust off and wipe all surfaces with a cloth lightly damp-
ened with water.
28. Repeat steps 25 and 26 to apply the second and final coat.
PRODUCT SAFETY
For your safety and the safety of those you work with, always read the
safety warnings, which manufacturers print on their labels, and follow
them to the letter. Typical safety advice and instructions will contain
information such as the following:
WARNING! Removal of old paint by sanding, scraping or other means
may generate dust or fumes that contain lead. Exposure to lead dust
or fumes may cause brain damage or other adverse health effects,
especially in children or pregnant women. Controlling exposure to
lead or other hazardous substances requires the use of proper protec-
tive equipment, such as properly fitted respirator (NIOSH approved)
and proper containment and cleanup. For more information, call the
National Lead Information Center at 1-800-424-LEAD (in U.S.) or
contact your local health authority.
When using oil-based wood finishing products:
CAUTIONS: CONTAINS ALIPHATIC HYDROCARBONS.
Contents are COMBUSTIBLE. Keep away from heat and open
flame. VAPOR HARMFUL. Use Only With Adequate Ventilation. To
avoid overexposure, open windows and doors or use other means to
ensure fresh air entry during application and drying. If you experi-
ence eye watering, headaches, or dizziness, increase fresh air, or wear
respiratory protection (NIOSH approved), or leave the area. Avoid
contact with eyes and skin. Wash hands after using. Keep container
closed when not in use. Do not transfer contents to other containers
for storage.
FIRST AID: In case of eye contact, flush thoroughly with large
amounts of water for 15 minutes and get medical attention. For
skin contact, wash thoroughly with soap and water. In case of
respiratory difficulty, provide fresh air and call physician. If
swallowed, call Poison Control Center, hospital emergency room,
or physician immediately.

–5–
CONTINUED - WOODWORKS: INTERMEDIATE PROJECT 2009-2010 WIFFLE BALL
NOTICE: Reports have associated repeated and prolonged occupa-
tional exposure to solvents with permanent brain and nervous system
damage. Intentional misuse by deliberately concentrating and inhaling
contents may be harmful or fatal.
WARNING: This product contains a chemical known to the State
of California to cause cancer and birth defects or other reproductive
harm. DO NOT TAKE INTERNALLY. KEEP OUT OF REACH
OF CHILDREN.
When using water-based wood finishing products:
CAUTIONS: Use Only With Adequate Ventilation. To avoid overexpo-
sure, open windows and doors or use other means to ensure fresh air
entry during application and drying. If you experience eye watering,
headaches, or dizziness, increase fresh air, or wear respiratory protec-
tion (NIOSH approved), or leave the area. Avoid contact with eyes and
skin. Wash hands after using. Keep container closed when not in use.
Do not transfer contents to other containers for storage.
FIRST AID: In case of eye contact, flush thoroughly with large
amounts of water. Get medical attention if irritation persists. If
swallowed, get medical attention immediately.
WARNING: Contains Alkyl propanols, ethylene glycol, n-methyl pyr-
rolidone. VAPOR HARMFUL. Use only with adequate ventilation. To
avoid overexposure, open windows and doors or use other means to
ensure fresh air entry during application and drying. If you experi-
ence eye watering, headaches, or dizziness, increase fresh air, or wear
respiratory protection (NIOSH approved), or leave the area. Avoid
contact with eyes and skin. Wash hands after using. Keep container
closed when not in use. Do not transfer contents to other containers
for storage.
DO NOT TAKE INTERNALLY.
FIRST AID: In case of eye contact, flush thoroughly with large
amounts of water for 15 minutes and get medical attention. For skin
contact, wash thoroughly with soap and water. In case of respira-
tory difficulty, provide fresh air and call physician. If swallowed,
call Poison Control Center, hospital emergency room, or physician
immediately.
DELAYED EFFECTS FROM LONG-TERM OVEREXPOSURE.
Contains solvents which can cause permanent brain and nervous
system damage. Intentional misuse by deliberately concentrating and
inhaling contents may be harmful or fatal.
WARNING: This product contains a chemical known to the State
of California to cause cancer and birth defects or other reproductive
harm. KEEP OUT OF REACH OF CHILDREN.
SAFE DISPOSAL OF RAGS AND WASTE.
DANGER: Rags, steel wool, other waste soaked with this product, and
sanding residue may spontaneously catch fire if improperly discarded.
Immediately place rags, steel wool, other waste soaked with this
product, and sanding residue in a sealed, water-filled metal container.
Dispose of in accordance with local fire regulations. This project originally appeared in American Woodworker
magazine, #132, November 2007, page 58.

–6–
CONTINUED - WOODWORKS: INTERMEDIATE PROJECT 2009-2010 WIFFLE BALL
fIG 1.
31/2"
1/4"
31/2"
21/8" Dia.

–7–
CONTINUED - WOODWORKS: INTERMEDIATE PROJECT 2009-2010 WIFFLE BALL
fIG 2.
Shim
Wiffle Blank
fIG 3.
Shim
Stop Block
Wiffle Holddown Block
Finger Hold
fIG 4.
A
45°
45°
B
Support Blocks
21/8"
11/2"
21/2"
11/8"
23
/8"
24"
12"
13/4"
1/4" Clear
Acrylic
1/4" x 12" Hardboard
Runners
1/2" Birch Plywood
1/4" Hardboard
fIG 5.

–8–
CONTINUED - WOODWORKS: INTERMEDIATE PROJECT 2009-2010 WIFFLE BALL
fIG 6.
45°
fIG 7.
A
B
Table of contents
Other Minwax Indoor Furnishing manuals
Popular Indoor Furnishing manuals by other brands

BROSA
BROSA Brunswick 175cm Dining Table Assembly guide

Carolina Forge
Carolina Forge CF4016CHETBK Assembly instructions

Next
Next JEFFERSON 881416 Assembly instructions

Songmics
Songmics VASAGLE LET024 Assembly instructions

Walker Edison
Walker Edison ARWM3F Assembly instructions

Heartland
Heartland 8005404P Assembly manual

Belleze
Belleze Quincy 014-HG-31807 Assembly instructions

New Classic Home Furnishings
New Classic Home Furnishings Canyon Ridge Assembly instructions

Furniture of America
Furniture of America CM7415D Assembly instructions

Tufferman
Tufferman Stoealex MT130 instructions

Stevens
Stevens Toy mate TM9372R quick start guide

GE
GE 106658 instruction manual