MIOPS Capsule360 User manual

Capsule360 User Manual
CONTENT
1. Content of the Package
2. Charging and Operation
3. First Use
4. Camera Connection
5. Mobile Application
6. Connecting to Capsule360
6.1 Connection Lights of Capsule360
7. Firmware Upgrade
7.1 Log-in & Create an Account
8. Using the Mobile Application
8.1 Smartphone Camera Control
8.2 Saving Preset
8.3 Learn Motion
8.3.1 Motion Control by Smartphone
FEATURES
9.1. Basic Timelapse
9.2. Long Exposure Timelapse
9.3. Bulb Ramping Timelapse
9.4. Interval Ramping Timelapse
9.5. HDR Timelapse
9.6. Basic Video
9.7. Follow me
9.8. Turntable
9.9 Multi- Row Panorama
9.10 Remote Controller
9.11. Star Tracking
9.12 Focus Stacking
10. SETTINGS
1. Content of the Package
When you purchase a Capsule360, it will be delivered with the following items.
1 x Capsule360
1 x USB Charge Cable
1 x Charger
2. Charging and Operation
Capsule360 comes with a USB charge cable and the battery which lasts up to 7
hours for video shooting and 24 hours for photo shooting with a single charge. The
battery will be charged when you connect Capsule360 to a USB power source.
Charging port is on the side of the Capsule360. You can use your computer USB port
or your regular phone charger for this purpose.

When you plug your Capsule360 in for charge, you will see the blinking green icon
on the top left side of the app screen that shows the device is charging. Depending
on the type of the device you are connected to, you will see a letter in the circle.
Letter “P” is for the Capsule360 (PAN), letter “S” is for the SLIDER, letter “T” is
for the TILT.
Stable green circle:Your device is connected.
Stable red circle: Your device lost connection.
Blinking green circle: Your device is charging.
P letter inside the circle: PAN

S letter inside the circle: SLIDER
T inside the circle: TILT
Warning: Using Capsule360 with other types of power sources may harm your
device.
3. First Use
Your Capsule360 may not be delivered with the latest firmware. If a new firmware
has been released, before you use it for the first time, you should update the
firmware first. To get detailed information about the firmware upgrade, see the
Firmware Upgrade Section.
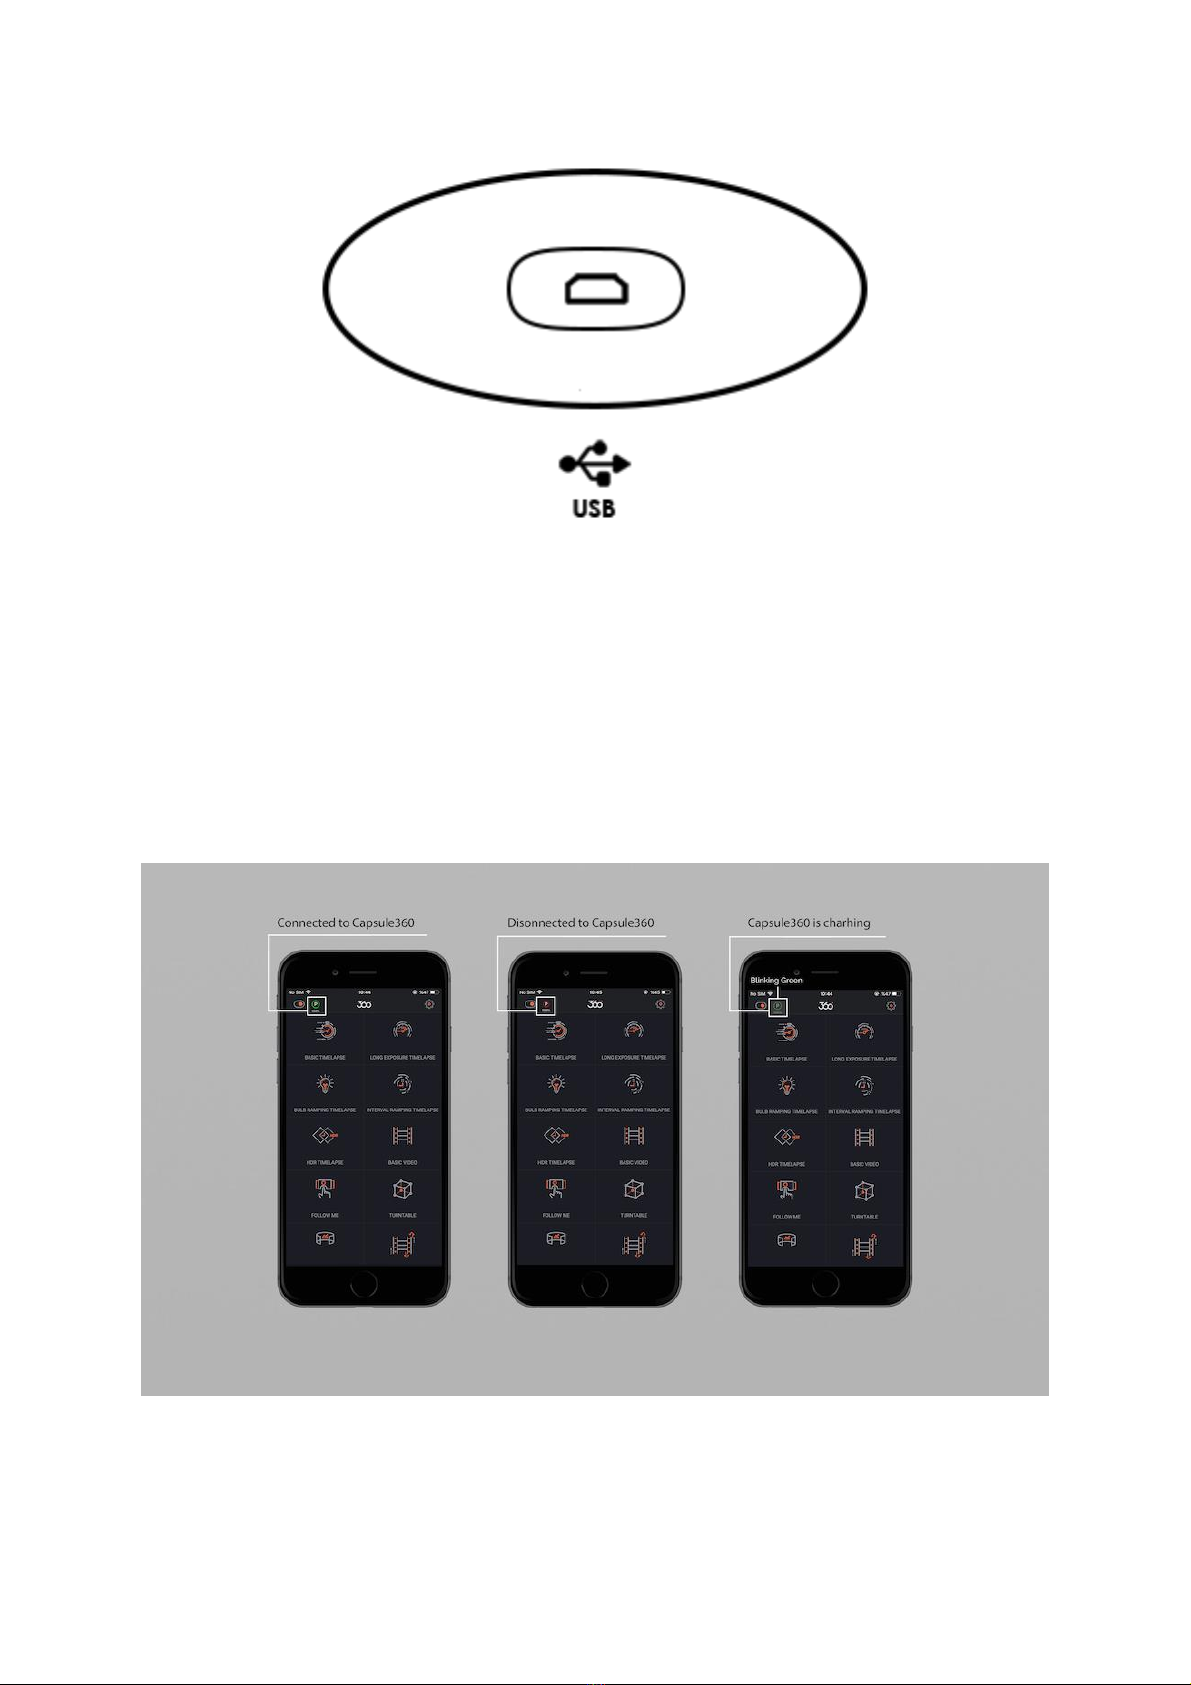
You can use it right out of the box but you may need to charge to get it fully
loaded. You can charge the battery using any USB phone charger (1000 mA min.) or
the USB port of your computer. Capsule360 will be delivered with a Micro-USB
cable. You can use this cable to charge it. The micro end of the USB cable will be
plugged into the USB port. It is located on the side of the device.
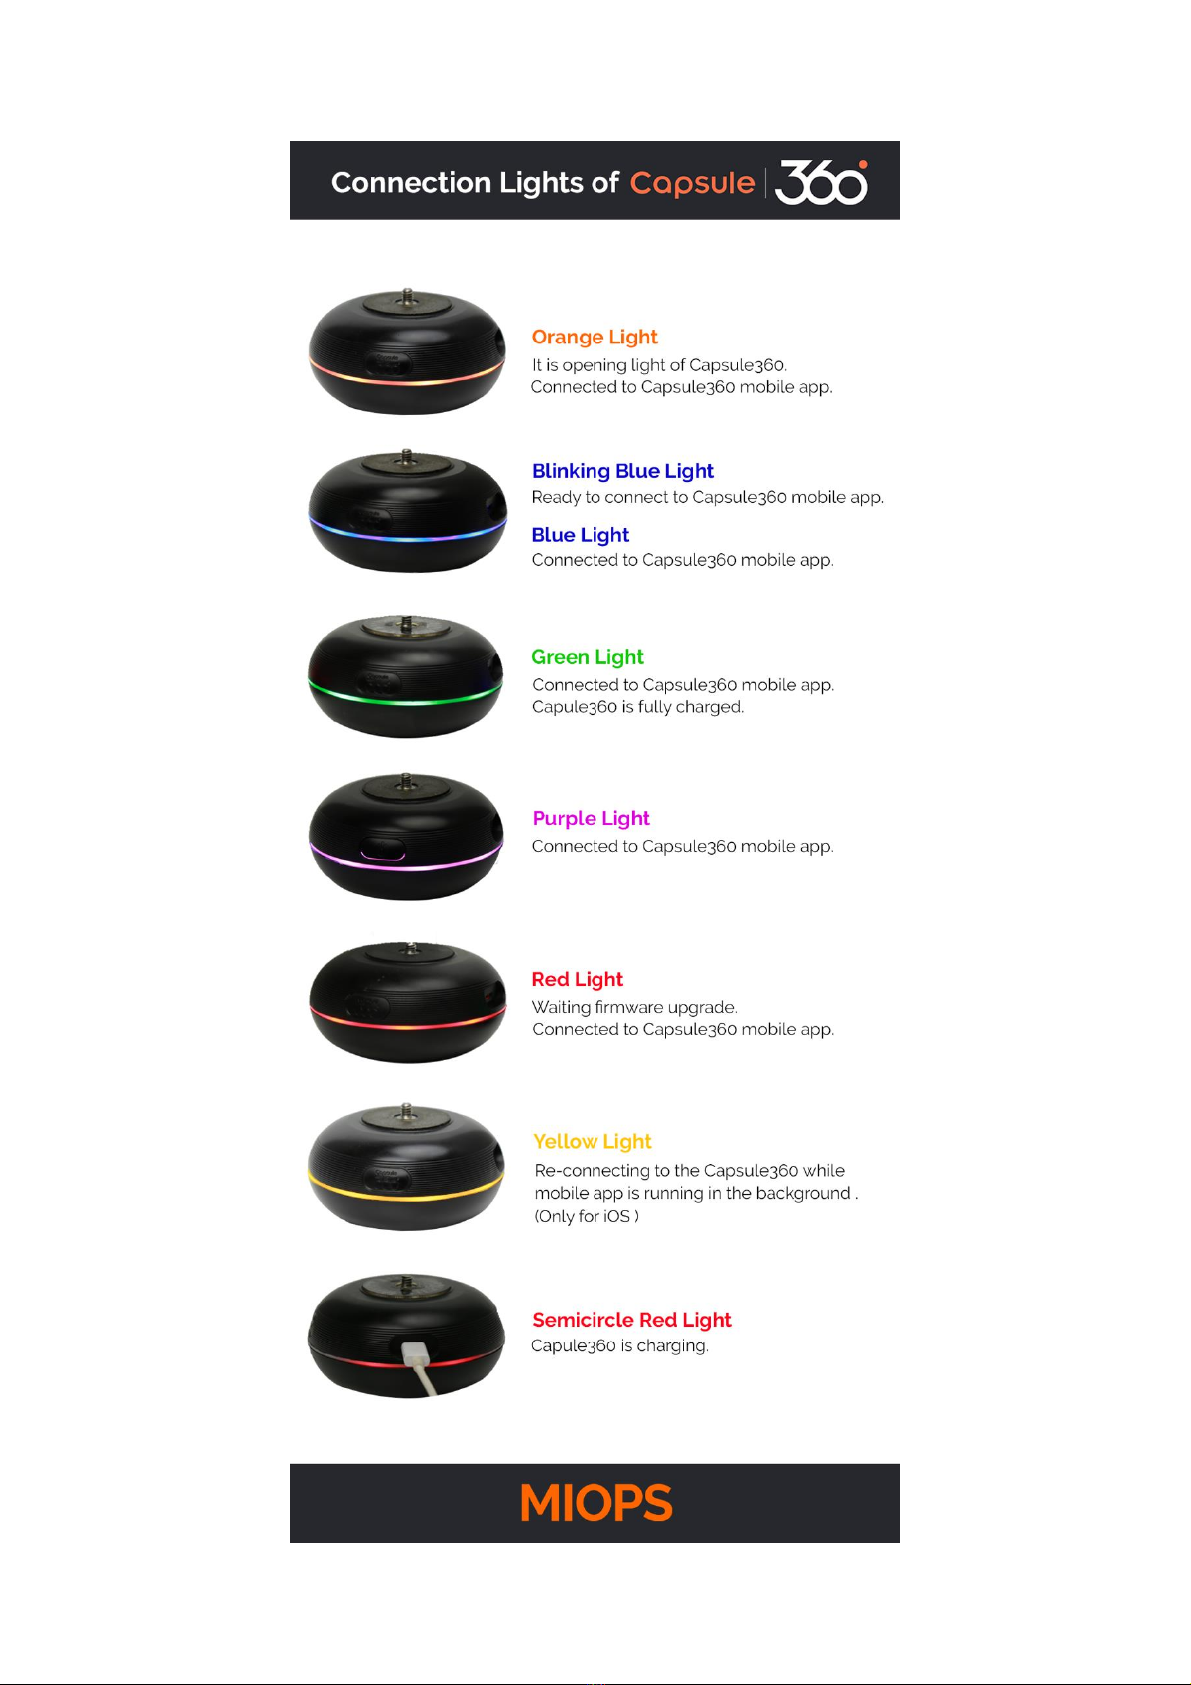
The on/off switch is a single button. You can simply turn it on by pressing the
button once. Opening light of Capsule360 will vary on its colors everytime.
4. Camera Connection
The Capsule360 uses connection cables to trigger your camera. Your unit will be
shipped with the proper camera connection cables. The Capsule360 is a motion
timelapse device, which is compatible with many brands and camera models. You
can use the same device with many different cameras by just changing the
connection cable.
The Capsule360 has separate outputs for the camera. The output ports are located
on the side the device.
The camera cable port is a 2.5 mm stereo female jack. The camera cables have
the male 2.5 mm stereo jack on one end. This end is plugged into the camera
connection port. The other end changes depending on the camera make and
model. This end is plugged in the shutter release port of your camera.

The external port : This mode helps you to trigger your camera via a device that
you connect externally. For instance, you can use an external microphone to send
signal command above a specific decibel to trigger your camera to take a shot.
You can use both of the outputs at the same time. They are electrically isolated
from each other. They trigger the connected device synchronously.
The camera cables are designed to trigger the cameras only. Do not use it for any
other purpose. Doing so may damage the cable or the device.
5. Mobile Application
We offer a Capsule360 mobile app which has been designed as an interface to
configure and control your Capsule360 easily. The communication between the
smartphone and Capsule360 is done over Bluetooth connection. So, your
smartphone has to be compatible with Bluetooth 4.0.
Capsule360 mobile app is available on iOS and Android platforms. Search for
Capsule360 in your app store, or use the following buttons to download the app.
6. Connecting to Capsule360
Warning: Please make sure that your Bluetooth is turned ON in the connection
preferences of your smartphone or tablet.
After opening the mobile app, a list of available devices will appear. In case your
device is not shown in the list, make sure that your Capsule360 is turned ON and
click the renew button (at the top right-hand side of the screen) again.
You can connect to multiple Capsule360 devices at the same time. They will be
shown in various colors.
6.1 Connection Lights of Capsule360


7. Firmware Upgrade
Capsule360 has the capability of updating its firmware without needing any cable
connection to a computer. You can use the Capsule360 mobile app to check for
new firmware version and then update the device with a single click.
When you connect your device through Capsule360 mobile app, it automatically
checks your device's firmware version and prompts a pop-up message if a new
firmware is available.
If you want to check it manually, go to the settings by the settings icon at the top-
right hand side of the app screen. Go to “Check for Updates”.
The app automatically lists the firmware updates. Check the status, if it is not “up
to date” then select your Capsule360. When you select your device, “update” icon
will turn orange at the bottom of the screen. Click “update” the firmware upgrade
process will start immediately.

7.1 Log-in & Create an Account
After you connect to your device, you will see the “check for updates” option on
the list when you touch to the settings icon on the top right-hand side of the
screen.
When you touch the "Check for Updates " option, Log-in screen will be opened
automatically. If you already have an account you can log in or if you do not have,
you can sign in and then login with a new account.
8. Using the Mobile Application
When you turn your Capsule360 and Capsule360 Mobile App on first thing you will
need to do is to connect your Capsule360 to your smartphone. For that, you will
see a “renew” icon at the top-right hand of the app screen. Renew the device
search by touching the icon. All the available devices will be listed.
As you can connect multiple Capsule360 devices at the same time, choose the
device/devices that you want to connect. You will notice that when you choose the
device/devices, an orange “connect” button will appear at the bottom of the app
screen. You can easily connect to the device by touching the button.
After you connect to the device, you will be directed to the “Auto Setup” menu. If
you want to connect to “PAN” mode just touch the button to connect. When you
are in the “Auto Setup” menu but you want to use the other modes, notice the
“Manual Setup” icon at the bottom of the app screen. Touch “Manual Setup” and
you will be directed to the “Manual Setup” menu. You can choose
between “PAN”, “TILT” or “SLIDE” modes.

PAN: If you want to control your Capsule360 horizontally, choose the “PAN” mode.
TILT: If you want to control your Capsule360 vertically, choose the “TILT” mode.
SLIDE: If you want to control your Capsule360 on the slider, choose the “SLIDE”
mode.
8.1 Smartphone Camera Control
Place your smartphone to the smartphone holder to place it to your Capsule360.
Your smartphone will be activated for the photoshoot when;
1- You choose the shooting mode that you will use.
2- You enter the data for the parameters of the mode.
3- You touch the smartphone notch that is placed on the left-hand side of the
screen.
4- Finally, you touch the start button that is placed on the below right-handside of
the screen.

8.2 Saving Presets
To save the parameters you use, you can touch the save icon on the right-hand side
of the screen.
To pick between the saved presets, touch the folder icon on the right-hand side of
the screen.You can delete the saved presets by swiping them to the left and

touching the “delete” icon that appears.
8.3 Learn Motion
In this mode, you can control the PAN, TILT and SLIDE motions by manually moving
your smartphone in certain ways.
8.3.1 Motion Control by Smartphone
You can control the motions of multiple devices at the same time.

PAN: Pan motion is done by holding the smartphone horizontally and moving it to
the left and right by holding down your finger on the PAN circle.
TILT: Tilt motion is done by holding the smartphone horizontally and moving it
back and forth by holding down your finger on the TILT circle.
SLIDE: Slide motion is done by holding the smartphone horizontally and moving it
up and down from the sides by holding down your finger on the SLIDE circle.
How does it works?

Firstly, set the start and end position of your shooting by touching the PAN, TILT or
SLIDE circle which are in the right-side of the screen. ( You must keep touching
until the movement is complete. ) or use the "Multi Axis" button to do PAN, TILT or
SLIDE at the same time by moving your smartphone.
Secondly, Move the camera to the start position by and tap the "set start" button
at the top right-hand corner of the screen. After that move your smartphone to
assay your camera`s PAN, TILT, and SLIDE motion you want to be occurred during
shooting by Capsule 360 as described in "8.3.1 Motion Control by Smartphone".
When you complete the motion flow, tap the “set finish” button which is at the
bottom right-hand corner of the screen to save motion.
Finally, After specifying the start and end points, touch the "OK" button. When you
tap the "OK" button, you will see the motion settings which are determine by
moving smartphone in the previous screen and you can begin the shooting by
touching the "Start" button.
Set Start: When you set the starting position of your camera, tap the " Set Start"
button.
Set Finish: When you set the finishing position of your camera, tap the " Set Finish"
button.
FEATURES
9.1. Basic Timelapse
The Basic Timelapse mode offers to take time-lapse photos automatically without
changing the exposure. It has five parameters:
PAN : Set the angle of turning value by swiping your finger under the circle on the
screen. You can choose start ( S ) and finish (F)point by using S an F buttons.
Before you start shooting, if you want to control shooting area of your camera, you
can use the grey button inside of the PAN circle.
CCW : Counterclockwise ( Your Capsule360 will turn in counterclockwise direction.
)
CW : Clockwise ( Your Capsule360 will turn in clockwise direction. )

Interval : This parameter defines the duration between each frame. The Interval
can have a value from 13 milliseconds up to 100 hours.
Frames Per Second (FPS) : This parameter defines how many pictures are to be
taken in one second. If you set the frame number to 0, this will mean that the
time-lapse will continue until you stop it.
Play time : Enter the total time value of final video which you want to create.
Mode : There are two shooting mode which you prefer such as “Shot move to
shot” and “Continuous” mode.
Shot move to shot mode
When Capsule360 is turning around it pauses to take a shot. After the camera takes
the shot Capsule 360 starts turning again.
Continuous mode
Capsule360 can take a shot when it is moving.
The Basic Timelapse mode does not offer any control over the exposure. The
exposure settings of your camera will be valid.
How does it work?
Once you start the mode, you can see the progress on the status screen. The circle
on the top will show the PAN value. After you adjust the all parameters, touch the
start button which is on the bottom right-hand corner, your camera will start
moving. When your camera starts moving, you can observe it on the app screen as

the orange area around the circle runs out. At the same time, the interval period is
over and the camera will take shots in numbers that you specified beforehand in
the settings of FPS (Frames Per Second). On the bottom right-hand corner, you will
see another shows the number of photos already taken.
Motion Settings : To turn Capsule360 to its starting point after the programmed
movements are finished, touch the “motion settings” button at the top left-hand
side of the app screen.
Smartphone Button : If you want to use your smartphone`s camera to shooting,
turn on the smartphone setting button by touching the white button which is left-
hand on the screen.
9.2. Long Exposure Timelapse
In this mode, you can define a custom exposure for the timelapse photos. It has
six parameters:
PAN : Set the angle of turning value by swiping your finger under the circle on the
screen. You can choose start ( S ) and finish (F)point by using S an F buttons.
Before you start shooting, if you want to control shooting area of your camera, you
can use the grey button inside of the PAN circle.
CCW : Counterclockwise ( Your Capsule360 will turn in counterclockwise direction.
)
CW : Clockwise ( Your Capsule360 will turn in clockwise direction. )
Interval : This parameter defines the duration between each frame. The Interval

can have a value from 13 milliseconds up to 100 hours.
Exposure : This value defines the exposure value for each photo. You can set a
custom exposure up to 100 hours in milliseconds.
Frames Per Second (FPS) : This parameter defines how many pictures are to be
taken in one second. If you set the frame number to 0, this will mean that the
time-lapse will continue until you stop it.
Play time : Enter the total time value of final video which you want to create.
Mode : There are two shooting mode which you prefer such as “Shot move to
shot” and “Continuous” mode.
Shot move to shot mode
When Capsule360 is turning around it pauses to take a shot. After the camera takes
the shot Capsule 360 starts turning again.
Continuous mode
Capsule360 can take a shot when it is moving.
How does it work?
Once you start the mode, you can see the progress on the status screen. The circle
on the top will show the PAN value. After you adjust the all parameters, touch the
start button which is on the bottom right-hand corner, your camera will start
moving. When your camera starts moving, you can observe it on the app screen as
the orange area around the circle runs out. At the same time, the interval period is
over and the camera will take shots in numbers that you specified beforehand in
the settings of FPS (Frames Per Second). On the bottom right-hand corner, you will

see another shows the number of photos already taken.
Motion Settings : To turn Capsule360 to its starting point after the programmed
movements are finished, touch the “motion settings” button at the top left-hand
side of the app screen.
Smartphone Button : If you want to use your smartphone`s camera to shooting,
turn on the smartphone setting button by touching the white button which is left-
hand on the screen.
The Long Exposure Timelapse mode requires that your camera is set to BULB
mode. This is the only way of achieving custom exposures. If you do not set your
camera to BULB mode, the exposure value of your camera will be valid and you will
not get photos with the exposure set on the Capsule360 app.
Please note that, if the exposure setting of your camera is greater than the interval
value, the time lapse process will not function properly. The exposure of your
camera must be greater than the interval value. Otherwise, the number of the
taken photos will be less than shown on the screen.
9.3. Bulb Ramping Timelapse
The Bulb Ramping Timelapse mode gives you the opportunity to take time-lapse
photos with changing exposures. In regular time-lapse modes, all of the pictures
will have the same exposure. This can be enough for some cases, but sometimes
the light changes throughout the whole photo taking process. The exposure needs
to be adjusted accordingly to avoid too dark or too bright pictures. Bulb Ramping
Timelapse mode takes care of that.
PAN : Set the angle of turning value by swiping your finger under the circle on the
screen. You can choose start ( S ) and finish (F)point by using S an F buttons.
Before you start shooting, if you want to control shooting area of your camera, you
can use the grey button inside of the PAN circle.
CCW : Counterclockwise ( Your Capsule360 will turn in counterclockwise direction.
)
CW : Clockwise ( Your Capsule360 will turn in clockwise direction. )

Interval : This parameter defines the duration between each frame. The Interval
can have a value from 13 milliseconds up to 100 hours.
Initial Exposure : This value defines the initial exposure value for each photo. You
can set a custom exposure up to 100 hours in milliseconds.
Final Exposure : This value defines the final exposure value for each photo. You
can set a custom exposure up to 100 hours in milliseconds.
Frames Per Second (FPS) : This parameter defines how many pictures are to be
taken in one second. If you set the frame number to 0, this will mean that the
time-lapse will continue until you stop it.
Play Time : Enter the total time value of final video which you want to create.
Mode : There are two shooting mode which you prefer such as “Shot move to
shot” and “Continuous” mode.
Shot move to shot mode
When Capsule360 is turning around it pauses to take a shot. After the camera takes
the shot Capsule 360 starts turning again.
Continuous mode
Capsule360 can take a shot when it is moving.

How does it work?
Once you start the mode, you can see the progress on the status screen. The circle
on the top will show the PAN value. After you adjust the all parameters, touch the
start button which is on the bottom right-hand corner, your camera will start
moving. When your camera starts moving, you can observe it on the app screen as
the orange area around the circle runs out. At the same time, the interval period is
over and the camera will take shots in numbers that you specified beforehand in
the settings of FPS (Frames Per Second). On the bottom right-hand corner, you will
see another shows the number of photos already taken.
Motion Settings : To turn Capsule360 to its starting point after the programmed
movements are finished, touch the “motion settings” button at the top left-hand
side of the app screen.
Smartphone Button : If you want to use your smartphone`s camera to shooting,
turn on the smartphone setting button by touching the white button which is left-
hand on the screen.
The process starts with Initial Exposure. With each frame, the exposure will be
changed towards the final exposure linearly. At the final frame, the picture will
have the final exposure. In order to be able to create custom exposure, the camera
must be in BULB mode; otherwise, all of the pictures will have the same exposure.
The exposure value can have an ascending or descending change. This depends on
the initial and final exposure values. The change of exposure will be the same
between each frame.

9.4. Interval Ramping Timelapse
The Interval Ramping Timelapse lets you ramp the interval so you have control to
change the interval over time . This mode has six parameters:
PAN : Set the angle of turning value by swiping your finger under the circle on the
screen. You can choose start ( S ) and finish (F)point by using S an F buttons.
Before you start shooting, if you want to control shooting area of your camera, you
can use the grey button inside of the PAN circle.
CCW : Counterclockwise ( Your Capsule360 will turn in counterclockwise direction.
)
CW : Clockwise ( Your Capsule360 will turn in clockwise direction )
Initial Interval : This value defines the initial interval value for starting to
shooting.
Final Interval : This value defines the final interval value to end of shooting.
Frames Per Second (FPS) : This parameter defines how many pictures are to be
taken in one second. If you set the frame number to 0, this will mean that the

time-lapse will continue until you stop it.
Play Time : Enter the total time value of final video which you want to create.
Mode : There are two shooting mode which you prefer such as “Shot move to
shot” and “Continuous” mode.
Shot move to shot mode
When Capsule360 is turning around it pauses to take a shot. After the camera takes
the shot Capsule 360 starts turning again.
Continuous mode
Capsule360 can take a shot when it is moving.
How does it work?
Once you start the mode, you can see the progress on the status screen. The circle
on the top will show the PAN value. After you adjust the all parameters, touch the
start button which is on the bottom right-hand corner, your camera will start
moving. When your camera starts moving, you can observe it on the app screen as
the orange area around the circle runs out. At the same time, the interval period is
over and the camera will take shots in numbers that you specified beforehand in
the settings of FPS (Frames Per Second). On the bottom right-hand corner, you will
see another shows the number of photos already taken.
This manual suits for next models
1
Table of contents
Other MIOPS Digital Imaging Accessories manuals