Mistral MEM815W User manual

Espresso Coee Machine
Model: MEM815/MEM815W
Instruction Manual

2
Important Safeguards
When using electrical appliances, in
order to reduce the risk of re, electric
shock, and/or injury to persons, basic
safety precautions should always be
followed, including:
For Your Safety
Read all instructions carefully, even if you are
quite familiar with the appliance.
• Read Instruction manual carefully.
• This appliance shall not be used by children.
Children less than 3 years should be kept
away unless continuously supervised.
• Make sure that your outlet voltage
corresponds to the voltage stated on the
rating label of the coee machine.
• To protect against re, electric shock and
injury to persons do not immerse cord, plug or
unit in water or other liquid.
• Close supervision is necessary when any
appliance is used by or near children.
• Unplug from outlet when not in use and before
cleaning. Allow to cool before inserting or
removing parts and or before cleaning the
appliance.
• Do not operate any appliance with a
damaged cord or plug or after the appliance
malfunctions, or has been damaged in any
manner. Return appliance to an authorized
service facility for examination, repair or
adjustment.
• The use of accessories not recommended by
the appliance manufacturer may result in re,
electric shock or injury to persons.
• Do not use outdoors.
• Do not let cord hang over edge of table or
counter, or touch hot surface.
• Do not place on or near a hot gas or electric
burner, or in a heated oven.
• Do not use appliance for other than intended
use.
• Only ll the tank with clean and cold water.
Never ll the tank with mineral water, milk or
other liquids.
• To disconnect, remove plug from wall outlet.
Always hold the plug. Avoid pulling the cord.
• Some parts of appliance are hot when
operated, so do not touch with hand.
• Do not leave the appliance on unaended.
• The environment temperature of operating or
storing shall be more than 0 degrees Celsius.
• Do not leave the appliance exposed to
atmospheric agents (sun, rain and so on).
• This appliance is not intended for use by
persons (including children) with reduced
physical, sensory or mental capabilities, or
lack of experience and knowledge, unless
supervised or instruction concerning use of the
appliances by a person responsible for their
safety.
• Children should be supervised to ensure that
they do not play with the appliance.
• This appliance has been incorporated with a
grounded plug. Please ensure the wall outlet
in your house is well earthed.
• Do not let the coee machine operate without
water.
• Do not use outdoors or for commercial
purpose.
• Your appliance must never be switched on
through an external timer or any kind of
separate remote control system.
• This appliance is intended to be used in
household kitchens and similar applications.
• DO NOT PUT FINGERS IN coee flow outlet and
steam release nozzle.
• To prevent damage to the appliance do not
use alkaline cleaning agents when cleaning,
use a soft cloth and a mild detergent.
• DO NOT overll the water tank past the max
level, doing so poses a scalding, electric shock
or re risk.
• Always operate the appliance on a smooth,
even, stable surface. Do not place the unit on
or near a hot surface.
• Ensure that the unit is switched o after use.
• Do not move while the appliance in operation.

3
Warning
If the supply power cord is damaged, the power cord
must be replaced by the manufacturer, its service
agent or similarly qualied persons in order to avoid
a hazard.
Thisproduct has not been designed for any uses other
than those specied in this booklet.
Save These Instructions

4
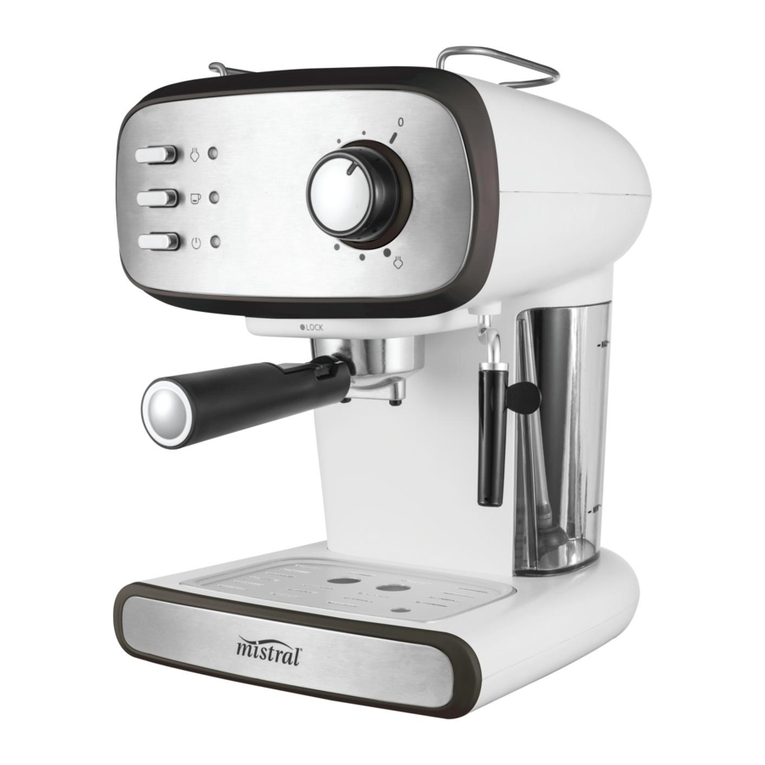
Features of Your Espresso Coee Machine
1. Control Panel
2. Steam Control Knob
3. Filter
4. Steam Wand
5. Coee Filter Holder
6. Measuring Spoon/Tamper
7. Water Tank
8. Drip Tray Plate
9. Drip Tray
A. Steam Buon
B. Coee Buon
C. On/O Buon
D. Steam indicator - Lights up green when the steam temperature is reached.
E. Coee indicator - Lights up green when the coee temperature is reached.
F. Power indicator - Lights up red when the power buon is pressed.

5
Geing to Know Your
Espresso Coee Machine
Congratulations on the purchase of your new
Coee Machine. Before rst using your new
Coee Machine, it is most important that you
read and follow the instructions in this use and
care booklet, even if you feel you are familiar with
this type of appliance.
Your aention is drawn particularly to the section
dealing with IMPORTANT SAFEGUARDS. Find a
safe and convenient place to keep this booklet
handy for future reference.
This appliance has been designed to operate from
a standard domestic power outlet. It is not
intended for industrial or commercial use.
Before First Use
Before rst use, carefully unpack
the unit and remove all packaging materials.
Wash the Water Tank, Coee Filter Holder, Filter,
Measuring Spoon / Tamper in warm soapy water,
then rinse and dry well.
Note: Do not immerse the main body in
water or any other liquid.
Set the Coee Filter Holder
Insert the Coee Filter(3) into the Coee Filter
Holder(5), make sure you align the notch on the
Coee Filter(3) with the groove on the Coee
Filter Holder(5).
• Rotate the Coee Filter Holder(5) to the left or
right to lock it in place.
Before You Use The Espresso Coee
Machine
The coee machine needs to be cleaned with
hot water to make sure your rst cup of coee is
perfect:
• Remove all the package.
• Make sure that the steam Control Knob (2) is
set to ‘0’, Make sure the steam buon
( ), and the Coee Buon ( ) are in the
O position (Not pressed in).
• Remove the Water Tank (7) at the rear of the
unit.
• Fill the Water Tank (7) with fresh water,
making sure do not exceed the ‘max’ or lower
than the ‘min’ level and insert it back into the
rear of the unit.
• Without adding coee powder, place the
Coee Filter Holder (5) including the empty
Coee Filter (3) into the dock (Fig.1), turn
anti-clockwise until it is xed tight (Fig.2 and
3).
Check the Steam Control Knob (2) is set to ‘0’.
Place an espresso coee cup onto the Drip Tray
Plate(8).
• Connect the mains plug to the mains supply.
• Press the On/O( ) buon , the Power
Indicator light (F) will illuminate red.
• Press the Coee Buon( ) , water will now
pump through. While water is flowing out,
press the Coee Buon( ) again . This
allows the coee machine to pre-heat. When
the coee machine has heated, the Coee
Indicator Light (E) will illuminate green, press
the Coee Buon( ) and hot water will flow
out.
• After water has been allowed to flow for
1 minute, press the Coee Buon( ) to
stop. Discard the water and clean the cup
thoroughly, you can now start making coee.
Note: There maybe a noise when using
the appliance for the rst time, this is
normal as the appliance pump is exclude
air inside, this should disappear after
approximately 20 seconds.

6
How To Use Your
Espresso Coee Machine
Pre-heating The machine
To make a good espresso coee it is
recommended to preheat the coee machine
before making the coee. Pre-heating includes
the Coee Filter Holder(5) and the cup(s) so that
the flavor and temperature of the coee is not
influenced by the cold parts.
• Remove the Water Tank (7) at the rear of the
unit.
• Fill the Water Tank (7) with water making sure
you do not exceed the ‘max’ or not lower than
‘min’ level and insert it back into the rear of
the unit.
Note: Insert the water pump suction hose
into the water tank prior to positioning
water tank into place.
• Insert the Coee Filter (3) into the Coee
Filter Holder (5), make sure you align the
notch on the lter with the groove on the
Coee Filter Holder(5). Rotate the Coee
Filter (3) to the left or right to lock it in Coee
Filter Holder(5).
• Without adding coee place the Coee Filter
Holder (5) (including the empty coee lter)
into the dock (Fig 1), turn anti-clockwise until
it is xed tight (Fig 2 and 3).
• Check again to ensure the Steam Control
Knob (2) is set to ‘0’. Make sure the Steam
Buon
( ), and the Coee Buon( ) are in the
“O” position (Not pressed in). Place an
espresso coee cup(s) onto the Drip Tray
Plate (8).
If you need making two small cups of coee,
place one cup under each nozzle of the Coee
Filter Holder (5).
Connect the mains plug to the mains supply.
Press the On/O Buon( ) , the red Power
Indicator Light (F) will illuminate.
• Press the Coee Buon( ) , water will
now pump through. While water is flowing
out, press the Coee Buon( ) again. This
allows the coee machine to preheat. When
the coee machine has heated, the Coee
Indicator Light (E) will illuminate turn green,
press the Coee Buon( ) and hot water
will flow out. After about 20 seconds, press the
Coee Buon( ) , to stop the water flowing.
• Your coee machine and cup are now
preheated.
Making an Espresso Coee
• Remove the Coee Filter Holder (5).
• Using the Measuring spoon (6), add ground
coee powder to the Coee Filter (3) Only ll
half way for one small cup of coee, ll it full
for two cups.
• Press the ground coee powder tightly using
the Tamper (6) at the end of the Measuring
Spoon (6).
• Set the Coee Filter (3) and Coee Filter
Holder (5) under the dock (see Fig.1), and
turn it anti-clockwise until it is xed tight and
securely (see Fig.2 and Fig.3).
• Pour out the hot water in the cup(s) from
pre-heating, then place your hot cups on to
the Drip Tray Plate (8). Make sure the Steam
Control Knob (2) is at the ‘0’ position and the
Steam Buon( ) is not pressed in.
• Once the Coee Indicator Light(E) illuminates
green, press the Coee Buon( ) , after a
brief moment coee will flow out.
• Press the Coee Buon( ) to stop when
the desired coee is obtained, or the color of
coee changes to a lighter color - indicating it
is weak.
• After your coee is made, press the On/O
Buon( ) . The Power Indicator Light (F) and
Coee Indicator (E) will go out. Your coee is
ready now.
WARNING: Do not leave the coee
machine unaended during coee
making process, as you need operate it
manually.
Note: During coee brewing or steam
making process, it is normal for the
Coee Indicator Light (E) to go on and
o. This indicates that the thermostat
is controlling the heating element to
maintain correct temperature.
• On completion of coee pouring process, you
can remove the Coee Filter Holder (5) by
turning it clockwise and dispose of the used
coee granules in the Coee lter(3, press the
lter retention clip on the handle to release
the lter from the lter holder.
• Let them cool down completely, then rinse
under running water.

7
Making a Cappuccino Coee
• Prepare your espresso coee as detailed
above in ‘Making Espresso Coee’ .Make sure
the cup is big enough to accommodate both
the coee and the frothed milk.
• Make sure that the Steam Control Knob (2) is
at the ‘0’ position.
• Press the Steam Buon( ) , until the Steam
Indicator light (D) illuminates green.
• Fill a jug with about 100 ml of milk for each
prepared cappuccino, recommend to use full
cream milk at refrigerator temperature (not
hot).
• In order to get beer milk foam performance,
open Steam Control Knob(2) for
approximately 15 seconds without puing it in
the milk yet. This will clear out any cold water
in the system. Then put the Steam Control
Knob(2) back to ‘0’ position and conduct the
next step.
• Insert the Steam Wand (4) into the milk about
2 cm depth, then turn the Steam Control
Knob(2) slowly anti-clockwise. Steam will
come out from the Steam Wand (4).
• Frothed milk is produced by moving jug in
circular motion while the Steam wand(4) is
submerged in the milk.
Warning: Never touch the steam outlet
during steam venting and be careful not
to get burnt.
Note: Always turn the Steam Control
Knob (2) slowly to release the steam in a
controlled manner.
• When frothing the milk is complete, you can
turn the Steam Control Knob (2) back to the
‘0’ position. The best temperature for frothed
milk is 70°C, so take care as there will be
plenty of steam coming from it.
• After frothing the milk, put an empty jug under
the Steam Wand (4), then turn on the Steam
Control Knob (2) and press down the Coee
Buon( ) to the lower position, this will
allow hot water to flow from the steam nozzle,
operate for approximately 30 seconds, then
turn it o again. This will clean out the steam
tube.
• Press and release the On/O Buon( ) to
switch the machine o.
• Pour the frothed milk into the espresso coee
you prepared, now the cappuccino is ready.
• Sweeten if desired and sprinkle the froth with
a lile cocoa powder.
Note: If the steam outlet becomes
blocked: Turn the steam knob to ‘0’
position and allow the coee machine
to cool down for about half an hour, then
poke the steam outlet several times
with a needle about 1mm in diameter
until it clears. Finally, press down the
Steam Buon( ) and turn on the
Steam Control Knob (2) to check if the
appliance can produce steam normally
when the Steam Indicator (D) green
illuminates. Finally, when cool clean the
steam outlet with damp cloth.
Note: After steaming, we recommend
you allow the machine to cool down for
at least for 5 mins before making coee
again. Otherwise a burnt odor may
manifest itself in your espresso coee.
If you want to make more coee immediately:
• Press and release the Steam Buon( ) to
the ‘O’ position; dip the Steam Wand(4)
into a cup, Press the Coee Buon( ) the
‘On’ position and turn on the Steam Control
Knob(2) and there will be water flowing from
Steam Wand(4); after the Coee Indicator(E)
goes out, press and release the Coee Buon(
) to the ‘O’ position, then turn the Steam
Control Knob (2) to ‘0’ position. When the
Coee Indicator(E) illuminates, you can start
to make coee again.
Automatic power ‘O’ function
• The coee machine will turn itself o
automatically 25 minutes after pressing the
On/O( ) buon.
Keep Warm Function
The coee machine can keep your coee warm
momentarily by placing the coee cup on the Top
warm plate.
Empty Drip Tray
Has xed a red indicator floater in the drip tray,
you should empty the drip tray once the indicator
was floated up.
Take out drip tray plate and then lift up drip tray
from the unit, empty water with coee residual.
Re-x the drip tray with it’s plate.

8
De-scaling your Espresso Coee
Machine
When tap water is heated, calcium and other
mineral deposits aach themselves to the inside
of your coee machine. Excessive limescale build
up will damage the coee machine, the steam
tube is particularly vulnerable to blockage and
should be cleaned regularly. We recommend
using boled water or ltered water. If you cannot
do this and use water straight form the tap, then
it is necessary to de-scale the coee machine
regularly. Do no use vinegar but a commercially
available decalcication agent, carefully follow
the quantities recommended in the instructions
of the agent.
How to de-scale:
To make sure your coee machine can operate
eiciently the internal piping must be cleaned.
You should clean away the mineral deposits left
every 4 weeks - if you live in a hard water area
every 2 weeks. Beer still, just use boled water
and none of this will be necessary.
• Fill the Water Tank (7) with water and
de-scaler to the ‘MAX’ level.
• Follow the steps as detailed in ‘Pre-heating’
above.
• Press the On/O Buon( ) to turn on the
unit, the Power Indicator(F) (red) will be
illuminated, press the Coee Buon(B) ,
make sure the Steam Buon( ) is in the o
position, when there is water flowing out, shut
o the water pump by pressing the Coee
Buon(B) again, and wait for a moment. The
coee machine will begin to heat.
• The green Coee Indicator light (E) will
illuminate to show when heating has nished.
• Press down the Coee Buon( ) and allow
water to flow through, then shut o the water
pump and wait for 5 seconds.
• Press the Steam Buon( ) , and wait
until the green Steam Indicator light (D)
illuminates. Make steam for 2 minutes, then
turn the Steam Control Knob (2) to the ‘0’
position to stop making steam.
• Press the On/O Buon( ) to turn o the
unit immediately, leave the de-scaler in the
unit for at least 15 minutes.
• Empty the tank and rell with clean water.
Restart the unit and repeat the above steps at
least 3 times with clean water.
Care and Cleaning
Always Switch o and unplug the appliance
before cleaning.
• Empty any water that may be inside the coee
machine by turning on the steam function for
approximately 2-3 minutes, or until steam no
longer comes from the Steam Nozzle.
• Unplug from the mains and allow coee
machine cool down completely before
cleaning.
• Clean housing of coee machine with damp
cloth and clean water tank.
• Wash the drip tray and removable drip tray
plate regularly, then dry thoroughly.
• Never immerse the housing in water for
cleaning.
• Immediately remove the plastic funnel over
the steam nozzle by turning it gently after use,
wash in warm soapy water and dry thoroughly.
• Clean the metal tube with a damp cloth, dry
and replace the plastic funnel.
• Wash the measuring spoon with tamper in
warm soapy water and dry thoroughly.
Note: Clean the appliance after every
use in order to keep it in good working
order.
Note: Do not allow water to sit in the
tank, empty the tank after every use.

9
Trouble shooting
Problem Possible cause Solution
Water is leaking from the
boom of the machine Too much water in the drip tray Clean out the drip tray
Water is leaking from the outer
side of the lter There is some ground coee on
edge of lter Clean it o
Tainted taste to the coee Allowing water to sit too long,
improper cleaning Clean and de-scale
Low or no steam from the steam
wand Steam wand is clogged up Clean and de-scale
Poor milk frothing Using skimmed milk Full cream milk is best
Specication:
Supply voltage:….........................…220-240v~ 50Hz
Power consumption:….................................…850W
Protection Class: ….............................................…..I
Water Tank Capacity:…......................................1.2L
Note: As a result of continual improvements, the design and specications of the product
within may dier slightly to the unit illustrated from the packaging.

10
Notes

11
Warranty Conditions For Purchase In Australia
Any claim under this warranty must be made within 12 months of the date of purchase of the product.
To make a claim under the warranty in Australia, take the product (with proof of purchase) to any
Australia Post outlet.
GSM Retail Group bears reasonable, direct, expenses of claiming under the warranty in
Australia. You may submit details and proof to Australia Post outlet for consideration or contact our
Consumer Service phone number below.
This warranty is provided in addition to other rights and remedies you may have under law: our goods
come with guarantees which cannot be excluded under the Australian Consumer Law (if purchased in
Australia). You are entitled to replacement or refund for a major failure and to compensation for other
reasonably foreseeable loss or damage. You are also entitled to have the goods repaired or replaced if
the goods fail to be of acceptable quality and the failure does not amount to a major failure.
The warranty excludes damage resulting from product misuse or product neglect. The warranty covers
domestic use only and does not apply to commercial applications.
This warranty is given by GSM Retail Group
ABN: 53007682475
For Warranty and technical queries 1300 941 901
Warranty Exclusions
Damage to the appliance or any part through accident, misuse or negligence.

12
Cat. No.
MEM815/MEM815W
April 2021
This manual suits for next models
1
Table of contents
Other Mistral Coffee Maker manuals
Popular Coffee Maker manuals by other brands

Milu
Milu 233919 Instructions for use

Cafe 98
Cafe 98 CB-2 Reference sheet

Bosch
Bosch TCA6001UC - Benvenuto B20 Gourmet Coffee... use and care manual

Nespresso
Nespresso ESSENZA AUTOMATIC C100 instruction manual

Melitta
Melitta ME10TDS Use and care guide

Hamilton Beach
Hamilton Beach BrewStation 48465-CN manual