Mitsubishi Electric Thermoscreens VRF HP Guide

T9901075-2-3 UK Page 1 of 38
VRF HP HEAT PUMP RANGE AIR CURTAINS
INSTALLATION, OPERATION & MAINTENANCE INSTRUCTIONS
For use with City Multi (VRF) systems
PLEASE READ THESE INSTRUCTIONS CAREFULLY BEFORE ATTEMPTING INSTALLATION
Thermoscreens Ltd
St. Mary’s Road Nuneaton
Warwickshire England
CV11 5AU
Email: [email protected]
Tel: +44 (0) 24 7638 4646
Fax: +44 (0) 24 7638 8578
www.thermoscreens.com
English
ErP2015
compliant

T9901075-2-3 UK Page 2 of 38
Thermoscreens / Mitsubishi Electric
City Multi (VRF) HP Heat Pump Air Curtain System
CONTENTS
Page
Air Curtain System Schematics 3
Design Information 5
Unpacking the Air Curtain 8
INSTALLATION
Installation of the Air Curtain 10
Figure 1 – Dimensions of VRF HP Air Curtain 11
Mitsubishi Electric Compressor Unit 12
Refrigerant Pipework 12
To gain access inside the Air Curtain 14
Electrical Supply and Wiring to the Air Curtain 15
Wiring Diagram 1, AC Fans (Defrost Cycle Auxiliary Heater disabled - as supplied) 17
Wiring Diagram 2, AC Fans (Defrost Cycle Auxiliary Heater enabled on site) 18
Wiring Diagram 3, EC Fans (Defrost Cycle Auxiliary Heater disabled - as supplied) 19
Wiring Diagram 4, EC Fans (Defrost Cycle Auxiliary Heater enabled on site) 20
PAR-31MAA Remote Controller 21
Wiring of Air Curtain Fan Speed 21
Condensate Disposal System 21
COMMISSIONING
Air Curtain Checks 23
Selecting the Fan Speeds of the Air Curtain (AC Fans) 25
Setting the Fan Speeds of the Air Curtain (EC Fans) 26
Starting the Heat Pump System 27
Filter Dirty Indicator 29
Hand-over to End-User 31
USER INSTRUCTIONS
User Instructions for the Air Curtain 32
SERVICING
Fortnightly Cleaning 33
Six Monthly Servicing 33
Fault Finding 36

T9901075-2-3 UK Page 3 of 38
Thermoscreens / Mitsubishi Electric
Thermoscreens HP City Multi (VRF) Heat Pump Air Curtains can be used with Mitsubishi
Electric City Multi Y/WY-Series (Heat Pump) or City Multi R2/WR2-Series (Heat Recovery)
systems.
City Multi Y/WY-Series Heat Pump Air Curtain System
City Multi Y/WY-Series Heat Pump Air Curtain Schematic :-
City Multi Y-Series System:-
Indoor Units and Air Curtains(s) all operate on heating at the same time, or all operate on
cooling at the same time.
The City Multi Y Series Heat Pump Air Curtain system consists of :-
one or more Thermoscreens VRF HP Heat Pump (heating and cooling) Air Curtains *
one or more Mitsubishi Electric City Multi Y/WY-Series Compressor Units +
a Mitsubishi Electric PAR-31MAA or PAR-U02MEDA Remote Controller +
a door switch to change fan speeds; higher speed when the door is open, lower speed
when the door is closed (optional)^
Mitsubishi Electric Indoor Unit(s) +[NB. Can be used on a full air curtain basis if required
up to 100% diversity]
* - supplied by Thermoscreens Ltd.
+- Mitsubishi Electric items supplied by the installer
^- supplied by the installer
Heat Pump
Air Curtain
Mitsubishi Electric
VRF Compressor Unit
M-Net Comms Link from
Compressor Unit
Permanent electrical supply
(from local switched spur)
Mitsubishi Electric
Indoor Units
Mitsubishi Electric
PAR-31MAA
or PAR-U02MEDA
Remote Controller
BMS
Control
On/Off
Mode change
Capacity control
3-Speed fan control
Temp. monitoring
Mitsubishi error
Refrigeration pipework
Electrical cables Control cables
BMS Control
Door Switch to change fan speeds
Door open - High; Door shut - Low
(optional)
Permanent electrical supply (from local switched spur)
1-phase for air curtain as supplied,
3-phase only if defrost cycle auxiliary heater is needed
(site change then required to air curtain)

T9901075-2-3 UK Page 4 of 38
City Multi R2/WR2-Series Heat Pump Air Curtain System
City Multi R2/WR2-Series Heat Recovery Heat Pump Air Curtain Schematic :-
City Multi R2/WR2-Series System:-
Indoor Units and Air Curtains(s) can operate on heating or cooling simultaneously, e.g.
some indoor units are cooling whilst other indoor units and air curtain are heating at the
same time.
The City Multi R2/WR2-Series heat recovery system with Heat Pump Air Curtain(s) consists
of :-
one or more Thermoscreens VRF HP Heat Pump (heating and cooling) Air Curtains *
one or more Mitsubishi Electric City Multi R2/WR2-Series Compressor Units +
Mitsubishi Electric BC Controller +
a Mitsubishi Electric PAR-31MAA or PAR-U02MEDA Remote Controller +
a door switch to change fan speeds; higher speed when the door is open, lower speed
when the door is closed (optional)^
Mitsubishi Electric Indoor Unit(s) + [NB. Can be used on a full air curtain basis if required
up to 100% diversity]
* - supplied by Thermoscreens Ltd.
+- Mitsubishi Electric items supplied by the installer
^- supplied by the installer
Permanent electrical supply (from local switched spur)
1-phase for air curtain as supplied,
3-phase only if defrost cycle auxiliary heater is needed
(site change then required to air curtain)
Heat Pump
Air Curtain
Mitsubishi Electric
VRF Compressor Unit
M-Net Comms
Link
Permanent electrical supply
(from local switched spur)
Mitsubishi Electric
Indoor Units
BC Controller
BMS
Control
On/Off
Mode change
Capacity control
3-Speed fan control
Temp. monitoring
Mitsubishi error
Refrigeration pipework
Electrical cables Control cables
BMS Control
Door Switch to change fan speeds
Door open - High; Door shut - Low
Mitsubishi Electric
PAR-31MAA
or PAR-U02MEDA
Remote Controller
(optional)

T9901075-2-3 UK Page 5 of 38
DESIGN INFORMATION
AS SUPPLIED the air curtain operates on a 1 phase electrical supply (1L+N+E) from a local
switched spur which provides power for fans and controls. There is an integral defrost
cycle auxiliary heater located inside the air curtain but this is ‘disabled’ as supplied. If the
defrost cycle auxiliary heater is required the air curtain will then need a 3 phase electrical
supply (3L+N+E) from a local switched spur, instead of the 1 phase electrical supply, to
provide power for the heater as well which will need to be ‘enabled’ on site during
commissioning, see also notes on Page 6 and Section 'Installation - Electrical Supply and
Wiring to the Air Curtain', Page 15.
Electrical power to the Mitsubishi Electric Compressor Unit(s) and BC Controller is fed
separately in the normal way (see separate Mitsubishi Electric Instructions).
There is a Mitsubishi Electric M-Net communications link between the Mitsubishi Electric
Compressor Unit or BC Controller and the Thermoscreens Heat Pump Air Curtain. When
used with a Mitsubishi PAR-31MAA or PAR-U02MEDA Remote Controller this link
provides:-
On/Off control of the Mitsubishi Electric heat pump system
Mode change between heating, fan only and cooling of the Mitsubishi Electric heat
pump system
Capacity control of the Mitsubishi Electric heat pump system
3-speed control of the Thermoscreens air curtain fans*
Temperature monitoring of the inlet air entering the air curtain, or the room air
temperature at the remote controller
Signal for when the outdoor unit is in defrost mode so a defrost cycle auxiliary heater
(if enabled) can provide partial heat back-up during the few minutes of defrost.
Error signal for if the Mitsubishi Electric system has a problem
*As an alternative a door switch can be used to switch between a higher fan speed with
the door open or a lower fan speed with the door closed.
The air curtain can be set to operate in HEAT, FAN or COOL mode within the Mitsubishi
Electric City Multi (VRF) system using a Mitsubishi PAR-31MAA or PAR-U02MEDA
Remote Controller or a Mitsubishi Electric BMS or Centralised Controller.
Refer to a Mitsubishi Electric agent if the air curtain is to be controlled via a Building
Management System (BMS) or Centralised Controller.
It should be noted that during heating mode, if the compressor unit goes into its defrost
cycle during cold weather, the air curtain fans will continue to operate to maintain the all-
important air stream across the doorway. It is this air stream, particularly towards the top of
the doorway, which is so effective at stopping buoyant warm air from inside the building
escaping to outside and wasting energy and also in reducing airborne contamination.
For Y-Series systems the temperature of the discharge air can be low during the defrost
cycle period that may occur every few hours under particular outdoor weather conditions
but this has rarely become an issue with the end user and is really only a perceived
problem. There is a defrost cycle auxiliary heater fitted in the air curtain which is disabled
when the air curtain is delivered. If there are concerns for a particular Y-Series installation
this defrost cycle auxiliary heater can be enabled during site commissioning and this will
maintain the discharge air at a higher temperature during the defrost cycle. A 3-phase
electrical supply is then required to power the air curtain.

T9901075-2-3 UK Page 6 of 38
NB. The defrost cycle auxiliary heater should not be site enabled during commissioning on
R2, WY and WR2 systems. On R2 systems the LEV in the air curtain closes during system
defrost and defrost does not occur on WY and WR2 systems.
Point of Information: If used, an auxiliary defrost heater may seem counter-productive for
a heat pump system. When put into context, however, the auxiliary heater fitted is of low
output for the size of the air curtain, it will just temper the discharge air and is only used for
a few minutes a day during a small period of the year. Tests at the Building Research
Establishment (BRE) test house on the heat pump air curtain system showed that even
with the auxiliary heater cutting in during defrost, as it has to during their EN14511
performance test, the annual seasonal COP was hardly affected.
The air curtain is supplied with an integral condensate drain tray fitted inside the unit so it
could be used in cooling mode during warm weather, if so desired. This should be decided
at the design stage as a condensate drain system will need to be installed if cooling is
required and extended to a suitable drain by the installer. The condensate can be drained
by gravity by connecting suitable condensate hose onto the 15mm drain pipe on the
condensate drain tray inside the air curtain. If a gravity condensate drain is not visually
suitable it will be necessary to remove condensate using a condensate pump, supplied
and fitted by the installer. The condensate pump can be located inside the right hand end
of the air curtain or in a remote location outside of the unit if required. It must be of
sufficient capacity, see Page 22, self priming and capable of providing the appropriate
suction head so the pump will lift condensate out of the air curtain, particularly if it is in a
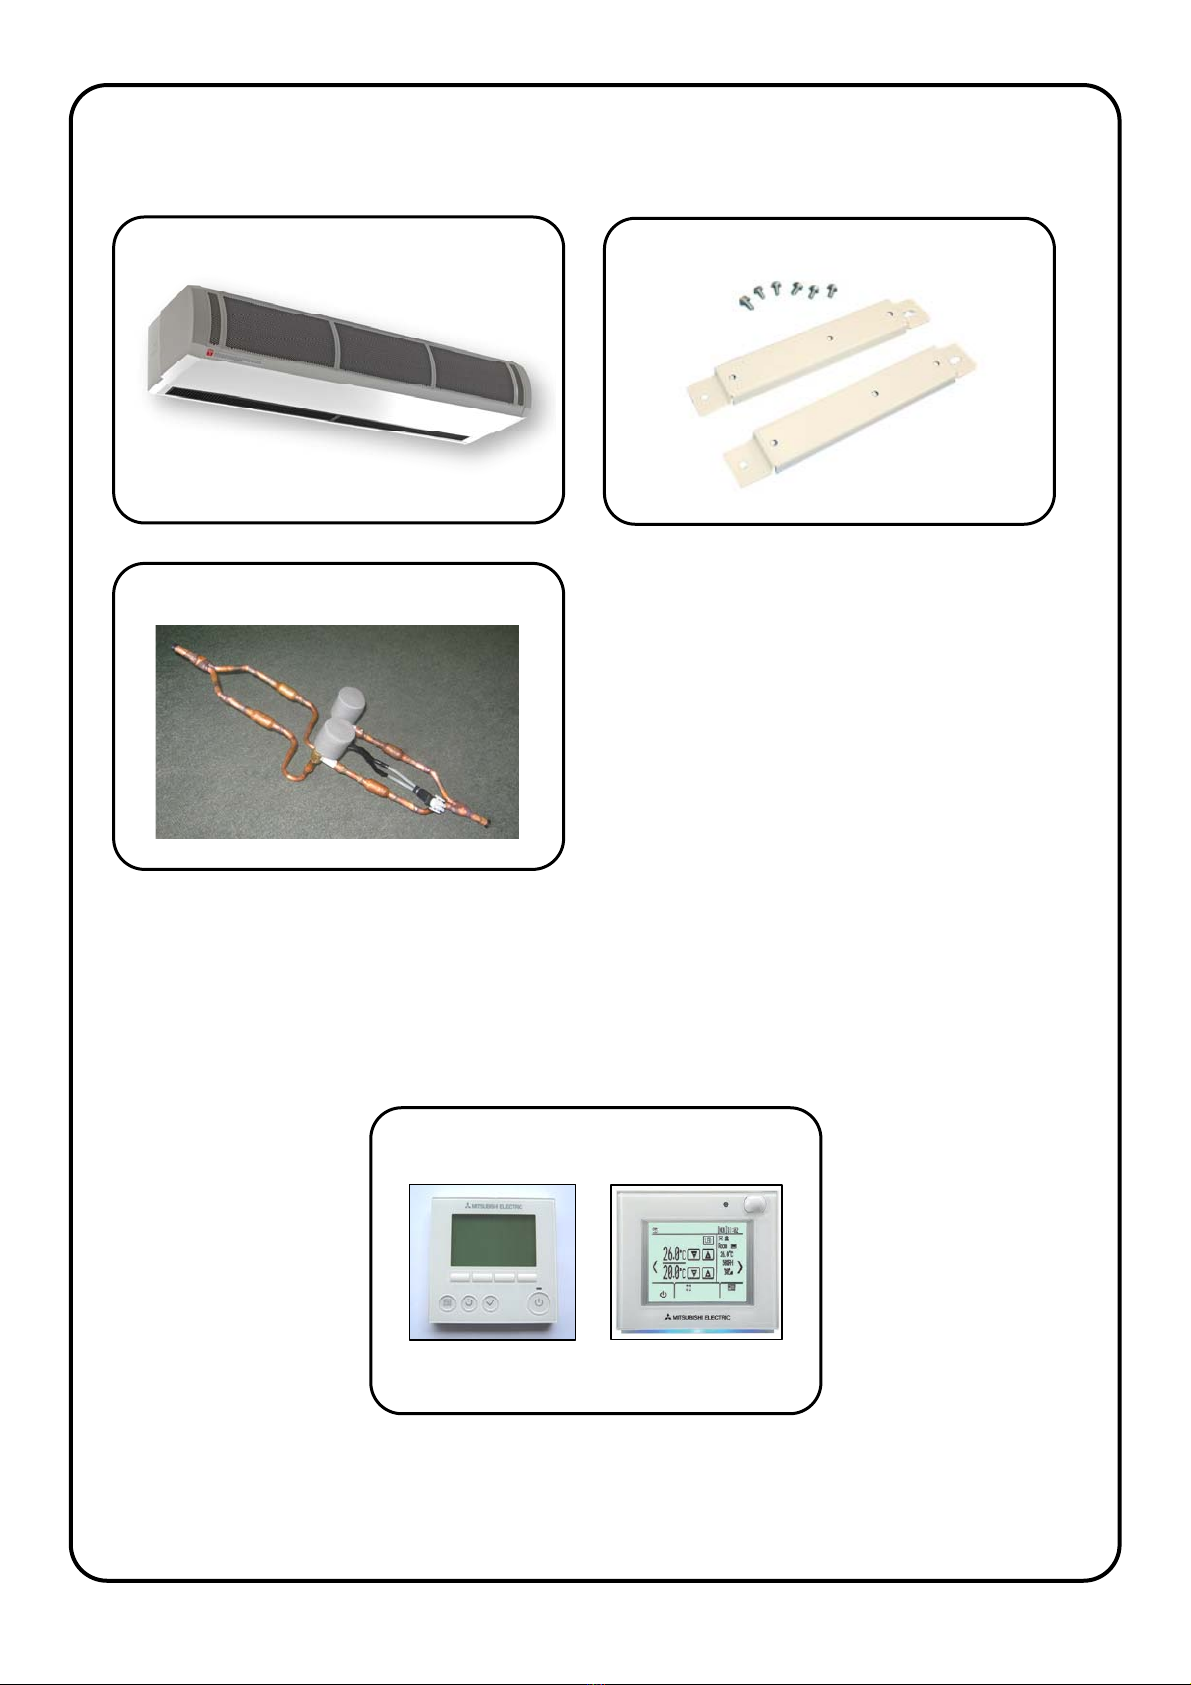
remote location. There are two hole penetrations at the right hand end of the air curtain for
condensate pipework to pass through, see Figure 1, Page 11. Suitable condensate pumps
are Peristaltic or Rotary Diaphragm type. We recommend the Blue Diamond rotary
diaphragm type with cooling signal sensor (drainStik) manufactured by Charles Austen
Pumps Ltd. (www.miniblue.co.uk).
If using a condensate pump it is recommended that it has the facility so it only operates
when the air curtain is in cooling mode by detection of water in the drain tray or by
detecting a cooling differential in the airflow. It should also have a pump overrun feature to
empty the drain tray as much as possible when the air curtain is switched off. It should
have an alarm system with appropriate sensor fitted in the drain tray that will give a volt-
free signal (open circuit = alarm) and stop the air curtain cooling if the condensate drain
tray is in danger of flooding (air curtain fans will continue to operate). Other indoor units on
the same City Multi system are unaffected if the air curtain condensate alarm occurs.
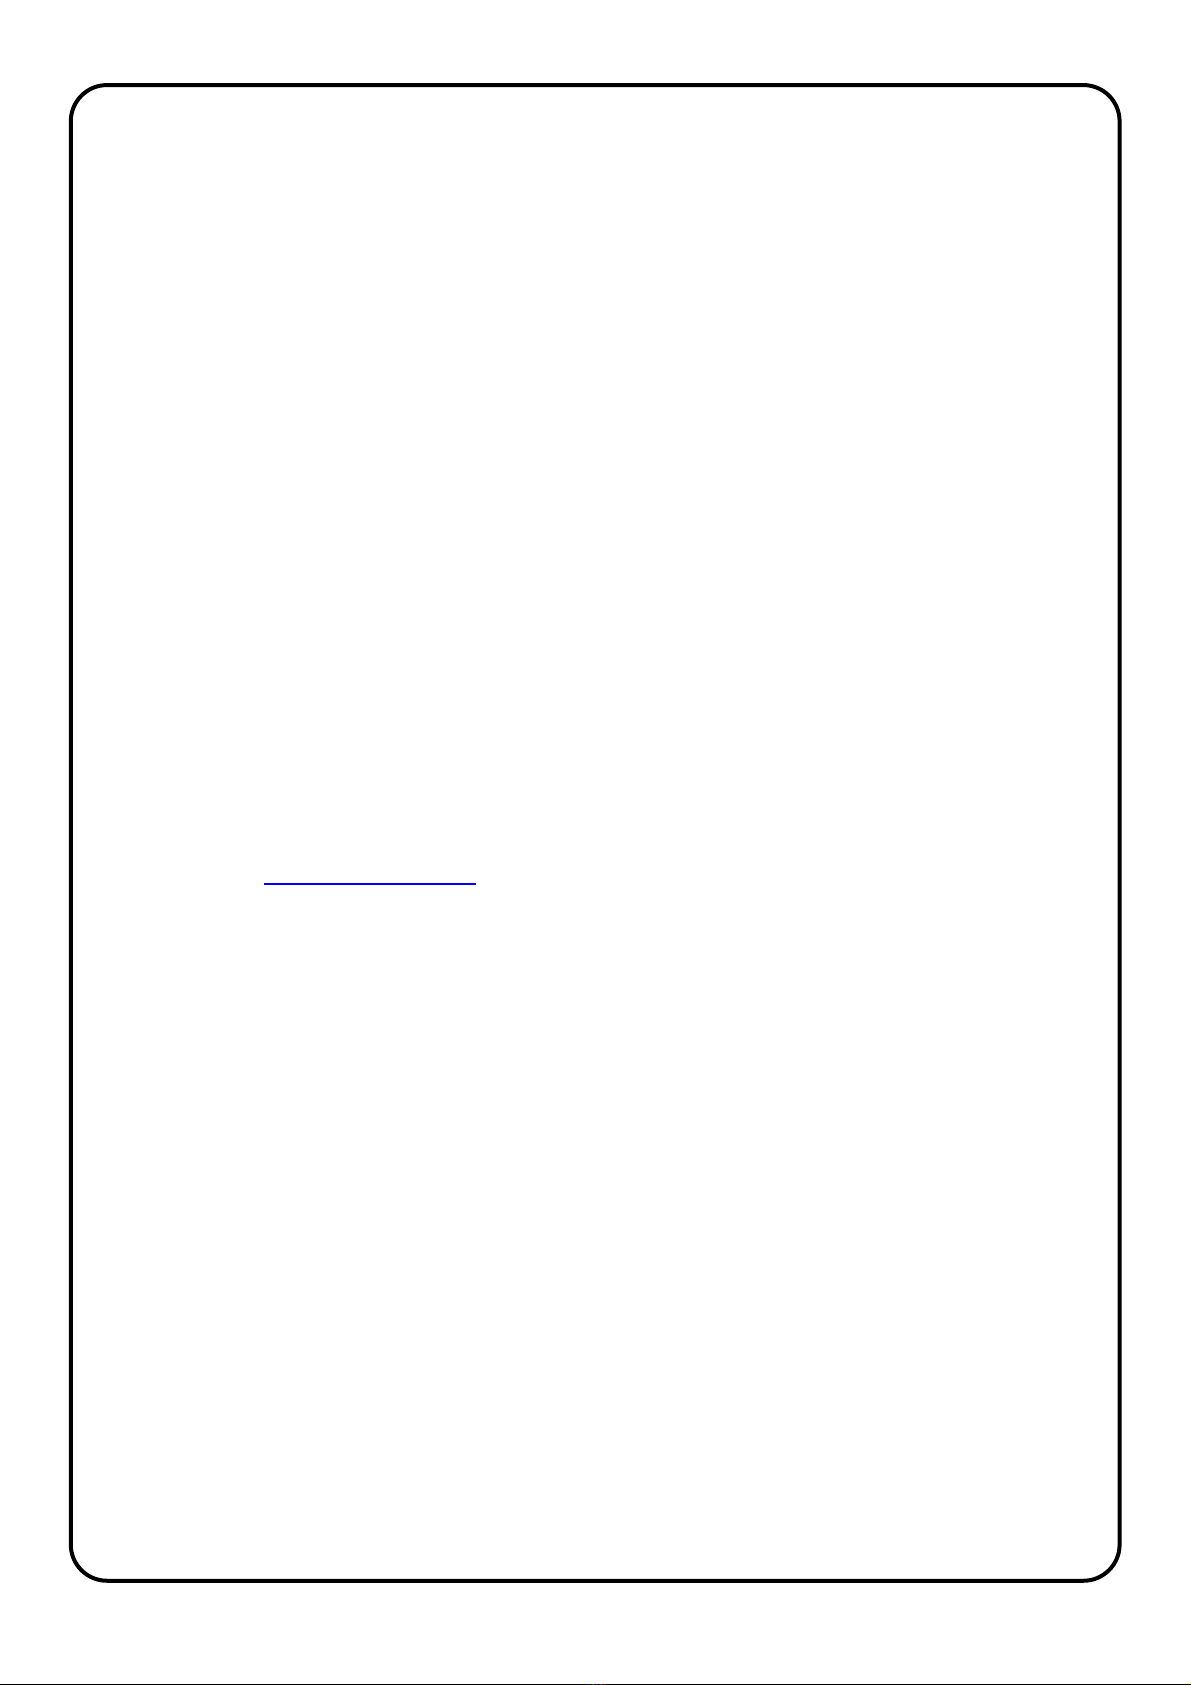
There is a fixing bracket with 8mm diameter hole attached to the drain tray inside the air
curtain so a condensate sensor can be fixed in the tray by the installer. The hole can be
enlarged, if necessary, to suit the type of sensor used so it is located in the tray at the
appropriate position, see the manufacturer’s instructions that come with the condensate
pump for further information. A 230V AC, single phase electrical supply is provided inside
the air curtain to power a condensate pump and a condensate alarm connection is
provided for the condensate pump alarm circuit.
Warning: The air curtain condensate collection system is designed to remove condensate
with the air curtain operating in cooling mode during normal summer weather conditions in
countries with a temperate climate. In case of extreme weather conditions, drain tray
blockage or condensate pump failure, which can occur, it is vital that the design of the floor
beneath the air curtain and its surface is such that it will not become slippery or damaged if
it became wet. This is similar to the conditions that might be experienced with heavy

T9901075-2-3 UK Page 7 of 38
rainfall in at an open doorway or wet pedestrian foot traffic, so careful consideration must
be paid to the design of the floor and its surface finish.
If it is intended that the air curtain should not operate in cooling mode and a condensate
drain system is not fitted, the BMS System, Centralised Controller or PAR-31 MAA / PAR-
U02MEDA Remote Controller must be configured at commissioning so that COOL or
AUTO mode can never be selected (see Section – Commissioning, Page 23). It is still
recommended, however, that the floor design and surface be as described above, in case
cooling mode is used in the future and also to cope with heavy rainfall or wet pedestrian
foot traffic.
Note: It could still be possible for an end user to unlock a PAR-31 MAA / PAR-U02MEDA
remote controller if they found out how to and switch it into cooling, not realising that
condensate would then flood out of the drain tray. It may be considered prudent, therefore,
to install a condensate drain system even if it is intended that the unit should only be used
in HEAT or FAN mode.
Note: When the LEV on a Multi-Split VRF system is closed it will not shut off refrigerant
flow completely, there will always be some flow of refrigerant through the DX coil in the air
curtain. This can be a problem with Multi-Split VRF systems in the summer in high
humidity hot climates such as Mediterranean or Southern European regions where other
indoor units are in cooling mode on the same VRF system. Even though the air curtain is
not being used for cooling the DX coil will still get cold because of the small flow of cooling
refrigerant and water condensate will be produced. This is why a drip tray is fitted in the air
curtain for unintentional condensate formation. In regions where there is high humidity and
heat in the summer it will be necessary to fit a condensate drain system to the drip tray as
the tray could fill-up and flood. An alternative is to have a manual shut-off valve fitted into
the refrigerant pipework to the air curtain.
The air curtain is designed only for use with a Mitsubishi Electric City Multi (VRF) system
for use on R410A. The complete Thermoscreens air curtain / Mitsubishi Electric heat pump
system, including fridge pipework, wiring, controls, etc. must be installed only by an
approved Mitsubishi Electric refrigeration contractor.
Persons using the air curtain must be given adequate instruction and supervision
concerning the use of the appliance by a person responsible for their safety. The air
curtain is not intended for use by persons (including children) with reduced physical,
sensory or mental capabilities.
These instructions must be read in conjunction with the separate Mitsubishi Electric
instructions that come with other components of the heat pump system, e.g. Compressor
Unit, BC Controller, PAR-31 MAA / PAR-U02MEDA Remote Controller, BMS System,
Centralised Controller, etc. All instructions should be kept by the building facilities manager
for future reference.

T9901075-2-3 UK Page 8 of 38
UNPACKING THE AIR CURTAIN
The following items are supplied and packaged within the air curtain box :-
If anything is missing or damaged please contact your place of purchase immediately.
There will also be a 'City Multi (VRF) heat pump system' supplied by Mitsubishi Electric.
The Installer will also need to supply and install the following:-
Wall Brackets and Fixin
g
Bolts
for if air curtain is to be wall mounted
V
RF HP Heat Pump Air Curtain
Please note, plastic end caps are supplied
loose to be fitted during installation
Twin LEV Kit
–
P200 units
PAR-31 MAA or PAR-U02MEDA
Remote Controller
If Air Curtain is to be manually controlled,
also needed for commissioning

T9901075-2-3 UK Page 9 of 38
The installer may also need to supply and install the following optional items:-
The complete Thermoscreens air curtain / Mitsubishi Electric heat pump system, to provide a
heat pump air curtain over a doorway, including wiring, fridge pipework, etc. is to be installed
only by an approved Mitsubishi Electric refrigeration contractor.
IMPORTANT
This Heat Pump Air Curtain is intended only for use with a Mitsubishi Electric City
Multi (VRF) system, for use on R410A.
These instructions must be read in conjunction with the separate Mitsubishi Electric
City Multi (VRF) instructions.
(All documentation supplied with the unit should be stored and kept for future reference.)
For your records:
Date of Purchase……………………………..
Place of Purchase…………………………….
Serial Number…………………………………
For warranty purposes proof of purchase is necessary so please keep a copy of your invoice.
Condensate Pump – self priming with
cooling mode detection, alarm
system and pump overrun
If
A
ir Curtain is to be operated in COOL or
AUTO mode and gravity drain cannot be used
– see text on Page 6 & 7 for more information
Door Switch – for energy efficient,
noise friendly, fan speed control,
Door open – Higher fan speed
Door shut – Lower fan speed
Gives industry standard fan speed control
–
see
wiring diagrams and text on Pages 21, 25 & 26
for more information
Example Switch only

T9901075-2-3 UK Page 10 of 38
Recommended
250mm min.
for pipework
INSTALLATION OF THE AIR CURTAIN
The air curtain is designed to be surface mounted inside a building and located
horizontally over a doorway. It must not be installed on the outside of the building,
or built into a cabinet or recessed in anyway.
Location
The air curtain must be mounted so the discharge grille is
located up to 3.2m(AC Fans) 3.6m(EC Fans) maximum
above floor level and as close to the doorway as possible.
It must be installed level or condensate may leak out if
used for cooling. It is recommended to leave a gap of
250mm minimum above the air curtain to allow for
pipework brazing operations. Beware of doorway top
edges, structural beams, door opening/closure devices,
etc. which may interfere with the air stream and affect the
location of the unit.
Wall Fixing
Bolt all of the wall brackets supplied to the rear face of the
unit as shown in the adjacent picture using the M10 bolts
supplied. Suitable wall fixing bolts (not supplied) need to
be used to fix the brackets to the wall, taking into account
the type of wall and the weight of the unit*, see Table 1:
Air Curtain Weight (kg)
VRF HP1000 DXE 46
VRF HP1500 DXE 67
VRF HP2000 DXE 84
Step 1. Refer to Figure 1, Page 11 for mounting details
and drill the fixing points in the wall.
Step 2. Screw in the top wall bolts leaving a small gap between the head and the wall.
Lower the unit onto the bolts via the key-hole slots in the top of the wall brackets and then
screw in the bottom wall bolts.
Step 3. Ensure all fixing bolts are tightened and the air curtain is safely secured to the
wall.
Ceiling Suspension
M10 threaded inserts are provided in the top face of the
unit (see Figure 1, Page 11 for positions) so it can be
suspended on M10 threaded hanging rods (not provided).
All suspension points must be used. Ensure each of the
hanging rods is secured onto a suitable structure that can
support the weight of the unit (see table above)*. Screw
the hanging rods into the inserts by a minimum or 20mm
and fit locking nuts (not provided) to prevent the rod
rotating and coming away from the casing. Do not screw
the hanging rod too far in or it could interfere with internal
components.
*It is the sole responsibility of the installer to ensure that the building fixing locations and suspension system
used are suitable for the air curtain being installed.
Table 1

T9901075-2-3 UK Page 11 of 38
Additional (M20)
Wiring Inlets on top
1300
VRF
HP1000DXE 1825 2350A (mm) 605 1225 1793
-918
898 1398 1904
-952
182 222 204
875
442 333 299
253 267 258
359 359 334
80 45 80
B (mm)
C (mm)
D (mm)
E (mm)
F (mm)
G
H (mm)
I (mm)
J (mm)
K (mm)
L
M
58in. 58in. 78in.
12in. 58in.
12in.
A
B
M
D
EE
340
25
15
306
100
AIR IN
AIR OUT
468
Liquid Line
Refrigerant
Connection (L)
P71 P125 P140
VRF
HP1500DXE VRF
HP2000DXE
Recommend
250 minimum
for pipes
-
655
699
570
20mm hole on top for pumped
condensate disposal (if cooling)
Gas
Line
(G)
Liquid
Line
(L)
K
50
200
4545
105
CI F
H
Inserts for M10 drop rods
4 for 1m unit, 6 for 1.5m/2m units
Use all drop rod holes !
1.5m only
J
45
225
20
250
20mm hole for gravity or pumped
condensate disposal (if cooling)
Electrical Supply and Mitsubishi
Control Wiring Inlets (M20)
Gas Line
Refrigerant
Connection (G)
45 (L)
P200
Liquid Line Refrigerant Connection (L) P200
Gas Line Refrigerant Connection (G)
P71
P125
P140
FIGURE 1 – DIMENSIONS OF VRF HP HEAT PUMP AIR CURTAIN

T9901075-2-3 UK Page 12 of 38
Mitsubishi Electric Compressor Unit
See table below for the VRF System Index Size to be used together with performance
data for the air curtain.
Table 2:
Air Curtain
VRF
system
Index
Size
Air Curtain Parameters
Maximum
Heating
Output
(kW)
Maximum
Cooling
Output
(kW)
Max. Air
Volume Flow
Rate
(m3/h)
Maximum
Noise Level
dB(A) @3m Effective
Width of
Airstream
(m)
AC EC AC EC AC EC AC EC
VRF HP1000 DXE P71 8.3 8.9 7.4 7.8 1310 1590 56 57 1.10
VRF HP1500 DXE P125 13.2 14.3 11.8 12.1 2070 2500 56 57 1.63
VRF HP2000 DXE P140 * 15.7 15.8 14.0 14.1 2590 3200 57 58 2.15
VRF HP2000 DXE (HO) P200 ** 21.0 22.0 16.8 17.1 2590 3200 57 58 2.15
Outputs based on:- Indoor air temperature = 20ºC. Outdoor condition = 7/6 db/wb ºC for heating output,
35/27 db/wb ºC for cooling output. AC = with AC Fans, EC = with EC Fans
Performance figures derived from independent testing by UK test houses BRE and BSRIA in accordance with
test standard EN14511. Noise testing carried out at Sound Research Laboratories to ISO3741 and BS4856-4.
See Table 4-5 on Page 25-26 for more details of air volume flow rates and noise levels.
P71, P125 and P140 Index air curtains have the LEV fitted inside of the air curtain.
* VRF HP2000 DXE P140 with EC Fans has low outlet air temperature at High Speed – not for normal use.
** VRF HP2000 DXE(HO) P200 air curtain has a twin LEV kit that is fitted into the liquid line pipework on site.
Refrigerant Pipework
This must be carried out before connection of any electrical and controls cables
and in accordance with the Instructions that come with the Mitsubishi Electric
City Multi system. This work must only be undertaken by a Mitsubishi Electric
approved Contractor.
Contact Mitsubishi Electric for recommended pipework sizes, pipework lengths,
numbers of fittings, etc.
The installation must be carried out in accordance with the Mitsubishi Electric
Installation Manual that comes with the compressor unit and with reference to the Index
Size of the air curtain (indoor unit).
It is intended that refrigerant pipe connections to the air curtain are made using brazed
joints and these must be carried out in a professional and safe manner. If installation
pipe sizes for the discharge (gas) line and liquid line are different from the pipe
connection sizes on the air curtain (see Figure 1, Page 11), suitable pipe reducers must
be used for the connection. R410A refrigerant systems can operate at pressures up to
610 psi (c. 42 Bar). These brazed joints may well be located in a public area and a
weakness leading to an explosion could be extremely dangerous.
The air curtain with its coil is manufactured in accordance with the Pressure Equipment
Directive (PED) and the installation must be carried out to a good standard of
workmanship. Remove the protective plastic film on top of the air curtain before starting
work and protect the top surface of the air curtain. Use a heat sink on the copper pipes
during brazing to reduce the transfer of heat to the inside of the air curtain where

T9901075-2-3 UK Page 13 of 38
sensitive components are located. Make sure the thermistor (gas) sensor has not been
inserted into its pocket on the gas line pipe at the top of the air curtain before brazing.
Remove it if it has or it will burn and damage when the pipe connection is brazed.
For the City Multi (VRF) R2 and WR2 Series system: pipework from P71 and P125
Index air curtains (see Table 2) must connect to one pair of ports on the Mitsubishi
Electric BC Controller. Do not combine pipework from two or more air curtains together
into one set of pipework and then connect this to one pair of ports.
With P140 index air curtains although a maximum P140 Index is possible from 1 pair of
ports it is recommended that 2 pairs of ports on the BC Controller are used to achieve
the correct output, contact Mitsubishi Electric for advice.
Pipework from P200 Index air curtains (see
Table 2) must go to 2 pairs of ports on the
BC Controller to achieve the correct output.
P200 Index air curtains do not have the
LEV fitted inside the unit but have a twin
LEV kit fitted into the liquid line during
installation:
After brazing all pipe connections and
insulating pipework.
Join the cable plug and socket together at
the LEV actuators and clip the cable along
the liquid line pipe to the air curtain.
Fit the thermistor (gas) sensor bulb into the Hot-Gas pocket on
the refrigerant gas pipe at the top of the air curtain after
brazing all pipe connections. Insulate over the pocket when
insulating the refrigerant pipework. Fit service covers if
necessary.
5m
max P200

T9901075-2-3 UK Page 14 of 38
access panel
screw
To gain access inside the Air Curtain
To gain access for connection of the electrical supply, controls wiring
and to work on the unit during commissioning, remove the air inlet
grilles and the bottom access panel.
First remove the plastic end caps at each end of the unit, if already
fitted, by pulling off to the side (see picture).
Then remove each inlet grille in turn with its filter by unfastening
the quarter-turn Philips Head fastener at the bottom corner of the
grille. Use a Philips No.1 screwdriver to access the screw via the
elongated hole at the bottom corner of each grille and turn anti-
clockwise to remove (see picture).
To remove the bottom access panel unfasten the access panel
securing screws, one at each end, plus two in the centre (VRF
HP1500 DXE and VRF HP2000 DXE units) and slide the panel
out forwards (see picture).
Please note: All the panels of the air curtain are covered in a protective plastic film
which should now be removed.

T9901075-2-3 UK Page 15 of 38
Electrical Supply and Wiring to the Air Curtain
This must be carried out AFTER the connection of the refrigerant pipework. All
electrical wiring and connections MUST be carried out by a competent qualified
electrician in accordance with the latest edition of the IEE wiring regulations
and/or local statutory regulations. (see also Wiring Diagrams 1 to 4)
A local isolator having a contact separation of at least 3mm on all poles must be fitted in
the 1 phase electrical supply (1L + N + E) to the air curtain and located in an accessible
position adjacent to the unit.
If the defrost cycle auxiliary heater is to be used the air curtain then requires a 3 phase
electrical supply (3L + N + E) to the air curtain instead of a 1 phase electrical supply. A
local isolator having a contact separation of at least 3mm on all poles must be fitted in the
3 phase electrical supply and located in an accessible position adjacent to the unit. The
defrost cycle auxiliary heater will need to be enabled during commissioning (see Section
‘Design Information’ – Page 5 and Section ‘Commissioning’ Page 23).
The appliance must be connected using cables having an appropriate temperature rating
(heat resistant).
Ensure that the supply cables, circuit breakers and other electrical installation equipment
are correctly sized for the air curtain being installed. See Table below.
A 25mm size cable gland or conduit connector should be used for the Electrical Supply
into the air curtain. See Figure 1, Page 11 showing where the electrical supply enters the
unit.
This appliance must be Earthed.
Wire in accordance either with 1) or 2) in the Table below:
Air Curtain
1) Unit as supplied - defrost cycle
auxiliary heater is disabled
(230V/1ph/50Hz electrical supply from
separate local isolator)
2) the defrost cycle auxiliary heater is
to be enabled during commissioning
(400V/3ph/50Hz electrical supply from
separate local isolator)
Rated Electrical
Power Input (kW) Rated Current (A) Rated Electrical
Power Input (kW) Rated Current per
phase (A)
AC Fans EC Fans AC Fans EC Fans AC Fans EC Fans AC Fans EC Fans
VRF HP1000 DXE 0.2 0.3 0.8 1.2 4.7 4.8 7.3 7.7
VRF HP1500 DXE 0.3 0.4 1.2 1.6 7.8 7.9 12.1 12.5
VRF HP2000 DXE 0.35 0.45 1.4 1.9 9.35 9.45 14.4 14.9
1) Unit as supplied – defrost cycle auxiliary heater
is disabled, see Wiring Diagram 1 or 3
(230V/1ph/50Hz electrical supply from separate
local isolator)
Connect to terminals Earth, L1 and N with a 1-
phase electrical supply.
Connect a Mitsubishi Electric PAR-31MAA Remote
Controller to terminals 1 and 2 on the air curtain, or
a PAR-U02MEDA to terminals M1 and M2.
Connect the M-Net 2-core cable to terminals M1
and M2 on the air curtain – this is the
communication link between the City Multi system
and the air curtain.

T9901075-2-3 UK Page 16 of 38
2) If the defrost cycle auxiliary heater is to be
enabled during site commissioning, see Wiring
Diagram 2 or 4
(400V/3ph/50Hz electrical supply from separate
local isolator)
Connect to terminals Earth, L1, L2, L3 and N with a
3-phase electrical supply.
Connect a Mitsubishi Electric PAR-31MAA Remote
Controller to terminals 1 and 2 on the air curtain, or
a PAR-U02MEDA to terminals M1 and M2.
Connect the M-Net 2-core cable to terminals M1
and M2 on the air curtain – this is the
communication link between the City Multi system
and the air curtain.
If required the defrost cycle auxiliary heater can be enabled
by disconnecting the neutral wire (violet) from the auxiliary
terminal 14NO on the contactor inside the air curtain. This
wire is then connected onto terminal A2 on the contactor
as shown in the adjacent picture (see also Wiring Diagram 2
or 4).
Recommended wire sizes for electrical connections are as follows:
Electrical Connection Wire Size
1-phase electrical supply from separate local isolator 2.5mm
2
max. for access
3-phase electrical supply from separate local isolator - if the
defrost cycle auxiliary heater is to be enabled 2.5mm2max. for access
Mitsubishi Electric PAR-31MAA or PAR-U02MEDA Remote
Controller (2-core cable) 0.75mm2
Mitsubishi Electric M-Net (2-core cable) 0.75mm
2
Door switch to change fan speeds as door opens and shuts 0.75mm
2

T9901075-2-3 UK Page 17 of 38
230V/1ph/50Hz Electrical Supply
VRF HP1000DXE = 0.8A
VRF HP1500DXE = 1.2A
VRF HP2000DXE = 1.4A
LN
TERMINAL
BLOCK
K1
K1
THERMOSCREENS HEAT PUMP AIR CURTAIN
PAR-31MAA MANUAL
ROOM CONTROLLER
M-NET COMMUNICATION BUS TO CITY
MULTI SYSTEM & PAR-U02MEDA CONTROL
MITSUBISHI HEAT PUMP SYSTEM ERROR
SIGNAL (OUTPUT) Closed Circuit = Error
SITEWIRING
L1
L2
L3
N
1
2
M1
M2
3
A1
A2
D11
D12
Orange
Pink
Black
Pink/Black
Brown
Violet
Blue
White
Brown
Black
Grey
DEFROST CYCLE
AUXILIARY HEATER
Yellow
Red
Black Brown
FILTER
INDICATOR
PCB
ERROR
SIGNAL
OPERATING
SIGNAL
DEFROST
Mitsubishi
Transformer
12V DC DURING OPERATION
0V DURING DEFROST
Red Red
RedBlack
Yellow
Grey
Yellow
Red
Blue
Green/Yellow
Blue
Brown
Violet
LEV
Brown
Brown
MITSUBISHI ELECTRIC
INTERFACE PCB
from PAC-AH...M-G
Black rectangle indicates moveable head of dip switch
Thermistor (Gas) - Sensor fitted on
site in top pocket after brazing
Thermistor (Liquid) - Factory fitted
Thermistor (Inlet Air) - Factory fitted
CONDENSATE ALARM
Open Circuit = Alarm
(Compressor Stops)
Black
White
Red
A
B
FUSE
TERM.
Grey
T 5A
FUSE
LN230v AC electrical power for
condensate pump (if required)
High
Low
Med
Fan
Grey
0
1
2
3
4
5
6
1~
Blue (Neutral)
Brown (High)
Grey
Violet
Orange
Red (Low)
FAN MOTOR 1
0
1
2
3
4
5
6
1~
Blue (Neutral)
Brown (High)
Grey
Violet
Orange
Red (Low)
Green
Orange
Blue
Red
FAN MOTOR 2
(2m unit only)
White
The air curtain is
delivered with the
Defrost Cycle Auxiliary
Heater disabled.
Enable/Disable 'PAR Controller' for ON/OFF
(ENABLE = NO LINK, DISABLE = LINK)
REMOTE ON/OFF, if link is between (A1 - 3)
Pink
Pink
4Defrost Heater
Thermal Trip
(x2 on 2m unit)
12V
230V
High
Low
Med
Fan
Door Open - Higher speed
Door Closed - Lower speed
Door-Switch
2A - AC3, 230v AC
REMOVE
WIRE LINK
CHANGE PCB
DIP SW4 TO
4
Wire in door switch:-
UN-PLUG CONNECTOR CN90 FROM PCB
1
2
3
4
4
12V DC
Relay 12V DC
Relay 12V DC
Relay 12V DC, 1mA
0V
Grey
Black
TOC
TOC
Black
Yellow
Red
Red
Blue
Black
Yellow
WIRING DIAGRAM 1 – VRF HP HEAT PUMP AIR CURTAIN (with AC Fans)
(No Defrost Cycle Heater – unit as supplied)

T9901075-2-3 UK Page 18 of 38
TERMINAL
BLOCK
K1
K1
1m unit 3 x 1.5kW = 4.5kW
1.5m unit 3 x 2.5kW = 7.5kW
2m unit 3 x 3.0kW = 9kW
12V DC
Relay
400V/3ph/50Hz Electrical Supply
for if Defrost Cycle Auxiliary Heater is to
be enabled during site commissioning
VRF HP1000DXE = 7.3A per phase
VRF HP1500DXE = 12.1A per phase
VRF HP2000DXE = 14.4A per phase
PAR-31MAA MANUAL
ROOM CONTROLLER
M-NET COMMUNICATION BUS TO CITY
MULTI SYSTEM & PAR-U02MEDA CONTROL
Enable/Disable 'PAR Controller' for ON/OFF
(ENABLE = NO LINK, DISABLE = LINK)
REMOTE ON/OFF, if link is between (A1 - 3)
MITSUBISHI HEAT PUMP SYSTEM ERROR
SIGNAL (OUTPUT) Closed Circuit = Error
SITEWIRING
L1
L2
L3
N
1
2
M1
M2
3
A1
A2
D11
D12
Pink
Black
Pink/Black
Brown
Violet
Blue
White
L1 L2 L3 N
Brown
Black
Grey
Red
Black Brown
FILTER
INDICATOR
PCB
ERROR
SIGNAL
OPERATING
SIGNAL
DEFROST
Mitsubishi
Transformer
12V DC DURING OPERATION
0V DURING DEFROST
Red Red
Grey
Black
Pink
Yellow
Red
Blue
Green/Yellow
Blue
Brown
Violet
LEV
Brown
Brown
MITSUBISHI ELECTRIC
INTERFACE PCB
from PAC-AH...M-G
Black rectangle indicates moveable head of dip switch
Thermistor (Gas) - Sensor fitted on
site in top pocket after brazing
Thermistor (Liquid) - Factory fitted
Thermistor (Inlet Air) - Factory fitted
CONDENSATE ALARM
Open Circuit = Alarm
(Compressor Stops)
Black
White
Red
A
B
FUSE
TERM.
3-PHASE
CONTACTOR
FOR DEFROST
HEATER
Grey
T 5A
FUSE
LN230v AC electrical power for
condensate pump (if required)
WARNING! 400V on some terminals
High
Low
Med
Fan
Grey
Green
Orange
Blue
Red
Defrost Heater
Thermal Trip
(x2 on 2m unit)
MOVE VIOLET
NEUTRAL WIRE
FROM TERMINAL
14NO TO TERMINAL
A2 FOR DEFROST
HEATER TO WORK
High
Low
Med
Fan
Door Open - Higher speed
Door Closed - Lower speed
Door-Switch
2A - AC3, 230v AC
REMOVE
WIRE LINK
CHANGE PCB
DIP SW4 TO
DEFROST CYCLE
AUXILIARY HEATER
Pink
Orange
Yellow
Yellow
TOC
TOC
4
4
12V
230V
Wire in door switch:-
UN-PLUG CONNECTOR CN90 FROM PCB
1
2
3
4
4
12V DC
Relay 12V DC
Relay 12V DC, 1mA
0V
Red
Black
White
Black
Yellow
Red
Grey
THERMOSCREENS HEAT PUMP AIR CURTAIN
Red
0
1
2
3
4
5
6
1~
Blue (Neutral)
Brown (High)
Grey
Violet
Orange
Red (Low)
FAN MOTOR 1
0
1
2
3
4
5
6
1~
Blue (Neutral)
Brown (High)
Grey
Violet
Orange
Red (Low)
FAN MOTOR 2
(2m unit only)
Yellow
Blue
Black
WIRING DIAGRAM 2 – VRF HP HEAT PUMP AIR CURTAIN (with AC Fans)
(Defrost Cycle Auxiliary Heater enabled on site)

T9901075-2-3 UK Page 19 of 38
230V/1ph/50Hz Electrical Supply
VRF HP1000DXE = 1.2A
VRF HP1500DXE = 1.6A
VRF HP2000DXE = 1.9A
LN
TERMINAL
BLOCK
K1
K1
THERMOSCREENS HEAT PUMP AIR CURTAIN
PAR-31MAA MANUAL
ROOM CONTROLLER
M-NET COMMUNICATION BUS TO CITY
MULTI SYSTEM & PAR-U02MEDA CONTROL
MITSUBISHI HEAT PUMP SYSTEM ERROR
SIGNAL (OUTPUT) Closed Circuit = Error
SITEWIRING
L1
L2
L3
N
1
2
M1
M2
3
A1
A2
D11
D12
Orange
Pink
Black
Pink/Black
Brown
Violet
Blue
White
Brown
Black
Grey
DEFROST CYCLE
AUXILIARY HEATER
Yellow
Red
Black Brown
FILTER
INDICATOR
PCB
ERROR
SIGNAL
OPERATING
SIGNAL
DEFROST
Mitsubishi
Transformer
12V DC DURING OPERATION
0V DURING DEFROST
Red Red
Red
Black
Yellow
Grey
Yellow
Red
Blue
Green/Yellow
Blue
Brown
Violet
LEV
Brown
Brown
MITSUBISHI ELECTRIC
INTERFACE PCB
from PAC-AH...M-G
Black rectangle indicates moveable head of dip switch
Thermistor (Gas) - Sensor fitted on
site in top pocket after brazing
Thermistor (Liquid) - Factory fitted
Thermistor (Inlet Air) - Factory fitted
CONDENSATE ALARM
Open Circuit = Alarm
(Compressor Stops)
Black
White
Red
A
B
FUSE
TERM.
Grey
T 5A
FUSE
LN230v AC electrical power for
condensate pump (if required)
High
Low
Med
Fan
Grey
Green
Orange
Blue
Red
The air curtain is
delivered with the
Defrost Cycle Auxiliary
Heater disabled.
Enable/Disable 'PAR Controller' for ON/OFF
(ENABLE = NO LINK, DISABLE = LINK)
REMOTE ON/OFF, if link is between (A1 - 3)
Pink
Pink
4Defrost Heater
Thermal Trip
(x2 on 2m unit)
12V
230V
High
Low
Med
Fan
Door Open - Higher speed
Door Closed - Lower speed
Door-Switch
2A - AC3, 230v AC
REMOVE
WIRE LINK
CHANGE PCB
DIP SW4 TO
4
Wire in door switch:-
UN-PLUG CONNECTOR CN90 FROM PCB
1
2
3
4
4
12V DC
Relay 12V DC
Relay 12V DC
Relay 12V DC, 1mA
0V
Grey
Black
TOC
TOC
Black
Yellow
Red
Red
White
FAN MOTOR
EC
Blue (Neutral)
Brown
Red
Orange
White
High Med Low
230V AC Relays
123N
CONT
10V GND A/T
HP1000/1500 DXE:- x1
HP2000 DXE:- x2
Speed Adjust
ECDC SPEED
ADJUST PCB
IN
WIRING DIAGRAM 3 – VRF HP HEAT PUMP AIR CURTAIN (with EC Fans)
(No Defrost Cycle Heater – unit as supplied)

T9901075-2-3 UK Page 20 of 38
TERMINAL
BLOCK
K1
K1
1m unit 3 x 1.5kW = 4.5kW
1.5m unit 3 x 2.5kW = 7.5kW
2m unit 3 x 3.0kW = 9kW
12V DC
Relay
400V/3ph/50Hz Electrical Supply
for if Defrost Cycle Auxiliary Heater is to
be enabled during site commissioning
VRF HP1000DXE = 7.7A per phase
VRF HP1500DXE = 12.5A per phase
VRF HP2000DXE = 14.9A per phase
PAR-31MAA MANUAL
ROOM CONTROLLER
M-NET COMMUNICATION BUS TO CITY
MULTI SYSTEM & PAR-U02MEDA CONTROL
Enable/Disable 'PAR Controller' for ON/OFF
(ENABLE = NO LINK, DISABLE = LINK)
REMOTE ON/OFF, if link is between (A1 - 3)
MITSUBISHI HEAT PUMP SYSTEM ERROR
SIGNAL (OUTPUT) Closed Circuit = Error
SITEWIRING
L1
L2
L3
N
1
2
M1
M2
3
A1
A2
D11
D12
Pink
Black
Pink/Black
Brown
Violet
Blue
White
L1 L2 L3 N
Brown
Black
Grey
Red
Black Brown
FILTER
INDICATOR
PCB
ERROR
SIGNAL
OPERATING
SIGNAL
DEFROST
Mitsubishi
Transformer
12V DC DURING OPERATION
0V DURING DEFROST
Red Red
Grey
Black
Pink
Yellow
Red
Blue
Green/Yellow
Blue
Brown
Violet
LEV
Brown
Brown
MITSUBISHI ELECTRIC
INTERFACE PCB
from PAC-AH...M-G
Black rectangle indicates moveable head of dip switch
Thermistor (Gas) - Sensor fitted on
site in top pocket after brazing
Thermistor (Liquid) - Factory fitted
Thermistor (Inlet Air) - Factory fitted
CONDENSATE ALARM
Open Circuit = Alarm
(Compressor Stops)
Black
White
Red
A
B
FUSE
TERM.
3-PHASE
CONTACTOR
FOR DEFROST
HEATER
Grey
T 5A
FUSE
LN230v AC electrical power for
condensate pump (if required)
WARNING! 400V on some terminals
High
Low
Med
Fan
Grey
Green
Orange
Blue
Red
Defrost Heater
Thermal Trip
(x2 on 2m unit)
MOVE VIOLET
NEUTRAL WIRE
FROM TERMINAL
14NO TO TERMINAL
A2 FOR DEFROST
HEATER TO WORK
High
Low
Med
Fan
Door Open - Higher speed
Door Closed - Lower speed
Door-Switch
2A - AC3, 230v AC
REMOVE
WIRE LINK
CHANGE PCB
DIP SW4 TO
DEFROST CYCLE
AUXILIARY HEATER
Pink
Orange
Yellow
Yellow
TOC
TOC
4
4
12V
230V
Wire in door switch:-
UN-PLUG CONNECTOR CN90 FROM PCB
1
2
3
4
4
12V DC
Relay 12V DC
Relay 12V DC, 1mA
0V
Red
Black
Black
Yellow
Red
Grey
THERMOSCREENS HEAT PUMP AIR CURTAIN
Red
White
FAN MOTOR
EC
Blue (Neutral)
Brown
Red
Orange
White
High Med Low
230V AC Relays
12
3N
CONT
10V GND A/T
HP1000/1500 DXE:- x1
HP2000 DXE:- x2
Speed Adjust
ECDC SPEED
ADJUST PCB
IN
WIRING DIAGRAM 4 – VRF HP HEAT PUMP AIR CURTAIN (with EC Fans)
(Defrost Cycle Auxiliary Heater enabled on site)
Table of contents
Other Mitsubishi Electric Heater manuals

Mitsubishi Electric
Mitsubishi Electric GK-2509YS2-CE User manual

Mitsubishi Electric
Mitsubishi Electric PAC-646BH-E User manual

Mitsubishi Electric
Mitsubishi Electric PAC-IH03V-E User manual

Mitsubishi Electric
Mitsubishi Electric CITY-MULTI PAC-PH01EHY-E User manual

Mitsubishi Electric
Mitsubishi Electric PAC-IH03V2-E User manual