MITSUI Kulzer Technotray POWER User manual

Bedienungsanleitung
Operating manual • Mode d’emploi • Manuale d’uso •
Manual de instrucciones
Materialography
Technotray®POWER
Light-curing unit

2
Technotray®POWER
Lichtpolymerisationsgerät
Standardbetrieb mit 4 Röhren
12
3
5 6
4

3
4. Netzschalter an der Rückseite des Gerätes betätigen,
[2] so werden Lampen und Timer in Stand-by-Betrieb
gesetzt (Netzschalter leuchtet bei eingeschaltetem
Gerät grün).
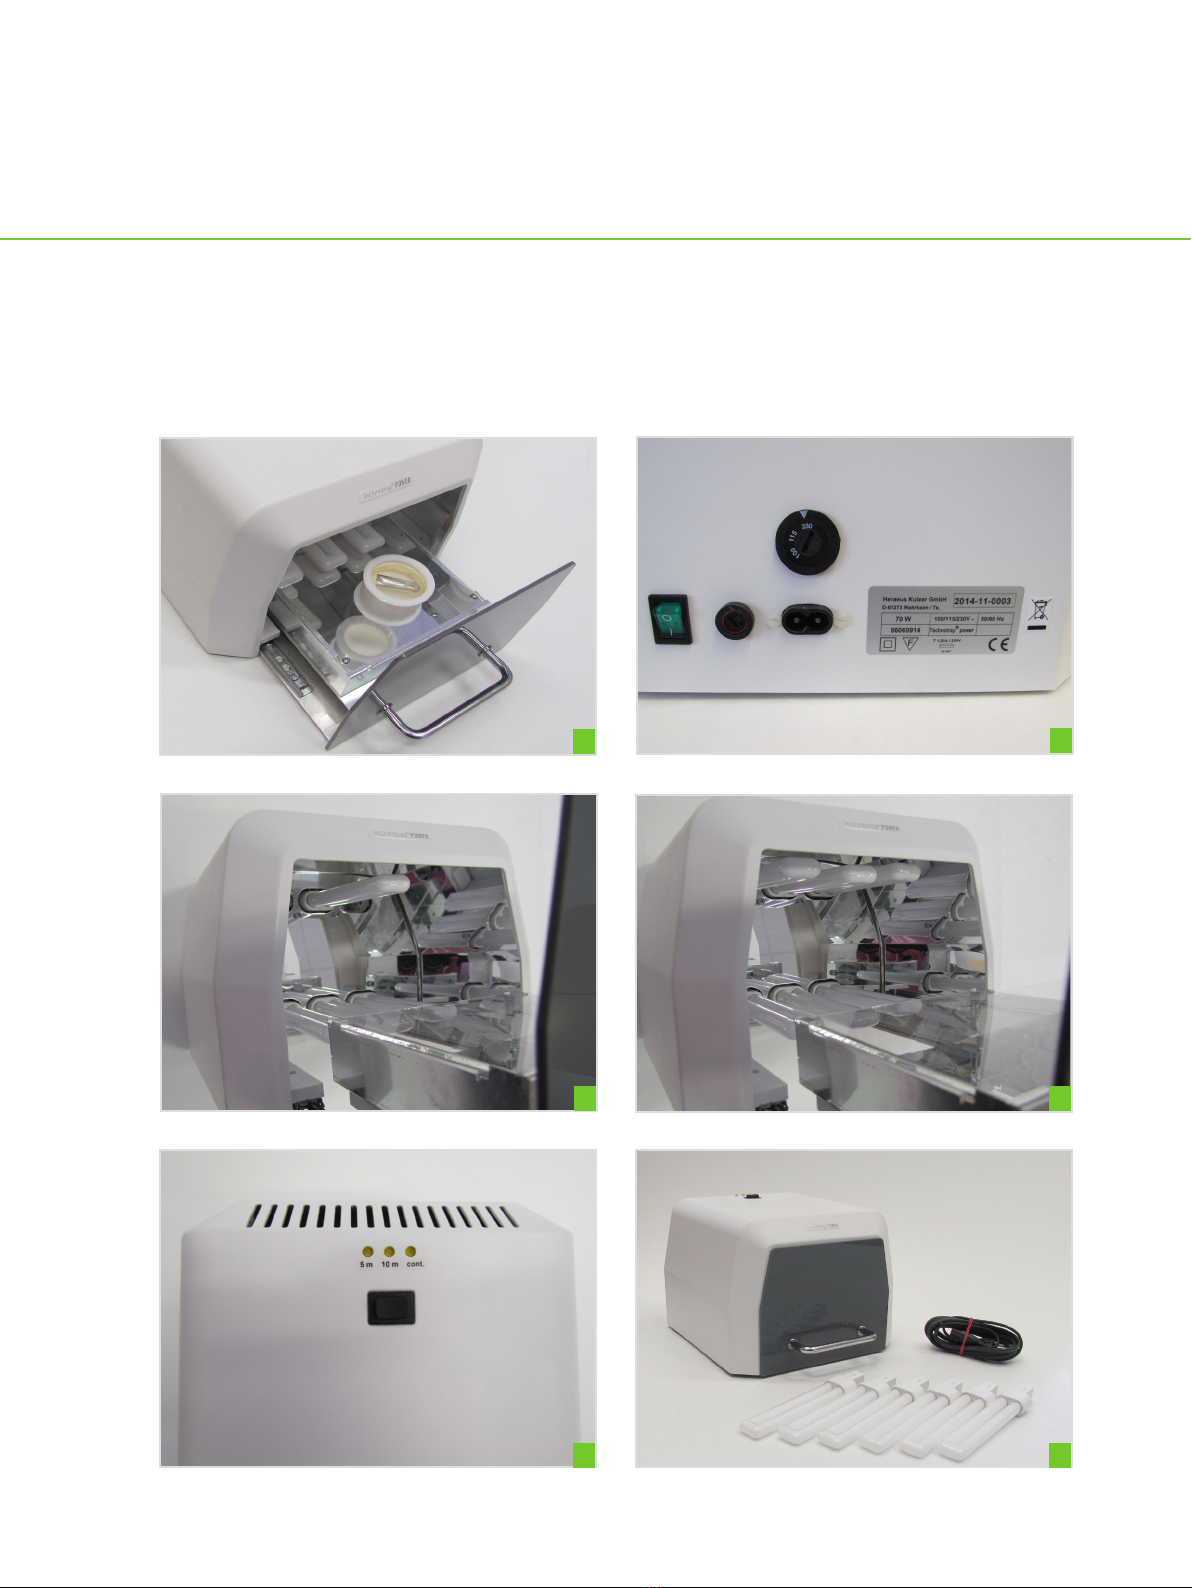
5. Öffnen des Polymerisationsraumes durch Herausziehen
des Polymerisationstrays. [1].
6. Einstellen der Bestrahlungszeit durch Betätigen der
Taste der Zeitschaltuhr auf dem hinteren Teil des Ge-
rätegehäuses (1 x drücken = 5 min, 2 x drücken = 10
min, 3 x drücken = Dauerbetrieb). [5]
7. Polymerisationstray wieder komplett ins Gerätegehäu-
se einschieben. Eingestellte Polymerisationszeit wird
automatisch mit verschließen des Trays gestartet. Beim
Öffnen des Trays während des Betriebes, wird das Ge-
rät automatisch ausgeschaltet. Sobald das Tray wieder
geschlossen wird startet die eingestellte Bestrahlungs-
zeit von neuem.
Polymerisation
1. Netzschalter an der Rückseite des Gerätes betätigen
[2], so werden Lampen und Timer in Stand-by-Betrieb
gesetzt (Netzschalter leuchtet bei eingeschaltetem
Gerät grün).
2. Öffnen des Polymerisationsraumes durch Herausziehen
des Polymerisationstrays. [1]
3. Probe auf dem Glasboden des Trays platzieren.
4. Einstellen der Bestrahlungszeit durch Betätigen der
Taste der Zeitschaltuhr auf dem hinteren Teil des Ge-
rätegehäuses (1 x tasten = 5 min, 2 x tasten = 10 min,
3 x tasten = Dauerbetrieb). [5]
5. Polymerisationstray schließen.
Das Technotray POWER startet automatisch die einges-
tellte Polymerisationszeit sobald das Polymerisationstray
geschlossen wird. Wird das Tray während der laufenden
Polymerisationszeit geöffnet, schalten die Lampen auto-
matisch ab. Die Lampen werden wieder eingeschaltet und
Zur Polymerisation lichthärtender
Kulzer Kunststoffe
Das Technotray POWER Lichtpolymerisationsgerät ist spe-
ziell für die Polymerisation der lichthärtenden Kulzer Kunst-
stoffe (z. B. Technovit 2000 LC oder Colorit) konzipiert.
Ausgestattet mit maximal 6 Blaulichtröhren à 9 Watt ist
das Technotray POWER ein leistungsstarkes Lichtpolyme-
risationsgerät, das eine schnelle, intensive und homogene
Polymerisation gewährleistet.
Die Blaulichtlampen garantieren eine zuverlässige Polyme-
risation bei:
• transparenten Technovit Kunststoffen in Schichten bis
30 mm.
• Colorit Basic-Farben bis 0,8 mm und Colorit Deep-
Farben bis 0,2 mm Schichtstärke.
Mit Ausnahme der Colorit Farbe YELLOW: hier ist die
max. Schichtstärke bei den Deep-Farben bis 0,8 mm
und bei Basic bis 0,2 mm.
Mit Innenabmessungen von BxTxH 170 x 160 x 120 mm
verfügt das Gerät über einen großzügigen und homogen
ausgeleuchteten Polymerisationsraum, der bei Ø = 50 mm
bis zu 4 Stück und Ø = 25 mm bis zu 9 Stück Einbett-
formen Platz bietet [4].
Inbetriebnahme
1. Prüfen, ob die Netzspannung mit der laut Typenschild
erforderlichen Nennspannung übereinstimmt. Ggfs.
Gerät auf die vorhandene Netzspannung mittels Wahl-
schalter an der Geräterückseite anpassen [2].
2. Je nach Anwendungsbereich kann das Gerät wahlweise
mit 4 oder 6 Leuchtstoffröhren ausgestattet werden
(siehe Punkt Polymerisation).
• Belegung mit 4 Leuchtstoffröhren: 3 x unten / 1 x
oben (Mitte). [3]
• Belegung mit 6 Leuchtstoffröhren: 3 x unten / 3 x
oben. [4]
a. Polymerisationstray soweit wie möglich
herausziehen. [1]
b. Lampen in die Stecksockel einstecken bis diese
hörbar einrasten. [3]
c. Polymerisationstray wieder schließen.
3. Netzanschluss herstellen. Netzkabel liegt bei.
DEUTSCH

4
Polymerisationsbeispiel Colorit
Schmuckfarben
Standardpolymerisation (Zeit: 2 x 5 min) im Technotray
POWER Gerät
Für ein gleichmäßiges Aushärten der Colorit Schmuckfar-
ben und eine homogene Lichtausleuchtung werden alle 6
Lampen benötigt.
Colorierte/s Schmuckstück/Schmuckstücke auf dem
Polymerisationstray positionieren. Timer auf 5 min einstel-
len und Tray schließen. Nach Ablauf der Polymerisations-
zeit Vorgang wiederholen. Nach Ablauf von 2 x 5 min kann
das Schmuckstück/die Schmuckstücke entnommen und
wie gewünscht weiter bearbeitet werden.
Technotray®POWER
Lichtpolymerisationsgerät
die voreingestellte Polymerisationszeit startet von neuem,
sobald das Tray wieder geschlossen wird. Die eingestellte
Polymerisationszeit ist abgelaufen, wenn sich die Lampen
automatisch abschalten.
Polymerisationsbeispiele
Technovit 2000 LC System
Standardpolymerisation mit Abdecklack (Zeit: 2 x 10 min)
im Technotray POWER
Das Einbetten der Proben erfolgt in halbtransparenten
PE-Einbettformen. Zum Positionieren der Proben kann die
Technovit 2000 LC Fixierpaste verwendet werden.
Anschließend die Einbettform mit Technovit 2000 LC bis
ca. 5 mm unter den Rand aufgießen und auf dem Polyme-
risationstray des Technotray POWER positionieren. Timer
auf 10 min einstellen und Tray schließen. Nach Ablauf
des Polymerisationszyklus ca. 3 mm Technovit 2000 LC
Abdecklack aufgießen. Dieser dient zur Vermeidung der
Dispersionsschicht auf der Probenrückseite. Anschließend
weiteren Polymerisationszyklus von 10 min starten. Nach
Ablauf der Polymerisationszeit Probe entnehmen, abkühlen
lassen und danach ausbetten.
Polymerisation in Schichten (Zeit: Zyklen à 5 min) im
Technotray POWER
Durch Arbeiten in mehreren Schichten kann die Polymeri-
sationstemperatur deutlich gesenkt werden. Das Einbetten
der Proben erfolgt in halbtransparenten PE-Einbettformen.
Zum Positionieren der Proben kann die Technovit 2000 LC
Fixierpaste verwendet werden.
Anschließend die Einbettform ca. 2 - 3 mm mit Technovit
2000 LC aufgießen und auf dem Polymerisationstray des
Technotray POWER positionieren und 5 min polymerisie-
ren. Danach die Probe abkühlen lassen und den Vorgang
so oft wiederholen bis die Probe ausreichend mit Technovit
2000 LC umschlossen ist.
Folgende Mengen an Einbett-
formen können gleichzeitig
ausgehärtet werden
Ø 50 mm = 4 Stück Ø 30 mm = 9 Stück
Ø 40 mm = 5 Stück Ø 25 mm = 9 Stück
Polymerisationstemperaturen
40er Form ohne Probe voll aufgegossen:
max. 120 °C
40er Form schichtweise gegossen (2 mm):
Bestrahlung 5 min: 70 – 90 °C

5
• Hochwertige Aluminiumreektoren
• Standzeit der Lampen: ca. 1.000 Betriebsstunden
bzw. ca. 20.000 Schaltungen
• Gehäusefarbe: weiß/grau
• Abmessungen: LxBxH 270x240x170 mm
• Gewicht: ca. 3 kg
Technische Änderungen vorbehalten.
Liefereinheit
Gerät, sowie lose beigepackt [6]:
• Leuchtstoffröhren, 6 St.
• Netzkabel
• Gebrauchsinformation
Haftungsausschluss
Für andere, von der Bedienungsanleitung abweichende
Verwendungen, sowie bei eigenmächtigen
Veränderungen, wird von Seiten des Herstellers keine
Haftung übernommen.
Kulzer GmbH
Division Technik
Philipp-Reis-Straße 8/13
61273 Wehrheim
Tel. 06181-9689-2571 oder 2574
technik.wehrheim@kulzer-dental.com
www.kulzer-technik.de
Lampenwechsel
Es ist empfehlenswert, die Lampen (OSRAM Dulux S9
W/71-blue) des Gerätes einmal jährlich bzw. nach 1000
Betriebsstunden oder 20000 Arbeitszyklen auszuwech-
seln.
Achtung: Lampenwechsel nur bei kaltem Gerät vornehmen!
Bitte folgende Reihenfolge beachten:
1. Gerät an der Geräterückseite ausschalten.
2. Netzstecker ziehen!
3. Polymerisationstray soweit herausziehen bis die Lam-
pen komplett zugänglich sind.
4. Zuerst die Lampen der unteren Reihe, dann die Lam-
pen der oberen Reihe aus der Fassung ziehen.
5. In umgekehrter Reihenfolge neue Lampen wieder in die
Stecksockel einstecken.
6. Verbindung zum Netzstrom wieder herstellen und Gerät
an der Geräterückseite wieder einschalten.
Wartungshinweis
Reinigung nur bei gezogenem Netzstecker!
Das Gerät kann mit einem feuchten Tuch gereinigt werden.
Dabei darf keine Flüssigkeit in das Gerät gelangen. Aggres-
sive Reinigungs- oder Lösemittel dürfen nicht verwendet
werden. Ersatzsicherungen können im Fachhandel bezo-
gen werden.
Technische Daten
• Netzspannung: 230 Volt, 50 Hz
• Leistung: max. ca. 60 Watt
• 6 Leuchtstoffröhren à 9 Watt
• Lampentyp: Blaulicht-Lampen
• Zeitschalter mit 3 Zeiteinstellungen: 5 Minuten, 10
Minuten sowie Dauerbetrieb
• Innenraumabmessungen: BxTxH 170x160x120 mm
• Autostart beim Einschieben der Schublade
DEUTSCH
Zur Polymerisation lichthärtender
Kulzer Kunststoffe

6
Technotray®POWER
Light curing device
Standard mode with 4 bulbs
12
3
5 6
4

7
DEUTSCH
3. Connect the device to the mains power. Power cord is
included.
4. Press the power switch on the back of the device,
which activates the lights and the timer in standby
mode (the power switch will light up green when the
device is switched on).
5. To open the curing chamber, pull out the light curing
tray [1].
6. Select the curing time by pressing the timer button on
the back of the device’s housing (pressing the button
1 x = 5 min, pressing it 2 x = 10 min, pressing it 3 x =
continuous operation) [5].
7. Fully push the curing tray back into the device again.
On closing the device’s door, it will automatically start
the curing process for the selected time. The device
automatically switches off if the tray is opened during
operation. As soon as the tray is closed again, it will
start the curing process anew for the selected time.
Curing
1. Press the power switch on the back of the device,
which activates the lights and the timer in standby
mode (the power switch will light up green when the
device is switched on).
2. To open the curing chamber, pull out the light curing
tray [1].
3. Place the sample onto the glass base of the tray
4. Select the curing time by pressing the timer button on
the back of the device’s housing (pressing the button
1 x = 5 min, pressing it 2 x = 10 min, pressing it 3 x =
continuous operation) [5].
5. Close the curing tray
for polymerization of light-curing
Kulzer resins
The Technotray POWER light curing device has been es-
pecially developed for polymerization of light-curing Kulzer
resins (e.g. Technovit 2000 LC and Colorit).
The Technotray POWER can be equipped with up to 6 blue
light tubes with 9 Watt each and is a high performance
light-curing device that guarantees a rapid, intensive and
homogeneous polymerisation.
The blue lights reliably cure layers of
• transparent Technovit resins with a thickness of up to
30 mm.
• Basic Colorit colours up to 0.8 mm and Deep Colorit
colours with a layer thickness of up to 0.2 mm. With
the exception of Colorit YELLOW, Technotray POWER
reliably cures all Deep colours with a layer thickness
of up to 0.8 mm and all Basic colours with a layer
thickness of up to 0.2 mm.
The device’s internal dimensions of WxDxH 170 x 160 x
120 mm allow for a spacious and homogeneously illumi-
nated curing chamber, which can hold up to 4 Ø = 50 mm
and up to 9 Ø = 25 mm embedding moulds [4].
Starting your Technotray POWER for
the rst time
1. Check whether your mains voltage matches the re-
quired nominal voltage specied on the device’s type
plate. If necessary, set the device to the relevant mains
voltage using the selector switch on the back [2].
2. Depending on the area of application, the device can be
operated with either 4 or 6 light tubes (see “Curing” for
more information).
• Operation with 4 light tubes: 3 x lower sockets /
1 x upper sockets (middle) [3].
• Operation with 6 light tubes: 3 x lower sockets /
3 x upper sockets [4].
a. Pull out the light curing tray as far as possible.[1]
b. Insert the light tubes into the light sockets until they
engage and you can hear a click [3].
c. Close the light curing tray again.
ENGLISH

8
Curing example for Colorit decorative
resins
Standard curing process (Duration: 2 x 5 min) with the
Technotray POWER device
Colorit decorative resins have to be cured using all 6 light
tubes to ensure even polymerisation and homogeneous
exposure to the curing light.
Place the coloured decorative item/items onto the curing
tray. Set the timer to 5 min and close the tray. Once the
curing time has elapsed, repeat the process. Once the
decorative item/items have been cured for 2 x 5 min, they
can be removed and processed as required.
Technotray®POWER
Light curing device
The Technotray POWER will automatically start the curing
process for the selected time as soon as the curing tray
has been closed. The lights will automatically switch off
if the tray is opened while curing is in procress, and start
up anew for the selected curing time as soon as the tray is
closed again. The lights automatically switch off when the
set curing time has elapsed.
Curing examples
Technovit 2000 LC
Standard Curing samples with covering varnish (Duration:
2 x 10 min) with the Technotray POWER
Place the sample inside a semi-transparent PE embedding
mould. If required, the sample can be held in place with
Technovit 2000 LC xing paste.
Now ll the embedding mould with Technovit 2000 LC up
to about 5 mm below the mould’s top edge and place it on
the Technotray POWER’s curing tray. Set the timer to 10
min and close the tray. Once this curing cycle has elapsed,
cover the sample with approx. 3 mm of Technovit 2000
LC covering varnish. This varnish will prevent a dispersion
layer from forming on the bottom of the sample. Next,
continue curing the sample for another 10 min.
Once the curing time has elapsed, remove the sample,
leave to cool and then remove it from the mould.
Curing in layers (Duration: 5 min cycles) with the Tech-
notray POWER
Embedding samples on a layer-by-layer basis will allow you
to use signicantly lower curing temperatures. Place the
sample inside a semi-transparent PE embedding mould. If
required, the sample can be held in place with Technovit
2000 LC xing paste.
Now ll the embedding mould with approx. 2 - 3 mm Tech-
novit 2000 LC, place it on the Technotray POWER’s curing
tray and cure for 5 min. Next, leave the sample to cool and
then repeat this process until the sample is adequately
embedded in Technovit 2000 LC.
The Technotray POWER can be
used to simultaneously cure the
following number of embedding
moulds:
Ø 50 mm = 4 moulds; Ø 30 mm = 9 moulds
Ø 40 mm = 5 moulds; Ø 25 mm = 9 moulds
Curing temperatures
40 mm mould without sample completely lled:
max. 120 °C
40 mm mould cured in individual layers (2 mm):
5 min exposure: 70 – 90 °C

9
• Timer with 3 time settings: 5 minutes, 10 minutes and
continuous operation
• Internal dimensions: WxDxH 170 x 160 x 120 mm
• Starts automatically when the tray is closed
• High-quality aluminium reectors
• Light tube service life: approx. 1,000 operating hours
or 20,000 cycles
• Housing colour: white/grey
• Dimensions: LxWxH 270 x 240 x 170 mm
• Weight: approx. 3 kg
Subject to technical changes.
Package contents
Device and enclosed loosely [6]:
• 6 x light tubes
• Power cord
• Operating manual
Disclaimer
We do not accept any liability for any use of the device
other than specied in the operating manual or
following unauthorised modications.
Kulzer GmbH
Division Technik
Philipp-Reis-Straße 8/13
61273 Wehrheim
Tel. 06181-9689-2571 or 2574
technik.wehrheim@kulzer-dental.com
www.kulzer-technik.de
Changing the light tubes
We recommend changing the device’s light tubes (OSRAM
Dulux S9 W/71-blue) once a year or after 1000 operating
hours or 20000 curing cycles.
Caution: Only change the light tubes when the device is
cool!
To change the lights, perform the following actions in the
order stated:
1. Switch off the device at the switch on the back.
2. Disconnect the mains plug.
3. Pull out the light curing tray as far as the lamps are
completely accessible.
4. Next, start by removing the light tubes from the bottom
row from their sockets, and then the light tubes from
the top row.
5. Now insert the new light tubes into the sockets in
reverse order.
6. Reconnect the mains power plug and switch the device
on again on the rear of the unit.
Cleaning the device
Always remove the mains plug before cleaning the device!
The device must only be cleaned using a damp cloth.
When doing so, always make sure that no uids get into
the device. Do not use any aggressive cleaning agents or
solvents.
Spare fuses can be obtained from specialist dealers.
Technical data
• Mains voltage: 230 Volt, 50 Hz
• Output: max. approx. 60 watt
• 6 light tubes with 9 watt each
• Type of lamp: Blue light tubes
ENGLISH
for polymerization of light-curing
Kulzer resins

10
Technotray®POWER
Appareil de photopolymérisation
Fonctionnement standard avec 4 tubes
12
3
5 6
4

11
FRANÇAIS
3. Brancher l‘appareil. Le câble d‘alimentation est livré
avec l‘appareil.
4. Activer l‘interrupteur à l‘arrière de l‘appareil [2], les
lampes et une minuterie passent en mode veille
(l‘interrupteur émet une lumière verte lorsque l‘appareil
est sous tension).
5. Ouverture de l‘espace de polymérisation par retrait du
tiroir de polymérisation. [1]
6. Réglage de la durée d‘irradiation en conrmant la
touche de la minuterie située à l‘arrière du boîtier de
l‘appareil (1 x pression = 5 min. 2 x pressions = 10
min., 3 x pressions = fonctionnement continu). [5]
7. Insérer complètement le tiroir de polymérisation dans
le boîtier de l‘appareil. La durée de polymérisation
paramétrée débute automatiquement avec la fermeture
du tiroir. En cas d‘ouverture du tiroir pendant le fonc-
tionnement, l‘appareil se met automatiquement hors
service. Dès que le tiroir est à nouveau fermé, la durée
d‘irradiation paramétrée débute à nouveau.
Polymérisation
1. En activant l‘interrupteur à l‘arrière de l‘appareil [2],
les lampes et la minuterie passent en mode veille
(l‘interrupteur émet une lumière verte lorsque l‘appareil
est sous tension).
2. Ouverture de l‘espace de polymérisation par retrait du
tiroir de polymérisation. [1]
3. Placer l‘échantillon sur le fond en verre du tiroir.
4. Réglage de la durée d‘irradiation en conrmant la
touche de la minuterie située à l‘arrière du boîtier de
l‘appareil (1 x pression = 5 min. 2 x pressions = 10
min., 3 x pressions = fonctionnement continu). [5]
5. Fermer le tiroir de polymérisation.
Matières résines Kulzer
pour photopolymérisation
L‘appareil de photopolymérisation Technotray POWER est
spécialement conçu pour la polymérisation des matières
résines Kulzer durcissant à la lumière (par exemple Tech-
novit 2000 LC ou Colorit). Équipé avec au maximum 6
tubes de lumière bleue de 9 watts, le Technotray POWER
est un puissant appareil de photopolymérisation, qui garan-
tit une polymérisation rapide, intensive et homogène.
Les lampes de lumière bleue garantissent une polymérisa-
tion able pour les
• matières résines Technovit transparentes par couches
allant jusqu‘à 30 mm.
• Couleurs Colorit Basic jusqu‘à 0,8 mm et couleurs
Colorit Deep jusqu‘à une épaisseur de couche de 0,2
mm. Une exception : la couleur YELLOW de Colorit.
Pour cette couleur, l‘épaisseur maximum de la couche
pour les couleurs Deep est de 0,8 mm et pour les
Basic de jusqu‘à 0,2 mm.
Avec des dimensions intérieures de LxPxH 170 x 160 x
120 mm, l‘appareil possède une large chambre de poly-
mérisation à éclairage homogène qui offre assez de place
pour Ø = 50 mm jusqu‘à 4 moules et Ø = 25 mm jusqu‘à
9 moules d´enrobage [4].
Mise en service
1. Vériez que la tension électrique correspond à la
tension électrique indiquée sur la plaque signalétique.
Le cas échéant, sélectionnez la tension électrique avec
l‘interrupteur situé à l‘arrière de l‘appareil [2].
2. Selon le domaine d‘application, l‘appareil peut être
équipé de 4 ou 6 tubes lumineux (voir point polyméri-
sation).
• Équipement avec 4 tubes lumineux : 3 x en bas /
1 x en haut (milieu). [3]
• Équipement avec 6 tubes lumineux : 3 x en bas /
3 x en haut. [4]
a. Tirer le tiroir de polymérisation aussi loin que
possible. [1]
b. Placer les lampes dans le socle de branchement
jusqu`à entendre un déclic. [3]
c. Refermer le tiroir de polymérisation.

12
Exemple de polymérisation couleurs de
décoration Colorit
Polymérisation standard (durée : 2 x 5 min) dans l‘appareil
Technotray POWER
Toutes les 6 lampes sont nécessaires pour un durcisse-
ment uniforme des couleurs de décoration Colorit et pour
un éclairage homogène.
Positionner l‘objet/ les objets à décorer et coloré(s) sur le
tiroir de polymérisation. Régler la minuterie sur 5 min. et
fermer le tiroir. Une fois la durée de polymérisation écou-
lée, répéter l‘opération. Après 2 x 5 min, l‘objet/ les objets
à décorer peuvent être retirés et traités comme souhaité.
Technotray®POWER
Appareil de photopolymérisation
La durée de polymérisation paramétrée du Technotray
POWER débute automatiquement dès la fermeture du tiroir
de polymérisation. En cas d‘ouverture du tiroir pendant la
durée de polymérisation, les lampes s‘éteignent automa-
tiquement. Les lampes s‘allument à nouveau et la durée de
polymérisation paramétrée débute à nouveau dès que le
tiroir est à nouveau fermé. La durée de polymérisation est
écoulée lors de l‘extinction automatique des lampes.
Exemples de polymérisation
Système Technovit 2000 LC
Polymérisation standard avec vernis (durée : 2 x 10 min)
dans le Technotray POWER
L‘enrobage des échantillons intervient dans des moules
d‘enrobage en PE semi-transparents. Il est possible
d‘utiliser de la pâte à xer Technovit 2000 LC pour positi-
onner les échantillons.
Remplir ensuite le moule d‘enrobage avec le Technovit
2000 LC jusqu‘à env. 5 cm sous le bord et le positionner
sur le tiroir de polymérisation du Technotray POWER.
Régler la minuterie sur 10 min. et fermer le tiroir. A la n
du cycle de polymérisation, appliquer env. 3 mm de vernis
Technovit 2000 LC an d‘éviter une couche de dispersion
sur le côté arrière de l‘échantillon. Débuter ensuite l‘autre
cycle de polymérisation de 10 min. Une fois la durée de
polymérisation écoulée, retirer l‘échantillon, le laisser
sécher et le démouler.
Polymérisation par couches (durée cycles à 5 min) dans le
Technotray POWER
Un travail en plusieurs couches permet une baisse con-
sidérable de la température de polymérisation. L‘enrobage
des échantillons intervient dans des moules d‘enrobage en
PE semi-transparents. Il est possible d‘utiliser de la pâte
à xer Technovit 2000 LC pour positionner les échantillons.
Verser ensuite 2-3 mm de Technovit 2000 LC dans le mou-
le d‘enrobage et le positionner sur le tiroir de polymérisa-
tion du Technotray POWER et polymériser pendant 5 min.
Laisser refroidir l‘échantillon et répéter l‘opération aussi
souvent jusqu‘à ce que l‘échantillon soit sufsamment
enrobé de Technovit 2000 LC.
Les quantités suivantes de moules
d‘enrobage peuvent être durcies
simultanément
Ø 50 mm = 4 pièces Ø 30 mm = 9 pièces
Ø 40 mm = 5 pièces Ø 25 mm = 9 pièces
Températures de polymérisation
Moule de Ø 40 mm sans échantillon rempli entière-
ment :
max. 120 °C
Moule de Ø 40 mm versé par couches (2 mm) :
Irradiation 5 min. 70 – 90 °C

13
FRANÇAIS
• Type de lampe : Lampes à lumière bleue
• Minuterie avec 3 réglages de durée : 5 minutes, 10
minutes ainsi que fonctionnement continu
• Dimensions chambre intérieure : LxPxH 170 x 160 x
120 mm
• Démarrage automatique lors de l‘insertion du tiroir
• Réecteurs en aluminium de haute qualité
• Durée d‘utilisation des lampes : env. 1 000 heures de
fonctionnement ou env. 20 000 allumages
• Coloris du boîtier : blanc/gris
• Dimensions : LxPxH 270 x 240 x 170 mm
• Poids : env. 3 kg
Sous réserve de modications techniques.
Livraison
Appareil, ainsi qu‘accessoires [6] :
• Tubes lumineux, 6 pcs
• Câble d‘alimentation
• Informations d‘utilisation
Clause de non-responsabilité
Le fabricant n‘assume aucune responsabilité pour d‘autres
utilisations différant de celles du mode d‘emploi ainsi
qu‘en cas de modications apportées sans l‘agrément du
fabricant.
Kulzer GmbH
Division Technik
Philipp-Reis-Straße 8/13
61273 Wehrheim
Tel. 06181-9689-2571 or 2574
technik.wehrheim@kulzer-dental.com
www.kulzer-technik.de
Changement de lampe
Il est préférable de changer les lampes (OSRAM Dulux S9
W/71-blue) de l‘appareil une fois par an ou après 1 000
heures d‘utilisation ou après 20 000 cycles de fonctionne-
ment.
Attention : Procéder à un changement de lampe unique-
ment lorsque l‘appareil est refroidi !
Veiller à procéder dans l‘ordre suivant :
1. Mettre l‘appareil hors service en activant l‘interrupteur
situé à l‘arrière de l‘appareil.
2. Retirer la prise !
3. Retirer le tiroir de polymérisation jusqu‘à ce que les
lampes soient entièrement accessibles.
4. Retirer d‘abord les lampes situées en bas, puis les
lampes situées en haut.
5. Réinsérer les nouvelles lampes dans le socle de bran-
chement dans l‘ordre inverse.
6. Rétablir l‘alimentation électrique et brancher à nouveau
l‘appareil en activant l‘interrupteur situé à l‘arrière.
Conseils d‘entretien
Nettoyer l‘appareil uniquement lorsqu‘il est débranché !
L‘appareil peut être nettoyé avec un chiffon humide.
Aucun liquide ne doit pas pénétrer dans l‘appareil. Ne pas
utiliser des produits de nettoyage ou de solvants agressifs.
Les fusibles de rechange peuvent être achetés dans un
magasin spécialisé.
Données technique
• Alimentation : 230 volts, 50 Hz
• Puissance : max. env. 60 watts
• 6 tubes lumineux à 9 watts
Matières résines Kulzer
pour photopolymérisation

14
Technotray®POWER
Fotopolimerizzatore
Modalità standard a 4 tubi
12
3
5 6
4

15
ITALIANO
3. Effettuare il collegamento di rete. Il cavo di rete è
fornito in dotazione.
4. Azionare l’interruttore di rete sul retro del dispositivo
[2], in tal modo le lampade e il timer verranno messi
in modalità stand-by (l’interruttore di rete si illumina in
verde col dispositivo attivato).
5. Aprire il vano di polimerizzazione estraendo il vassoio di
polimerizzazione. [1]
6. Impostare il tempo di irradiazione azionando il tasto del
temporizzatore sulla parte posteriore del corpo del dis-
positivo (1 x pressione = 5 min, 2 x pressioni = 10 min,
3 x pressioni = funzionamento continuo). [5]
7. Inserire nuovamente e completamente il vassoio di
polimerizzazione all’interno del dispositivo. Il tempo di
polimerizzazione impostato viene avviato automatica-
mente alla chiusura del vassoio. All’apertura del vassoio
durante il funzionamento, il dispositivo viene auto-
maticamente disattivato. Non appena il vassoio viene
nuovamente chiuso, il tempo di irradiazione impostato
parte nuovamente.
Polimerizzazione
1. Azionare l’interruttore di rete sul retro del dispositivo
[2], in tal modo le lampade e il timer verranno messi
in modalità stand-by (l’interruttore di rete si illumina in
verde col dispositivo attivato).
2. Aprire il vano di polimerizzazione estraendo il vassoio di
polimerizzazione. [1]
3. Posizionare il campione sul ripiano in vetro del vassoio.
4. Impostare il tempo di irradiazione azionando il tasto del
temporizzatore sulla parte posteriore del corpo del dis-
positivo (1 x pressione = 5 min, 2 x pressioni = 10 min,
3x pressioni = funzionamento continuo). [5]
5. Chiudere il vassoio di polimerizzazione.
Per la polimerizzazione di resine
Kulzer fotoindurenti
Il fotopolimerizzatore Technotray POWER è stato progettato
appositamente per la polimerizzazione di resine Kulzer
fotoindurenti (ad es. Technovit 2000 LC o Colorit).
Technotray POWER è dotato di 6 neon a luce blu da 9 watt
ed è un potente fotopolimerizzatore che garantisce una
polimerizzazione rapida, intensa e omogenea.
Le lampade a luce blu garantiscono una polimerizzazione
afdabile delle
• resine trasparenti Technovit in strati no a 30 mm.
• Colori Colorit Basic con spessore dello strato no a
0,8 mm e colori Colorit Deep no con spessore dello
strato no a 0,2 mm. Ad eccezione del colore Colorit
GIALLO. Qui il max. spessore dello strato per i colori
Deep è no a 0,8 mm e per i colori Basic no a 0,2
mm.
Con dimensioni interne di Lagh. x Pr . x Alt. 170 x 160 x
120 mm il fotopolimerizzatore dispone di un ampio vano
di polimerizzazione con illuminazione omogenea che offre
spazio per 4 muffole da Ø = 50 mm e no a 9 muffole con
Ø = 25 mm [4].
Messa in servizio
1. Controllare se la tensione di rete corrisponde a quella
indicata sulla targhetta. Eventualmente adattare il dis-
positivo alla tensione di rete presente tramite il selettore
sul retro del dispositivo stesso. [2]
2. In base all’ambito di utilizzo, il dispositivo può essere
dotato a scelta di 4 o 6 neon luminosi (vedere il punto
relativo alla polimerizzazione).
• Disposizione in caso di 4 neon 3 x sotto / 1 x sopra
(centro). [3]
• Disposizione in caso di 6 neon: 3 x sotto / 3 x sopra.
[4]
a. Estrarre il più possibile il vassoio di
polimerizzazione. [1]
b. Inserire le lampade a neon nel portalampada no a
quando non si sente un rumore di ssaggio. [3]
c. Chiudere nuovamente il vassoio di polimerizzazione.

16
incapsulato con Technovit 2000 LC.
Esempio di polimerizzazione con resine
decorative colorate Colorit
Polimerizzazione standard (tempo: 2 x 5 min) all’interno del
dispositivo Technotray POWER
Per un indurimento uniforme delle resine decorative colo-
rate Colorit e per un’irradiazione luminosa omogenea sono
necessarie tutte e 6 le lampade.
Posizionare l’elemento / gli elementi decorati colorati sul
vassoio di polimerizzazione. Impostare il timer a 5 min e
chiudere il vassoio. Ripetere il processo al termine del tem-
po di polimerizzazione. Al termine di 2 x 5 min è possibile
prelevare l’elemento / gli elementi decorato/i e continuare
la lavorazione nel modo desiderato.
Technotray®POWER
Fotopolimerizzatore
Technotray POWER avvia automaticamente il tempo di
polimerizzazione impostato non appena il vassoio di poli-
merizzazione viene chiuso. Se il vassoio durante il tempo
di polimerizzazione in corso viene aperto, le lampade si
spengono automaticamente. Esse verranno riaccese, e il
tempo di polimerizzazione preimpostato verrà riattivato non
appena il vassoio verrà richiuso. Il tempo di polimerizzazi-
one impostato è trascorso quando le lampade si spengono
automaticamente.
Esempi di polimerizzazione
Sistema Technovit 2000 LC
Polimerizzazione standard con smalto di copertura dentale
(tempo. 2 x 10 min) all’interno di Technotray POWER
La messa in muffola dei modelli avviene in muffole
semitrasparenti in PE. Per il posizionamento dei modelli è
possibile usare la pasta di ssaggio Technovit 2000 LC.
Successivamente all’interno della muffola viene versato il
prodotto Technovit 2000 LC no a 5 mm sotto il bordo ed
esso viene posizionato sul vassoio di polimerizzazione di
Technotray POWER. Impostare il timer a 10 min e chiudere
il vassoio. Al termine del ciclo di polarizzazione bisogna
versare ca. 3 mm di smalto di copertura Technovit 2000
LC. Esso serve per evitare lo strato di dispersione sul resto
del modello. Successivamente avviare un ulteriore ciclo di
polimerizzazione di 10 min. Al termine del tempo di poli-
merizzazione bisogna rimuovere il pezzo, farlo raffreddare
e smuffolarlo.
Polimerizzazione in strati (tempo: cicli da 5 min) all’interno
di Technotray Power.
Lavorando in più strati è possibile abbassare notevolmente
la temperatura di polimerizzazione. La messa in muffola
dei modelli avviene in muffole semitrasparenti in PE. Per
il posizionamento dei modelli è possibile usare la pasta di
ssaggio Technovit 2000 LC.
Successivamente versare nella muffola ca. 2 - 3 mm di
Technovit 2000 LC, posizionare sul vassoio di polimerizza-
zione di Technotray POWER e polimerizzare per 5 minuti.
Successivamente far raffreddare il modello; poi ripetere
il processo no a quando esso non sia completamente
È possibile eseguire l’indurimento
contemporaneo del seguente
numero di muffole
Ø 50 mm = 4 pezzi Ø 30 mm = 9 pezzi
Ø 40 mm = 5 pezzi Ø 25 mm = 9 pezzi
Temperature di polimerizzazione
Muffola da Ø 40 mm senza modello totalmente
riempito:
max. 120 °C
Muffola da Ø 40 mm con versamento a strati (2
mm):
Irradiazione 5 min: 70 – 90 °C

17
ITALIANO
• Dimensioni interne: larghezza x profondità x altezza
170 x 160 x 120 mm
• Avvio automatico all’inserimento del vassoio
• Pregiati riettori in alluminio
• Durata delle lampade: ca. 1.000 ore di esercizio o ca.
20.000 accensioni
• Colore alloggiamento: bianco/grigio
• Dimensioni: larghezza x profondità x altezza 270 x
240 x 170 mm
• Peso: ca. 3 kg
Con riserva di modiche tecniche.
Confezione
Dispositivo e altri pezzi sfusi [6]:
• Lampade al neon, 6 pezzi
• Cavo di rete
• Informazioni per l’uso
Esclusione di responsabilità
Il produttore non si assume alcuna responsabilità per altri
utilizzi diversi da quelli citati nel manuale di istruzioni per
l‘uso nonché in caso di modiche arbitrarie.
Kulzer GmbH
Division Technik
Philipp-Reis-Straße 8/13
61273 Wehrheim
Tel. 06181-9689-2571 or 2574
technik.wehrheim@kulzer-dental.com
www.kulzer-technik.de
Sostituzione delle lampade
Si raccomanda di sostituire le lampade del dispositivo (OS-
RAM Dulux S9 W/71-blu) almeno una volta all’anno o dopo
1000 ore di esercizio o 20000 cicli di lavoro.
Attenzione: sostituire le lampade solo con il dispositivo
freddo!
Rispettare questa sequenza:
1. Spegnere il dispositivo dal retro.
2. Staccare la spina di rete!
3. Estrarre il vassoio di polimerizzazione no a quando le
lampade sono completamente accessibili.
4. Prima estrarre dal supporto le lampade della serie infe-
riore e poi quelle della serie superiore.
5. Applicare le nuove lampade sul supporto portalampada
in maniera inversa.
6. Ripristinare il collegamento alla corrente elettrica e riatti-
vare il dispositivo sul retro.
Indicazione di manutenzione
Pulire il dispositivo solo con la presa di corrente staccata!
Il dispositivo può essere pulito solo con un panno umido.
Non deve penetrare liquido all’interno del dispositivo. Non
bisogna utilizzare solventi o detergenti aggressivi.
È possibile ordinare i fusibili di ricambio presso il rivendi-
tore.
Dati tecnici
• Tensione di rete: 230 Volt, 50 Hz
• Potenza: max. ca. 60 Watt
• 6 lampade al neon da 9 Watt
• Tipo di lampada: lampade a luce blu
• Temporizzatore con 3 impostazioni: 5 minuti,
10 minuti nonché funzionamento continuo
Per la polimerizzazione di resine
Kulzer fotoindurenti

18
Technotray®POWER
Fotopolimerizador
Funcionamiento estándar con 4 tubos
12
3
5 6
4

19
ESPAÑOL
3. Establecer la conexión a la red. Se adjunta cable de
red.
4. Accionar el interruptor de red en el lado posterior del
aparato [2], para que las lámparas y los temporizadores
se pongan en modo de espera (el interruptor de red se
ilumina con luz verde al encenderse el aparato).
5. Abrir la cámara de polimerización mediante extracción
de la bandeja de polimerización. [1]
6. Ajustar el tiempo de irradiación accionando la tecla
del reloj programador dispuesto en el lado posterior de
la carcasa del aparato (1 pulsación = 5 min, 2 pul-
saciones = 10 min, 3 pulsaciones = funcionamiento
continuo). [5]
7. Volver a introducir la bandeja de polimerización com-
pletamente en la carcasa del aparato. El tiempo de
polimerización ajustado se inicia automáticamente al
cerrar la bandeja. Si se abre la bandeja durante el fun-
cionamiento se apaga el aparato automáticamente. En
cuanto se vuelve a cerrar la bandeja se inicia de nuevo
el tiempo de irradiación ajustado.
Polimerización
1. Accionar el interruptor de red en el lado posterior del
aparato [2], para que las lámparas y el temporizador
se pongan en modo de espera (el interruptor de red se
ilumina con luz verde al encenderse el aparato).
2. Abrir la cámara de polimerización mediante extracción
de la bandeja de polimerización. [1]
3. Colocar la probeta en el fondo de vidrio de la bandeja.
4. Ajustar el tiempo de irradiación accionando la tecla del
reloj programador dispuesta en el lado posterior de la
carcasa del aparato (1 toque = 5 min, 2 toques = 10
min, 3 toques = funcionamiento continuo). [5]
5. Cerrar la bandeja de polimerización.
Para la polimerización de resina foto-
polimerizables Kulzer
El fotopolimerizador Technotray POWER está diseñado
especialmente para la polimerización de los resina foto-
polimerizables Kulzer (p. ej., Technovit 2000 LC o Colorit).
Equipado con un máximo de 6 tubos de luz azul de 9 va-
tios, el Technotray POWER es un fotopolimerizador de gran
potencia que garantiza una polimerización rápida, intensa
y homogénea.
Las lámparas de luz azul garantizan una polimerización
able en :
• resina Technovit transparentes en capas de hasta 30
mm.
• Colores Colorit Basic con hasta 0,8 mm y colores
Colorit Deep con hasta 0,2 mm de grosor de capa.
Con excepción del color Colorit YELLOW: en este
caso, el grosor de capa máx. en los colores Deep es
de hasta 0.8 mm, y en Basic, de hasta 0,2 mm.
Con medidas interiores de AxPxH 170 x 160 x 120 mm, el
equipo dispone de una cámara de polimerización amplia y
homogéneamente iluminada, que con Ø = 50 mm ofrece
espacio para 4 unidades, y con Ø = 25 mm hasta para 9
unidades de moldes de inclusión [4].
Puesta en servicio
1. Comprobar si la tensión de la red coincide con la
tensión nominal necesaria según la placa de caracterí-
sticas. En su caso, adaptar el equipo a la tensión de la
red existente mediante el interruptor selector de la parte
trasera del equipo. [2]
2. Según el campo de aplicación, el dispositivo se puede
elegir equipado con 4 o 6 tubos uorescentes (ver el
punto Polimerización).
• Ocupación con 4 tubos uorescentes: 3 x abajo / 1 x
arriba (medio). [3]
• Ocupación con 6 tubos uorescentes: 3 x abajo / 3 x
arriba. [4]
a. Extraer la bandeja de polimerización tanto como sea
posible. [1]
b. Encajar las lámparas en los casquillos hasta que se
enclaven de forma audible. [3]
c. Volver a cerrar la bandeja de polimerización

20
Ejemplo de polimerización colores de
adorno Colorit
Polimerización estándar (tiempo: 2 x 5 min) en el aparato
Technotray POWER
Para un endurecimiento uniforme de los colores de adorno
Colorit y una iluminación homogénea se necesitan 6
lámparas.
Colocar la pieza o piezas de adorno coloreadas en la
bandeja de polimerización Ajustar el temporizador a 5
min y cerrar la bandeja. Una vez transcurrido el tiempo de
polimerización, repetir el proceso. Al cabo de 2 x 5 min se
pueden retirar las piezas de adorno y seguir procesándolas
como se desee.
Technotray®POWER
Fotopolimerizador
El Technotray POWER inicia automáticamente el tiempo de
polimerización ajustado en cuanto se cierra la bandeja de
polimerización. Si se abre la bandeja durante el tiempo de
polimerización, las lámparas se apagan automáticamente.
En cuanto se vuelve a cerrar la bandeja se encienden otra
vez las lámparas y vuelve a iniciarse el tiempo de polimeri-
zación previamente ajustado. El tiempo de polimerización
ajustado ha transcurrido cuando las lámparas se apagan
automáticamente.
Ejemplos de polimerización
Sistema Technovit 2000 LC
Polimerización estándar con barniz cobertor (tiempo: 2 x
10 min) en el Technotray POWER
La inclusión de las probetas se realiza en moldes de inclu-
sión de PE semitransparentes Para posicionar las probetas
se puede emplear la pasta de jación Technovit 2000 LC.
A continuación, llenar el molde de inclusión hasta aprox.
5 mm por debajo del borde con Technovit 2000 LC, y
colocarlo en la bandeja de polimerización del Technotray
POWER. Ajustar el temporizador a 10 min y cerrar la
bandeja. Una vez transcurrido el ciclo de polimerización,
introducir aprox. 3 mm de barniz cobertor Technovit 2000
LC, que sirve para evitar la capa de dispersión en el lado
posterior de la probeta. A continuación, se inicia otro ciclo
de polimerización de 10 min. Al concluir el tiempo de
polimerización, retirar la probeta, dejarla enfriar, y seguida-
mente, desmoldearla.
Polimerización en capas (tiempo: ciclos de 5 min) en el
Technotray POWER
Mediante el trabajo en varias capas se puede reducir
considerablemente la temperatura de polimerización. La
inclusión de las probetas se realiza en moldes de inclusión
de PE semitransparentes. Para posicionar las probetas se
puede emplear la pasta de jación Technovit 2000 LC.
A continuación, llenar el molde de inclusión aprox. 2 – 3
mm con Technovit 2000 LC, colocarlo en la bandeja
de polimerización del Technotray POWER y polimerizar
durante 5 min. Seguidamente, dejar enfriar la probeta y re-
petir el proceso hasta que la probeta esté sucientemente
envuelta con Technovit 2000 LC.
Se pueden endurecer simultán-
eamente las siguientes canti-
dades de moldes de inclusión
Ø 50 mm = 4 unidades Ø 30 mm = 9 unidades
Ø 40 mm = 5 unidades Ø 25 mm = 9 unidades
Temperaturas de polimerización
Molde de Ø 40 mm sin probeta completamente
colado:
máx. 120 °C
Molde de Ø 40 mm colado por capas (2 mm):
Irradiación 5 min: 70 – 90 °C
Table of contents
Languages: