Modena WT 1121 WAM Owner's manual

User
Manual Book
Top Load Washing Machine
WT 1121 WAM

2
Table Of Content
Part 1: Installation 3
Bottom Cover Installation 3
Outer Drain Hose Installation 3
Placing The Washer 3
Accessories 3
Part 2: Understanding Control Panel 4
Part 3: Preparation Before Washing 6
Part 4: Troubleshooting 9
Part 5: Maintenance 12
Part 6: Specification 13
Appendix 1: International Textile Care Label 14
Appendix 2: Helpful Instructions In Removing The Stain 16

3
Water Supply Hose
Outer Drain Hose
Bottom Board
Screw
Bottom Cover Installation
1. Lean the back of washer forwards a bit, push
the bottom to end from he groove of
pedestal.
2. Fix the bottom board to the
pedestal of washer by screw.
Outer Drain Hose Installation
Insert the outer drain hose into the
intake on the ground and fix it at the
joint near the intake by spring ring.
Placing The Washer
1. If the washer is not of level, level
up one or two of the washer feet
with small pad to make sure that
the edge of the spin-dry tub is of
the same distance from the
cabinet. Then: adjust the bar until
the washer don’t shake obviously.
2. Washer is away from the wall at
least 5 cm.
3. Operating washing machine on the
edge of high places are prohibited,
in case of an accident.
Accessories
PART 1: INSTALLATION
Bottom Board
Spring
Ring

4
A (Power)
Press this button to switch on and off washing
machine.
B (Program)
•STANDARD: This Indicator light will ignite during
washing, rinsing, and spinning.
•BIG OBJECT: This program is for washing big,
thick, and dirty laundry.
•GENTLE: This program is for washing clothes
which are made of silk or undergarments.
•QUICK WASH: This program is for washing small
quantity of laundry or washing in a quick
manner.
•SOAKING: Soaking is an additional function to
the program. When soaking, the digital screen
will display JP and accompanied by the rotating
of pulsator. Soaking time is automatically set by
volume of water selected instead of manually.
Water level from 1 to 5 is set for 20 min; water
level from 6 to 10 for 40 min.
PART 2: UNDERSTANDING CONTROL PANEL

5
•WASH: This program is standard program for
washing.
•RINSE: This program is to rinse clothes.
•SPIN: Spin is required after laundry is being
washed.
C (Start/Pause)
Press this to start the operation after power is
connected and this button also serves to pause the
operation and press it again to restart operation.
D (Water Level)
Choose water level according to water level and
clothes quantity.
E (Preset)
This button is to preset time from 1 to 24 hours.
F (Safety Lock)
Press “Preset” and “Add” button simultaneously
until safety lock indicator lamp is on. Press those
buttons again to deactivate safety lock. Under
safety lock mode, all keys are invalid except for
Release.
When choosing “standard” or “big object” program, you can choose the
water inlet way by pressing the button of additional function. The
program can change in the following way by pressing the button of
additional function: cold water → cold water+ hot water → hot water →
cold water→……”.
Digital screen explanation: Fuzzy control begins by displaying “----” on
the screen. When program is working,
remaining time “min” will be displayed.
During preset process, preset time “hour”
will be displayed. During soaking process,
“JP” will be displayed.

6
1. Installation Method of Intake Hose
•Align screw thread of connector with
screw thread of tap bore.
•Switch connector tightly to make
rubber tap press tightly on the tap
bore until it is completely prevented
from water leaking.
•Switch the joint at the other side of
the intake hose to the joint of
washing machine.
•Notice: Use your strength evenly
while switching. do not twinkle the
intake hose in case that the hose
end will be broken.
PART 3: PREPARATION BEFORE WASHING
Intake Hose
Nut

7
2. Turn on the tap with pressure (0.03~0.6MPa)
Bad installation of quick joint will cause water-leaking, please check:
1. Whether the flat surface of tap bore is plain or not.
2. Have the four screws been switched tightly?
3. The socket must be safely earthed, then connect the
wire.
To ensure your safety, the washer must be earthed.
1. The washer uses three phase power cord. It should use three
phase sockets during installation, if there isn’t any earth socket,
you must ask special technicians for installation.
2. The ground wire must connect with power socket.
3. The ground wire of the washer is already installed with the plug.
Don’t change the plug personally.
4. The ground wire should never be connected with the gas pipe,
tap water pipe, antenna or lightning rod etc.
5. The cross-section area of the ground wire is at least 0.75 mm2.
6. The power cord of the washer is connected by Y shape. If it its
soft wire is damaged, you should ask special technician. You are
not allowed to do it by yourselves.
7. Please use the washing machine with the rated voltage and
current according to rating label.
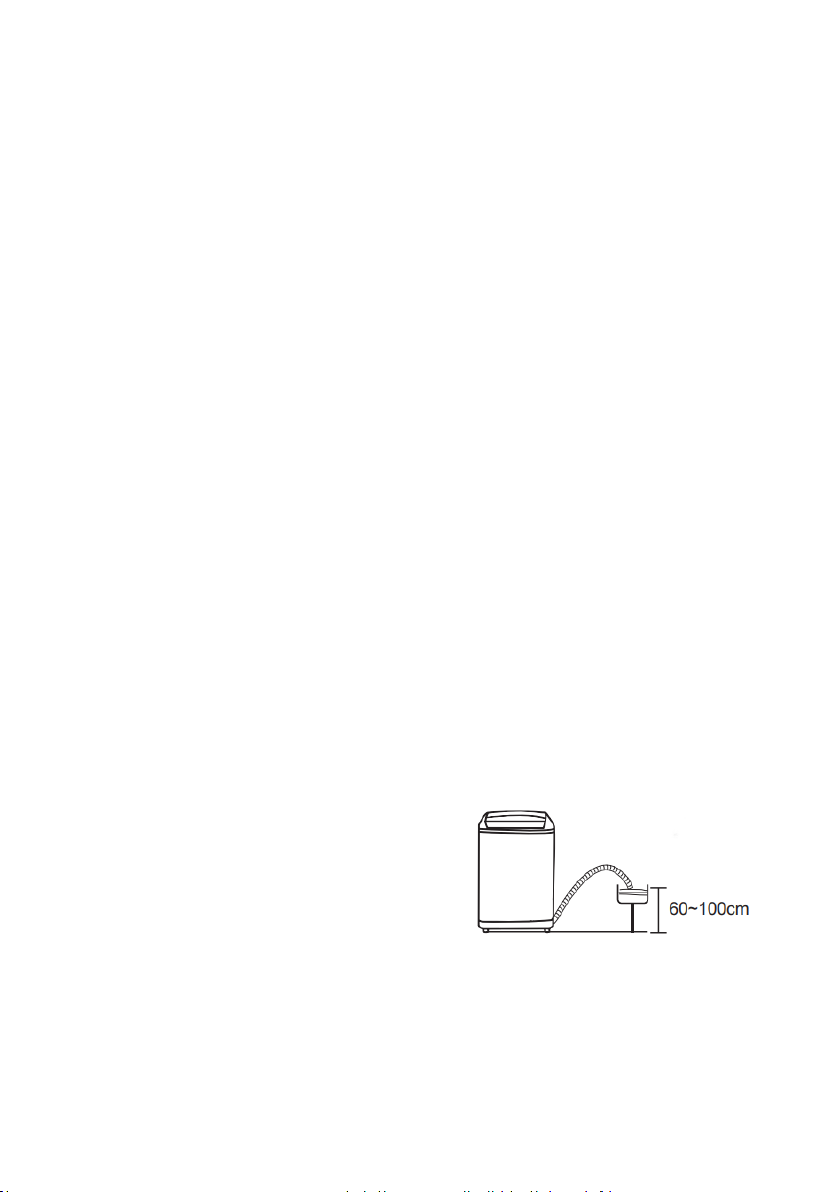
4. Lay down the drain hose
1. Don't fix and seal the outlet of drain hose in the sewer. Or the
air will be prevented from the drain hose and the drain hose will
be clogged or not drained.
2. Never let the end of the drain
hose immerses in water.
3. In order to prevent siphoning,
please ensure the end of the
drain hose is fitted minimum
60cm and maximum 100cm
above the ground.
5. Ensure the clothes meet the washing requirement before
putting them in

8
1. Don’t forget to take out coin and key or etc. from the pocket
before washing to avoid damaging clothes and tub.
2. Clothes should be classified and then wash them separately.
3. When washing good quality clothing or with fuzz, please put
clothes inside nylon net bag.
6. Put detergent into the tub
7. Start Washing

9
When something goes wrong with the washer, unplug the washer.
Check whether there is any problem below:
PROBLEM
POSSIBLE CAUSES
OF BREAKING
DOWN
DIGITAL
SCREEN
SOLUTIONS
•
Water inflow
overtime(30min), small
water volume.
•
Water faucet does not
open.
•
Filter net of the inlet
valve is jammed with
impurity.
•
Control unit
breakdown.
•
Inlet valve
breakdown.
•
Wire is not well
connected.
E1
•
Increase water
volume.
•
Open water
faucet, then
press
start/pause
button.
•
Clean the
impurity then
press
start/pause
button.
•
Water level is higher
than the high-level
alarm limit.
•
Water level is lower
than the low-level
alarm limit.
•
Water level is lower
than the reset level
during operation
•
Control unit
breakdown
•
Water level
sensor
breakdown
•
Inlet valve
breakdown,
retractor keeps
on power
E2
/
•
Cover opens during
spinning
•
Control unit
breakdown
•
Safety switch
breakdown
•
Wire does not
get through
E3
•
Close the
cover
•
Washing machine is
placed uneven,
clothes to be put
unbalance
•
Spin unbalanced
•
Control unit
plug does not
connect well
E4
•
Place the
washing
machine stably
•
Water outlet too
high/not put down.
•
Drain hose freeze/jam.
•
Drain valve
breakdown.
•
Retractor
breakdown.
E5
•
Lower / Put
down the drain
hose then
PART 4: TROUBLESHOOTING

10
•
Drain hose
bending/flatten/twisted.
•
Wire not well
connected.
•
Control unit
breakdown.
press start/
pause button
•
Melt the
ice/clean the
jam then press
start/pause
button
•
Smooth the
drain hose
then press
start/pause
button
•Water level self-
checking does not work
well
•Water level
sensor
breakdown
•Control unit
breakdown
E6
/
•Cover does not close
while using child lock
•Safety switch
breakdown
•Control unit
plug does not
connect well
E7
Close the cover
within 10s,
Program recover
and alarm rest;
Cover does not
close after 10s,
program turn to
drain. program
recover after
turning off the
child-lock. pull out
the power plug
can make the
washing machine
normal after
restart.
•Under the model of
water saving, the first
two spin unbalance and
strike the bucket.
•Control unit
plug does not
connect well
E8
Open the cover,
place the cloth
balance, close the
cover. Program
will automatically
be processing
after 1 min.
OCCURRENCE
EXPLAINATIONS
Pause during wash and rinse process
Water level sensor is checking water
level
Water is fed during wash and rinse
process
Water added automatically due to
declining of water level

11
There is a pause after wash and spin
process
Extended draining program sets by
program
Tub rotates on and off when spinning
begins
Intermission spinning is set to achieve
the better spinning effects
Water fed and rinsed may occur during
spinning
During spinning, unbalanced laundry is
being automatically put right
Water-flowing can be heard when spin
stops
Liquid flows in the balance circle to
reduce vibration of spinning
When power is off, control board is still
a bit hot partially
Cause by heating of memory circuit
electronic parts
Power switched off suddenly, and the
washer cannot operate when power
comes again
Please reset it

12
Don't expose the washer in
the sun orrain or put it near
fire and heat source.
Don't put it in a damp place like
bathroomsor wash it with
water
or
put wet clothes
on it,
especially on the control panel
Don't place the washer
nearby the fire
or heat
sources.
Don't put heavy or hot things on the
washer'scover to avoid plastic parts
being deformed.
Don't wash the laundry with
chemicalreagent.
Don't wash water-proof
laundry in the
washer.
Don't wash laundry with the
water
above 45℃ to avoid
plastic parts
being
deformed.
Don't push or pull the plug
with wet
hand to avoid
electric
Don't put hands into the
tub when it'sworking. Don't
let children play the
washer.
Don’t put hands into the
washing machine tubs
when it is working in
case
of accidents.
Don’t flush the washer with water
otherwise
electrical shock will be
happened due
to damped components.
Don't make bold to
disassemble,
repair or
refit the washer.
PART 5: MAINTENANCE

13
MODEL
WT 1121 WAM
Type
Single tub
Wash Capacity
11 kg
Spin Capacity
11 kg
Rated Washing Power
(W)
560 W
Rated spin power (W)
440 W
Glass Top Lid
Yes
Number of Programs
8
Two Water Inlet
Yes (with pump)
Wash/Spin Water Inlet
Selection
Yes
Bubble maker function
No
PART 6: SPECIFICATION

14
Notice the wash code symbols on attached clothing labels. In taking
care of your clothes, preferably before washing by the machine, you
need to pay attention to the wash code symbols on the label attached
to your clothing, the description is outlined below:
Normal wash action
Washing
temperature
max. 95 °C
Gentle wash action
Washing
temperature
max. 60 °C
Washing by hand
Washing
temperature
max. 40 °C
Do not wash
Washing
temperature
max. 30 °C
Bleach
Chlorine bleach can
be used
Do not give the
bleach
Ironed
Can be ironed until
200 °C
Can be ironed
until 100 °C
Can be ironed until
150 °C
Do not ironed
Dry cleaning
APPENDIX 1: INTERNATIONAL TEXTILE CARE
LABEL

15
Dry cleaning with all
abstergents
Dry cleaning
with besin, pure
alcohol and
R111
Dry cleaning with
perchloride, petrol,
pure alcohol, R111
and R113
Do Not dry
clean
Drying
Drying by stretched
Drying with
machine dryer
at high
temperatures
Drying by swing
Drying with
machine dryer
at low
temperature
Drying using hangers
clothing
Do not dry
using the dryer

16
Stain removal instructions below are approximate and can only be used
on clothing / materials that can be washed.
Alcoholic Beverages:
Clean up material with water first, then use
the liquid and rinse water-glycerin with a
vinegar-water liquid.
Blood Spot:
Soak the clothes for 30 minutes in cold water.
Use liquid ammonia to remove stains. (4 liters
of water - 3 tablespoons of ammonia)
Shoes polish:
Without damaging the material, removes stain
carefully by rubbing it with detergent. If this
does not help, provide the water and liquid
alcohol (2:1) and rub the material, then wash
with warm water.
Ice-cream, Milk and Cream:
Put the clothes in cold water for a few
moments. Rub with detergent, and rinse with
warm water. If there is residual fat, get rid of
it using oxygen water.
Tea and Coffee:
Pour hot water on the stain. If the material is
white, pour a little bleach and rinse with
water.
APPENDIX 2: HELPFUL INSTRUCTIONS IN
REMOVING THE STAIN

17
Chewing Gum:
Harden the gum stains by putting ice on it.
Then wash the stain carefully.
Moss:
Do not let stains moss materials for too long.
Put the clothes into the cold water for a few
moments, rub with detergent, and rinse with
warm water. If there is residual fat, eliminate
using the oxygen water.
Chocolate:
Soak the clothes in cold water for a few
moments. Rub with detergent, and rinse with
warm water. If there is residual fat, get rid of
it using oxygen water.
Fruit:
Pour cold water on the stain and do not use
warm water to rinse it. Let it be for 2 minutes
and remove the stains with white vinegar and
rinse it.
Tomato paste:
Rub hardened tomato paste and soak it in
cold water for 40 minutes. Rub with detergent
and then rinse.
Ink:
Wet the stain on the clothes with cold water
and wait until the ink stain lost. Then rub with
lemon juice and detergent. Let the stains for
5 minutes and rinse the clothes.
Eggs stain:
If the stain hardens, scrub and remove stains
with a soft cloth. Then rub with detergent and
rinse with cold water.

18
Grass stain:
Rub stain with detergent. If possible, use
bleach. For wool, use alcohol for good results.
Oil / Fat Stain:
Scrub the stain with detergent and rub it.
Then, wash the material with warm water.
Paint :
Use paint thinner to remove the stain. Put on
cotton wool. Rub stain with detergent and
rinse with cold water.
Mustard:
Use glycerin and rub it with detergent. If
unsuccessful, remove the stain with alcohol.
(Colored and synthetic materials need 2 cups
of water and 1 cup of alcohol liquid).
Burn Stain:
Use bleach if possible. For wool, give oxygen
water to the stain and scrub. Rinse and wash
material.

11/20
Table of contents
Other Modena Washer manuals

Modena
Modena WF Series User manual

Modena
Modena WF 0652 WSR Owner's manual

Modena
Modena Semplice Series Owner's manual

Modena
Modena WT 1081 WTM Owner's manual

Modena
Modena WF 0532 WSR Owner's manual

Modena
Modena Tiziano Series Owner's manual

Modena
Modena WF Series User manual

Modena
Modena WF 741 WAM Owner's manual

Modena
Modena WF 1030 VDWH Owner's manual

Modena
Modena WF 730 Owner's manual