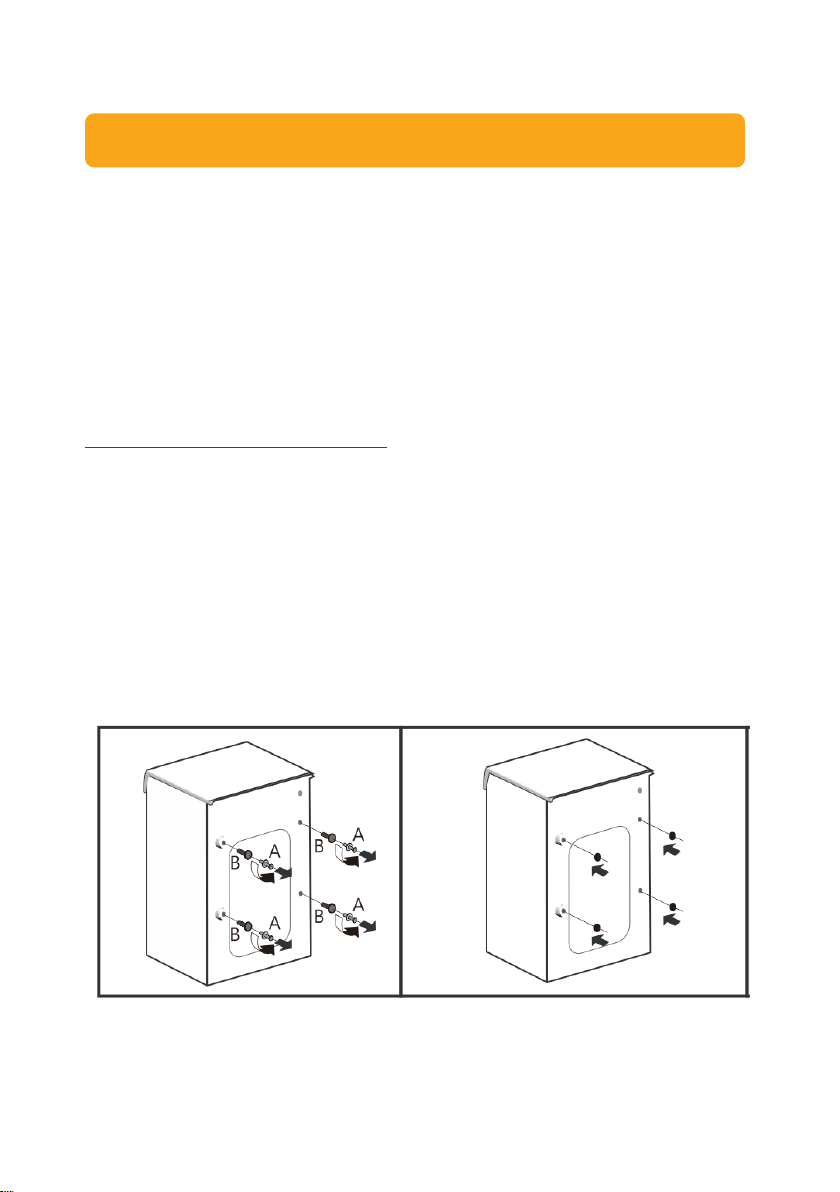
Modena WF 1030 VDWH Owner's manual

User
Manual Book
Washing Machine
WF 1030 VDWH

TABLE OF CONTENT
Part 1: Safety Information 3
Precautions 3
Environmental Notice 5
Part 2: Name of Parts 5
Part 3: Installation Guide 6
Installation 6
Part 4: How to Use 12
Door Lock & Unlock 12
Detergent Drawer 13
Precautions Before Washing 14
Control Panel 15
How to Start Washing 16
Washing Programs 16
Part 5: Maintenance 18
Cleaning & Maintenance 18
Drum Self-Cleaning 19
Cleaning the Universal Coupling 19
Cleaning the Inlet Valve 20
Cleaning the Drain Filter 20
Part 6: Troubleshooting 21
Part 7: Specification 23
This guide book explains everything you need to know about your new
product. Please contact our Customer Care should you need further
assistance through www.modena.com.

3
Read the user manual book carefully!
•Do not try to install or turn on the unit without having read the
indicated safety precautions in this manual.
•Do not disassemble the electrical parts of this appliance. Any repairs
done by an unauthorized person may cause serious injuries or
properties incident.
•The adult should supervise the children in order to make sure the
children can not play with the appliance.
•The appliance is not intended for use by persons(including children)
with reduced physical, sensory or mental capabilities, or lack of
experience and knowledge, unless they have been given supervision
or instruction concerning use of the appliance by a person
responsible for their safety.
•This appliance is intended to be household use only. Usage outside
the intended use or excessive use may void the warranty.
•Do not modify the power cord. If the power cord is damaged, it must
be replaced by technician with a replacement cable according to the
appliance specification
•To avoid danger of suffocation, keep plastic bag away from babies
and children.
Precautions
•Destroy the carton, plastic bag and other packing materials after the
appliance is unpacked. Children might use them for play.
•Children require supervision when using the appliance
•Plug the appliance directly into the socket and ensure secure
connection
•The unit requires proper grounding and the correct voltage
•An appropriate length of power cord is provided to reduce the risks
of becoming entangled in, or tripping over a longer cord.
•Do not use an extension cord or plug adaptor. Failure may cause
electric shock or risk of fire
•Choose a place that is near a grounded electrical socket.
•Do not place the appliance sitting over the power cord.
PART 1: SAFETY INFORMATION

4
•Do not pull out or insert the plug with wet hands to avoid electric
shock.
•Do not fasten, twist or tie the power cord. if the power cord is
damaged, it should be replaced by the manufacturer, service
technician or a qualified person to prevent any risk.
•Do not spill water directly onto the control panel
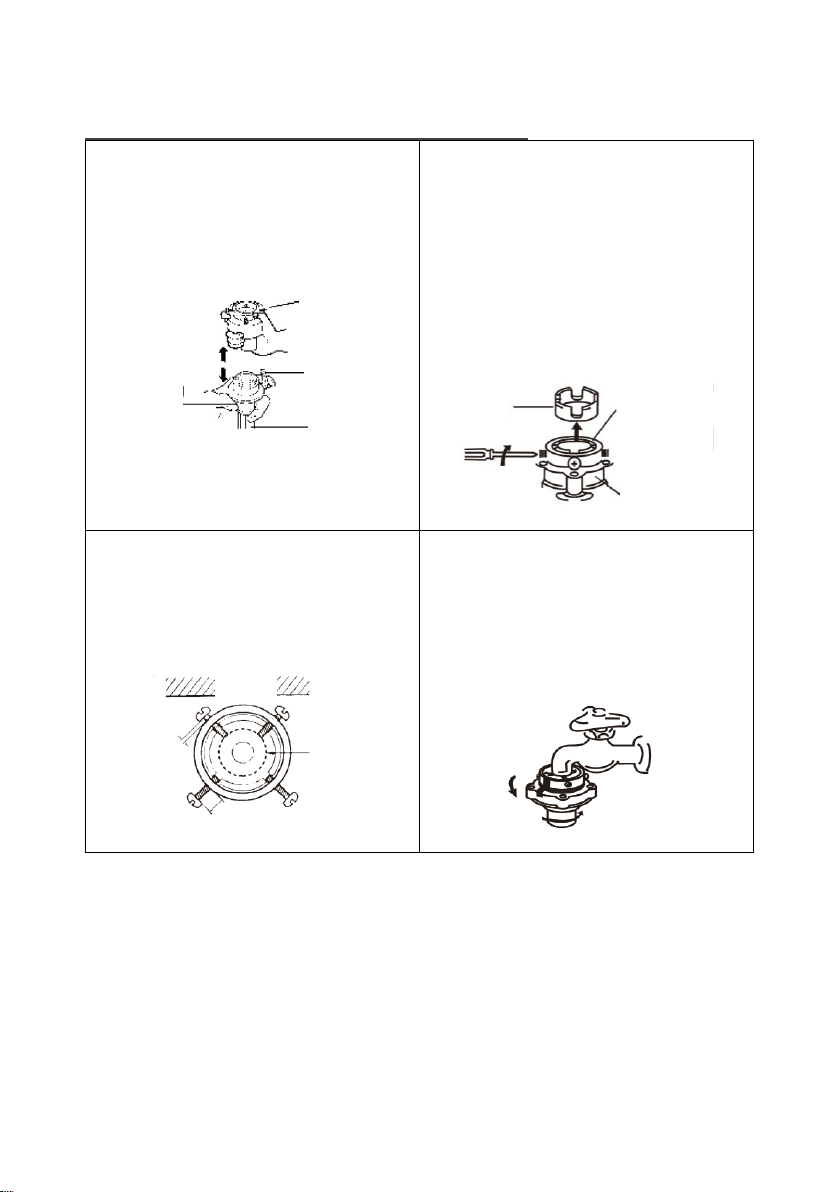
•Fix the drain pipe before use, make sure that the drain hole is not
blocked
•Keep the unit in a dry place and away from direct sunlight. Do not
place the machine on paper or foam. Do not place anything
flammable beside this machine.
•When washing at high temperature, the door glass will get hot.
Please do not touch the door glass, especially children.
•When the door needs to be opened in high temperature washing,
please wait until the temperature drops to the safe temperature and
the door lock is automatically unlocked.
•Please close the door when the washing machine is not in use to
prevent children from entering the washing barrel.
•Please do not wash waterproof clothes, such as raincoats, down
products, sleeping bags, etc.
•Only machine washable clothes can be washed. If in doubt, please
follow the washing guide on the clothes.
•Do not wash or dehydrate the clothes stained with kerosene,
gasoline, diluent and other flammable materials.
•When the power plug is pulled out, the door lock can be opened even
if the water level in the barrel is high. Therefore, in any case, please
confirm the water level in the barrel before opening the door. If the
water level is high, please do not open the door to avoid unnecessary
loss caused by water overflow
•Unplug the unit when the unit will not be used for a long period for
the reason of saving electricity.
•Never use organic liquids polishing chemical to clean the machine.

5
Environmental Notice
The packaging material used is recyclable. We recommend
that you separate plastic, paper and cardboard and give
them to recycling agents. According to WEEE (Waste of
Electrical and Electronic Equipment) guidelines, waste from
electrical and electronic devices should be collected
separately. If you need to remove of this appliance in the
future, do not throw it away with the rest of your domestic garbage.
Instead, please take the appliance to the nearest WEEE collecting
agents, where available.
Above picture is for reference only. Actual product may have slight difference
PART 2: NAME OF PARTS
Inlet valve
Detergent
drawer
Control panel
Power
cord
Body
Adjustable feet
Door
Drum

6
Installation
•The appliance should not be installed in an environment below 0°C.
Do not install or place the washing machine outdoors.
•When the washing machine is installed on a floor with a carpet, do
not block the ventilation orifice of the base.
•If there are many insects in the installation environment, please keep
the surroundings of the washing machine clean. The warranty does
not cover any damage caused by cockroaches or other insects.
Shipping/Transporation Bolts
The appliance is equipped with shipping bolts that are used to prevent
internal damage of the washing machine during transport. To
disassemble the shipping bolts, follow these instructions:
1. Open the package, remove the packaging base and move the
washing machine to the installation place.
2. Disassemble the 4 shipping bolts, rubber pads and plastic rods (see
Figure 1). If the shipping bolts are not disassembled, they may cause
intense vibrations, noise and faults. The shipping bolts shall be
installed every time before the washing machine is transported.
3. Use the supplied plastic plugs to cover the four holes. (see Figure 2).
Figure 1 Figure 2
PART 3: INSTALLATION GUIDE

7
•The tilt angle shall not exceed 1 degree.
•Allow sufficient safety distance between the washing machine and
the wall or other objects. Distance between the back/left/right of the
washing machine and the wall/object should be more than 2 cm.
•Install the washing machine on a hard and flat floor with a drain hole.
Do not install on soft carpeted or wooden floors.
•Do not put clothes to be washed or other objects at the worktop of
the washing machine because they will affect the running of
programs.
Connecting the power supply
•The washing machine must have a grounding device. The grounding
device can reduce the danger of electric shocks in case of a failure.
This device has a grounding line (a conductor with a grounding plug).
The grounding plug must be inserted into an appropriate power
outlet.
Wall
>2cm
Wall
>2cm

8
•Please contact professional persons to test whether or not the
washing machine is grounded correctly. If the power outlet and the
power plug do not match, please do not change the power plug.
•If the washing machine smokes or emits a peculiar smell, please cut
off the power supply and contact service center.
Connecting the water supply hose
•The water supply pressure must be from 0.05-0.85 MPa.
•During connection of the water supply hose and the inlet valve, do
not screw them tightly to avoid slipping.
•There are 2 seal rings in connectors at both ends of the water supply
hose to prevent water from leaking.
•Turn on the faucet to check the connectors for any water leakage.
•Check the water supply hose regularly and replace it if necessary.
•Make sure that the water supply hose is not warped or damaged.
ATTENTION!
To ensure quality, the washing machine is filled with water for
testing at the factory, water may remain in the interior of the drum,
the door seal and the door glass, and this is a normal condition.
ATTENTION!
Use the new hose assembly that comes with the washing machine.
The old hose assembly cannot be reused.
Screw cap
Elbow
Water supply hose

9
Connection of water supply hose to faucet
1. Hold the connector with one
hand, press the retaining ring
with the other hand and pull it
down to separate the
connector from the water
supply hose.
2. Loosen the four mounting
screws on the upper part of
the connector, and rotate the
lower part of the connector to
leave a distance enough
(equal to the height of 3
threads) for installing screws
between the upper part and
the lower part of the
connector.
3. Adjust the four screws of the
connector evenly so that two
screws near the wall are fully
in contact with the exterior of
the faucet first.
4. Hold the upper part of the
connector against the mouth
of the faucet so that the seal
ring in the connector is fully in
contact with the faucet
(please do not take out the
seal ring).
Plastic
Connector
Lower part
of
connector
Connector
Retaining
ring
Water
supply
hose
Retaini
ng ring
Wall
small
gap
big gap
faucet

10
5. Rotate two screws (see figure
below) opposite to the wall so
that they are in contact with
the faucet, and screw them
with a screwdriver tightly.
6. Rotate the lower part of the
connector to screw it tightly
(or else, water may leak from
the connection). After
rotation, the clearance
between the lower part and
the upper part of the
connector shall be lower than
3mm.
7. To remove the water supply
hose, please press the
retaining ring of the water
supply hose.
8. To install the water supply
hose, please turn the retaining
ring of the water supply hose
back to release it.
lower
than 3
mm
Connector
Retaining ring
Ensure
that the
retaining
ring is
intact

11
9. Check whether or not the lower part of the connector and the
water supply hose are connected firmly.
•Screw the connector of the water supply hose and the inlet
valve tightly. Slowly turn on the faucet to check for water
leakage.
•If water leaks from the connection, please turn off the faucet
and assemble them again. (Water may leak from the
connection if the upper part of the connector is not assembled
correctly or the upper part and the lower part of the connector
are not screwed on tightly.)
•After using for a long time, the connection may be loose. Then,
please assemble parts again by following steps 1-9. (If it is
necessary to assemble the connector of the water supply
hose after a move, please follow steps 1-9 too.)
Installing the drain hose
To ensure normal operations of the washing machine, the inner diameter
or width of the end of the drain hose to be inserted into the sewer shall
be no less than 4cm. The height of the outlet of the drain hose shall be
within a certain range. For specific data, please refer to the figure below.
Horizontal adjustment
•Adjust the level of the washing machine to avoid additional noise and
vibrations. Install the washing machine on a hard and horizontal floor
(the corner of a room is preferred).
The end of the drain hose cannot be immersed in water
min. 4 cm
do not bend
do not connect the hose this way
min. 50 cm
max. 80 cm
max.
extension
2.6 m
max. 1 m

12
•If the floor is not flat, please adjust the adjustable feet. (Do not insert
objects such as wood chips under the adjustable feet). Make sure
that the four adjustable feet are in contact with the floor firmly and
check that the washing machine is horizontal. (use a levelling tool).
•Adjust the adjustable feet so that the washing machine is flat and
stable on the floor. After position adjustment, screw the locknuts
tightly to keep the washing machine stable.
•Do not place the washing machine on a table on the floor to prevent
it from falling accidentally.
•When pressing each corner of the worktop of the washing machine,
it should not move. (Check on all corners. If the washing machine still
moves, please readjust the adjustable feet)
Door Lock & Unlock
Door Lock
After wash program startup, the door will be locked automatically and
cannot be opened. Then, the “Lock” light/icon on the control panel
illuminates.
Door Unlock
•When the “Lock” light/icon on the control panel illuminates, press the
“Start/Stop” button. After the washing/spin drum stops rotating, wait
for 2 minutes until the door is unlocked automatically.
•Foams may rise from the drum during washing. Please clean it with
a towel
•During washing, the door cannot be opened at high temperature.
•During washing, the door cannot be opened with high water level.
PART 4: HOW TO USE

13
Detergent Drawer
Main Wash Compartment
•Please use synthetic low-foam liquid detergents.
•If concentrated liquid detergents are used, please dilute them with
water (2:1) and pour them into the detergent compartment.
Softener Compartment
•Add softeners before washing. The washing machine will
automatically inject softeners into the drum during the final rinse.
•If concentrated softeners are used, please dilute them with water
appropriately and evenly and pour them into the detergent
compartment.
•Do not exceed the "Max" line.
Pre-Wash Compartment
•If the clothes are very dirty, please add appropriate detergents after
selecting the pre-wash function. (The quantity of detergents varies
with models)
Main Wash compartment
Pre-Wash
compartment
Softener
compartment

14
Precautions Before Washing
•Read the care labels of clothes. The kind, materials and washing
method of a cloth are printed on a care label.
•Always sort your laundry to achieve the best result. Wash only one
kind of clothes in a washing period. Water temperature, spin speed
and programs vary with clothes. Dark clothes shall be washed
separately from light and white clothes. Dyed clothes and cotton
velvet clothes shall be washed separately, or the white clothes may
be stained. If possible, do not wash very dirty clothes with
moderately dirty clothes.
ATTENTION!
•Use detergents made specially for drum washing machines.
•Do not use too much detergent, or too much foams may
affect the rinse effect or cause functional faults.
•Please follow the instructions of the manufacturer to use
detergents by the kinds and colors of clothes, water
temperature, degree of staining, etc.
•Using appropriate detergents has good washing effect and is
beneficial for environmental protection.

15
Control Panel
Note: Control panel image is for reference only, actual product may have slight difference
1. Program Selection Knob
Select an appropriate program by kinds of clothes and degree of
stains.
2. Water Temperature Button
•Select the water temperature by the kinds of clothes and degree
of staining.
•The range of water temperature varies with programs. The water
temperature is not required for some programs.
•After the program starts, press for more than 2 seconds to turn
toggle the child lock function. After setting the child lock
function, except for the "POWER” button, other buttons cannot
be used.
3. Dewatering Speed Button
•Press this key to select dewatering speed or spin speed
•Press and hold this button for 2 seconds to start the dewatering
or spin function.
4. Start/Pause button
•Press this button to start the selected wash program.
•During operation, press this button to stop a program temporarily
and press it again to restart this program.

16
•Press and hold this button for 2 seconds to open the door
temporarily for adding clothes during operation.
5. “Power” button
•Press this button to turn the appliance ON or OFF.
•After a program is finished, press the “Power” button to turn off
the appliance
How to Start Washing
1. Prepare for washing
•Open the door, add clothes to the drum, and close the door
•Open the detergent drawer, add detergents and fabric
softener, and close the detergent drawer
•Connect the water supply hose, and make sure that the
faucet is turned on
2. Press the “Power” button to turn on the appliance
3. Select the appropriate wash program for your laundry
4. Press the “Water Temperature”button to set the water
temperature if needed
5. Press the “Start/Pause” button to start the wash program
6. After washing is finished:
•The LED flashes and the washing machine gives a buzzing
sound
•Open the door to take out the clothes
•Unplug the power plug and turn off the faucet
Washing Programs
Program
Water temperature
(°C)
Rinse
Max
load
Cloth type
Mixed
40/normal/20
2
≤4kg
Cotton fabric/chemical fiber
fabric
Intensive
40/60/85/normal/20
2
10 kg
Dirty cotton fabric/chemical
fiber fabric

17
Program
Water temperature
(°C)
Rinse
Max
load
Cloth type
Cotton
40/60/85/normal/20
2
10 kg
General cotton fabric
Down
40/normal/20
2
≤3kg
Down clothing
Gentle
40/normal/20
≤3kg
Wool, silk, synthetics
Wool
40/normal/20
2
≤3kg
Machine washable wool fabr
ic
Night
40/60/normal/20
2
≤4kg
Cotton fabric/chemical fiber
fabric
Antibacterial
85
2
≤4kg
Need to eliminate mite, bact
eriostatic cotton fabric
Drum Clean
85
2
-
Washing machine cleaning, s
terilization
Rinse+Spin
-
1
10 kg
Cotton fabric/chemical fiber
fabric
Spin
-
-
10 kg
Cotton fabric/chemical fiber
fabric
Kids wear
60/85/normal/20/40
3
≤4kg
Kids wear from cotton/synth
etics

18
Program
Water temperature
(°C)
Rinse
Max
load
Cloth type
Shirts
40/normal/20
2
≤4kg
Cotton fabric/chemical fiber
fabric
Underwear
40/60/normal/20
2
≤3kg
Cotton fabric/chemical fiber
fabric
Quick30'
normal/20/40
2
≤2kg
Less soiled clothes or towels
that are used frequently
Quick15'
normal/20/40
1
≤2kg
Less soiled clothes or towels
that are used frequently
Notes:
1. The first parameter of water temperature and spin speed is the
default parameter at startup
2. You can select other parameters manually if available
3. The washing time required may vary with water pressure, drainage
conditions, clothes type and water temperature
4. When the washing machine starts up after a power failure, it runs
from the time node before the power failure occurs
Cleaning & Maintenance
1. Periodic cleaning & maintenance can prolong the life time of your
appliance
2. Ensure the power cord is unplugged before performing cleaning and
maintenance activity
3. Please wipe the body with a soft and clean cloth every time after the
washing machine is used. When there are serious stains, please wipe
PART 5: MAINTENANCE

19
the body with a cloth dipped in appropriate detergents or soapy
water.
4. Do not spray water on the body directly
5. Do not wipe the body with chemicals such as putty-powder, diluting
agents, gasoline and alcohol
6. Clean the Door Seal. Please wipe stains and foreign matters such as
thread chips away with a towel every time after using. If there are
foreign matters such as pins in the groove of the door seal, please
take them out.
7. To prevent detergents becoming moldy on the wall of the detergent
drawer, please clean the detergent compartment regularly.
8. Press the specified position and pull out the detergent drawer, wash
it with water and put it back.
Drum Self-Cleaning
After using for a long time, there may be stains in the washing drum. The
drum self-cleaning program can be used to clean the exterior and the
interior of the drum. Recommended every month
Cleaning the Universal Coupling
1. Remove the water supply hose from
the universal coupling.
2. Loosen off the fastener from the
faucet.
3. Rinse the interior of the fastener with
water.
WARNING!
During drum self-cleaning, do not add clothes or detergents.
Pull out
Press down
Fastener

20
4. Install the clean fastener and the water supply hose.
5. Recommended every 6 months
Cleaning the Inlet Valve
1. Remove the water supply hose from
the washing machine.
2. Take out the filter screen from the
inlet valve.
3. Clean the filter screen thoroughly
with a toothbrush or similar tools.
4. Install it to the inlet valve.
5. Connect the water supply hose
again.
6. Recommended every 6 months
Cleaning the Drain Filter
1. After drainage, disconnect the power plug, press the clip above the
decorative cover for the drainage pump at the right corner in the
front of the body, and open the filter cover. (Note: if there is hot
water in the washing machine, please take the above actions only
after cooling.)
2. Screw off the filter countere-clockwise.
3. Rinse the filter thoroughly with water.
4. Insert the filter, screw it clockwise and close the decorative cover
for the drainage pump.
Inlet valve
Table of contents
Other Modena Washer manuals

Modena
Modena WF Series User manual

Modena
Modena WF 1156 Owner's manual

Modena
Modena WF Series User manual

Modena
Modena WF 0652 WSR Owner's manual

Modena
Modena WF 730 Owner's manual

Modena
Modena WF 741 WAM Owner's manual

Modena
Modena WT 1121 WAM Owner's manual

Modena
Modena WT 1120 UFWH Owner's manual

Modena
Modena WT 1081 WTM Owner's manual

Modena
Modena WF 0532 WSR Owner's manual