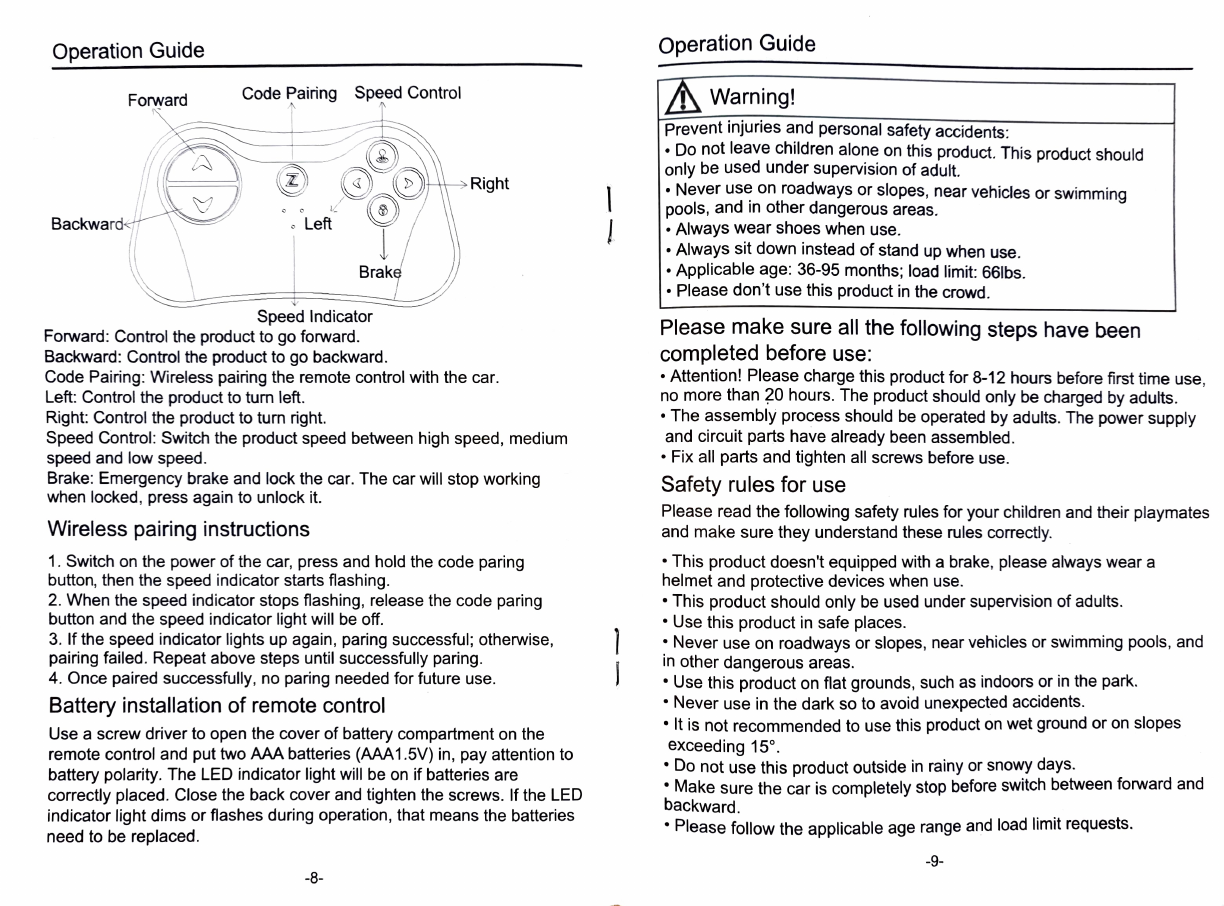
Modern-Depo MX TRUCK User manual

Children's
Ride On
Car
MX
TRUCCK
Instruction
for
Installationand
Operation
Please
read
this
manual carefully before
use.
Please
don't
useit
on
the
roadway
for
itisn'ta
traffic
tool.
This
manual contains important information, please
properly keepitforfuture reference.
For
product
improvement
purpose,
part
of
the
product
structure, appearance,
packing
and
assembly
method
might
be
changedwithout priornotice.
If
there'sany
difference
betweenthis
manual
and the
product,
please
in
kind
prevail
Thanks
for
your
understanding!
1

Contents
Assembly
Parts
List
NO
NAME
PICTURE QTY
NO
NAME
PICTURE QTY
Page
2
.Page
3
...Page
4
..Page
5-7
...Page
8-12
Page
13
Page
14
...Page
15
..
Page
16
1.
About
This
Product
2.
Assembly
Parts
List
3.
Assembly
Parts
Diagram
4.
Assembly
Steps.
5. Operation
Guide.
6.
AboutCharging
7.
Troubleshooting
8.
Maintenance
..
1
Body
2
Windshield
1
1
Seat
1 4
Wheel
4
9.
Battery
Disposal
Steering
wheel
Drive
motor
About
This
Product
2
1
Thanks
for
choosing
our
product.
We
sincerely
hope
this
product
could
bring
happiness
to
your
children.
Please
read
this
manual
carefully
before
use.
Rear
axle
fixed
1
1 8
Charger
Suitable
Age
|Load
Weight
36-95
months
Battery
DC12V7AH1/12V10AH1
mount
Motor
Steering
RS-380
RPM12V5500|
Driving
RS-550
RPM12V10000|
66lbs
9
Window
10
Screw
15
2
Optimum
Temperature
Charging
|8-12
hours
Time
Material
PP
Below
40C
Input:100-240V
50-60HZ
Seat
knob
Charging
no
more
than
20
hours
Instruction
1 1
Output:
12V700mA/12V
Fuse
1000mA
113
*62
*55
CM
10A
self-resetting
Size
Remote
control 1
Warning!
For
your
children's
safety,
please
read
all
warnings
and
instructions
carefully
before
use.
And
keep
this
manual
properly for future
reference.
This
product
should
be
assembled
by
adults
only.
Product
contains
small
parts,
please
keep
away
from children when assembling.
Remove
protective
material
and
plastic
packing
bags
before
assembly,
and
dispose
them
properly
after
assembly
complete.
-2-

Assembly
Steps
Assembly
Parts
Diagram
. This
product
should
be
assembled
by
adults.
Assembly
may
take
40
minutes
or
more.
Unassembled
parts
might
have
hazardous
sharp
edge
or
tip,
and contain small parts, please keep away from children.
Please
confirm
all
mentioned
parts
are
included
before
assembly
and
don't
dispose
them
until
assembly
is
finished.
Assembly
tools
needed:
screwdriver
(not included), pliers (not included),
hammer (not included).
1.
Install
the
rear
axle
fixed
mount
Turn
over
the
car
body
at
first.
Then
take
out
the
rear
axle
fixed
mount
and
fix
it
on
the
car
with 8 flat
head
screws
(4*12).
2.
Install
the
front
wheels
Take
out
two wheels (no distinction between
front
and
rear).
Fit
the
wheel on the front axle, push the quick
release
button
in
the
middle
of
the
wheel
and
Note:
some
parts
need
to
be
installed
on
both
sides
of
the
product.
push
the
wheel
hard
till
it
is
tight.
Repeat
above
steps
to
install
the
other
front
wheel.
Tools
required
NO
NAME
QUANTITY
NO
NAME
QUANTITY
Screwdriver
1
Car
body
Windshield
1
(not
included)
1
4
Wheel
3.
Install
the
rear
wheels
Seat
Steering
wheel
4
Take
out drivemotors (no distinction between
left
and
right)
and
the
remaining
wheels.
.Fit
the
motor
on
the
rear
axle.
6
Drive
motor
2
Pliers
(not
included)
Then
fit a
wheel
beside
the
motor,
push
the
quick
release
button
in
the
middile
of
the
wheel
and
push
the
wheel
hard
till it
is
tight.
Repeat
above
steps
to
install
the
other
rear
Hammer
(not
included)
wheel.
SE
4-
-5

Assembly Steps Assembly Steps
4.
Install
the
windows
7.
Connect
the
power
unit
Take
out
the
windows.
Distinguish
left
and
right,
align
them
to
the
slots
on
the
door
respectively
and
push
down
with
force.
Before
install
the
seat,
match
all
wiring
harnesses
on
the
battery
and
in
battery
groove
according
to wire
colors.
Warning! Anode and
cathode
reverse
is
not
allowed.
Then
severallyfix them with 3 flat
head
Screws
(4*12).
A
Battery
Safety
Warning!
Different
models
or
new
and
used
batteries
cannot
be
used
together.
Non-rechargeable
batteries
cannot
be
charged.
Rechargeable
batteries
can
only
be
charged
by
adults.
Please
take
out
the
rechargeable
battery
from
product
before
charging.
Always
connect
the
anode
and
cathode
correctly.
Exhausted
batteries
should
be
taken
out
from
the
product
in
time.
Short
circuit is
prohibited.
Do
not
use
dry
batteries.
5.
Install
the
steering
wheel
Connect
the
wire
connector
on
steering
wheel
and
steering
groove,
and
place
it
into
the
steering
groovve.
.Then
hold
the
buttons
on
both
sides
of
the
steering
wheel
column,
and
gently
push
the
steering
wheel
into
the
groove
until
the
buttons
stuck
in
the
holes
on
the
groove.
8. Install
the
seat
Find
the
seat
limiting
device
on
the
ca.
Align
the
seat
to
the
limiting
device
and
fix
it.
Insert
the
seat
knob
into
the
hole
at
front
end
of
the
seat,
and
rotate
for
90°
to
lock
the
seat.
6.
Install
the
windshield
Connect
the
wire
connector
on
windshield
and
car
body
(not
applicable
for
the
version
without
alarm
light).
Then
align
the
windshield
to
the
slot
on
the
car
and
push
down
to
fix it.
9.
Install
the
music
player
Embed
the
music
player
in
the
opening
beside
steering
Then
fix
it
with a flat
head
screw
(4*12).
vheel (as shown).
-6

Operation
Guide
Operation
Guide
Forward
Code
Pairing
Speed
Control
AWarning!
Prevent
injuries
and
personal
safety
accidents:
.Do
not
leave
children
alone
on
this
product.
This
product
should
only
be
used
under supervision of adult.
|.Never
use
on
roadways
or
slopes,
near
vehicles
or
swimming
pools,
and
in
other
dangerous
areas.
|.
Always
wear
shoes
when
use.
.
Always
sit
down
instead
of
stand
up
when use.
.Applicable age:
36-95
months;
load
limit:
66lbs.
Please
don't
use
this
product
in
the
crowd.
Right
Backward
Left
Brake
Speed
Indicator
Forward:
Control
the
product
to
go
forward.
Backward:
Control
the
product
to
go
backward.
Code
Pairing:
Wireless
pairing
the
remote
control with
the
car.
Left: Control
the
product
to
turn left.
Right Control the product
to
turn
right.
Speed
Control: Switch
the
product
speed
between
high
speed,
medium
speed
and
low
speed.
Brake:
Emergency
brake
and
lock
the
car.
The
car
will
stop
working
when
locked,
press
again
to
unlock
it.
Please
make
sure
all
the
following
steps
have
been
completed
before
use
Attention! Please charge this product
for
8-12 hours before
first
time
use
no
more
than
20
hours.
The
product
should
only
be
charged
by adults.
The
assembly processshould
be
operated
by
adults.
The
power
supply
and
circuit
parts
have
already
been
assembled.
Fix
all
parts
and
tighten
all
screws
before
use.
Safety
rules
for
use
Wireless
pairing
instructions
Please
read
the
following
safety
rules
for
your
children
and
their playmates
and
make
sure
they
understand
these
rules
correctly.
1.
Switch
on
the
power
of
the
car,
press
and
hold
the
code
paring
button,
then
the
speed
indicator
starts
flashing.
2.
When
the
speed
indicator
stops
flashing,
release
the
code
paring
button
and
the
speed
indicator
light
will
be
off.
3.
If
the
speed
indicator lights up again, paring successful; otherwise,
pairing failed.
Repeat
above
steps
until
successfully
paring.
4.
Once
paired
successfully,
no
paring
needed
for
future
use.
This
product
doesn't
equipped
with a brake,
please
always
wear
a
helmet
and
protective
devices
when use.
This
product
should
only
be
used
under
supervision
of
adults.
Use
this
product
in
safe
places.
Never
use
on
roadways
or
slopes,
near
vehicles
or
swimming
pools,
and
in
other
dangerous
areas.
Use
this
product
on
flat
grounds,
such
as
indoors
or
in
the
park.
Never
use
in
the
dark
so
to avoid
unexpected
accidents.
It
is
not recommended
to
use this product
on
wet ground
or
on
slopes
exceeding
15°.
Do
not
use
this product outside
in
rainy
or
snowy days.
Make
sure
the
car
is
completely
stop before switch
between
forward
and
backward.
Battery installation
of
remote
control
Use
a
screw
driver
to
open
the
cover
of
battery
compartment
on
the
remote
control
and
put
two
AAA
batteries
(AAA1.5V) in,
pay
attention
to
battery
polarity.
The
LED indicator light
will
be
on
if
batteries
are
correctly
placed.
Close
the
back
cover
and
tighten
the
screws.
If
the
LED
indicator
light
dims
or
flashes
during
operation,
that
means
the
batteries
need
to
be
replaced.
Please
follow
the
applicable
age
range
and
load limit
requests.
9
8-

Operation
Guide
Operation Guide
It
is
prohibited
to
change
the
circuit
or
add
other
electric
parts.
.Check
the
wires
regularly.
Check
the
product before
each
use
to
ensure
the
safety
of children.
Do
not
let
children
stand
near
this
product
when
it
is
moving,
especially
MP3
player
near
the
wheels.
B)
Fast
This
product
has
adjustable
seatbelt, please
show
your
children
how
to
use
it
properly.
Please
fasten
the
seatbelt
when
use.
88.8vD
Operation
steps
(please make
sure
the
car
is powered on)
Important!
Always
stop this
product
before
change
the
speed
or
direction
to
avoid
gearbox
and
motors
R
START
Power
switch
2
STOP
3
D
Forward
button
RBackward button
damage._
Siren
button
(this
function
is
invalid
in
the
version without alarm
light)
Foot
pedal
3)
Stop
Release
the
foot pedal.
4)
Backward
Press
the
"R"
button.
Ligkt
4
10
5
11
6 2
1) Turn
on
the
power.
2) Forward
Press
the
"D"
button.
1. Siren button
(whistle
button
for
the
version without alarm
light)
2.
Bluetooth
and
music
button
Step
on
the
foot pedal.
Product
will
go
forward. 3. Light on/off button
4. Music
play/pause
button
5.
USB port
6.
Start/stop
button
(short
press
to
start
the
car,
long
press
to
shut
of)
7.
Forward
button
Stepon the
foot
pedal
Product
will
go
backward.
Removable
battery
box
8. Last
song
(long
press
for volume down)
9.
Backward
button
1.
Remove
the
seat.
2.
Unfasten
the
strap
(as
shown)
and
loosen
the
screws
that
are
used
to
fix
the
battery
box.
3.
Take
out
the
battery
box
and
charge
it.
4. Battery box
can
be
fixed with belt only after
then.
10. Next
song
(long
press
for
volume
up)
11.
AUX
port
12. Charging port
Steering
wheel
Music button
Horn button
-10
-11

Operation
Guide
About Charging
AWarning!
Remove
the
overheated
parts
and
wash your hands
immediately.
Do
not
open
the battery,
it
contains lead and acid substances, which can
cause poisoning
and
corrosion.
Do
not
disassemble the charger. Exposed
wires
would
cause
an
electric
shock.
Charging
must
be
done
by
adults.
Keep
the battery properly. Battery drop
may
permanently damage
it.
Make
sure the circuit
and
pats
are
in
good condition before charging.
Do
not
charge
if
there
is
any
damage.
Battery
runs out
is
not
allowed. Please charge the producttimely after
each
time
use.
If
not
use
for a
long
time,
please
charge
it
regularly
every
month.
Battery
electrode
reverse
is not allowed.
Make
sure
the
battery
is well
covered
to avoid
unexpected
injury
to
children.
Use
this product under supervision
of
adults.
To
prevent children
from
falling
and
injury,
please be
careful
when
using
this
product.
Circuit
diagram
Steering
motor
High/low
speed gear
(Closed
in
high
speed)
Drive
motor
Speed
Forward
Backward
Ground
Disconnection
+12V
Disconnection
Forward/backwatd
gear
Drive
motor
Diode
foot
pedal
switch
Charging
w
port
Fuse
12V
storage
battery
Power
switch
About Charging
Charging
must
be
done
by adults!
Please
turn
off
the
power
when
charging
Please
charge this product for 8-12 hours beforefirst time use.
To
avoid
overheating, do not
charge
for more than
20
hours.
Please
charge
in
time
if
the
car
slowed down
during
normal
driving.
Please
charge timely after
each
time use.
If
the
product
will
not be used
for a long
time,
charge
it
regularly
every
month.
8-12
hours
for
each
time
charging, no more than 20 hours.
AWarning!
Prevent
fire
hazard
and
electric
shock.
Use
the
original
rechargeable
battery
that
comes
with
this
product.
Do
not replace or refit the battery, or
it
may
cause
fire
or explosion.
Do
not
use
the battery or charger
of
this
product
on
other products,
or
it
may
cause
overheating,
fire
or
explosion.
|
Do
not
refit
the
circuit
of
this
product,
that
may
cause
a fire
or
explosion,
or
permanently
damage
the
product.
Do
not
connect
the
power
terminals
directly,
otherwise
fire
or
explosion
may
occur.
Keep
liquids
away
from
charging
devices.
Do
not
charge
this
product
near
overheating
or
flammable
materials
since
inflammable
gas
will
be
produced
when
charging.
Charge
the
battery
in
draughty place.
Use
proper
tools
to
take
out
the
battery
of
this
product.
Do
not
remove
the
battery
by
metal
wires,
or
it
may
cause
a fire.
Please
charge
the
battery
in
dry place.
AWarning!
This
product
is
equipped
with
charging
protection
device.
All
functions wil not
be
available
when
charging.
Charging
port
1. There
is
a charging port on the battery.
2.
Take
down
the
seat
knob
and
remove
the seat.
3. Plug the charger
in
the charging port.
4.
Plug
the
charger into
the
socket
and
start charging.
-12- -13-

Troubleshooting
Troubleshooting
Problem:
battery
cannot
be
charged
Cause:
battery connector
is
loose
Make
sure
the
battery
connects
well
before each time
use.
Cause: The charger
is
not plugged
in.
Make
sure
the
charger
plugs
in
and power
is
on.
Cause: charger failure.
Does the
charger
get
hot
when
charging?
If
not,
it
might
have been
damaged.
Please
replace
the
charger
in
time.
Problem:
battery
life
is
short
Cause:
low battery.
Please
charge
timely
after
each
time
use.
If
the
product
will
not
be
used for a
long
time,
charge
it
regularly
every month. 8-12 hours
for
each time
charging
no more
than
20
hours.
Problem:
The
product did not move
Cause:
low
battery.
Please
charge
the
product
timely
after
each
time
use.
If
the
product
will
not
be
used
for a
long
time,
charge
it
regularly
every month. 8-12
hours
for
each
time
charging,
no
more
than
20 hours.
Cause: thermal fuse cut
off.
This
product
is
equipped
with self-resetting fuse. When
the
product is
overloaded
or
be
operated
incomectly,
the
self-resetting
fuse
will
be
cut
off for
5-20
seconds
and
can
be
reused
after
then.
The
self-resetting
fuse
is
under
the
seat.
(As
shown)
To
prevent
the
fuse
from being
cut
off,
please
refer to
the
following advises:
Do not overload.
The
maximum load
weight
is
30KG
Do
not
use
this
product
to
pull
things.
Do not drive on
slopes.
Avoid getting
the
wheels
in
trouble,
which
will
cause
the
wheels
rotate
at
a
Cause:
ageing
of battery
The
ageing
speed
and
degree
of a
battery
is
different
according
to
how often
it
is used.
Please
replace
the
battery
in
time
if
it
is
ageing.
Problem:
there's
some
noise
when
charging
Fuse:10A
It's
normal.
high
speed
and
motors overheating. Problem:
heat
when
charginng
lt's normal.
Do
not
use
this
product
in
hot
weather;,
it
will
cause
accessories
overheating.
Do
not
change
the
circuit
by
yourself,
it
will
cause
short circuit. Maintenance
Adults
should
regularly
check
the
parts
of
this
product,
such
as
battery
charger, wires, switch and others.
Make
sure
all
fixing
parts are
well
fixed
and
no
screw
is loose.
Stop
using
if
potential
risks exist until
repaired.
Make
sure the plastic parts ofthis product are not cracked or broken.
Lubricate
the product after using a period of time
to
prevent rust.
Please
store
the
product indoors.
In
case
of
wet
weather,
please
cover the
product
with
waterproof cloth.
Keep this
product
away
from
heat
source,
or
plastic
parts
will
be
melted.
Please
charge
timely after
each
time use.
If
the product
will
not be used
for
a
ong
time,
charge
it
regularly
every month.
Charging
must
be
done
by
adults.
Do
not
clean
the
product with
soap
and
water, that
will
damage
the motors
and
cause
short
circuit.
Cause:
screws
on wheels
are
loose
When
screws
on
wheels
are
loose,
the
car
will
not
be
able
to
go
forward.
Please
carefully
check
all
wheels
and
make
sure
all
screws
are
tightened
before
each
time
use.
Cause:
battery
connector
is
loose
Make
sure
the
battery
connects
well before
each
time use.
Cause:
battery is
damaged
Make
sure
to replace
the
battery timely
and
insert
it
correctly.
Cause:
circuit is
damaged
Keep
the
product
away
from liquids
and
sands
to prevent circuit
damage.
Cause: motor
is
damaged
Needs
professional
maintenance.
Wipe
clean
with
dry
cloth.
Non-waxy
furniture
polish
can
be
used
instead
of
Soft
cloth to
wipe
the
plastic
parts,
so
to
achieve
surface finish effect.
Do
not
use
this
product
in
dangerous
areas
like
streets, roads, slopes
and
gravel
roads
etc.,
so
to avoid
motors
and circuit damage.
lease
turn
off
the
power
when
not
use
this
product.
Disconnect
the
battery
if
not
use
for
a
long
time.
-14- -15-

Battery
Disposal
Disposal
of
battery
Storage
battery can
be
recycled
and
cannot
be
disposed
at
will.
Do
not
dispose
the
battery
near
the
fire,
it
will
cause
explosion
and
leakage.
Do
not
dispose
the battery
together
with household waste.
It
is strictly forbidden
by
law
to
incinerate
batteries
and
household
waste
together
Dispose
used batteries
into
the designated dustbin or
give
it
to a professional
worker.
Please
consultthe
relevant
institution
for
a reasonable
way
to
handle
the
battery
before
dispose
it
by
yourself.
Charge
the battery before use. Charging must
be
done
by
adults.
Charging
within
the specified voltage range
only.
Do
not operate the product
when charging.
Regularly
Check
the
sockets,
wires,
charging
case
and
other
parts.
Stop
using
the
product
if
there is any
damage.
Remove
the
batterycover
in
back
of
the remote control, put
in
2
AAA
batteries
corectly. (Batteries should be replaced by adults).
Make
sure the positive and negative poles
of
all
batteries are correct placed.
Non-rechargeable batteries cannot
be
charged; take
it
out
of
product after
run
out.
Different
models
or
new
and
used
batteries
cannot
be
used
together
Check
the storage battery regularly;
if
any
damage
is
found, please stop using
it
until repaired.
-16-

Instruction for 2.4G Remote Control
of
Electric
Ride-on Car
Features
Supply Voltage:
2X
A5V
-Frequencyi
2.4GHz
Button Description
Forword
Poring
Speed
A
Right
Bockword&<7
Left
Brake
Speed
indicotor
light
-Forward: Direct
the
ride-on
car
to
move forward
-Backward: Direct
the
ride-on
car
to
move
backward
-Paring:
Pair
the
ride-on
car
with a
remote
controller
-Left: Direct
the
ride-on
car
to
turn
left
Right:
Direct
the
ride-on
car
to
turn right
-Speed:
Adjust
the
speed
of
the
ride-on
cars
movement
as
low,
moderate
or high
-Brake: Immediately
stop
the
ride-on
car and lock
the
car until released
Pairing Instruction
1. Turn
on
the
power
of
the
ride-on
car, press
and
hold
the
pairing
button
until
the
speed
indicator light switches on without
flashing
2.
Release
the
pairing button,
and
the speed indicator light
will
switch off
3.
If
the
speed
indicator
light
switches
on
again,
then
the
pairing
is
successtut,
if
not.
please
repeat
steps
1
and
2
4.
One
successful
pairing
is
all,
and
no
more
pairings
are
needed
in
later
use
Battery
installation
Open
the
back
cover
of
the
remote
contro
wIn
screwdriver
and
insert
two
triple
A
batteries
(AAA
1.5V).
Please pay attention
to
the polarily. Close the back cover
and
tighten the screws
when
the
LED light is
on,
indicaing
battery
installed
properly.
Battery
needs
to
be
replaced
when
the
LED
light
dims
or
blinks.
Table of contents