Modernum Smart 20 User manual

USER GUIDE
Battery Charger
Smart 2
0
for 1-20Ah lead-acid batteries
lease read this user guide carefully before using the charger
Use protective eyewear when handling batteries
INTRODUCTION
Thank you for choosing a professional quality product from
MODERNUM! This advanced and user-friendly battery
charger will optimize performance and lifetime of your
battery.
This intelligent and fully automatic charger can be used to
charge any type of lead-acid batteries, including AGM and
GEL types from 1 to 20Ah.
Visit www.modernum.se for more info about us.
SAFETY
•This charger is made for charging 12V lead-acid
batteries. Do not use it for other purposes or with other
battery types.
•Do not try to recharge non-rechargeable batteries.
•Do not use the charger if its casing, terminals, clamps or
cables are damaged.
•If the supply cord is damaged, it must be replaced by
the manufacturer, its service agent or similarly qualified
persons in order to avoid a hazard.
•Use protective eyewear when handling batteries, and
connecting or disconnecting it.
•Battery acid is corrosive. If it comes in contact with skin
or eyes – rinse with plenty of water and contact a
doctor immediately.
•DURING CHARGE, A BATTERY CAN EMIT
EX LOSIVE GASES. MAKE SURE THERE ARE
NOT S ARKS OR FLAMES CLOSE TO IT, AND
ENSURE GOOD VENTILATION.
•Never charge a battery that is frozen.
•Do not place the charger on top of the battery.
•Do not cover the charger.
•The charger is protected against overheating. If the
ambient temperature is too high, the charging current
is reduced.
•During the charge, the charger may intermittently
provide a 15.0V charge voltage. Ensure that no
equipment that may be damaged by this voltage level is
connected to the battery during charging.

•THIS A LIANCE CAN BE USED BY CHILDREN
AGED FROM 8 YEARS AND ABOVE AND
ERSONS WITH REDUCED HYSICAL,
SENSORY OR MENTAL CA ABILITIES OR LACK
OF EX ERIENCE AND KNOWLEDGE IF THEY
HAVE BEEN GIVEN SU ERVISION OR
INSTRUCTION CONCERNING USE OF THE
A LIANCE IN A SAFE WAY AND
UNDERSTAND THE HAZARD INVOLVED.
CHILDREN SHALL NOT LAY WITH THE
A LIANCE. CLEANING AND USER
MAINTENANCE SHALL NOT BE MADE BY
CHILDREN WITHOUT SU ERVISION.
•Make sure that the charger switched to maintenance
mode after normal charging is completed, if you want
to leave it unattended and connected for a long time. If
it does not leave charge mode after maximum time,
disconnect charger from the battery. See technical
specifications below for info about time limit.
•All batteries will eventually fail. If that happens during
charging, the charger will detect it, but there may be
some rare faults in the battery, so do not leave it
charging unattended for longer periods of time.
•You need to have read and understood the full context
of this user guide before you start using the battery
charger.
GETTING STARTED
1. Connecting the charger: The battery terminal not
connected to the chassis has to be connected first. The
other connection is to be made to the chassis, remote
from the battery and fuel line. The battery charger is
then to be connected to the supply mains. The red
clamp should connect to the positive (+) pole of the
battery and the black clamp to the negative (-) pole.
For stand-alone batteries: Connect the red clamp to the
battery’s positive (+) pole, and then the black clamp to
the battery’s negative (-) pole. Then connect the
battery charger to the supply mains.
2. A constant green light means the battery is fully
charged.
3. After charging is complete, the charger will switch to a
maintenance mode to keep the battery fully charged as
long as charger is plugged in to the mains.

INSTRUCTIONS
1. Connect the charger as explained in GETTING STARTED,
point 1, above. After 1-5 seconds the charger will
initialize while the green light will flash 3 short, 3
long, 3 short . When it changes to
short flashes
, it is ready to charge.
2. Green long flashes indicate correct connection to the
battery. If connection is wrong it will continue the short
flashes (check polarity of clamps and that the
connectors are firmly connected).
= No battery / wrong connection
3. Approximately 3 seconds after the battery is connected,
the charging will start, indicated by long flashes every
second.
4. If the battery is very empty and/or big, the indication
will change, after a couple of hours, to long flashes
every two seconds.
5. When battery is 50% charged, the flashes will change to
two flashes every second.
6. When charging is complete the light will be constant
green. After charging, disconnect the battery charger
from the supply mains. Then remove the chassis
connection and then the battery connection.
For stand-alone batteries: After charging, disconnect
the charger from the supply mains. Then remove the
black clamp and then the red clamp.
7. By leaving the clamps on the battery after charging, and
mains plugged in, the charger will automatically switch
to 13.7V maintenance mode as long as it is connected
to the mains.
8. To stop or interrupt charging, unplug the supply mains,
at any time, and then remove clamps.
CHARGING CURVE
Reference charging time (hours) to 85 % capacity.
Time varies with different batteries and conditions.

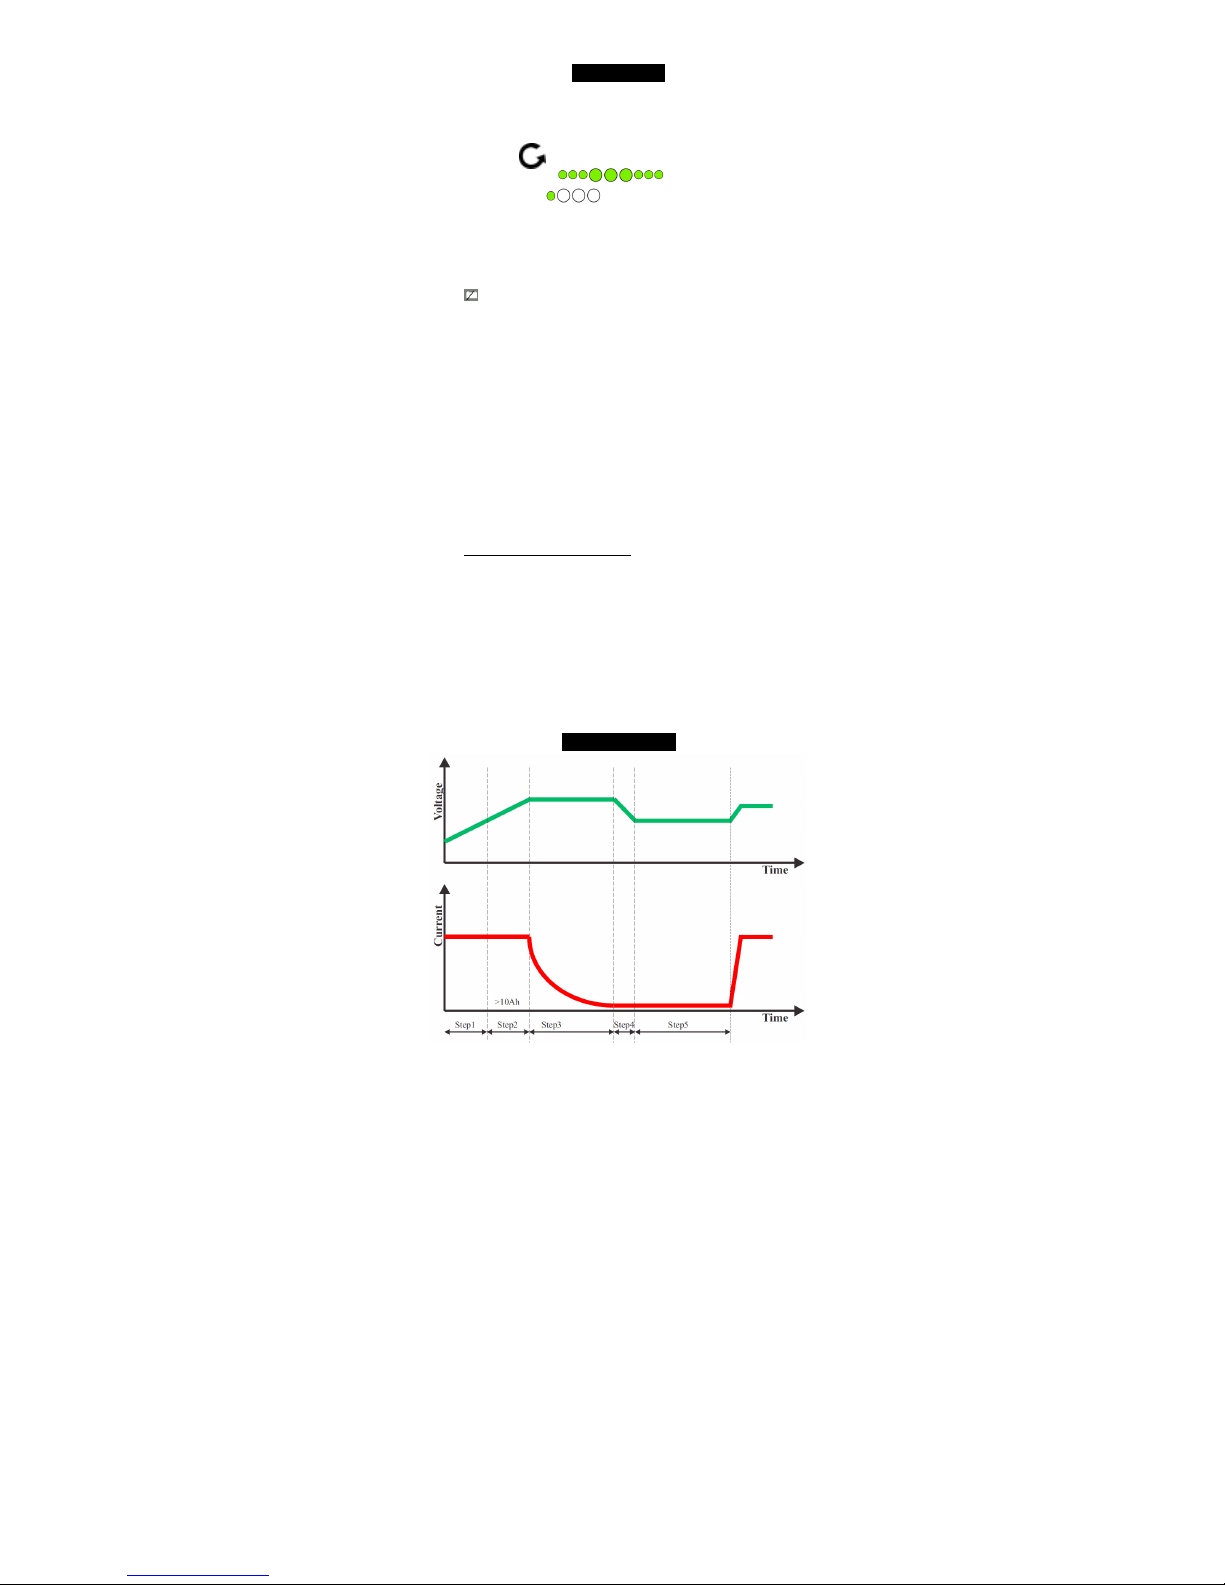
1.2Ah: 1.5h 7Ah: 6h 12Ah: 9h 20Ah: 15h
Notes: min charge time is 6h. If left connected after step 5, it
is programmed to restart from Step1 after 7 days, to refresh
the battery.
SPECIAL FEATURES
Temperature en or: The temperature affects the batteries
ability to receive charge. This product has a sensor in the
battery cable connector, which compensates for
temperature variations to give optimal charge in cold as well
as warm conditions, avoiding the common problem of
insufficient charging in cold weather and over-charging at
high temperatures.
Storage and travel: To make it easy to bring the charger with
you, and for compact storage, you can wind the cables
around the charger’s holders in the back and front, and then
lock them together with the included strap.
FAULTS INDICATIONS & TROUBLE-SHOOTING
1. Fault: Charging does not start , i.e. green light
does not change from quick to slow flashes, when
battery is connected.
Probable cau e 1: Reversed polarity.
Action: disconnect charger from the mains, re-
connect the clamps correctly, connect charger to
mains again.
Probable cau e 2: Clamps do not have good
connection to battery.
Action: Check that clamps are connected well to
metal on both battery poles. Check that
connector on the clamp cable is pushed all the
way into connector on charger’s connector.
Probable cau e 3: The battery voltage is too low
for the charger to detect it, and it will not start.
This may be because the battery is worn or faulty
or has been overly discharged.
Action: You can try to connect another battery in
parallel, like when using jump-start cables:
Disconnect the charger, and then connect the
batteries to each other by connecting their
positive terminals (+) together using a jumper
cable, and then connecting the negative terminals
(-) using another jumper cable. Then connect the
charger and retry the process. If charging starts,
disconnect the jumper cables and let charging
continue until battery is fully charged. If the
charging does not begin the battery is probably
defective and should be replaced.
MAINTENANCE
The charger is entirely maintenance-free. It has no user-
serviceable parts. Opening the charger will void the

warranty. The case may be cleaned using a soft, damp cloth.
The charger must be disconnected from the mains when
being cleaned.
ACCESSORIES
The charger comes with clamp cables and a set of ring
terminal cables, which can be used for fixed installations. To
change cables, press the unlock flange on the connector and
pull it out. Connect the desired new cable. ush it all the
way. The flange should lock it.
TECHNICAL SPECIFICATIONS
Model: Smart 20
Type: switch mode charger,
microprocessor controlled
For battery types (12V) lead-acid (incl AGM,GEL)
For battery capacity 1 – 20Ah
Input voltage 220-240 VAC
Input current 0.3A
Back current ≤1mA
Charging Voltage 13.7 – 15.0VDC
Charging current Max 2A
Ripple voltage Max 30mV
Ambient temperature - 25 – +50°C
Cooling Convection
Spark protection Yes
Temperature sensor Yes (≈0.3V/10°C)
Min charging time 6 hours (approx.)
Max charging time 24 hours (approx.)
Charging type 5 step
Battery DC cable (length) 1300 mm
ower cable (length, type) 1000 mm, 2x0.75 mm
2
Dimensions (LxWxH) 157x33x34 mm
International rotection class I 44
Weight 0.35 kg (net)
CE MANUFACTURER DECLARATION
Made by: HF SM ower Innovations AB
roduct: Battery charger Smart 20
The manufacturer guarantees that the unit complies with the
relevant standards. Tested and approved by Intertek.
LIMITED WARRANTY
We guarantee the quality of this product. It is made to meet
high industrial production standards for electronics. This
limited warranty is made to the original purchaser of this
product, and is valid from the date of purchase, meeting the
mandatory warranty rights for the country of purchase. If the
product has workmanship defects or damages relating to
manufacturing or distribution, contact the store where you
purchased the charger for warranty claims. The warranty is
void if the unit has been damaged due to careless handling,

abuse or unauthorized repair, or has been opened, or screws
and/or labels have been removed. We are not responsible
for any consequential costs, or shipping- or handling costs for
the return to the place of purchase. Nor are we liable under
any other warranty than this one. This warranty is not
transferrable.
Note: Measurements such as time, %, lengths etc are approximates.
Doc.No: MAN-293-08-ENGrev0-5 all rights reserved
Table of contents
Other Modernum Batteries Charger manuals