Modifry Products DCI-3 User manual

07/13/18 ver 3.0 1 of 3
Sony-Pioneer Wired DCI-3
The DCI does NOT work like the factory dash controls so review the Operation section before using it. Be careful if you
are doing your own wiring and follow the diagrams below; do not assume “color-to-color” wiring.
Do NOT mount the DCI module behind, below, or above the HU where it can get crushed or overheated. Put it in
an accessible place under the dash so you can change the switch options at a later date.
Important note – Some head units have the wired remote feature disabled from the factory and require changing
an option in the setup menu. If your DCI doesn’t work check your HU manual carefully for this setting.
Installation using the Pioneer Plug-n-Play harness
Insert the black connector of the PnP harness into your head unit,
connect the blue plug into the Honda stereo harness, and then plug DCI
module into the small white connector. The supplied 3.5mm cable goes
into the jack on the DCI and the other end into the “Wired Remote” input
on the head unit. This is usually a 3.5mm jack on the rear panel labelled
“W/R”. NEVER connect the DCI to an AUX or MIC jack.
If you need an “amp turn-on” wire, T-tap the light blue wire with a white
stripe, it’s located next to the red wire in the blue connector.
If you purchased the SCV Wiring Kit with the PnP harness follow the
instructions included in the kit to complete that part of the installation.
Installation without the Plug-n-Play harness
If you have the DCI Adapter Harness your
job just got a lot easier because it’s the
only adapter on the market that includes
the wires for the S2000 dash controls, and
it comes pre-wired for the DCI.
If you have a generic adapter harness you
will have to splice the DCI red and black
wires into the switched power wires for the
head unit, and then splice the DCI green
and purple wires directly into the factory
stereo harness green/red and yellow/blue
wires (as if the DCI Adapter Harness in the above diagram were missing). The DCI Blue wire is optional and is described
in detail below.
Plug one end of the included 3.5mm cable into the jack on the DCI and the other end into the “Wired Remote” input on the
head unit (see your head unit manual to determine the jack location). This is usually labelled “W/R” on Pioneer and
“Remote In” on Sony head units. Some Sony head units have a recessed jack so make sure the plug goes in all the way.
NEVER connect the DCI to an AUX or MIC jack.
Blue wire - Optional Wired Mute connection - The DCI can perform the mute function one of two ways: either through
the 3.5mm cable that is used for the rest of the commands or via a dedicated Mute or ATT lead on the head unit. If your
head unit has a wire lead for this purpose you should set DCI switch #1 to OFF to utilize that feature. This will usually
pause playback and fully mute the sound, similar to the way the OEM radio operated.
If your head unit does not have a dedicated mute wire then you must set DCI switch #1 to ON, which will send the MUTE
command via the 3.5mm cable. In most cases this will lower the volume but continue to play, as this feature is controlled
by the head unit software and unfortunately can’t be changed to provide the “pause” function.
SCV - If you purchased the SCV wiring kit refer to the instructions in the kit to install and program the SCV feature.

07/13/18 ver 3.0 2 of 3
Sony-Pioneer Wired DCI Dip Switch Settings
Change switches with the power off, as the DCI only reads the switch
settings on power-up.
Switch 1 - Mute Control – Set to OFF if your head unit has a dedicated
mute wire and you want to use it for the mute function. If your HU does not
have a dedicated mute wire set switch #1 ON, which will, send a mute
command via the 3.5mm cable. How that command works depends on
your head unit’s feature but usually lowers the volume but continues to play.
Switch 2 - Tap-n-Press – This switch activates the “Tap-n-Press” feature
which changes how the MODE and CH dash buttons work. Setting switch 2
ON causes the DCI to perform different commands depending on how long
you hold MODE or CH before you release the button. See the Operation
section for details.
Switches 3 & 4 - Head Unit Brand – Set these switches for your head unit
brand.
Trouble getting your DCI to work? See important tips below and on our web site.
We test every DCI using an after-market head unit and a dash control mockup before it’s packaged for sale, so we are
pretty sure the product we ship is fully functional. In most cases you will get it working faster if you assume the DCI is
good and look for a problem with installation or setup.
Troubleshooting Tips – One of these tips solves over 99% of the “my DCI doesn’t work right” emails we receive,
though for some reason it frequently takes 4 or 5 (or in one case 11) emails before the customer figures it out.
1. Review the DCI operating instructions. The DCI does NOT work like the OEM system and some users think there’s
something wrong when it doesn’t act like their original dash controls.
2. If the dash mute is on, the DCI will appear dead, as it disables all other commands until mute is turned off again.
3. Verify wiring and switch settings. Get a friend to review your work; it helps to have someone who hasn’t been staring
at it for 2 hours look it over.
4. Make sure you’re not setting the DCI switches up-side down. Yes, it happens.
5. If you’re using an adapter harness check the connector for bent pins. These use long thin pins that must align
perfectly with a tiny hole in the mating socket. If a pin misses the hole it can get bent out of alignment and bend
sideways. We’ve even seen cases where the pin enters the hole at an angle and so makes intermittent contact with
the terminal socket, so make sure the pins are straight.
6. Always change switch settings with power off, as the DCI only reads the switches during power-up. This can be
especially confusing if the switches are set wrong initially and the DCI doesn’t work when you first turn the ignition on.
Some users then check the manual and set the switches correctly, but the DCI still doesn’t work (because they didn’t
cycle power), so now they think the DCI is bad. Set the switches according to the manual and LEAVE THEM ALONE.
Trying every possible switch combination “in case the manual is wrong” is DUMB and will not fix the problem.
7. Connect the included 3.5mm cable from the DCI to the HU “remote control input” jack (see your HU manual for
location). This is how the remote control signals get from the DCI to the HU. Some people think the cable is for an
MP3 player or plug it into AUX; others just ignore it. Seriously, you would be surprised how many customers don’t
connect it and then wonder why the DCI isn’t working.
8. READ YOUR HU MANUAL. Some head units (especially Sony) come with the remote control input disabled from the
factory and it must be enabled through a menu option. I will no longer read your head unit manual for you and tell you
what it says in an email.
9. Swap the 3.5mm cable we supplied with a known good one. We see about 1/2% failure after we test them. Sorry, but
it happens and there’s not much we can do about it. Fortunately it’s easy to test and a simple thing to fix.
10. If you are using SCV and it doesn’t seem to work, hit the MODE + CH button combination a couple times and try
again. If it still doesn’t work then check your connection to the speed signal wire. We test the SCV function on every
DCI before it ships so we know it worked when it was sealed in the pink bag.

07/13/18 ver 3.0 3 of 3
Operation of the DCI-3
Please note that the DCI does not operate exactly like the factory stereo controls. This is because aftermarket head units
use different commands than the factory head unit. For example, the OEM radio cycles from CD to AM Radio to FM radio
with one button (Mode). Not one after-market radio does this; they all use 2 separate controls; one to change Sources
(CD or Radio) and a second button to change AM-FM bands. The same behavior exists with "next track" and "next radio
preset". OEM does this using one button because the head unit is designed that way, but all after-market head units use
two separate buttons for those commands.
Tap-n-Press Feature
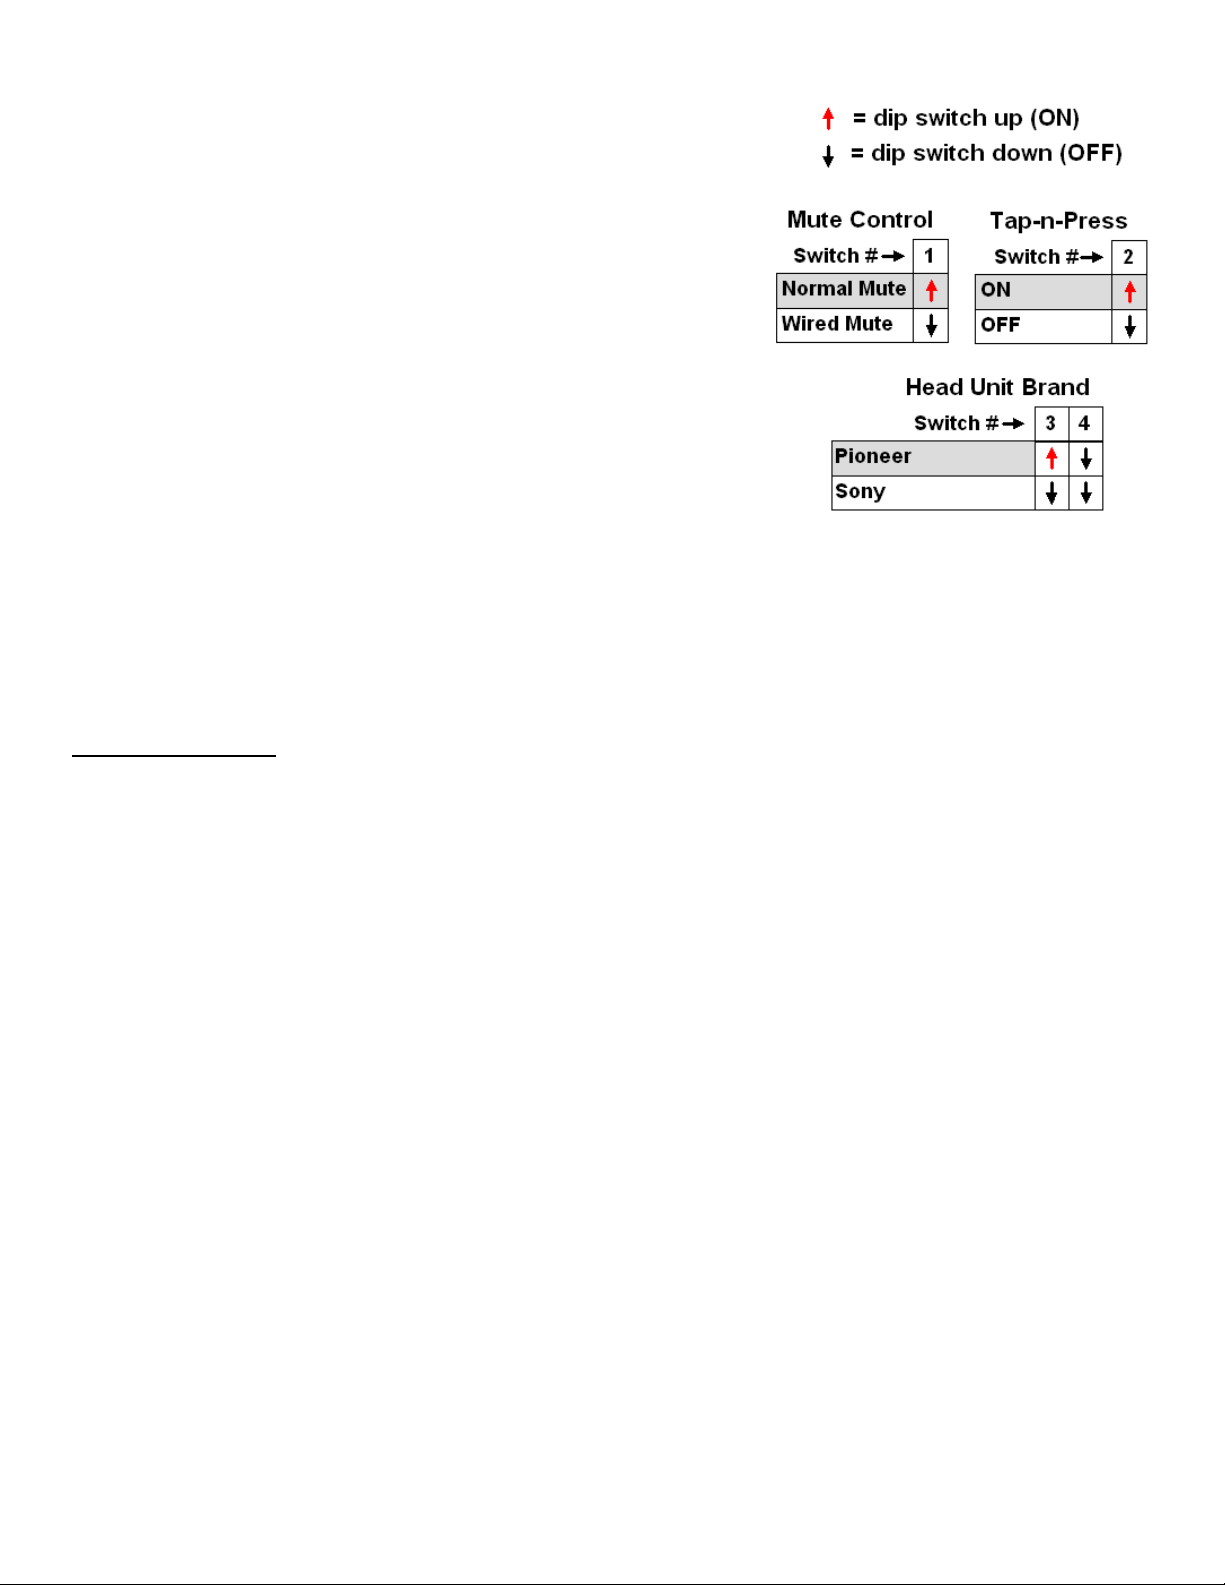
As shipped, DCI Tap-N-Press is disabled. Enable it by setting switch 2 ON, as shown on page 1.
For some head units Tap-n-Press makes it easier to perform the “Next Song/Station” commands. Once set, the DCI will
perform different commands depending on how long you hold the MODE or CH button depressed before you release
them. If you give the button a quick “Tap” you get one command; if you “Press” the button longer you get a different one.
While this sounds confusing at first it’s actually very easy to use, and the benefit is that the most common commands are
now on the easiest to hit buttons – Tap MODE and Tap CH.
A “Tap” is defined as holding the button for less than ½ second. A “Press” is when you hold the button longer than ½
second. If you look at the table below you will see that tapping the MODE button performs the Next Track function if
you’re listening to CD or it does Seek Up if you’re in radio mode. If the MODE button is pressed longer than ½ second it
will perform its “normal” function – changing sources. Likewise, I put the Disk Up and Next Radio Preset commands on
the CH button, so tapping CH allows you to change disks (or MP3 folders) if you’re listening to a CD or it will jump to the
next preset when you’re in radio mode. A longer “Press” of the CH button does its normal AM/FM Band function.
In previous versions of the DCI these functions were only available through “button combinations” where you pressed two
buttons at once. Those combinations are still there, but by activating Tap-n-Press you can perform the most common
commands with a quick Tap of the MODE or CH buttons.
Special note on the MUTE function – When the DCI receives a MUTE command from the dash controls it disables all
other DCI commands, including the SCV function. This is because the head unit will come out of MUTE if it receives
another command and that can be pretty annoying, especially if you have SCV enabled. When MUTE is cycled back OFF
via the dash switch the other dash switches will be enabled again and the DCI will adjust the volume based on your new
speed (if it changed while you were muted).
Functions provided by using a single dash switch – Tap-n-Press commands are in bold and italics
Dash Switch
Normal Functions (Tap
-
n
-
Press turned OFF)
Tap
-
n
-
Press Functions
MUTE mutes the audio output, some HU will pause mutes the audio output, some HU will pause
Tap MODE changes source (Radio, CD, Aux/Changer) Next Track or Seek Up
Press MODE changes source (Radio, CD, Aux/Changer) changes source (Radio, CD, Aux/Changer)
Tap CH changes Radio bands (FM1, FM2, AM1 etc)
Disk Up or Next Radio Preset
Press CH changes Radio bands (FM1, FM2, AM1 etc) changes Radio bands (FM1, FM2, AM1 etc)
Volume
Up/Dn
adjust volume up or down in steps, hold to
adjust rapidly
adjust volume up or down in steps, hold to
adjust rapidly
Functions provided by pressing multiple buttons
Hold this button
and press this button
to get this function
MODE
Volume Up
Next Track or Seek Up (hold for fast-forward)
MODE
Volume Down
Previous Track or Seek Down (hold for fast-rewind)
CH
Volume Up
Disk Up or Next Radio Preset
CH
Volume Down
Disk Down or Previous Radio Preset
MODE
CH
Toggles the SCV feature between your 2 settings
Table of contents
Other Modifry Products Automobile Accessories manuals
Popular Automobile Accessories manuals by other brands

APS Auto Parts Specialist
APS Auto Parts Specialist IB06EJJ9 installation instructions

iBeam
iBeam TE-BTM45 user manual

Connects2
Connects2 CAM-54 user manual

ULTIMATE SPEED
ULTIMATE SPEED CARBON Assembly and Safety Advice

Continental Refrigerator
Continental Refrigerator NTG7 MID LFT2 User instruction manual

Metra Electronics
Metra Electronics 99-7875 installation instructions