mods4cars smartTOP STHFJR1 Owner's manual

OPERATION AND PROGRAMMING
STHFJR1
Comfort Roof Control Module designed for
• Jaguar F-Type
Firmware v2.00 and up
Further information and manuals for all products can be found on our web site
w w w . m o d s 4 c a r s . c o m
PLEASE READ THE COMPLETE MANUAL CAREFULLY BEFORE USING THIS PRODUCT.
We explicitly point out that all functions of this control unit should be used only while
exercising caution and responsibility. We can NOT be held liable for any damage or injury
caused by installing or using this product. Operation must be supervised and paid attention to
in order to ensure that there are no objects or persons in range of moving parts due to the fact
that top mechanics do not have pinch protection. Please study and be aware of the procedures
to interrupt an ongoing operation in an emergency.

Important Information. READ BEFORE USING!
PRINTING THIS MANUAL
This manual is designed to produce completely filled pages. In order
to get best print results, simply set the borders to minimum settings
in the browser's page setup menu and disable headers and footers.
Activate the print preview and if necessary decrease the zoom level
until all pages are shown correctly.
ALL IMAGES CAN BE CLICKED FOR FULL SIZE in the browser.
TROUBLE SHOOTING - NEED TO CONTACT US?
If you run into any problems after installing the module, please go
over the manual again in great detail, clicking every photo for full
size!
We now have a full Knowledge Base with Support Ticket system
available online at www.mods4cars.com/support
If you need to contact us, the best and fastest way to do so is by
opening a support ticket there
This module comes with our USB Field Upgrade and
Configuration Port! We recommend connecting it to a computer
BEFORE YOU INSTALL and using our support app "m4cconnect"
to do a quick firmware update check. M4cconnect as well as all
other information regarding USB update and configuration can be
found at www.mods4cars.com/usb. You can even configure and
activate your favorite module functions and settings on screen
before the module is installed in the car! It is a good idea to
permanently install the USB cable with the module in the car,
leaving the computer plug in an easily accessible spot for later use
with a Wifi/3G/4G connected laptop.

Detailed function description (Factory setting underlined)
Function 1 - MODULE MODE + MASTER SWITCH ( 0=OFF / 1=ON / 2=EXT / 3=EXP )
The module can quickly and easily be enabled and disabled using this function. It acts like a master switch. When disabled, the module
becomes completely inactive and behaves as if it was not installed while keeping all other function settings intact for when it is re-enabled
later.
• Setting 1 is the regular operation mode with emphasis on safety. Turning the ignition on or off as well as hitting any button on the remote at
any time during remote operation immediately stops an ongoing top operation.
• Setting 2 is the extended operation mode with emphasis on convenience. Starting or stopping the engine will not stop a top operation and
it is possible to lock or unlock the doors one time from the remote while the top is moving.
• Setting 3 is the operation mode designed for responsible experts. It allows the doors to be locked and unlocked more than once. This can
come in handy if after getting out and locking the doors something was forgotten in the car and needs to be retrieved while the top is still
running.
Settings 2 and 3 require extra responsibility and caution to avoid injury by moving top parts to passengers not expecting the top
to continue running after the engine is turned off and due to the fact that the first key press on the remote to lock or unlock the
doors (or continued toggling of the door locks) will not stop the top! To abort the operation, press unlock while the doors are
unlocked or lock while they are locked.
EXTREMELY IMPORTANT: In order to avoid problems with diagnostic tools and to avoid confusion or risk of injury by unexpected
top movement, we urge you to ALWAYS DISABLE the module before taking the car in for routine maintenance or lending it to a
third person! In case of any top malfunction NEVER take the car with the module still installed to an unsuspecting dealer! In such
cases ALWAYS contact Mods4Cars for support first at www.mods4cars.com or completely uninstall the module before a dealer
visit.
Function 2 - Console Switch One-Touch ( 0=OFF / 1=ON / 2=VALET )
This function allows full automatic top operation using the console switch.
• Setting 1 enables One-Touch operation and comfort close for all windows.
• Setting 2 disables opening of the top (Valet Mode), even from the remote!
IMPORTANT: Setting 2 disables top operation completely! If the top unexpectedly does not work, check and make sure VALET
mode is not turned on.
Top operation with the console switch:
• Holding down the switch (longer than 1 sec) in either direction will operate the top in manual mode for as long as the switch is held.
• Tap open 1x: Open the top and bring the windows into the programmed position.
• Tap open 2x: Open the top and bring the windows into the opposite position this one time.
• Tap close 1x: Close top and windows.
• Tap close 2x: Close only the top and leave the windows open.
Comfort close for all windows:
• Tap the top close switch while the top is already closed to roll all windows up.
To interrupt an ongoing operation: Tap the console switch in any direction at any time (ignition must be on!) - even if the top was
started by remote!
Function 3 - Console Switch Invert ( 0=OFF / 1=ON )
This function allows reversing the direction of the console switch.
• Setting 1 activates reversed direction operation.

Function 4 - Remote Top ( 0=OFF / 1=ON )
This function allows full automatic top operation with the original remote fob by pressing the lock and unlock buttons.
• Setting 1 allows opening and closing of the top by tapping the unlock and lock buttons on the remote multiple times.
• If closing the top triggers an alarm or the factory horn signal is undesired, an alternate sequence can be used to close the top.
Top operation with the remote fob using TAPS:
• Tap unlock 3x in 1 sec intervals: Open the top and bring the windows into the programmed position.
• Tap unlock 4x in 1 sec intervals: Open the top and bring the windows into the opposite position this one time.
• Tap lock 3x in 1 sec intervals: Close top and windows.
• Tap lock 4x in 1 sec intervals: Close only the top while leaving the windows down.
• Tap unlock 3x in 1 sec intervals: Close top and windows. (Alternate operation)
• Tap unlock 4x in 1 sec intervals: Close only the top while leaving the windows down. (Alternate operation)
Operation for model years 2015-2017 where the above for technical reasons does not work:
• Tap unlock-lock-unlock in 1 sec intervals: Open the top and bring the windows into the programmed position.
• Tap lock-unlock-lock in 1 sec intervals: Close top and windows.
To interrupt an ongoing operation: Tap unlock or lock again. IMPORTANT: Keep in mind that Extended and Expert modes allow
one time change (or multiple changes) of the door locks! In such case a second key press on the same button will be necessary
to stop the top.
Function 5 - Remote Windows ( 0=OFF / 1=ON )
This function allows separate control of the windows with the original remote fob by pressing the lock and unlock buttons.
• Setting 1 allows opening and closing of the windows by tapping the unlock and lock buttons on the remote multiple times.
Window operation with the remote fob using TAPS:
• Tap unlock 2x in 1 sec intervals: Open all windows.
• Tap lock 2x in 1 sec intervals: Close all windows.
IMPORTANT: Remote window control is NOT possible on model years 2015-2017 where consecutive button presses are not
processed (see roof operation).
Function 6 - Window positions after opening top ( 0=DOWN / 1=UP )
This function determines the position of the windows after an automatic top opening run.
• Setting 0 leaves the windows down.
• Setting 1 raises the windows up.
Function 7 - ECO Mode Auto-OFF ( 0=OFF / 1=MEMORY / 2=ON )
This function allows automatic deactivation of the "Eco Mode" (auto stop/start) when starting the car. By factory this setting reverts to ON
every time the car is started.
• Setting 1 memorizes the last used setting and restores it when starting the car. It can be toggled manually later using the ECO button.
• Setting 2 turns the ECO mode off shortly after starting the engine. It can be activated manually later using the ECO button.

Function 8 - Exhaust Valves ( 0=OFF / 1=MEMORY / 2=ON )
This function allows automatic activation of the "Sport Mode" (exhaust valves) when starting the car. By factory this setting reverts to OFF
every time the car is started.
• Setting 1 memorizes the last used setting and restores it when starting the car. It can be toggled manually later using the exhaust valve
button.
• Setting 2 opens the exhaust valves shortly after starting the engine. They can be closed manually later using the exhaust valve button.
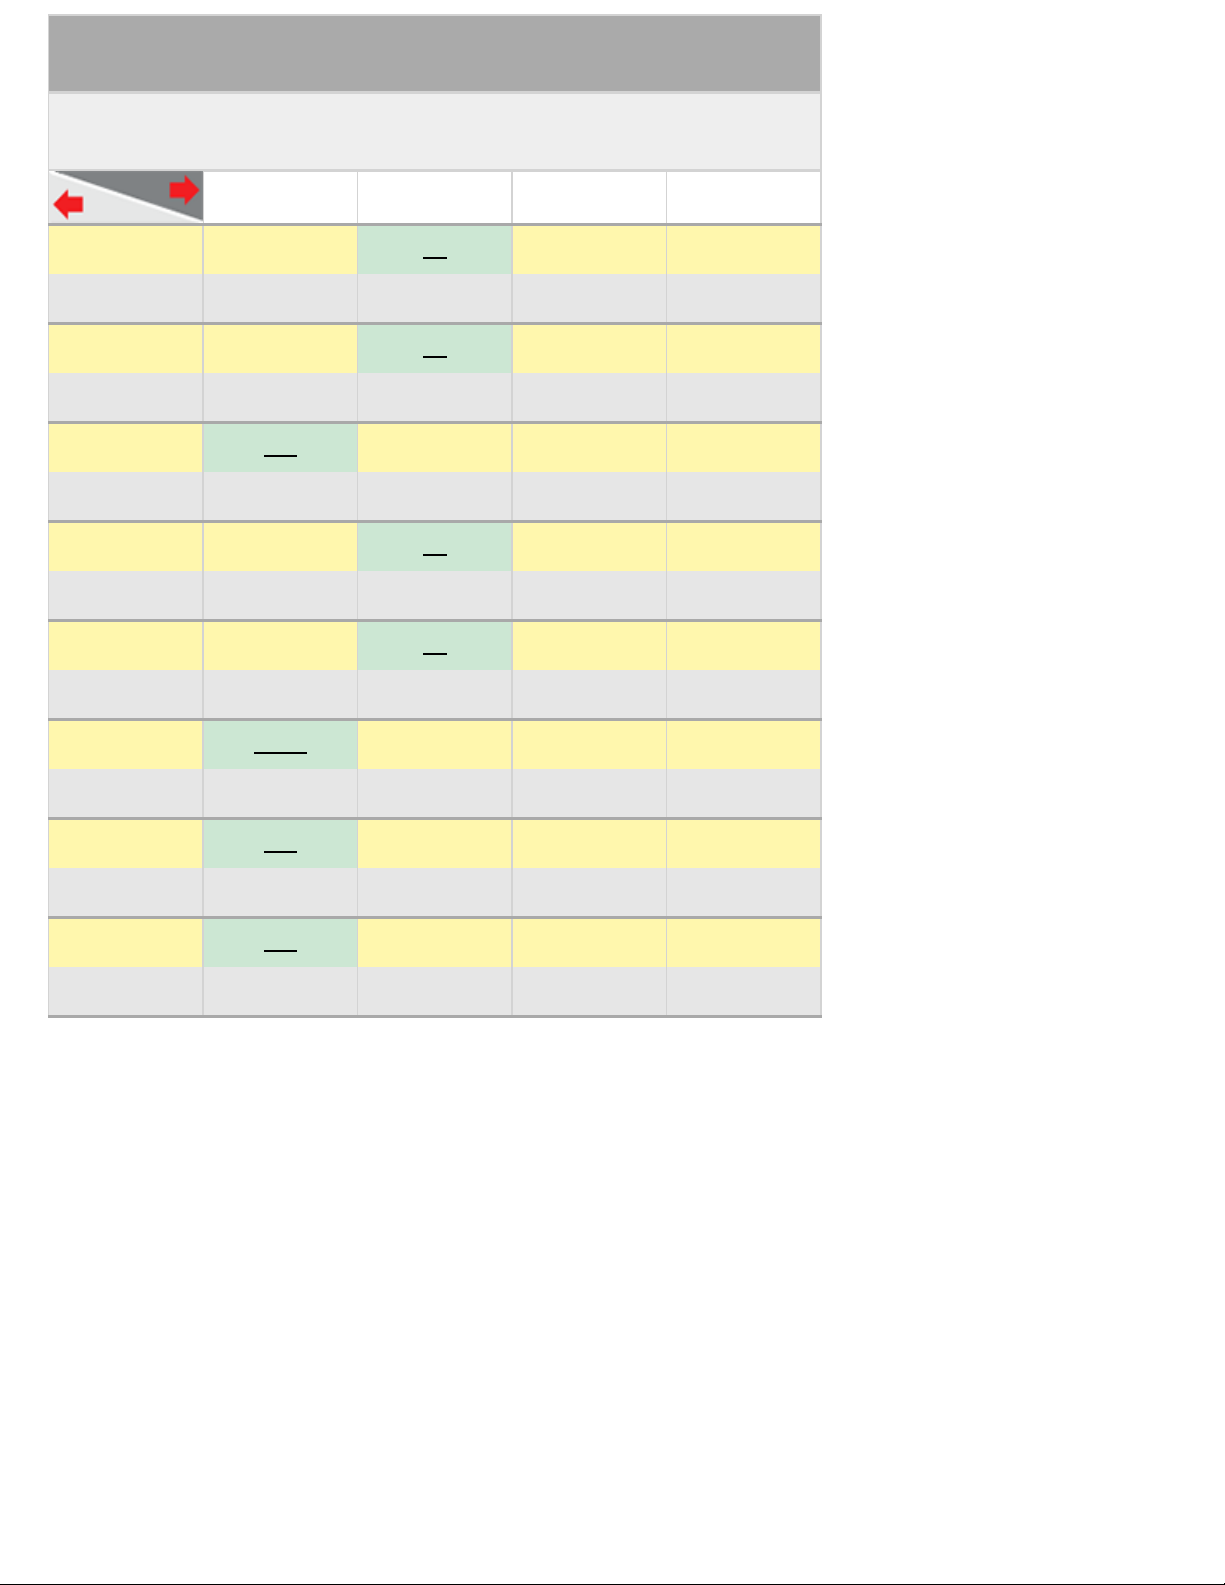
Programming
This module offers several different functions, each with several
settings. All functions and settings are described in detail above and
a quick reference table (matrix) can be found at the end of this
manual. We recommend printing the matrix and storing it in the
glove box!
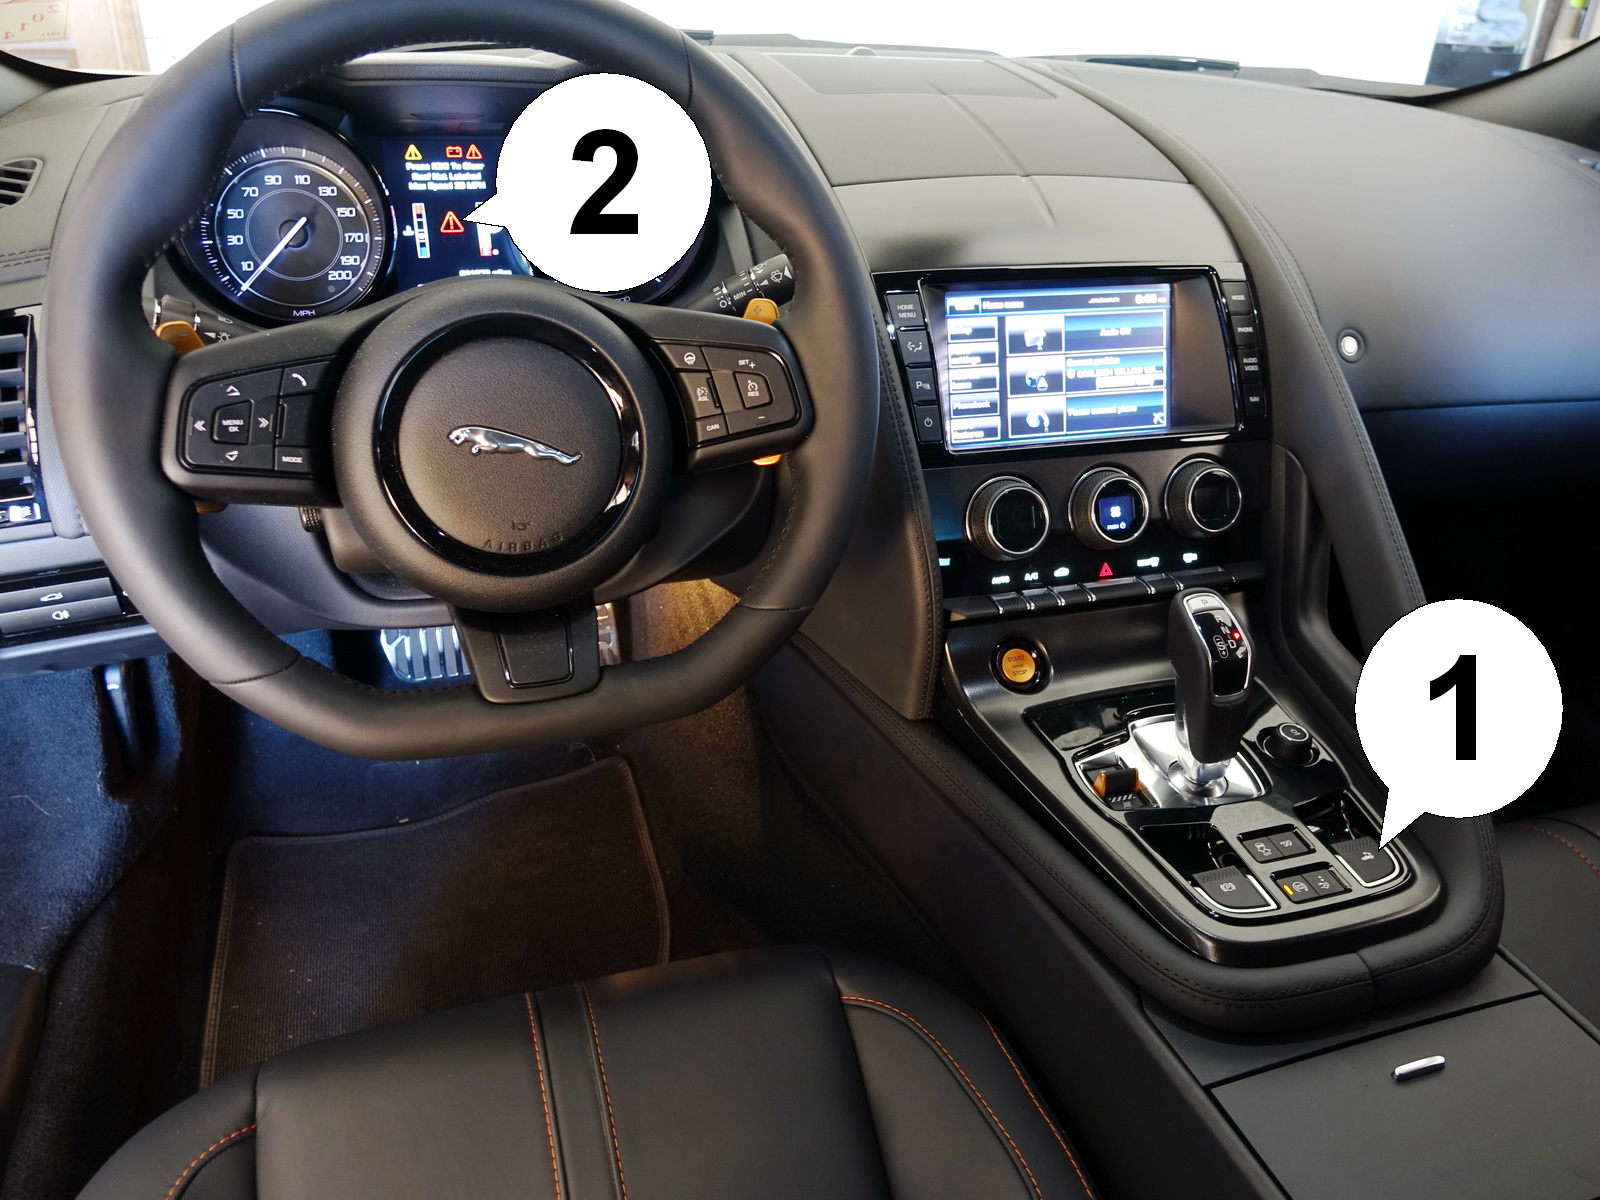
To activate the programming mode, turn the ignition (1) fully ON (no
need to start the engine), then hold down the convertible top switch
(2) in the direction the top is already in (open when the top is open,
close when the top is closed) until the cluster emits a signal beep.
Now let go.
The module outputs the current function number and setting level
via the cluster buzzer. As an example, the buzzer sounds once,
brief pause, then sounds twice: Function 1 is currently set to setting
2.
To select the function, tap the top switch briefly. To change the
setting of the selected function, hold the switch for about 1 sec. A
brief pull advances to the next function, a brief push returns to the
last one. After listening to the buzzer signals, a long pull increases
the setting while a long push decreases it.
To end programming mode, either turn the ignition off or hold down
the top switch in either direction for a longer time (about 5 sec) until
the cluster beeps again. Programming mode also terminates
automatically after 60 sec. of inactivity.
• Shortcut to toggle Main Switch: With the ignition on as above,
hold and keep the top switch pressed in the direction the top is
already in (ignoring the first beep) for a full 10 seconds, until the
cluster beeps once, followed by the new setting for function 1
(silent=OFF, 1x=ON, 2x=EXT, 3x=EXP). Let go.
• Shortcut to toggle Valet Mode: With the ignition on as above and
the top closed, tap the top-close switch quickly 10 times in a row,
until the cluster either beeps twice, then twice (Valet Mode ON) or
twice, then once (Valet Mode OFF).

Function/Setting Matrix (green fields are defaults)
Product: STHFJR1 - SmartTOP for Jaguar F-Type
Firmware: v2.00 and up
SETTING 0 SETTING 1 SETTING 2 SETTING 3
Function 1 OFF ON EXT EXP
MODULE MODE +
MASTER SWITCH Module Disabled Module Enabled Extended Mode
READ MANUAL!
Expert Mode
READ MANUAL!
Function 2 OFF ON VALET
Console Switch
One-Touch Factory behavior One-Touch operation Valet Mode
Function 3 OFF ON
Console Switch
Invert Factory Behavior Switch inverted
Function 4 OFF ON
Remote Top No remote functions Enabled
Function 5 OFF ON
Remote Windows No remote functions Enabled
Function 6 DOWN UP
Window positions
after opening top Windows down Windows up
Function 7 OFF MEMORY ON
ECO Mode Auto-OFF Factory Behavior Memorize setting ECO disable on start
Function 8 OFF MEMORY ON
Exhaust Valves Factory Behavior Memorize setting Open on start
Other mods4cars Control Unit manuals
Popular Control Unit manuals by other brands

LEGRAND
LEGRAND 7 521 82 user guide

Jinan USR IOT Technology
Jinan USR IOT Technology USR-WIFI232-B2 user manual

NSK
NSK Nakanishi ASTRO-E 400 Operation manual

INOXPA
INOXPA INNOVA G Installation, service and maintenance instructions

Honeywell
Honeywell SDW 10 Mounting and operating instructions

Rise
Rise MAX.CP installation manual

Carrier
Carrier 50CJ Installation, operation and maintenance instructions

turck
turck FDN-DN1 manual

GE
GE GEH-5201 instructions

Motorola
Motorola Canopy Backhaul Module quick start guide

Kessel
Kessel FKA Instructions for installation, operation and maintenance

Cytron Technologies
Cytron Technologies BlueBee user manual