MODULE-AIR AF-24 Series Instructions for use

Operating Instructions & Parts Manual
READ AND SAVE THESE INSTRUCTIONS
WARNING –TO REDUCE THE RISK OF FIRE, ELECTRIC SHOCK, OR INJURY TO PERSONS, OBSERVE THE FOLLOWING:
A) Use this unit only in the manner intended by the manufacturer. If you have questions, contact the manufacturer.
B) Before servicing or cleaning unit, switch power off at service panel and lock the service disconnecting means to prevent power
from being switched on accidentally. When the service disconnecting means cannot be locked, securely fasten a prominent warning
device, such as a tag, to the service panel.
Read carefully before attempting to assemble, install, operate or maintain the product described. Protect yourself and
others by observing all safety information. Failure to comply could result in personal injury and/or property damage.
Retain instructions for future reference.
MODUL
E
-
AIR
AF-24xx SERIES AIR CLEANER
(AF-2423, AF-2433, & AF-2453)
Description
This 8500 CFM Air Cleaner was designed for use as ambient air filtration
where airborne particles are prevalent. The air cleaner consists of 4 intakes
and one exhaust, one motor, one blower, electrical components and a
riveted sheet metal housing.
These units are about 410 pounds, and cannot be handled or
transported without the help of lifting tools.
It is recommended that you consult a professional electrician prior to
installing this product. If this Air Cleaner is to be used in an application that
presents a potential fire hazard, a fire protection expert should be
consulted.
Unpacking
The machine should be unpacked carefully. Check if the machine and
components are consistent with those indicated in the Parts List. If any
doubt arises or if parts appear to be missing, contact your dealer.
MOTOR
OPTIONS:
MODEL
NUMBER
VOLTAGE
HP
Hz
AMP DRAW
AF-24xx230
230V THREE PHASE
5 HP
60
12.6
AF-24xx480
480V THREE PHASE
5 HP
60
6.3
AF-24xx575
575V THREEPHASE
5 HP
60
5
BLOWER:
MODEL
NUMBER
TYPE:
CFM:
(ALL)
FORWARDINCLINE
8500
SOUND LEVEL: 68 Db(A)
APPROXIMATE WIEGHT
AF-24xx
410 lbs

Module-Air
Revised 6-10-2014
Operation
Once installed using the above instructions, your AF-24xx air cleaner(s) can be operated with the flip of a switch.
Because the AF-24xx series is designed as an “Air quality Maintenance” system, it is important that the units are turned
on in the beginning of the shift and left on until the end of the shift. The reason the units need to remain on is because
Air Cleaners train the air current throughout the entire area in order to ensure that all of the air is cycling through the
filters. The process of training the air can take a while, but is usually about 30 minutes.
Maintenance
Follow these precautions when performing maintenance on the motor or blower.
Turn off motor, and LOCK OUT electrical service to the unit.
LOCK OUT even when changing filters.
Change filters regularly to maintain optimum performance. If the performance of your air cleaners appears to be
declining, try replacing the filters.
Be sure that replacement filters are always rated for the correct CFM and air flow.
NOTE FOR INSTALLING BAG FILTERS:
When installing fiberglass bag filters, MAKE SURE THAT NO FABRIC IS PINCHED BETWEEN THE HEADER AND FILTER
FRAME. Performance will decrease dramatically if bag filters are not properly installed. To ensure no fabric is pinched,
place your fingers inside each cell, and gently move each bag cell side to side, freeing any fabric sandwiched between
the header and filter frame.
If the system requires maintenance exceeding filter change, read below…
Take the unit down and place it on a level surface that allows access to the door panel of the Main Housing.
To access the motor, pulleys and belt: Remove the door panel by removing (16) ¼-20x1-1/4” bolts with a 3/8 socket.
Troubleshooting Chart
Symptom
Possible Cause(s)
Corrective Action
Excessive belt noise
1. Belt is loose
1. Remove door panel, loosen nuts that fasten motor, turn
adjustment screw until optimum belt tension is achieved
2. Belt needs to be flipped.
2. Follow step (1) to loosen belt, then remove belt and turn it
around. Replace belt, and then reverse step (1) to tighten belt
and re-assemble.
3. Belt is worn out or glazed.
2. Follow step (1) to loosen belt, put new one on, and then
reverse step (1) to tighten belt and re-assemble
Air cleaner has poor
performance.
1. It’s possible that the air cleaner may
have been wired backwards upon
installation. Air will blow out the exhaust
either way, but if wired correctly it should
blow at about 58 mph.
1. If the motor is wired to run the wrong direction, disconnect
power supply, & switch the necessary wires around to reverse
the motors rotation with the voltage you are using.
2. The bag filter may not be seated
properly
2. Reach in each pocket to make sure fabric is not between filter
stop and filter frame.
Air is not staying as clear as
usual
1. Prefilters may be loaded with debris
1. Turn unit off, lock out power to unit, then replace the prefilter
by pushing clips out of the way and then sliding it out and sliding
a new one in.
2. Bag filter(s) may be spent
2. Follow step (1) to remove the prefilter, then if unit is equipped
with clips, push them out and away from the bag filter, slide out
the old bag filter and slide in new one until clips snap around it.

Module-Air
Revised 6-10-2014
General Safety information
SAFETY GUIDELINES- DEFINITIONS
This manual contains information
that important for you to know
and understand. This information
relates to protecting YOUR SAFETY
and PREVENTING EQUIPMENT
PROBLEMS.
GENERAL SAFETY RULES
!WARNING!
This machine was designed for
certain applications only. Tanis
Technologies strongly
recommends that this machine
not be modified and/or used for
any application other than that for
which it was designed. If you have
any questions relative to a
particular application, DO NOT use
the machine until you have first
contacted Tanis Technologies and
confirmed that the product is
suited for your application.
!WARNING!
Failure to follow these rules may
result in serious personal injury.
1. For your safety, read and
understand the instruction
manual before operating the unit.
Learn the unit’s application and
limitations as well as the specific
hazards, related to it.
2. Don’t use in dangerous
environment.
Don’t use this unit in damp or wet
locations or expose to rain.
3. Disconnect unit before
servicing.
4. Check damaged parts before
future use of the unit, properly
repair or replace any part that is
damaged.
ADDITIONAL SAFETY RULES FOR
AIR CLEANERS
1. Install Module-Air AF-24xx
series air cleaners according to all
electrical and safety codes as well
as the National Electrical Code
(NEC) National Fire Protection
Association (NFPA) and the
Occupational Safety and Health
Act (OSHA). Only someone who is
qualified to do electrical work
should wire the units in.
2. These air cleaners are intended
to be installed at least 8.2 feet (2.5
meters) above the floor.
3. Specific duct design and dust
collector configurations are
required under standards set forth
by the National Fire Protection
Association (NFPA). These are
applicable when collecting
potentially reactive metal dusts
(like aluminum, magnesium and
other materials). NFPA also has
standards that cover other dusts
like grain and plastics, ect. For
guidelines on determining which
precautions should be taken,
please refer to NFPA
497. There may be other
specifications that apply for your
particular application, so please
consult current NFPA standards
that may be acquired at:
NFPA
1 Batterymarch Park
Quincy, MA 02269
1-800-344-3555
This information may contain
safeguards that are required for
the installation, operation and
service of AF-24xx series products.
!WARNING!
4. Avoid mixing combustible
materials like (but not limited to)
the following: buffing lint,
paper/wood dust, aluminum or
magnesium with dust generated
from the grinding of ferrous
materials. This creates a potential
for fires due to the mixing of
sparks and combustible materials.
5. A machine operator should
NEVER be allowed to put lit
cigarettes or any burning object
into this or any dust control
system.
6. If there is a chance for heated
and/or flammable materials to
enter the unit, installation of the
unit should be evaluated to
determine if a fire
rotection/exhaustion systems
should be installed. Federal, State
or local codes, as required by
organizations such as NFPA and
Factory Mutual Insurance or your
insurance carrier may require such
a system. Module-Air can offer
basic guidelines for such an
installation: however, final
installation design is the
responsibility of the purchaser.
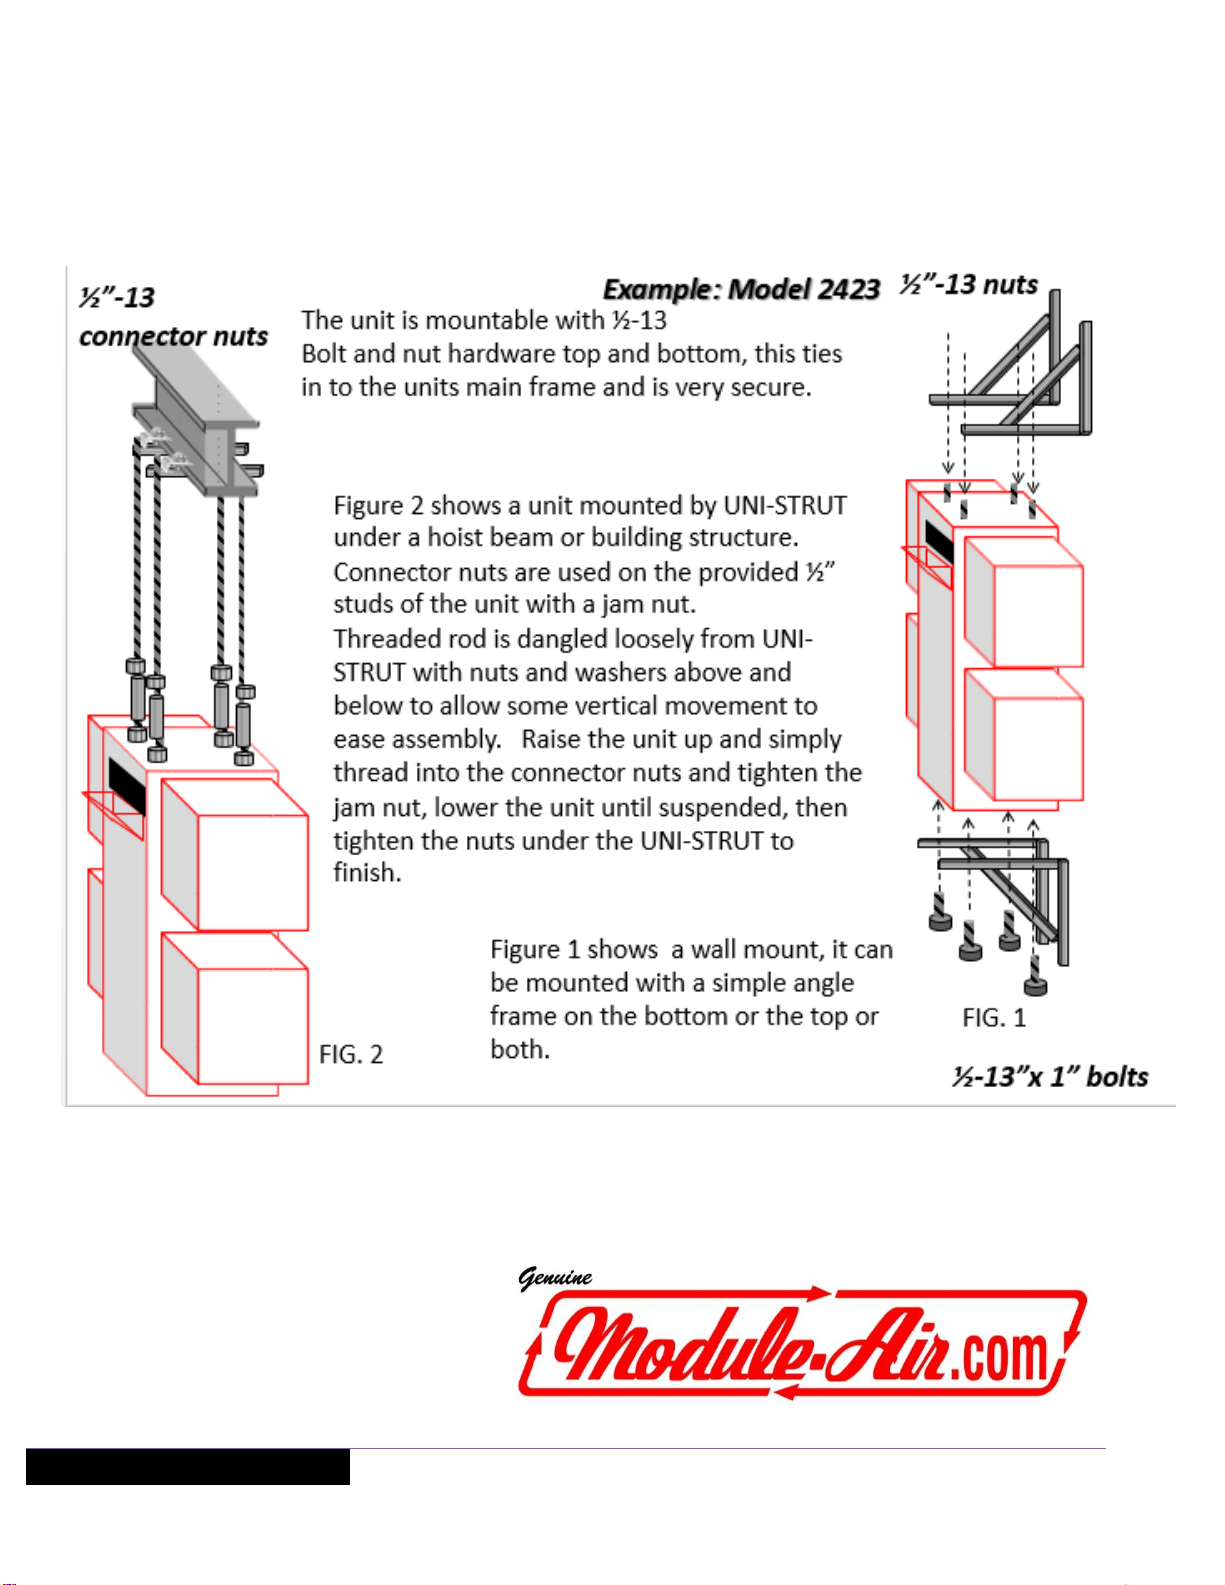
7. Securely anchor unit to a
permanent or fixed supporting
structure, be sure the structure is
rated to hold the weight of the
unit.
8. Support this unit or clamp it to
the work surface when using it in a
portable application to eliminate
potential injury or damage to the
unit
9. Ensure that the intake and
exhaust areas are clear prior to
starting the unit. Clogged intakes
or exhaust can cause explosion
and/or fire.
10. Keep arms and fingers away
from fan. Avoid all exposure to
rotating parts to prevent injury.
11. Do not attempt to
remove/replace filters while unit is
running. Fan blades can cause

Module-Air
Revised 6-10-2014
severe cuts. Be sure the unit is
disconnected from power source
12. Maintain the unit in top
condition. Clogged filters can
increase potential for fire or
explosion. Follow instructions for
changing filters.
13. Turn the unit “off” and
disconnect power source before
installing or removing accessories,
before adjusting or changing set-
ups or when making repairs. An
accidental start up can cause
serious injury.
14. Explosion relief vents are
required for some applications.
Consult with an insurance
underwriter or an NFPA manual to
determine proper vent size and
ratio. Module-Air LLC DOES NOT
CONTAIN EXPLOSION RELIEF
VENTS as shipped from the factory
and must be field installed per
NFPA standards.
15. The AF-24xx series units are
made to run continuously, check
the filters regularly for built-up
debris. Frequency of filter
changes will depend upon the
environment in which the unit is
running.
16. To maintain warranty, be sure
to use only filters that are
approved by the manufacturer.
INSTALLATION AND
PREPARATION BEFORE
OPERATING:
Disclaimer:
Although instructions and
recommendations are included for
installation of your Module-Air air
filtration system, the
manufacturer does not assume
responsibility for the installation
of this equipment nor shall be
held liable for direct or
consequential damages resulting
from improper methods,
structural failure or inadequate
supports.
Installation: (Diagram on PG. 5)
Installation methods will depend
upon the style of intake options
that were selected when your
system was ordered. The
following is a basic guide line and
only a suggestion. A professional
installer should be consulted.
One option is to mount Uni-
Strut to the building structure,
dangle threaded rod through the
holes in the strut with a nut and
washer 6” down and under the
strut. Lift the unit up until the top
of the unit taps the threaded rod.
Thread the connector nuts onto
the ½” studs provided in the top of
the unit. Start a ½” nut on the
threaded rod to be used as a jam
nut.
Now screw the threaded rod into
the connector nuts and tighten up
the jam nuts.
The unit can now be lowered and
the nuts under the strut can be
tightened up to finish the
suspension.
The unit can also be
mounted on the wall with a simple
angle frame, as shown in fig 1. on
page 5.
The uni-strut rails, nuts, and
threaded rods are not provided
with the units. (Uni-strut is
available through several places,
such as Grainger). .
Again, mounting instructions are
only a suggestion. Module-Air is
indemnified from any liability
related to improper installation.
Improper installation could result
in person injury and/or damage to
the unit.
Noise Declaration
The figures shown are emissions
levels and are not necessarily safe
working levels. While there is a
correlation between the emission
and exposure levels, this cannot
be used reliably to determine
whether or not further
precautions are required.

Module-Air
Revised 6-10-2014

Module-Air
Revised 6-10-2014
480 V Three Phase/ 60Hz
Three
phase
motor
L1
L2
L3
OL
OL
OL
T1
T2
T3
3 phase
power

Module-Air
Revised 6-10-2014

Module-Air
Revised 6-10-2014
Limited One (1) Year Parts Warranty
MODULE-AIR warranties all MODULE-AIR filtration products to be free from defects in materials or
workmanship. This warranty is valid for the original purchaser and for a period of one (1) year from the
date of shipment or installation sign off. The liability of MODULE-AIR is limited expressly to the replacement
or rebuilding of any article, or part thereof, proven defective, when returned by authorized approval to
MODULE-AIR, transportation prepaid, within a reasonable time after the termination of the 365-day warranty.
Customer must be able to provide proof of purchase in order to submit a claim.
NOTE: In order to maintain the one year warranty on MODULE-AIR products replacement filters must be
purchased from MODULE-AIR for that first year. Proof of filter orders must be kept on file and be readily
available upon request by MODULE-AIR.
This warranty is void if the product is installed or assembled in any manner that contradicts the instructions
specified by MODULE-AIR
,
or if the product is dismantled, modified, altered or damaged from improper
maintenance, excessive temperature, excessively dirty filters, or other abuse. This warranty does include
standard warranties from purchased parts such as motors, blowers, ect. Any part which is determined to be
defective in material or workmanship can be shipped, prepaid, to MODULE-AIR or authorized service facility in
which case a determination will be made whether to repair or replace the component.
MODULE-AIR is not responsible for shipping costs related to sending replacement parts to customer or
customer returning parts to MODULE-AIR for inspection. All freight costs incurred by warranty claims are the
responsibility of the customer.
MODULE-AIR is not responsible for any damages to buildings or equipment nor is liable for any injuries caused
by filter fires. Customers are responsible for choosing necessary spark arrestor accessories and equipment.
No representative, agent or employee of MODULE-AIR has any authority to modify the terms of this warranty.
MODULE-AIR will not be responsible for any consequential or resulting damage which may be claimed to have
occurred though the sale or use of such products or parts thereof, which might be defective.
There are no warranties which extend beyond the description contained under this heading, express or
implied, including warranties of fitness for a particular purpose.
Any damages incurred while parts are in transit from customer to MODULE-AIR or authorized service facilities
are the responsibility of the sender. MODULE-AIR and distributors reserve the right to freeze the warranty
claim process if parts are damaged in shipping until customer can be contacted and informed.
Module-Air,
L.L.C.
645 Commerce Court, Suite 10
Holland, MI 49423
Phone: 616-990-8005 Fax: 616-796-1213
This manual suits for next models
6
Table of contents
Popular Water Filtration System manuals by other brands

A.O. Smith
A.O. Smith AO-US-200 owner's manual

Clean Water Systems
Clean Water Systems Fleck 9100 Installation & start?up guide

Parker
Parker Racor RK20025-01 quick start guide

Pure Blue H20
Pure Blue H20 PB-TLRO4H50T instruction manual

amiad
amiad TEQUATIC PLUS F-150 C Series Installation & operation manual

A.O. Smith
A.O. Smith Z8 user manual

3M
3M ScaleGard HP Installation and operation instructions

Pentair
Pentair OMNIFILTER OT32 installation instructions

Kenmore
Kenmore 625.343920 owner's manual

Graf
Graf Optimax-Pro Instruction for installation and maintenance

Fluval
Fluval MSF 104 manual

Nature Pure
Nature Pure Ultrafine Faucet Series installation instructions