manuals.online logo
Brands
  1. Home
  2. •
  3. Brands
  4. •
  5. Moen
  6. •
  7. Plumbing Product
  8. •
  9. Moen T590 Series User manual

Moen T590 Series User manual

INS104B
®
ROMAN TUB DIVERTER
TRIM KITS
MODELS T590 Series, T591 Series,
T592 Series, RT590 Series, AT590
Series
DÉRIVATEUR DE BAIGNOIRE
ROMAINE/NECESSAIRE DE GAR-
NISSAGE
MODÈLES T590 Séries, T591 Séries,
T592 Séries, RT590 Séries, AT590
Séries
DESVIADOR DE TINA ROMANA JUE-
GOS DE DECORADO
MODELOS SERIES T590, T591, T592,
RT590, AT590
1
2
7
8
9
10
11
12
13
14
15
16
17
18
19
T590, RT590, AT590 T592 T591
ENGLISH
FRANÇAIS
ESPAÑOL
1
HandShower
Escutcheon
Rosacepour
Douchette
Chapetónde
Duchade Mano
2
Handle Escutcheon
Rosacea Poignée
Chapetón de Manija
3
UniHandle
PoignéeUni
Manija Uni
4
Washer
Rondelle
Arandela
5
HandleScrew
Visde Poignée
Tornillo de Manija
6
EmblemInsert
Encart à Emblème
Inserto con Emblema
ENGLISH
FRANÇAIS
ESPAÑOL
7
HandShower
Escutcheon
Rosacepour
Douchette
Chapetónde
Duchade Mano
8
Handle Escutcheon
Rosacede Poignée
Chapetón de Manija
9
Knob Handle
Bouton de Poignée
Manija de Pomo
10
HandleScrew
Visde Poignée
Tornillo de Manija
11
EmblemInsert
Encart à Emblème
Inserto con Emblema
ENGLISH
FRANÇAIS
ESPAÑOL
12
HandShower
Escutcheon
Rosacepour
Douchette
Chapetónde
Duchade Mano
13
Handle Escutcheon
Rosacede Poignée
Chapetón de Manija
14
Handle Adapter
Adaptateur de Poignée
Adaptador de Manija
15
HandleSkirt
Jupede Poignée
Falda de Manija
16
Concentrix Insert
(not included)
EncartConcentrix
(pasinclus)
Inserto Concentrix
(no incluido)
17
HandleScrew
Visde Poignée
Tornillo de Manija
18
Gasket
(not included)
Garniture
(pasinclus)
Empaque
(no incluido)
19
HandleCap
Capuchon de Poignée
Tapa de Manija
Shown with T590 Trim
Montré avec Garnissage T590
Ilustrado con Decorado T590
3
4
5
6
Ajuste del Vástago de la Manija
Quite el tubo de ajuste roscado (A) de la tapa hexagonal (B). La medi-
da desde el alto de la superficie acabada hasta el alto del vástago de
la manija (C) debe ser 64mm.
Si se necesita un ajuste, afloje la tuerca del vástago (D) mientras esté
sosteniendo las áreas planas del vástago del cartucho (E) con una
llave. Gire el vástago de la manija hasta la altura deseada y apriete
bien a nuevo la tuerca del vástago para que comprima totalmente la
arandela aseguradora (F).
88
16 816 8
Installer la Rosace de Dérivation
Visser le tube d’ajustement (A) fermement à l’interieur de la rosace de la
poignée (2), (8) ou (13) et bien serrer avec les doigts.
Ne pas utiliser des pinces sur les filets.
Appliquer un lacet de mastic de plombier (non fourni) de 9mm sur le rebord
intérieur de la rosace.
Glisser le tube d’ajustement pardessus la tige de la poignée (C) et le viss-
er dans le capuchon hexagonal (B). Serrer la rosace à main sur la surface
terminée.
Ajustement de la Tige de Poignée
Enlever le tube fileté d’ajustement (A) du capuchon hexagonal (B). La
mesure à partir du haut de la surface achevée jusqu’en haut de la tige
de la poignée (C) doit être 64mm.
Où un ajustement serait nécessaire, desserrer l’écrou de la tige (D) tout
en tenant les parties plates du haut de la tige de la cartouche (E) à l’aide
d’une clé. Tourner la tige de la poignée à la hauteur désirée et resserrer
l’écrou de la tige fermement de sorte qu’elle comprime entièrement la
rondelle de blocage (F).
Instale el Chapetón del Desviador
Enrosque el tubo de ajuste (A) bien ceñido dentro del chapetón de la mani-
ja (2), (8) o (13) Apriete bien con los dedos. No use las pinzas sobre las
roscas.
Aplique un cordón de 9mm de masilla de plomero (no suministrada) en el
reborde interior del chapetón.
Deslice el tubo de ajuste sobre el vástago de la manija (C) y enrosquelo en
la tapa hexagonal (B). Apriete el chapetón a mano dentro de la superficie
acabada.
ESPAÑOL
FRANÇAIS
Install Diverter Escutcheon
Thread the adjustment tube (A) into the handle escutcheon (2), (8) or
(13) and finger tighten securely. Do not use pliers on threads.
Apply 3/8” (9mm) bead of plumbers putty (not furnished) on the inside
rim of the escutcheon.
Slide the adjustment tube over the handle stem (C) and thread into the
hex cap (B). Hand tighten the escutcheon onto the finished surface.
Handle Stem Adjustment
Remove the threaded adjustment tube (A) from the hex cap (B).
Measurement from the top of the finished surface to the top of the
handle stem(C) must be 2-1/2” (64mm).
If adjustment is necessary, loosen the stem nut (D) while holding the
top flats on the cartridge stem (E) with a wrench. Twist the handle
stem to the required height and retighten the stem nut securely so it
fully compresses the lock washer (F).
2-1/2"
(64mm)
FINISHED
SURFACE
SURFACE
FINIE
SUPERFICIE
ACABADA
B
C
E
D
F
A
2
C
INS104B
A
ENGLISH
Instale el Chapetón del Montante de la Cubierta
Chequee para asegurarse que el anillo deslizador plástico (N) esté en
su lugar encima del montante de la cubierta (P). Los dos planos dentro
del anillo deben ser alineados en las posiciones correspondiendo a las
9 y 3 horas de un reloj con relación a la manija del desviador.
Para condiciones de instalación provisoria profunda, gire el montante
de la cubierta para un ajuste vertical.
Aplique un cordón de 7mm de masilla de plomero (no está incluida en
el interior del reborde del chapetón del montante de cubierta (1), (7) o
(12). Enrosque el chapetón sobre el montante de la cubierta y apriete
bien a mano.
Installer la Rosace du Support de Douchette
Vérifier pour assurer que l’anneau coulissant en plastique (N) soit en
place en haut du support de douchette (P). Les deux plats à l’intérieur
de l’anneau doivent être alignés en position d’horloge soit de 9 hrs. et 3
hrs. par rapport à la poignée du dérivateur.
Pour des situations ou l’installation provisoire est profonde, pivoter le
montant de comptoir pour l’ajuster verticalement.
Appliquer un lacet de mastic de plombier de 7mm (non inclus) sur le
rebord intérieur de la rosace du montant de comptoir (1), (7) ou (12).
Visser la rosace sur le montant de comptoir et visser fermement à la
main.
Install the Deckpost Escutcheon
Check to make sure the plastic glide ring (N) is in place in the top of the
deckpost (P). The two flats on the inside of the ring must be aligned at
the 9 and 3 o’clock positions in relationship to the diverter handle.
For deep rough-in conditions, twist the deckpost for vertical adjustment.
Apply a 1/4” (7mm) bead of plumbers putty (not furnished) to the inside
rim
of deckpost escutcheon (1), (7) or (12). Thread the escutcheon onto the
deckpost and hand tighten securely.
16 816 8
OPTIONAL
CONCENTRIX INSERTS
OPTIONAL
CONCENTRIX INSERTS
OPTIONAL
CONCENTRIX INSERTS
Left Right
Flats
c c
3
4
5
6
9
10
11
14
15
16
17
18
19
1
N
P
Pour Installer les Garnitures de Poignée
Pour la Poignée Uni T590 et le Bouton de Poignée Acrylique T592
Orienter le trou en forme de “D” dans l’adaptateur de poignée (3) ou (9)
vers les plats sur la gueue de la poignée (C). Placer la poignée sur la tige.
Installer la vis de poignée (5) ou (10) (et la rondelle (4) s’il y a besoin) et
serrer fermement. Presser l’encart à emblème (6) (pour faciliter l’installa-
tion, humecter l’anneau en «O» avec de l’eau) ou (11) dans la poignée.
Pour la Poignée Concentrix T591
Orienter le trou en forme de “D” dans l’adaptateur de poignée (14) vers les
plats sur la tige de la poignée (15) en descendent sur l’adaptateur. Aligner
la rainure sur l’encart (16) à la nervure sur l’adaptateur. Placer l’encart sur
l’adaptateur et installer et serrer la vis de poignée (17). Placer la garniture
(18) (pass inclus) sur le capuchon de poignée (19), puis visser le capu-
chon dans l’adaptateur et serrer à la main.
Para Instalar el Decorado de la Manija
Para la Manija Uni T590 y la manija de pomo acrílico T592
Oriente el hoyo en forma de “D” en la manija (3) o (9) hacía los planos en el
vástago de la manija (C). Coloque la manija en el vástago. Instale el tornillo de
la manija (5) o (10) (y la arandela (4) si se necisita) y apriete bien. Empuje el
inserto con emblema (6) (para facilitar la instalación, humedezca el anillo en “O”
con agua) o (11) dentro de la manija.
Para le Manija T591 Concentrix
Oriente el hoyo en forma de “D” en el adaptador de la manija (14) hacía los
planos sobre el vástago de la manija (C). Coloque el adaptador sobre el vásta-
go y deslice la falda de la manija (15) bajando sobre el adaptador.Alinee la ranu-
ra sobre el inserto (16) con la costilla sobre el adaptador. Coloque el inserto
sobre el adaptador e instale y apriete el tornillo de la manija (17). Coloque el
empaque (18) (no incluido) dentro de la tapa de la manija (19), luego enrosque
la tapa dentro del adaptador y apriete con los dedos.
To Install Handle Trim
For T590 Uni Handle and T592 Acrylic Knob Handle
Orient the “D” shaped hole in the handle (3) or (9) to the flats on the handle
stem (C). Place handle on stem. Install handle screw (5) or (10) (and wash-
er (4) if required) and tighten securely. Press emblem insert (6) (for easy
installation, moisten o-ring with water) or (11) into handle.
For T591 Concentrix Handle
Orient the “D” shaped hole in the handle adapter (14) to the flats on the han-
dle stem (C). Place adapter on stem and slide handle skirt (15) down over
adapter. Align notch on insert (16) to rib on adapter. Place insert onto
adapter and install and tighten the handle screw (17). Place the gasket (18)
(not included) into the handle cap (19), then thread cap into adapter and fin-
ger tighten.
©Copyright 2000
Moen Incorporated
Printed in USA
INS104B FEB 00
Moen Incorporated 25300 Al Moen Dr., North Olmsted, OH 44070-8022, U.S.A.
In Canada:
Moen Inc. 2816 Bristol Circle, Oakville, Ontario L6H5S7
G
H
J
L
J
KM
ENGLISH
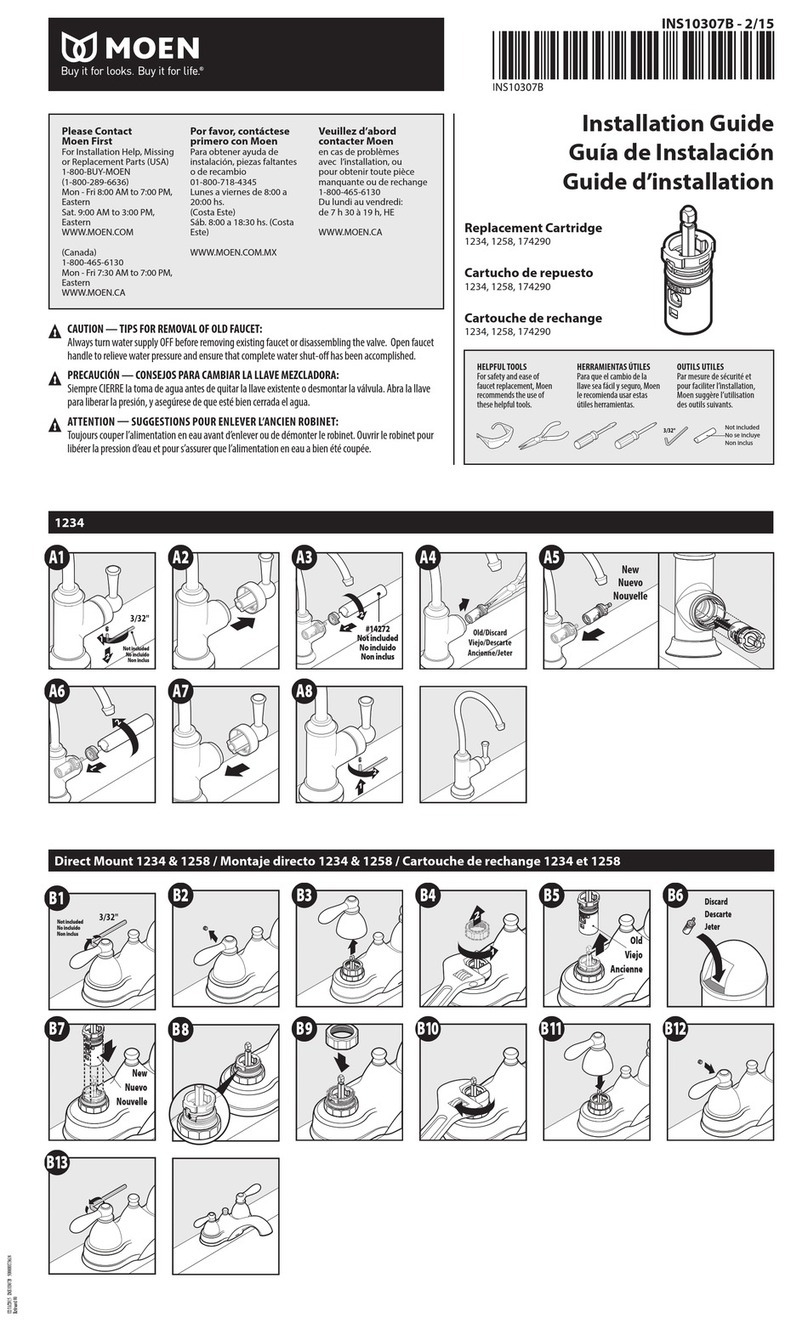
Install Shower Hose, Elbow, and Hand Shower
Connect the shower hose (G) to the leader hose (H) using a seal washer (J) and
tighten securely (do not retract shower hose under deck at this time). Connect the
elbow (K) to the hand shower (L) making sure the seal washer with screen (M) is in
place. Finger tighten. Connect the shower hose to the elbow using a seal washer (J)
and tighten securely. Retract hose under deck and place hand shower elbow into
deckpost. Align the handshower to the elbow and tighten connection securely.
FRANÇAIS
Installer la Boyau de la Douche, le Coude et la Douchette
Connecter le boyau de douche (G) au boyau conducteur (H) en se servant d’une
rondelle de blocage (J) et serrer fermement (ne pas rentrer le boyau de la douche
sous le comptoir pour le moment). Connecter le coude (K) à la douche à main (L)
ens’assurant que la rondelle de blocage à crépine (M) soit en place. serrer avec les
doigts. Unir le boyau de la douche au coude à l’aide d’une rondelle de blocage (J)
et bien serrer. Rentrer le boyau sous le comptoir et placer le coude de la douchette
dans le support de douchette. Aligner la douchette avec le coude et serrer le rac-
cord fermement.
Instale la manguera de ducha, el Codo y la Ducha a Mano
Conecte la manguera de ducha (G) con la manguera de guía (H) con una arandela
selladora (J) y apriete bien (no retracte la manguera de ducha bajo la cubierta por
ahora). Acople el codo (K) a la manguera de mano (L) asegurándose que la aran-
dela selladora con rejilla (M) esté en su lugar. apriete con los dedos. Acople la
manguera de ducha al codo mediante un arandela selladora (J) y apriete bien
seguramente. Retracte la manguera bajo la cubierta y coloque el codo de la ducha
de mano dentro del montante de cubierta. Alignee la ducha de mano con el codo y
apriete bien la conexión.
ESPAÑOL
Para Aclarar sus dudas relacionadas con la instala-
cion, refacciones, partes y/o garantia de nuestras
llaves, llamenos por cobrar a los siquientes tele-
fonos: (84) 88-08-26, 88-08-27, o 91-800-84-345.
FAX (84) 88-08-04.
En los Estados Unidos: 1-800-289-6636
Pregunte por el personal de servicio a clientes.
Horario: 9:00 A.M. - 1:00 P.M. - de Lunes a viernes.
LINEAS TELEFONICAS
DE SERVICIO
APPELER SANS FRAIS
M. CONSEIL®
Utiliser notre LIGNE D’ASSISTANCE
TÉLÉPHONIQUE disponible entre 8 h 30 et 16 h 30
(HNE) pour obtenir les réponses á toutes vos ques-
tion au sujet du produit, de l’installation ou de la
garantie. Toronto: 905-829-3400; Autres régions
du Canada: 1-800-465-6130.
Aux États-Unis: 1-800-289-6636
Demander le Service au Produit.
HELPLINE
1-800-289-6636
In the U.S. call our toll free Helpline number, for
answers to any product installation, or warranty
questions. In Canada:
Toronto: 905-829-3400;
Rest of Canada: 1-800-465-6130
In Mexico:
(84) 88-08-26, 88-08-27,
o 91-800-84-345

This manual suits for next models

4

Other Moen Plumbing Product manuals

Moen T6125WR User manual

Moen

Moen T6125WR User manual

Moen Camerist 7825 User manual

Moen

Moen Camerist 7825 User manual

Moen 4520 User manual

Moen

Moen 4520 User manual

Moen 87520 Series User manual

Moen

Moen 87520 Series User manual

Moen POSI-TEMP 82241 User manual

Moen

Moen POSI-TEMP 82241 User manual

Moen MONTICELLO 4570 User manual

Moen

Moen MONTICELLO 4570 User manual

Moen Excalibur 22826 User manual

Moen

Moen Excalibur 22826 User manual

Moen T3405 SERIES User manual

Moen

Moen T3405 SERIES User manual

Moen 6510 Series User manual

Moen

Moen 6510 Series User manual

Moen MOENTROL T3108 Series User manual

Moen

Moen MOENTROL T3108 Series User manual

Moen 84390 User manual

Moen

Moen 84390 User manual

Moen TS93003 User manual

Moen

Moen TS93003 User manual

Moen L4621 Series User manual

Moen

Moen L4621 Series User manual

Moen TS41706 Series User manual

Moen

Moen TS41706 Series User manual

Moen LEGEND MOENTROL L3175 series User manual

Moen

Moen LEGEND MOENTROL L3175 series User manual

Moen Show House S899 User manual

Moen

Moen Show House S899 User manual

Moen MOENTROL User manual

Moen

Moen MOENTROL User manual

Moen MOSAIC S1300 User manual

Moen

Moen MOSAIC S1300 User manual

Moen Brushed Nickel S41705BN Manual

Moen

Moen Brushed Nickel S41705BN Manual

Moen Brantford 6610 Series User manual

Moen

Moen Brantford 6610 Series User manual

Moen ShowHouse Bamboo TS88110BN Manual

Moen

Moen ShowHouse Bamboo TS88110BN Manual

Moen 6102 SERIES Operational manual

Moen

Moen 6102 SERIES Operational manual

Moen Camelot 22245 User manual

Moen

Moen Camelot 22245 User manual

Moen 8270 User manual

Moen

Moen 8270 User manual

Popular Plumbing Product manuals by other brands

Ruby 125 user manual

Ruby

Ruby 125 user manual

Beurer FS 50 Instructions for use

Beurer

Beurer FS 50 Instructions for use

Blanco Contemporary Kitchen Faucet with Side Spray... specification

Blanco

Blanco Contemporary Kitchen Faucet with Side Spray... specification

Conti+ IQ A10 Installation & user manual

Conti+

Conti+ IQ A10 Installation & user manual

Bristan GLL FLEXSNK C (D1) Installation instructions & user guide

Bristan

Bristan GLL FLEXSNK C (D1) Installation instructions & user guide

PEERLESS P188710 quick start guide

PEERLESS

PEERLESS P188710 quick start guide

Franke Eos Neo EOS-PD-316 installation manual

Franke

Franke Eos Neo EOS-PD-316 installation manual

American Standard Colony/ Colony Soft/ Cadet 2475 installation instructions

American Standard

American Standard Colony/ Colony Soft/ Cadet 2475 installation instructions

Rohl PERRIN & ROWE U.3706X Series quick start guide

Rohl

Rohl PERRIN & ROWE U.3706X Series quick start guide

Hans Grohe Talis S Prep Kitchen Faucet Pull-Down... Specification sheet

Hans Grohe

Hans Grohe Talis S Prep Kitchen Faucet Pull-Down... Specification sheet

Toto GUINEVERE TL970DDLQ Installation and owner's manual

Toto

Toto GUINEVERE TL970DDLQ Installation and owner's manual

Luxart Poydras PO241E-PU Installation

Luxart

Luxart Poydras PO241E-PU Installation

KIBI Circular KBF1008 installation guide

KIBI

KIBI Circular KBF1008 installation guide

Laufen LANI H4035221122601 installation instructions

Laufen

Laufen LANI H4035221122601 installation instructions

Hans Grohe AXOR Citterio E Instructions for use

Hans Grohe

Hans Grohe AXOR Citterio E Instructions for use

Hans Grohe Talis S 260 Instructions for use/assembly instructions

Hans Grohe

Hans Grohe Talis S 260 Instructions for use/assembly instructions

TLV J3S-X instruction manual

TLV

TLV J3S-X instruction manual

KWC KONOS K.10.K1.12 Specification sheet

KWC

KWC KONOS K.10.K1.12 Specification sheet

manuals.online logo
manuals.online logoBrands
  • About & Mission
  • Contact us
  • Privacy Policy
  • Terms and Conditions

Copyright 2025 Manuals.Online. All Rights Reserved.