Moffat WC8S User manual

Wall Cupboards & Base Units
Manual 030 Issue 001 March 2021
Installation instructions
1

The appliance must only be used for the purpose it was designed for and may
become unsafe if used for any other purpose.
Operators should be trained.
The room where this counter is used must be dry, clean with temperatures between
3°C and 25°C and with a maximum relative humidity of 60%.
These units are for indoor use only and have an IPX4 rating.
Prior to ANY service calls
Check warranty/maintenance terms and conditions
Consult individual user manuals for basic fault-finding advice
and information required to place the call
To ensure the best results from these units please take
the time to read and follow all safety, installation and
maintenance guidelines carefully before proceeding
to install. Keep this manual in a safe place for future
consultation.
These appliances are marked in compliance with the
relevant Low Voltage & EMC Directives. Voltage stated
on unit data plate.
Warning!
Please pay attention to sections of the manual displaying this symbol.
2

Contents
Positioning base units
Kick-plates
Door Hinges
Drawers
Wall-cupboard Fitting
Cleaning
1
2
3
4
5
6
Page
4 / 5
6
7
8
9 / 10 / 11 / 12
13
L x D x H
(mm)
800 x 303 x 600
1000 x 303 x 600
1200 x 303 x 600
Height with sloping roof
(mm)
700
700
700
Model
WC8S
WC10S
WC12S
Sliding door models
L x D x H
(mm)
400 x 323 x 600
800 x 323 x 600
1000 x 323 x 600
1200 x 323 x 600
Height with sloping roof
(mm)
700
700
700
700
Model
WC4HL/R
WC8H
WC10H
WC12H
Hinged door models
3

Check designated area for floor level irregularities.
• Lay out skid plates (e.g. 100mm x 1000mm x 1mm approx metal sheet strips )
on the floor roughly where the counter module feet will land & place unit on top.
• To eliminate the additional feet snagging on the floor when positioning, temporarily run up the
adjustable feet that are not on the skid plates.
This allows the unit to slide on the feet in contact with the plates
• Whenever possible start at the high end of the floor & position the first unit in its chosen location.
• Check the module unit height from floor to work top, adjust legs and set level.
(Making sure the skid plates are central to the units legs)
Step 1:
Step 2:
1: Electrical
1: Positioning base units
4

Joining Multiple Modular Units Together
Joining the tops
• Tighten up joining strap on to the under top weld studs with nuts supplied.
Warning: do not over tighten [over-tightening may result in broken weld studs]
Step 3 & 4:
1: Electrical
1: Positioning base units
• Positioned the next module onto the skid plates and slid up to the first,
being careful not to move the first unit out of position.
• Adjust the legs until it’s perfectly aligned and level with the first.
• Repeat with all other units.
5

2: Kick plates
Kick plates are designed to clip onto the counter legs allowing easy fitting and removal.
The leg clips slide freely along the inside of the kick trim.
• Slide the leg clips into the kick plate and line up with legs, push on to the legs to fit.
• Finish o using screw fixings provide at each counter join and on the end plates.
6

3: Door Hinges
Clip On Design
This hinge comes supplied with an adjustable clip on mounting plate, which allows the door to be fully
adjusted and then quickly removed by simply pushing a small button at the very tip of the hinge.
Below diagram shows how the concealed style hinge clips on and o from the mounting plate.
7

4: Drawers
Drawer are fitted with lift out stainless steel inners. For deep cleaning the drawers also have fully
extendible runners with an easy release lever located on the side of the runner.
8

5: Wall-cupboards: Doors
Hinged Doors
Soft closing easy to remove and adjust, fitted with sturdy easy clip in hinges and recessed handles.
(See page 7.)
Sliding doors
Easily lift o for cleaning fitted with unique skid pads and black recessed handles.
1. Hold the rear door at a slight angle & locate the door fully into the top track.
2. Swing the bottom of the door inwards connecting with the bottom track
3. Lower the door into the bottom track, & slide the door fully to the left.
4. The fitting of the outer door is the same as above.
Door removal is a reverse of the above.
Fig. 1 Fig. 2
Fig. 3 Fig. 4
9

5: Wall-cupboards: Fitting
Commercial grade wall cupboards available in three standard lengths (800mm 1000mm or 1200mm
with a choice of sliding or hinged doors. Wall cupboards are fully enclosed, fabricated in stainless steel.
The internal mid shelf is removable and adjustable for height in 48mm increments.
Designed with a flat roof as standard with the option of a sloping type roof.
Note: The weight capacity for each unit is 150kg
Fitting: (wall fixing)
The wall units are hung onto brackets and double secured through the back on the bottom corners.
Wall units are usually fitted or hung with the bottom of the unit around 500mm above the worktop to
give enough head height for working on the worktop.
The important thing is to work out how close to the ceiling you want the top of the wall unit.
Make sure the units are at the same height and are level all around the room.
Note: Base cabinets and worktops units are usually set at 900mm high.
If you have multiple wall units to hang it’s a great idea to mark the height of the wall unit brackets at
both ends of the wall and ping a chalk line between them.
Fix the brackets in place at the correct distance apart for each wall unit and directly onto the line you
marked. (See page 11 for dimensions)
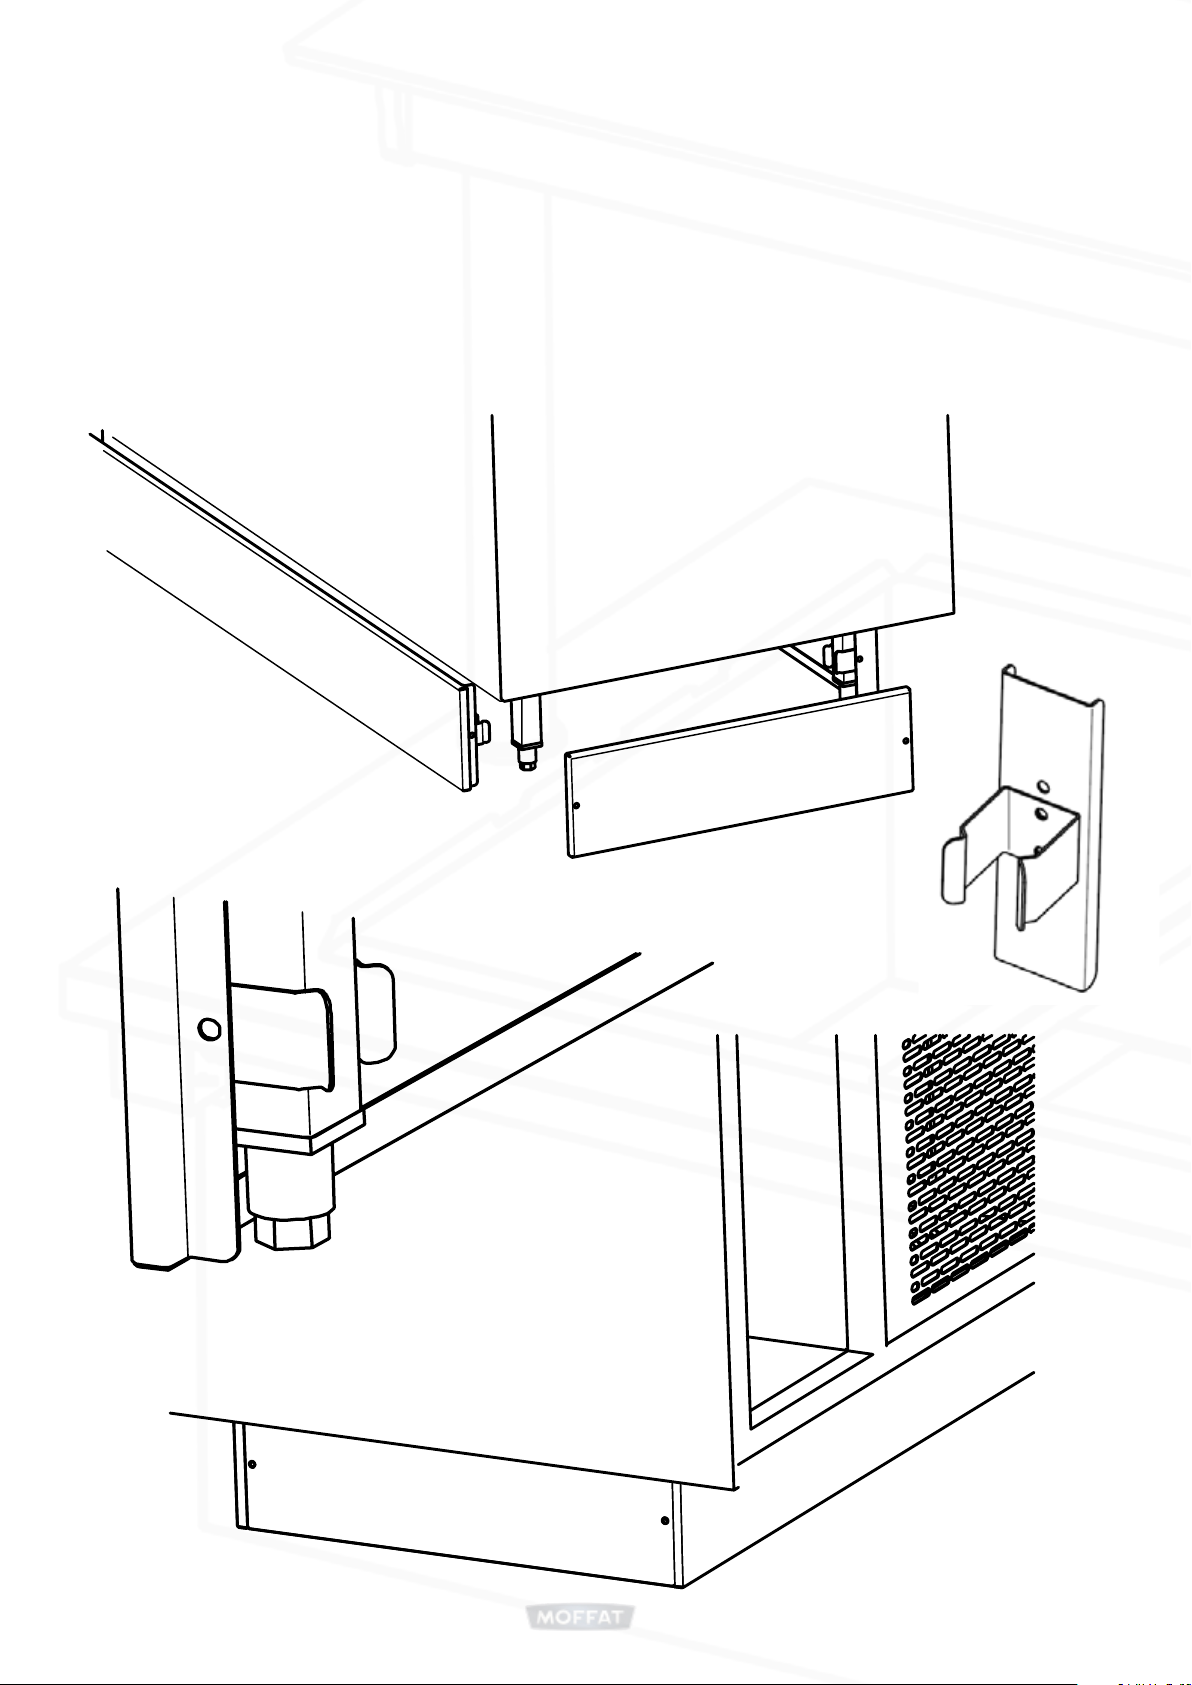
Once the wall brackets are fixed,
• Hang the cupboard and adjust the top corner hanging brackets.
• There are two screws at the back of the internal wall unit bracket.
• One adjusts the height of the bracket for fine tuning on the wall
• The other pulls the unit in towards the wall to keep it tight against it.
Use a spirit level or a laser level to get the units straight and level
There are two additional fixing points located on the bottom corners of the cupboard.
After fixing the top hangers mark and fix the bottom screws. (See page 11 for dimensions)
10

5: Wall-cupboards: Fitting
Wall-plate fixing centres
Fixing bracket centres
(Dimension “A” mm)
305
705
905
1105
Model
WC4HL/R
WC8H
WC10H
WC12H
D
im
en
sion "A"
30
5
35
8
47
.5
47
.5
40
0
5
0
53
9
EX
AM
PLE:
40
0M
M WIDE
CUPBOAR
D
6
00
Wa
ll
P
la
te
s
Ad
di
ti
on
al
An
chor P
oi
nt
s
11

A wide range of fixings are available from expansion, universal or multi-purpose plugs
to various anchor types.
Make your decision based on the material you’re working on and the weight of the fixture.
Fixings should be selected according to:
• Base material, whether it is a solid (concrete, stone, etc.)
or a hollow material (brick, breeze block, Wood, etc.)
• Size (according to plug type and the weight of load).
5: Wall-cupboards: Fitting
The correct and fit for purpose wall fixings must be use.
12

General fabrication and neutral units.
Cleaned with hot soapy water and thereafter dried & polished with a soft dry cloth or
Leather chamois.
Shelving and understructure
Should be similarly cleaned, always ensuring that the stainless steel is wiped in straight
Strokes following the grain of the material.
Cupboards
The top should be wiped as described above and the interior cleaned with a damp
cloth, then dried & polished. If sliding doors are fitted within the unit these can easily be
removed for cleaning as described in the instruction manual supplied with the unit.
Any drain holes must also be kept clear from blockage.
Glass panels and sneeze screens should be cleaned with a damp, clean cloth and
finish o by carefully drying with a soft dry cloth or kitchen towel.
DO NOT
• Leave wet cloths on the surface
• Do not use strong bleach,or material
containing sodium hypochlorite or
chlorine.
• Do not soak cloths or materials in
bleaching fluids within sink bowl over a
period of several hours.
• Do not use concentrated disinfectants
within sink bowl. Always dilute and
carry out full cleaning instructions.
• Do not use wire wool or abrasive
cleaning Materials.
• Do not use acids for cleaning the floor
around the unit.
Do not use scouring pads or abrasive cleaners of any type.
Do not use Solvents, bleach, Caustic Cleaners or biological powders
DO
• Wash down regularly with hot soapy
water.
• Soap powders (non-abrasive) or
cleaning powders may also be used to
help remove stubborn deposits
• Rinse surface thoroughly with clean hot
or cold water. dry with soft cloth.
• Clean undershelf & legs in the same
manner, ensuring that they are properly
rinsed with clean water & dried
• When cleaning stainless steel, always
wipe in straight strokes following the
grain of the Material.
6: Cleaning
13

E&R Moat Ltd.
Bonnybridge
FK4 2BS
Scotland
Scan the QR code below to visit the
E&R Moat website for further information:
www.ermoat.co.uk
+44 (0) 1324 812272
sales@ermoat.co.uk
Thank you for choosing E&R Moat!
Failure to use the correct cleaning
procedure will invalidate the
warranty of your product.
This manual suits for next models
8
Table of contents
Other Moffat Indoor Furnishing manuals
Popular Indoor Furnishing manuals by other brands

Songmics
Songmics LYY42 quick start guide

Strictly Beds & Bunks
Strictly Beds & Bunks Wiltshire Bunk Bed Assembly instructions

Universal
Universal Sleigh Bed instruction sheet

Gracious Home
Gracious Home GH3015CR-WH Assembly instructions

Woodpecker
Woodpecker RTS2027-22 owner's manual

Furinno
Furinno 99736 Assembly instruction

Mocka
Mocka Essentials 2 Cube Assembly instructions

Furniture of America
Furniture of America FOA7144CK Assembly instructions

Winco
Winco 8500 CUSTOMER INSTRUCTIONS

Target
Target Berkshire FWS80633 Assembly instructions

Homelegance
Homelegance 1559K-1 Assembly instruction

Belleze
Belleze 014-HG-20061 owner's manual