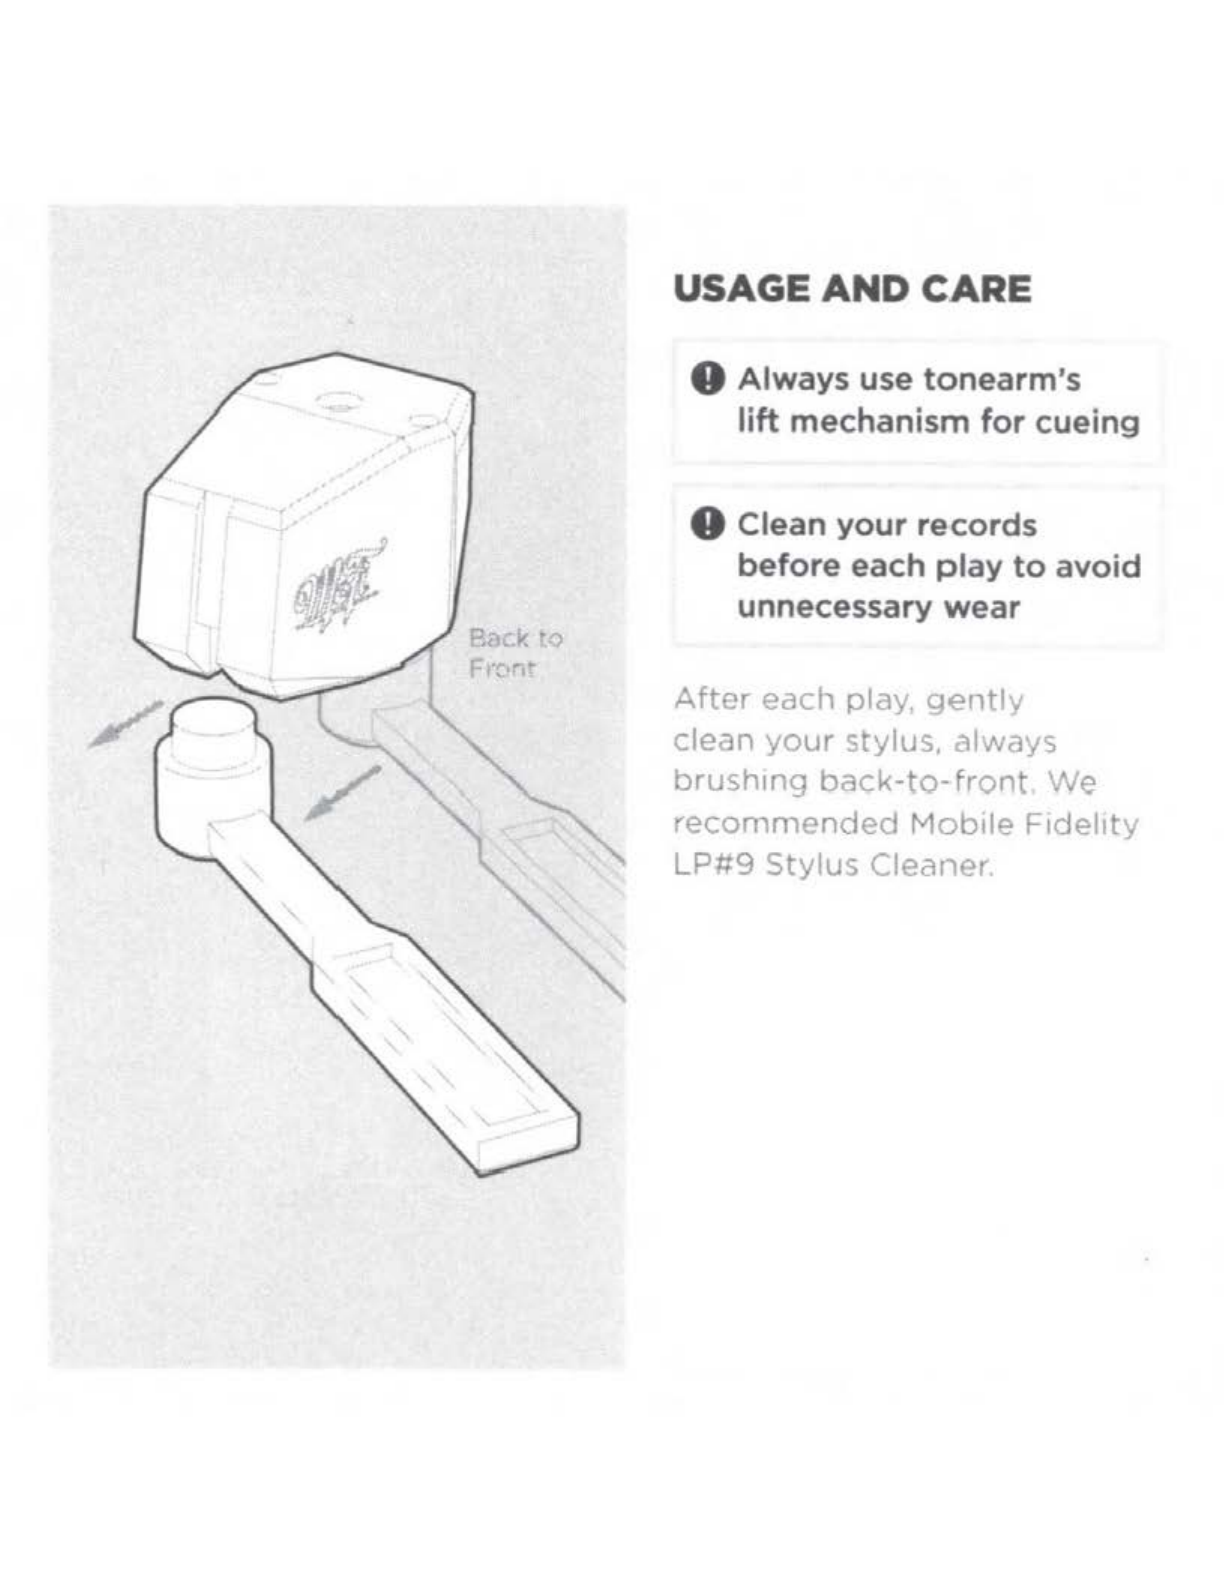
Mofi BEL SST S00R User manual

PLEASE KEEP
THE
PACKAGING
0 To
ensure
safe
transit,
your
MoFi
turntable
must
be
properly
repackaged
using
the
original
packaging
materials
(boxes
,
inserts
,
etc.).
Instructions
are
available
from
your
dealer
or
can
be
found
at
mofielectronics
.
com.
FUSE
INFORMATION
0
Before
changing
the
fuse
,
unp
l
ug
the
power
cord
.
Instructions for Changing
the
Fuse
Rotate
the
fuse
head
counterclockwise
with
a
flat
5mm
screwdriver,
remove
fuse,
and
change
if
needed.
Model
BEL
SST
S00R
Technical
Data
Slow
Blow, Glass,
5mm
x
20mm,
.SA x
250VAC
ELECTRON
I
CS

ATTENTION
0
For
sonic
reasons,
we
use
a
specially
formulated
material
in
our
platters.
Some
abnormalities
and
material
marks
are
normal
and
do
not
affect
the
performance
of
the
platter
or
turntable.
0
Due
to
very
tight
tolerance
in
the
platter
bearing
system,
it
may
take
up
to
several
hours
for
the
platter
to
settle
into
final
position.
Thank
you
for
your
patience
during
this
process.
PLEASE
NOTE
D
For
best
performance,
please
lubricate
your
turntable
bearing
at
least
once
a
year
with
MoFi's
lubricant,
available
through
your
local
dealer,
or
via
mof1.com.
ELECTRONICS


IN
THE BOX
1. MasterTracker
Cartridge
with
Stylus Guard
2. Stylus Cleaning Brush
J. Hex
Driver
4.
2.5mm
x
8mm
Hex
Screw
(2)
5.
2.5mm
x
10mm
Hex
Screw
(2)
6. 2.5mm
Metal
Washer
(2)
7. 2.5mm Nylon Washer
(2)

..,
c:k
to
USAGE
AND
CARE
0 Always use tonearm's
lift mechanism for cueing
0 Clean your records
before each play to avoid
unnecessary wear
After
each
play,
gently
clean
your
stylus,
always
brushing
back-to-front.
We
recommended
Mobile
Fidelity
LP#9
Stylus
Cleaner.

StudjoTracker UltraTracker MasterTracker
Type
Dual
Magnet
Dual
Magnet
Dual
Magnet
(MM)
Stereo
(MM)
Stereo
(MM)
Stereo
Weight
6.49
9.7g
97g
Tracking
1.8
-
2.2g
1.8 - 2
2g
1.8
-2.2g
Force
Impedance
47kOhm 47kOhm
47kOhm
Capacitance
l00pF l00pF l00pF
Frequency
20-20,000Hz
20-25,000Hz 20-25,000Hz
Response
Stylus
Ell1pt1cal
Nude
Elliptical
Micro-Line
Output
3.
5mV
3.SmV
3mV
Voltage
Color
Grey
Silver
Dark
Grey

SETUP
8 Keep stylus guard in
place during installation
to
prevent damage
to
the
needle
1.
Connect
the
four
headshell
leads,
making
sure
the
color-coated
leads
match
the
corresponding
color-
coded
pins.
2.
Carefully
mount
cartndge
to
the
headshell
.
Using
the
threaded
screw
holes
1n
the
rnetal
body
as
guides.
gently
tighten
the
screws
while
leaving
enough
tolerance
to
make
sltght
adJustments.

3.
Carefully
remove
stylus
guard.
balanced
the
arm,
and
set an
approximate
tracking
force
of
2g
.
4 . Using
the
Mobile
Fidelity
GEO-Disc
or
other
alignment
tool,
set
overhang
/
zenith
by
adJusting
cartridge
so
the
stylus
tip
sits
right
on
the
bullseye
while
the
cantilever
1s
parallel
with
the
line
that
intersects
the
bullseye. Then
tighten
the
cartridge
screws
and
double-check
your
work
If
your
turntable
allows,
check
VTA,
azimuth,
and anti-skate.
Double-check
overhang
/
zenith.
Set
the
tracking
force
to
1.8
-
2.
2g
. We
recommend
2g.
I
I!
: ~
=:..:
-
::-...:::,--
/
b--
'
--=-=---
r ----=.
-
...
---
--
4
'
l
Front;/
IYH

ELECTRONICS
www
.mofielectronics.com
MoF•
E,E>ctron,c~-
H311
'-!
✓
n,
/r
• M:w,,
~,•,(.,
_.;,,,~0g•·,
ll

ELECTRONICS

•~· 0
IN
THE
BOX
1.
Studi0Deck
1
"'
Turntable
2.
Dustcover
6.
Power
Cord
7.
Counterweight
l
0
J. Delrin1~
Platter
8.
Additional
Parts
4.
Platter
Belt
5.
RCA
Interconnects
•
Hex
Wrench
(2)
•
Anti-skate
Weight
• Stylus Brush 0


TRACKING FORCE
AND
ANTI-SKATE
Install
the
supplied
counterweight
on
the
arm's
endstub
c:ind
bulc:ince
the
arm
for
zero
tracking.
For
best
results
,
use
a
stylus
force
gnuge
(sold
separately
thr
)Ugh
your
local
audio
dealer)
and
,et
the
tracking
force
as
outlined
by
your
cartridge
manuhcturer·s
specifications.
If
your
model
came
with
a pre1nstc:illed
MoFi
cartridge,
simply
install
the
counterweight
until
it
lines
up
to
the
assigned
locntion
on
the
endstub.
Attach
the
anti-skate
weight
with
loop
to
the
anti-skate
pm.
and
dress
the
remciining
line
and
weight
to
the
urm·s
anti-skate
l1anger.
Set
the
loop
to
the
suggested
notch
on
the
pin
based
on
your
cart1:1dge's
weight
Ench
notch
reads
from
front
to
back
(refer
to
chnrt)
.
If
StudioDeck
'"
came
with
the
Studio
Tracker'''
cartridge
preinstalled.
use
notch
2
__.P
~
~
·,\
r.i
Ji
~ -
'
,.!.
,
..
~~~
-
1-
-~
-
·~~--
';
if\
('
·, \:, ,
·, .
---
-
---....
...
..___
...
.....
:....
Notch 1:
4g
-
6g
cartridges
Notch 2:
6g
-
89
cartridges
Notch 3:
89
-10g
cartridges
Notch 4:
10g
-12g
cartridges
l

---
..
......
..
...
....
•'
_.,,,,,~.
Front L nes
Rccoro
:::,vrfacc>
~
..
/
~:..:.
..
.
/
VTA
AND
AZIMUTH
0
If
StudioDeck
r"
came with
StudioTracker™preinstalled,
the
following steps were
completed
at
the
factory
After
setting
tracking
force
and
anti-skate,
ad1ust
the
tonearrn
's
height.
Loosen
the
hex
screw
located
at
the
base
of
the
tonearm
to
raise
or
lower
the
arm
height.
and
tighten
once
the
arm
ts
parallel
to
the
record
surfoce.
Next,
ad1ust
your
headshell
and
c;:irtridge
for
correct
azimuth
.
Loosen
the
hex
screw
loc21ted
under
the
armtube
,
then
adjust
the
he21dshell as
needed
until
it
1s
parallel
to
the
record
surface

CONNECTIONS
AND
LEVELING
l11stall
the
RCA
interconnects
and
ground
wire
to
your
preamp's
pl1ono
section,
and
then
connect
the
power
cord
from
the
turntable
to
c1ny
outlet
or
power
conditioner
of
your
choi
e
If
the
turntable
is
on
.:in
unleveled
surf
ace
,
place
a
bubble
level
on
the
platter
,
then
carefully
adjust
ench
foot
until
the
turntable
's
platter
is
true
.
......
~-~-~~·
~
.
~
':\,,
a~-
l~;~J., I
J
I;,,.,
'.\
•
...
,.
-~-✓
1 t ....
....
--
.••
''
!'-.
\'..
' ·.
\"
,
~-
-
,:,
~,,~
.,/
, , t
·,
.<:)
'
-,
/
/
...
--..,_
/
/
\\
.,
.,
i)
/ . /
/
~-,
,.
,,
/ /
_.
/
/;
,.
/;
/,//
, ,,
//"/
;'
-,.,,
/
/ _
/,.,
/ , ,,
,.
/,
;
,.,,
,,
-'/
;
';
,..,,,,
/
~,'/'
; ,,
/
/~
,.
//
,.
;,
,
/ ;
,
·~!
-
:-:
_ :-
~/
--...
.
--
~
~
----
--
..
- -
♦

l -
t.:·
..
-
:~:--.
\
1.~
,'
..
~ - - \ l I :'1,..-.,
•,·;'-'!(_
-,.~•
_v ~\
• . ' )
''
·1r,
•,I .
·"',,
I I
J_
~wtr
.,,,,,
dnck
to
Fror.t
--,:
_,,,.
I
.-/
~\-,j
~
STYLUS CARE
AND
DUSTCOVER
O Keep your records clean by
using a high-quality record
brush and record cleaner
After
each
play.
gently
clean
your
stylus.
21lw21ys
brushing
back-to-
front
using
the
supplied
stylus
brush
.
We
c.1lso
recommend
using
a
liquid
stylus
cleaner such
as
Mobile
Fidelity
LP#9
.
When
not
in
use. please
cover
your
turntable
with
the
supplied
dustcover.
For
best
sonic
result
s,
remove
the
dustcover
while
playing
.

Motor
Speeds
Platter
Wow
&
Flutter
Signal-To-Noise
Ratio
Power
Supply
Requirements
Power
Consumption
Dimensions
Weight
Tonearm
Type
Overhang
Offset
Angle
Curtndge
Weight
Range
Studio
Deck
™
300
RPM
AC
Synchronous
33
1/3
RPM,
45.0
RPM
3.88
lb
Delrin"
0.017% -
0.025%
72dB
120V
60Hz,
220-230V
S0Hz, l
00V
S0Hz
<SW
19.69" X 5.375" X 14.25"
19.1
lb
10"
Straight
Aluminum,
Gimbaled
Bearing
0.71"
(18mm)
22.a·
(+/-
2·
adjustable)
Sg
-109
Ultra
Deck
,,.
300
RPM
AC
Synchronous
33
1/3
RPM,
45.0
RPM
6.8
lb
Delrin"
0.017% -
0.025%
74dB
120V
60Hz,
220-230V
50Hz,
100V
50Hz
<SW
19.69" X 6
11
X 14.25"
23.1
lb
10"
Straight
Aluminum,
Gimbaled
Bearing
0.71"
(18mm)
22.8°
(+/-
2·
adjustable)
Sg -
l0g

Fuse Information
Brand
Model
Technical Dnta
Location
BEL
SST
SOOR
Slow
Blow, Glass,
Smm
x
20mm
, .SA x 2SOVAC
Back
panel
of
turn
t
able
0 Before changing the fuse,
unplug the power cord.
Instructions for Changing
the
Fuse
Rotate
the
fuse
head
counterclockwise
with
a
flat
5mm
screwdriver
,
remove
fuse,
and
chunge
if
needed
.

ELECTRONICS
www.mofielectronics.com
Mo'-1
E:-k-ctronics
'(1 N
.7~r,m
'·1
:M
.u..e Ch:r,190
IL

"JJ/if'
MOFI ELECTRONICS LIMITED
WARRANTY
MoFi
Electronics
'"
(referred
to
as ''
MoFi")
warrants
the
product
designated
herein
to
be
free
of
manufacturing
defects
1n
materials
and
workmanship
for
a
period
of
three
(3)
years
from
the
date
of
purchase
by
the
original
purchaser
for
any
MoF1
Electronics"'
product
except
phone
cartridges
,
which
are
warranted
for
onP
(1)
year
from
the
date
of
purchase
The
warranty
is
void
and
inapplicable
1f
:
•
The
product
is
used
or
handled
other
than
1n
accordance
with
the
instructions
1n
the
owner's
manual.
•
The
product
is
abused
or
misused,
damaged
by
accident
or
neglect
or
in
being
transported
or
the
defect
1s
due
to
the
product
being
repaired
or
tampered
with
by
anyone
other
than
MoFi,
its
authonzed
dealer,
or
authorized
Repair
Center.
Additionally,
stylus
wear
or
damage
(including
the
cantilever)
and
turntable
drive
belt
wear
are
not
covered
by
this
war
r
anty
.
The
product
must
be
shipped
1n
the
original
packing
and
returned
to
an
authonzed
MoFi
Repair
Center
by
the
customer
at
his
or
her
sole
expense
after
requesting
a
Return
Authorization
Number
(RA#)
.
MoFi
will
pay
return
freight
of
,ts
choice
. A
copy
of
the
purchase
receipt
and
description
of
the
problem
must
accompany
the
product
Table of contents
Other Mofi Turntable manuals