Molbio Trueprep AUTO User manual

True AUTO prep™
User Manual
603041001
REF
DIAGNOSTICS
IVD
Universal Cartridge Based
Sample Prep Device


DIAGNOSTICS
1
TABLE OF CONTENTS
Table of Contents
Table of Figures
1
2
1 Introduction 3
2 Installation 4
2.1 Installation Precautions 4
2.2 Environmental Requirements 4
3 Specifications 4
4 Precautions 4
5 Materials Required 5
5.1 Contents 5
5.2 Materials Required but not provided with device 5
6 The Trueprep™ AUTO 5
6.1 A Top Panel View 5
6.1B Back Panel View 6
6.2 The Cartridge 6
7 Using the Trueprep™ AUTO 7
7.1 Charging/Using the Trueprep™ AUTO with the AC Adapter 7
7.2 Plugging in the reagent bottles 8
7.3 Switching ON the Trueprep™ AUTO 9
7.4 Placing the Cartridge in the device and starting the run 9
8 Errors, Alerts and Maintenance 12
8.1 Error Messages 12
8.2 Alert Messages 13
8.3 Maintenance 14

DIAGNOSTICS
2
TABLE OF FIGURES
Figure 1: The Trueprep™ AUTO Top View, with cartridge holder 5
shown in the front panel
Figure 2: The Trueprep™ AUTO Back Panel, with tubing and caps for plugging 6
in reagent bottles from the Reagent Pack of the
Trueprep™ AUTO Universal Cartridge Based Sample Prep Kit
Figure 3: Disposable Trueprep™ AUTO cartridge for sample processing 6
Figure 4: Low battery LED glowing red 7
Figure 5: The Charging Port in right hand side of the 8
Back Panel of the Trueprep™ AUTO
Figure 6: The Blue Charging LED Indicator Glowing 8
Figure 7: Reagent bottles with tubing fully immersed in liquid 9
Figure 8: The cartridge holder opened after eject button is pressed 9
Figure 9: Cartridge being placed in cartridge holder 10
Figure 10: Cartridge placed in cartridge holder in correct orientation 10
Figure 11: Replaceable tray and Rail guards in cartridge holder 11
Figure 12: Removal of Replaceable Tray and Rail guards from cartridge holder 11
Figure 13: Replacement of discarded Replaceable tray and Rail guards with new 12

DIAGNOSTICS
3
1. Introduction
1.1 The Trueprep™ AUTO Universal Cartridge Based Sample Prep Device
Testing for infectious diseases by detecting the pathogens nucleic acids using nucleic acid
amplification methods is a highly specific and sensitive diagnostic tool. Molbio's Truelab™ micro
PCR System is a nucleic acid amplification platform that works on Real Time Polymerase Chain
Reaction (PCR) technology that enables near patient diagnosis through disposable, disease
specific microPCR chips and a portable, automated Truelab™ Real Time micro PCR analyzer.
The PCR process necessitates the extraction and purification of nucleic acids from clinical
specimens to free it from potential PCR inhibitors. The Trueprep™ AUTO Universal Cartridge
Based Sample Prep Device together with Trueprep™ AUTO Universal Cartridge Based
Sample Prep Kit provides an easy method of nucleic acid extraction and purification.
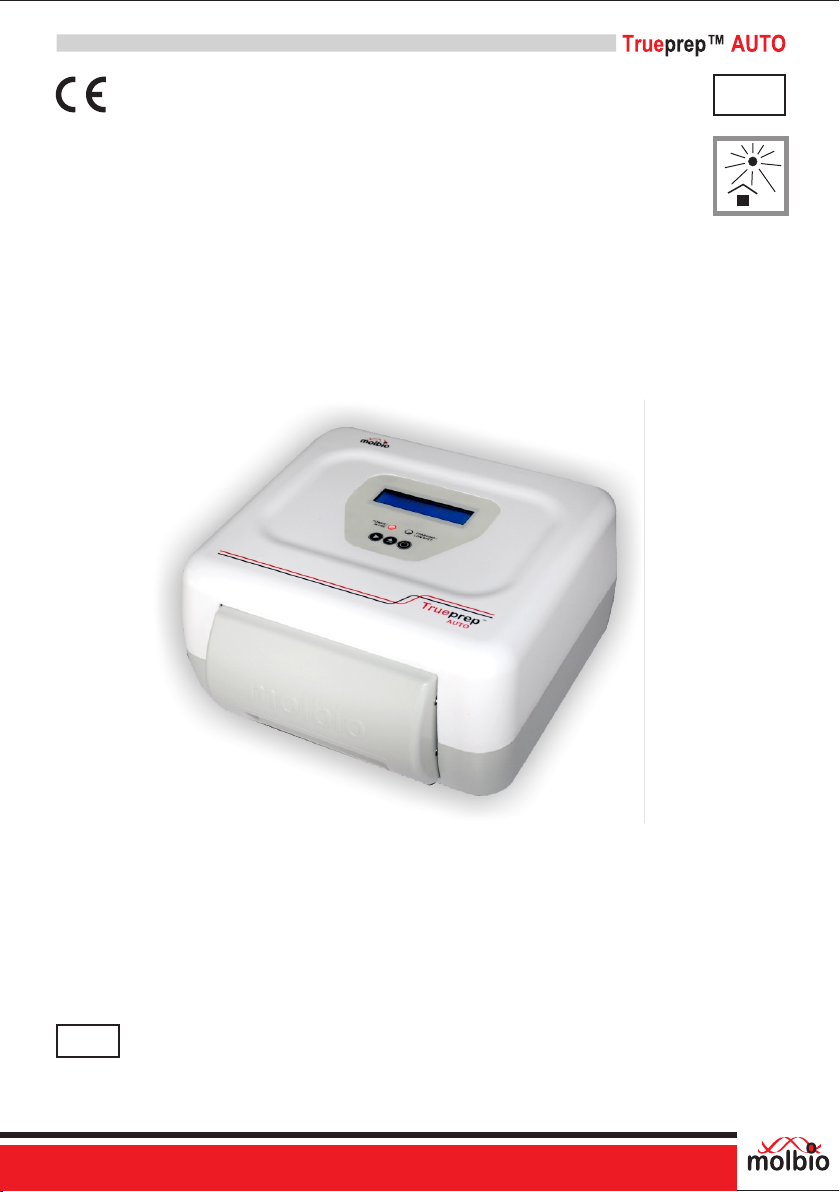
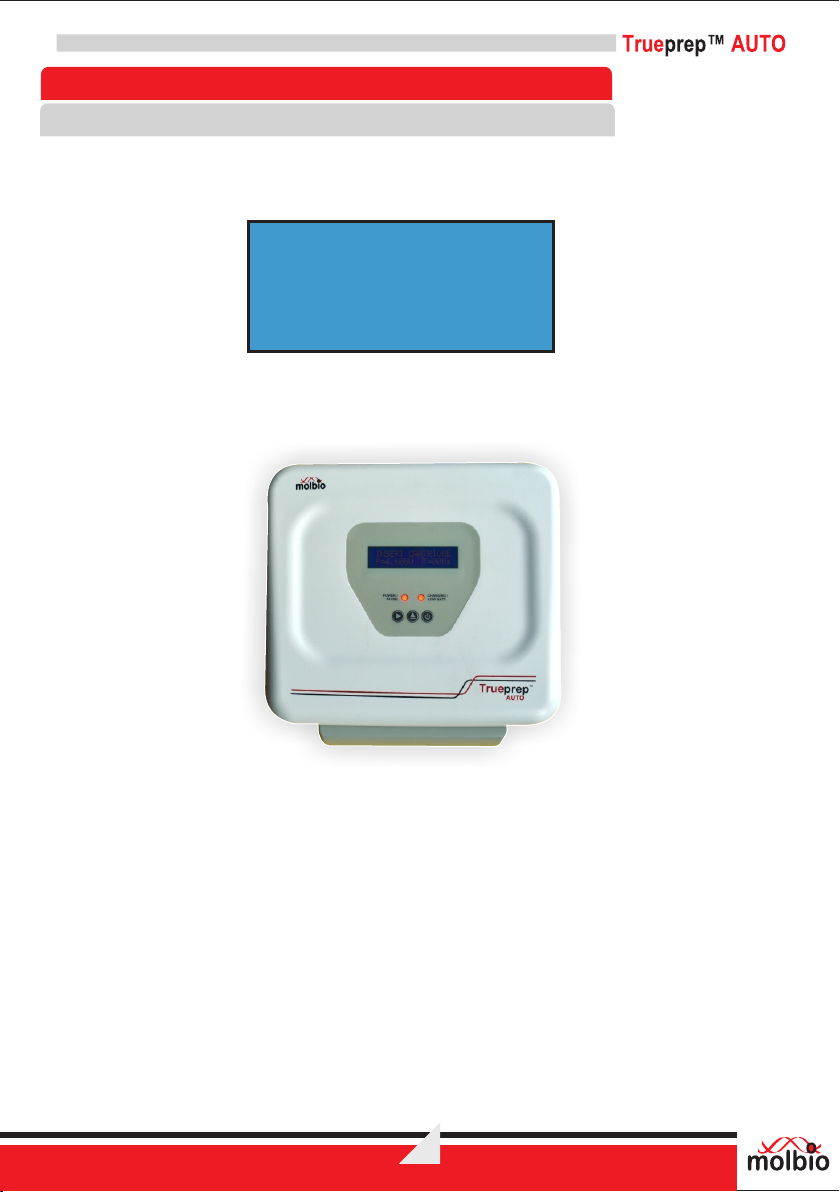
Trueprep™ AUTO Universal Cartridge Based Sample Prep Device is light weight and
portable and operates on mains and/or re-chargeable battery. It is capable of performing 16
sample extractions with one recharge and is fully Automatic, with minimal hands on time.
The cartridge based extraction process is quick, reliable, and efficient and does not require
highly skilled personnel to carry out the extraction process. All the waste from processing of the
sample is contained within the cartridge dump area thus posing no risk from potentially bio-
hazardous material.
The device has a universal protocol and can work with all kinds of samples such as sputum, BAL,
whole blood, serum, plasma, tissue, stool, urine, CSF, plural fluid, lymph node aspirate, pus,
peritoneal fluid, saliva, swab specimens and culture specimen.
1.2 Principle
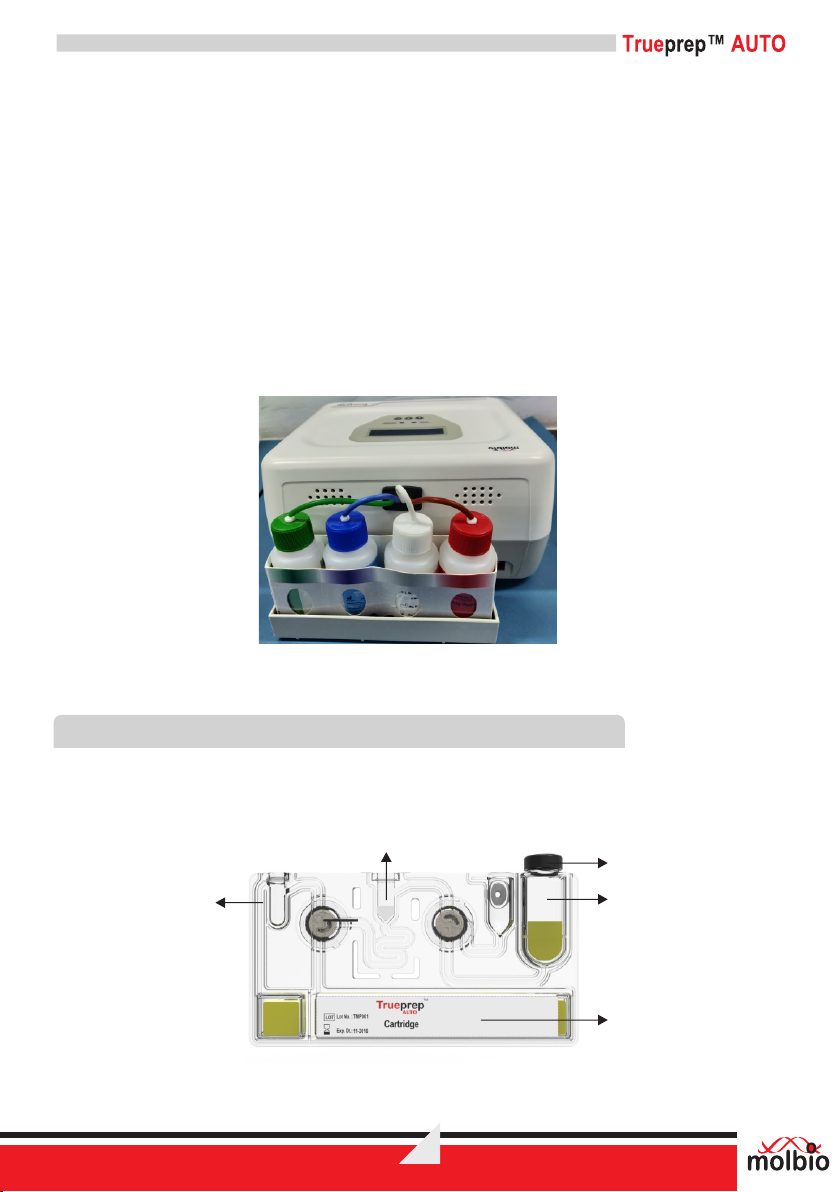
The Trueprep™ AUTO is an electromechanical system pre-programmed to sequentially heat,
mix and add reagents to the contents of the cartridge placed in the cartridge holder and has a
2 - line LCD screen that displays the status.
Specimen pre-treated with lysis reagent is added to the sample chamber of the cartridge which
is then placed in the cartridge holder of the device. Sample processing is initiated upon pressing
the start button on the device, through an automatic pre-programmed process wherein nucleic
acids released by chemical and thermal lysis of cells bind to the proprietary matrix in the matrix
chamber. In subsequent steps, the captured nucleic acids are washed with buffers to remove the
PCR inhibitors and finally eluted from the matrix using the elution buffer. At the end the cartridge
is automatically ejected and the elute containing purified nucleic acids is then collected from the
elute chamber for further analysis.

DIAGNOSTICS
4
2 Installation
2.1 Installation Precautions
Do not install the Trueprep™AUTO next to instruments that may cause
vibrations or electromagnetic interference.
Do not store the Trueprep™ AUTO in the path of direct sunlight or use it close to any
radiating or heating apparatus, such as a conventional oven, hot plate or infrared lamp.
Do not store the Trueprep™ AUTO in an atmosphere of potentially explosive liquids,
vapors and gas.
Always place theTrueprep™ AUTO on a flat surface in an upright position.
2.2 Environmental Requirement
The Trueprep™ AUTO has been designed to operate safely within the following environment
specifications:
Room temperatures ( between 15°C to 45°C )
Relative Humidity (RH) between 10% –90% (non-condensing)
The unit should be stored on a flat, dry surface.
3 Specifications
4 Precautions
Check for Low Battery before using the Trueprep™ AUTO (see section 7.1)
Insert and remove the cartridge gently from the holder, use of excessive force could damage
it.
Do not spill liquids inside the cartridge holder
Do not perform an extraction in the presence of reactive vapours (e.g., from sodium
hypochlorite, acids, alkalis or aldehydes) or dust.
Proprietary matrix-based extraction
Fully Automatic
2 line alphanumeric LCD
Rechargeable Lithium Ion Battery Pack 7.4 V, 11.6 Ah
External AC/DC adaptor: Input 1.5A, 100/240V, 50/60 Hz;
Output 10V, 4.5A
2.9 kgs
215 x 235 x 115 mm
Proprietary firmware
Temperature 15 - 45°C, RH: 10 -90%
Principle
Operation
Display Screen
Power
Weight
Size
Software
Operating environment
Trueprep™AUTO Device

DIAGNOSTICS
5
5 Materials Required
5.1 Contents
Trueprep™ AUTO Universal Cartridge Based Sample Prep Device (REF603041001)
AC Adapter (SMPS) with power cord to power -1No.
(REF603090001)- 25 Nos.Trueprep™ Replaceable tray for cartridge holder
R for cartridge holder Trueprep™ ail guards (10 left hand side and 10 right hand side)
(REF603140001) -10 pairs.
(REF603100001) - 1No.Trueprep™ Cartridge Stand
Bottle holder tray (REF603110001) - 1No.Trueprep™
User Manual -1No.
5.2 Materials Required but not provided with Device
Trueprep™ AUTO Universal Cartridge Based Sample Prep Device compatible with :
Trueprep™ AUTO Universal Cartridge Based Sample Prep Kit (REF60203AR25)consisting of
Universal Reagent Pack (25 tests)
Universal Cartridge Pack (25 nos.)
Disposable transfer pipette graduated (25 x3ml)
Package insert (1 No.)
TM
6. The Trueprep AUTO
6.1A Top Panel View
Figure 1 : The Trueprep™AUTO Top View, with cartridge holder shown in the front panel.
The Power button switches on and switches off the Trueprep™ AUTO
The Eject button opens the cartridge holder
CHARGING /LOW
BATTERY LED
Indicator
POWER button
START button
POWER/IN USE
LED Indicator
EJECT button

The Start button is used to begin sample processing
The Power/In Use LED Indicator will glow when the Trueprep™ AUTO is switched on and
when it is in use.
i) It will glow red and blink continuously when the Trueprep™ AUTO is switched on and waiting
for user input
ii) It will glow red continuously when it is in use
The Charging/Low Battery LED Indicator will glow when the Trueprep™ AUTO battery is low
and when it is being charged using the power cable.
i) It will glow red when the battery is low and needs to be charged
ii) It will glow blue when the Trueprep™ AUTO is being charged
6.1B Back Panel View
Figure 2: The Trueprep™ AUTO Back Panel, with tubing and caps for plugging in reagent bottles
from the Reagent Pack of the Trueprep™ AUTO Universal Cartridge Based Sample Prep Kit
6.2 The Cartridge
Samples are processed on disposable, single-use cartridges that are inserted into the cartridge
holder. These cartridges come pre-loaded with Internal Positive Control and only require the
addition of pre-treated sample to the sample chamber for processing on the Trueprep™ AUTO.
Figure 3: Disposable Trueprep™ AUTO cartridge for sample processing
Elute
Chamber
Matrix Chamber
Sample
Chamber
Dump
Cap
DIAGNOSTICS
6

DIAGNOSTICS
7
7 Using the Trueprep™ AUTO
7.1 Charging/Using the Trueprep™ AUTO with the AC Adapter
7.1.1 Press the Power button to switch on the Trueprep™ AUTO
7.1.2 Low battery
If the battery charge is low, you will see the above alert message
The Charging/Low Battery LED Indicator will glow red and you will also hear a beeping
sound. The Trueprep™ AUTO device will not let you begin a run if the battery is low.
Fig 4: Low battery LED glowing red
7.1.3 If the battery charge is full or sufficient to carry out a run, the Charging/Low Battery LED Indicator
will stay off. You may proceed to use Trueprep™ AUTO on battery charge.
For charging or to use Trueprep™AUTO on mains, connect the AC Adapter to the Charging
Port on the right side of the back panel of the device.
BATTERY LOW !
CONNECT CHARGER

DIAGNOSTICS
8
Figure 5: The Charging Port in right hand side of the Back Panel of the Trueprep™ AUTO
7.1.4 Connect the other end of the AC Adapter to a mains socket.
7.1.5 Switch On the mains power.
7.1.6 You can now proceed to use the Trueprep™AUTO using the mains power.If the Trueprep™
AUTO is being charged, the charging LED Indicator will glow blue. Charging takes ~9-10 hours
(overnight). When charging is complete, the charging LED Indicator will go off. When this
happens, please disconnect the AC Adapter unless it is being used to power the device.
Figure 6: The Blue Charging LED Indicator Glowing
7.2 Plugging in the reagent bottles
7.2.1 Before starting a run for the first time, plug in the colour coded reagent bottles from the
TM
Trueprep AUTO Sample Prep Kit Reagent Pack into the back panel of the device, matching
the colour of the cap on the panel with the colour of the reagent bottle cap in the kit. Discard the
reagent bottle cap once the bottle is plugged in.
7.2.2 Ensure that the tubing is fully immersed in the liquid upto the bottom of the reagent bottle.
7.2.3 A set of bottles is sufficient for 25 tests.
7.2.4 The device will prompt when 25 tests have been completed and the bottles have to be replaced.

Figure 7: Reagent bottles with tubing fully immersed in liquid
7.3 Switching ON the Trueprep™ AUTO
7.3.1 Press the Power button to switch on the Trueprep™ AUTO. You will be prompted with the
message ‘Buffer Count’.
.
7.3.2 Later you will be prompted with the message for
7.4 Placing the Cartridge in the device and starting the run
Important: Only use the cartridge provided in the corresponding sample prep kits.
7.4.1 Press the Eject button to open the cartridge holder. You will be prompted with the message
Figure 8: The cartridge holder opened after eject button is pressed
DIAGNOSTICS
9
TRUEPREP AUTO
INSERT CARTRIDGE
BUFFER COUNT

DIAGNOSTICS
10
7.4.2 Take a cartridge out of the Cartridge Pouch from the Trueprep™ AUTO Universal Cartridge
Based Sample Prep Kit Cartridge pack. The pouch also contains one Elute Collection Tube
(ECT) for use at the end of extraction. Place the cartridge, after adding pre-treated sample
(sample + lysis reagent) into the sample chamber ( see procedure in corresponding Truenat™
pack insert), in the cartridge holder. Note the orientation of the cartridge is to be placed in picture
below.
Caution: Placing the cartridge in the wrong orientation will cause the cartridge holder to remain
open, and the cartridge will not be inserted in the device
Figure 9: Cartridge being placed in cartridge holder
7.4.3 Push the cartridge holder gently inwards to close it shut. Press the Start Button to proceed.
This is the start of the Trueprep™ AUTO sample preparation process. The reagents from the
bottles in the back will be automatically added to the cartridge based on the pre-programmed
protocol.
Figure 10: Cartridge placed in cartridge holder in correct orientation
7.4.4 Once the process is completed the device will give a beep sound with display message as below
COLLECT ELUTE
---COMPLETED---

The device will automatically eject the cartridge holder. Take out the cartridge and place it on the
cartridge stand. Pierce the seal of elute chamber and aspirate out the entire elute into Elute
collection tube (ECT) using Disposable transfer pipette provided in the cartridge pack.
7.4.5 Discard the cartridge as per the instructions in Section 8.3.
7.4.6 Tray replacement
Cartridge holder contains two rail guards (Left hand side and Right hand side) and one middle
replaceable tray as shown in Figure 11. Steps for replacement of replaceable tray and rail guards are as
follows:
Step 1: Removal of the tray:
1a. Remove the Replaceable tray and Rail guards from cartridge holder as shown in the Figure 12.
1b. Clean the rail guards and the Replaceable tray with 70% Isopropyl Alcohol (IPA).
Step 2: Addition of the tray:
2a. Place the Rail guards first on the rails as shown as shown in Figure 13.
2b. Place the Replaceable tray above the rail guards in cartridge holder as shown Figure 13.
i. Inspect the replaceable tray in the cartridge holder
ii. If there are liquids spilled in the tray, take out the tray and discard as per the instructions in
Section 8.3.
iii. Clean the cartridge holder with 70% Isopropyl Alcohol (IPA) as described in Section 8.3.
iv. Replace the removed tray with a new tray and close the cartridge holder (24 Extra trays are
TM
provided with the Trueprep AUTO device. More trays, if required, can be ordered from
Molbio).
Figure 11: Replaceable tray and Rail guards in cartridge holder
Figure 12: Removal of Replaceable Tray and Rail guards from cartridge holder
DIAGNOSTICS
11
Replaceable Tray
Rail guard
(Left Hand Side)
Rail guard
(Right Hand Side)

DIAGNOSTICS
12
Figure 13: Replacement of discarded Replaceable tray and Rail guards with new
8 Errors, Alerts and Maintenance
8.1 Error Messages
The Screen displays the
error message
“Cartridge Not Loaded”
Reason:
No cartridge is inserted or
cartridge orientation is
wrong.
Solution:
Please ensure cartridge is
loaded and is in the
correct orientation.
The Screen displays the
error message “VALVE
ERROR”
Reason:
Cartridge valve are
damaged.
Solution:
Please start afresh with a
new cartridge
The Screen displays the
error message
“CARTRIDGE
CLOGGED
PRESS EJECT”
Reason:
The cartridge is clogged
because the specimen
used is too thick.
Solution:
Please start with a new
cartridge. In case the
Problem persists contact
Molbio support.
Error Message Description Reason for Error
and Solution
CARTRIDGE NOT
LOADED
VALVE ERROR
CARTRIDGE CLOGGED
PRESS EJECT

DIAGNOSTICS
13
8.2 Alert Messages
The Screen displays the
error message
“CARTRIDGE ERROR
PRESS EJECT”
Reason:
There is a leak in the
cartridge.
Solution:
Check for spillage in the
tray below the cartridge in
the cartridge holder. If
necessary, replace the tray
(refer 7.4.6).
In case the Problem
persists contact Molbio
support.
The Screen displays
the error message
“RTD ERROR”
Reason:
The heater is not working.
Solution:
Contact Molbio Support.
The Screen displays the
error message “Self Test
Failed, Press Eject”
Reason:
This error message
appears when the device
is powered ON because
the pressure from
previous run is not
released.
Solution:
Press Eject. When the
cartridge holder opens,
close it gently.
The screen displays the
alert message
“Battery Low !, Connect
Charger”
Reason:
This alert appears when
the battery is low and the
charger needs to be
plugged in. The device
cannot start a run when
the battery is low
CARTRIDGE ERROR
PRESS EJECT
RTD ERROR
SELF TEST FAILED
PRESS EJECT
BATTERY LOW !
CONNECT CHARGER

DIAGNOSTICS
14
8.3 Maintenance
8.3.1 Disposal of consumables
Discard the used cartridges, replaceable trays, reagent bottles and other consumables in 0.5%
Sodium Hypochlorite. Let the items remain submerged in the solution for 30 minutes and then
dispose as per the medical waste guidelines in your region.
8.3.2 Cleaning
The surface of the device should be cleaned using freshly prepared 0.5% Sodium Hypochlorite
solution and a clean cloth or tissue. This should be done once everyday and/or when the device is
moved to a different work space.
8.3.3 Spills
If you notice a spill in the replaceable tray and rail guards placed in the cartridge holder, dispose
the tray. Clean the insides of the cartridge holder with clean cloth or tissue or swab dipped in 70%
Iso Propyl Alcohol (IPA). Wait for 5 minutes before inserting a new replaceable tray and rail guards
into the holder.
8.3.4 Disposal of Instrumentation
Do not Dispose off Instrument as unsorted municipal waste. Contact Molbio for collection of
instrument.
The Screen toggles
between 2 displays
“Change reagent pack
and Reset” and “By
Pressing Start & Eject
SW”
Reason:
The reagent bottles have
been used up.
Solution:
Remove the used up
reagent bottles and
discard as per the pack
insert. Plug in a new
TM
Trueprep AUTO
Reagent Pack as shown in
Section 7.2. Re-set the
counter by pressing Start
and Eject buttons together.
Solution:
Connect the charger and
wait for the device to finish
charging or operate it on
mains
CHANGE REAGENT
PACK & RESET
BY PRESSING
START & EJECT SW

DIAGNOSTICS
15
In Vitro Diagnostic Medical Device

DIAGNOSTICS
15
THIS SIDE UP
MEDICAL
ELECTRONIC
RUSH
DO NOT STACK
FRAGILE
KEEP DRY
Fully automatic operation
Rapid sample prepping
Mains / rechargeable battery powered
AUTO Universal Cartridge
Based Sample Prep Kit
Portable
This Side Up
Medical Electronic Rush
Do Not Stack
Fragile
Keep Dry


MB/TA/09-18/VER-3
Registered Office:
H.No. 13, Sagar Society, Dona Paula
Panaji, North Goa,Goa - 403 722, India.
www.molbiodiagnostics.com
Molbio Diagnostics Pvt. Ltd.
Qarad b.v.b.a. Cipalstraat 3, B-2440 Geel, Belgium
EC REP
Manufacturing Unit:
Plot Nos. M-46/47, Phase III B,
Verna Industrial Estate, Verna,
Goa - 403 722, India.
Email: sales@molbiodiagnostics.com
Table of contents
Other Molbio Laboratory Equipment manuals
Popular Laboratory Equipment manuals by other brands

Frederiksen
Frederiksen 400150 quick guide

CertoClav
CertoClav MultiControl user manual

NuAire
NuAire LabGard NU-560E Series Operation & maintenance manual

Tamson Instruments
Tamson Instruments TLV25 manual

Agilent Technologies
Agilent Technologies 1290 infinity user manual

Magnaflux
Magnaflux CSV Series Operation manual