manuals.online logo
Brands
  1. Home
  2. •
  3. Brands
  4. •
  5. Momento
  6. •
  7. Automobile Accessories
  8. •
  9. Momento MR-1000 User manual

Momento MR-1000 User manual

R1 Rearview Mirror Replacement for Backup Camera
R1 Rétroviseur de Remplacement pour Caméra de Recul
MR-1000 Quick Start Guide
MR-1000 Guide de Démarrage Rapide
21903 68th Avenue South
Kent, Washington 98032
Toll-Free: (888)820-3690
Monday-Friday 8am-5pm Pacific (US)
This device has been designed as a driver aid and must not be considered
infallible. Always reverse vehicles with caution and using common sense.
Manuever your car slowly in the interest of your own safety and that of others.
Cet appareil a été conçu pour servir d’aide au conducteur et ne doit pas être
considéré comme étant infaillible. Faites attention et faites preuve de bon sens. Pour
votre sécurité et celle des autres, effectuez vos manœuvres lentement.
www.momentocam.com
5. Adjustable Parking Guide Lines
The Momento R1 has 9 kinds of parking guide lines for your selection.
Press the hidden buttons to adjust these parking guidelines, as well as brightness, contrast &
color. TIP: when adjusting parking lines, park the vehicle half-way into a parking spot with
painted lines.
Appuyez sur les touches camouflées pour effectuer le réglage de la luminosité, du contraste, des
couleurs, de l’aide au stationnement. Choix de 9 lignes d’aide au stationnement.
Vous pouvez les ajuster vers la gauche, la droite, le haut et le bas pour un meilleur visionnement.
TRUC: Lorsque vous ajustez les lignes d’aide au stationnement, reculez le véhicule jusqu’à la demie
de la distance d’un espace de stationnement ayant des lignes peintes.
6. System Operation
The R1 Mirror is signal-sensing. When the mirror’s Video 1 or Video 2 input receives a signal,
the LCD will automatically activate. When the signal is removed, the LCD will automatically
turn off. Video Input 2 will override Video Input 1. Video Input 1 will activate after the vehicle
is switched out of reverse gear or by pressing “M” button.. Video Input 1 will remain active
for 10 seconds.
Le rétroviseur R1 a été conçu pour capter les signaux. Lorsque les entrées Vidéo 1 ou Vidéo 2 du
rétroviseur reçoivent un signal, l’écran ACL s’active automatiquement. Lorsque le signal n’est plus
capté, l’écran ACL se désactive automatiquement. L’entrée Vidéo 2 aura priorité sur l’entrée Vidéo
1. L’entrée Vidéo 1 s’activera seulement lorsque le véhicule ne fera plus marche arrière ou via le
bouton “M”. L’entrée Vidéo 1 demeurera active pour 10 secondes.
7. Auto-Adjusting Brightness Feature
The brightness of the 4.3” LCD screen will adjust automatically to its environment’s lighting
conditions. In brighter conditions, the display will brighten to increase the image’s view
ability. In darker conditions, it will decrease its brightness so as not to over-stimulate the
driver’s eyesight.
La luminosité de l’écran ACL de 4,3 po s’ajustera automatiquement selon l’intensité de la
luminosité de l’environnement. Lors d’un éclairage intense, la luminosité de l’écran s’intensifiera
pour assurer une meilleure visibilité et diminuera son intensité pour ne pas trop stimuler la vision
du conducteur.
Settings / Adjustment +/-
Réglage / Ajustement +/-
Standby Indicator
Voyant ‘Standby’
Environment Sensor for
Auto-Adjusting LCD
Détecteurs de Luminositéet
d'Environnement
3
Front Camera Activation
Activation de Caméra Avant
1
1. Introduction
Thank you for purchasing your new Momento R1 Rearview Mirror Replacement System for
Backup Camera! The Momento R1 is a premium solution that replaces your vehicle’s
rearview mirror for connecting to a backup camera. The R1 has auto-switching video inputs
that automatically activate when your vehicle is in reverse.
Le R1 de Momento est une solution primée pour le remplacement du rétroviseur de votre véhicule
pour vous raccorder à une caméra de recul. Le R1 est muni d'entrées vidéo à cummutation
automatique, la caméra s'active automatiquement lorsque votre véhicule fait marche arrière.
2. Package Components
• R1 10.5"x3.2" Replacement Mirror w/ Bracket
Rétroviseur de remplacement R1 de 10,5 po x 3,2 po avec fixation
• Front + Rear Auto/Manual-Switch Video Inputs
2 - Entrées vidéo à commutation automatique et manuelle à l'avant et à l'arrière
• R1 Harness Kit & Mounting Tool
Faisceau de conducteurs R1 et outil de fixation
• 4 Mounting Adapters
4 adapteurs de montage
• 3 Year Manufacturer’s Warranty
Garantie de 3 ans du fabricant
3. Specifications
Power Supply
Bloc d’Alimentation
Brightness / Luminosité
OSD Menu
Signal System
Systéme de Détection
Dual Video Inputs
2 Entrées Vidéo
Screen Type
Panneau
LCD Size / Format d’Ecran
Resolution / Résolution
Aspect Ratio
Rapport d’Image
Power Consumption
Consommation d’Énergie
TFT LCD
TFT ACL
4.3 in / pi
480 x 272
16 x 9
3.6W
(Working / en Marche)
0.5W
(Standby / en Attente)
DC 12V
12 V C.C.
1000 cd/m2
Available / Offert
PAL / Auto /
NTSC
AV1 - Video Input
Entrée Supplémentaire
AV2 - Rear Camera
Caméra Arriére
4. Installation
1. Remove OEM rearview mirror. You may need a special removal tool for select vehicles
(e.g. Ford). Visit www.firstechdata.com for more information on mounting.
2. The Momento R1 includes 4 mounting adapters, including one attached to the R1 mirror
out of the box. Determine which adapter is appropriate for mounting the R1 mirror.
Please do so with caution, without damaging the windshield.
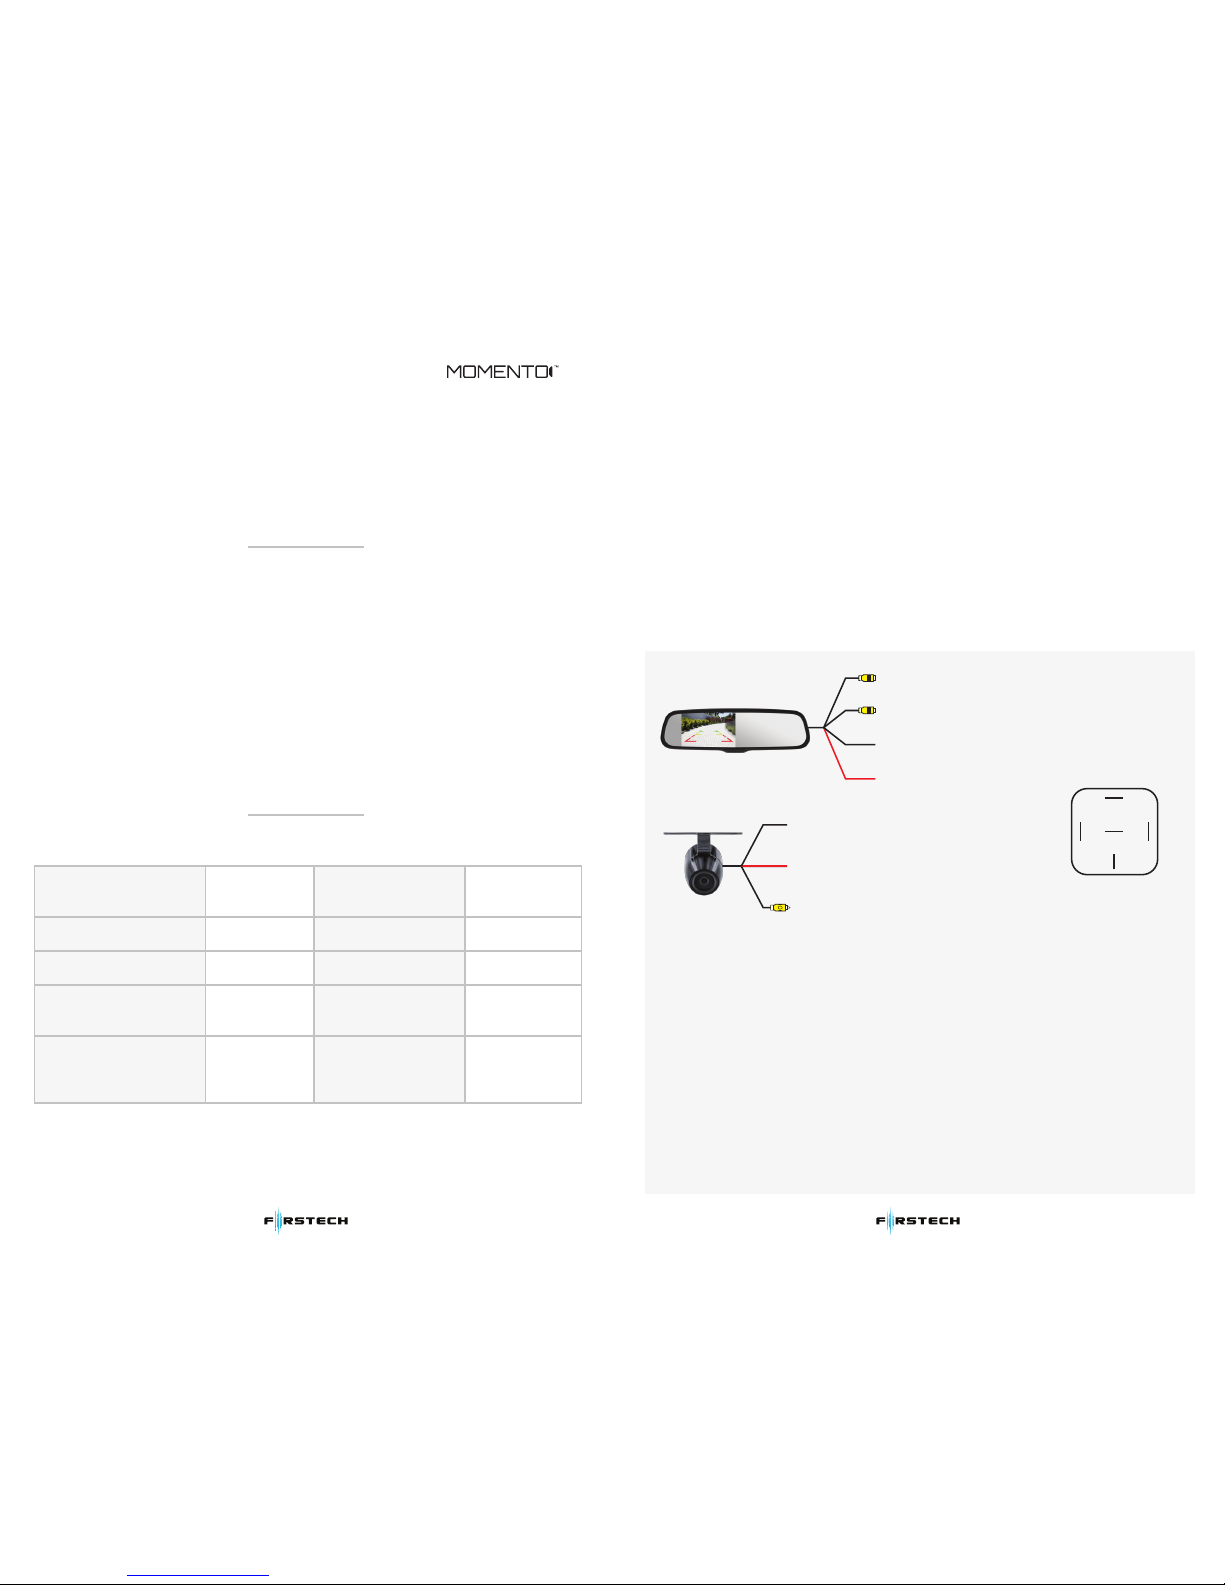
3. Make all necessary wiring connections (see diagram below).
1. Retirez le rétroviseur d’origine. Certains véhicules nécessitent un outil spécial pour retirer le \
rétroviseur (ex. Ford). Visitez www.firstechdata.com pour de plus amples informations
concernant l’installation.
2. Le Momento R1 comprend 4 adaptateurs pour l’installation. Déterminez lequel des adaptateurs
est approprié pour l’installation de votre rétroviseur R1.
Veuillez travailler avec prudence pour ne pas endommager le pare-brise.
3. Effectuez toutes les connexions de câblage nécessaires (Voir le schéma de câblage).
Installer Notes
1. The R1 Mirror is signal-sensing, there is no “reverse trigger wire” in the wire harness please
connect to key switched power (ACC B+)
2. Black (Ground) - Find a suitable location to ground the Black wire in the wiring harness.
For example: attach a ring terminal to the black wire and screw into the body of the vehicle. If you choose to screw
into the body, clean the area of any paint or adhesives to allow for good metal-to-metal contact.
1. Le rétroviseur R1 a été conçu pour capter les signaux. Le faisceau de conducteurs ne comprend pas de
câble de marche arrière. Si le câble du voyant de marche arrière du véhicule procure une tension
insuffisante pour alimenter la caméra, assurez-vous d’utiliser un relai supplémentaire (non inclus) tel
que ci-haut mentionné.
2. Noir (Mise à la Terre) – Repérez un endroit propice pour fixer le câble noir de mise à la terre (négatif)
inclus dans le faisceau de conducteurs.
Par exemple: attacher un anneau à l’extrémité du câble noir et le visser au véhicule. Si vous choisissez de le visser au
véhicule, assurez-vous de bien nettoyer l’endroit pour enlever toute trace de peinture ou de substance adhésive pour
permettre un bon contact métal sur métal.
2
R1 Mirror / Rétroviseur
Video 2 Input (To Camera)
Vidéo 2 (Vers la Caméra)
Video 1 Input (Addtl. Video Input)
Vidéo 1 (Sortie Supplémentaire)
Black (Ground)
Noir (Mise à la Terre)
Red (Accessory)
Rouge (Accessoires)
Black (Ground)
Noir (Mise à la Terre)
Red (Reverse Lamp-Wire)
Rouge (Câble du Voyant de Marche Arrière)
RCA Output to R1 Video Input
Sortie RCA à Vidéo
C1/C2/C3 Camera
1
1
2
2
87
85
30
86 87a
NA
To Camera Red
À Caméra Rouge
Vehicle Reverse
Lamp Wire
Câble du Voyant
de Marche Arrière
GND
Acc Input (From Vehicle)
Entrée RVE du Véhicule
Relay / Relai
(Not Included / Non Inclus)
1

Other Momento Automobile Accessories manuals

Momento MR-C300 User manual

Momento

Momento MR-C300 User manual

Momento MR-C100 User manual

Momento

Momento MR-C100 User manual

Momento MR-S100 User manual

Momento

Momento MR-S100 User manual

Popular Automobile Accessories manuals by other brands

Road Angel vantage Product manual & user guide

Road Angel

Road Angel vantage Product manual & user guide

CrimeStopper ST-906.6 installation guide

CrimeStopper

CrimeStopper ST-906.6 installation guide

Hamron 619-627 User instructions

Hamron

Hamron 619-627 User instructions

PEUGEOT 3008 user manual

PEUGEOT

PEUGEOT 3008 user manual

Kenwood KCA-RC700A instruction manual

Kenwood

Kenwood KCA-RC700A instruction manual

Leer 217988 Installation instructions & owner's manual

Leer

Leer 217988 Installation instructions & owner's manual

Webasto thermo top evo Installation documentation

Webasto

Webasto thermo top evo Installation documentation

Thule 1384 instructions

Thule

Thule 1384 instructions

Smappee EV Base installation manual

Smappee

Smappee EV Base installation manual

A-Tach Mounts ST-2 instructions

A-Tach Mounts

A-Tach Mounts ST-2 instructions

Kuda 083810 Installation instruction

Kuda

Kuda 083810 Installation instruction

Volvo 31210148 installation instructions

Volvo

Volvo 31210148 installation instructions

Whispbar K881W Fitting instructions

Whispbar

Whispbar K881W Fitting instructions

Front Runner RRAC051 quick start guide

Front Runner

Front Runner RRAC051 quick start guide

Edelbrock 60459 Installation instructions and owner's manual

Edelbrock

Edelbrock 60459 Installation instructions and owner's manual

Webasto Telestart T70 installation instructions

Webasto

Webasto Telestart T70 installation instructions

Steinhof O-105 FITTING AND OPERATION MANUAL

Steinhof

Steinhof O-105 FITTING AND OPERATION MANUAL

Curt Group Liverne 401801 installation manual

Curt Group

Curt Group Liverne 401801 installation manual

manuals.online logo
manuals.online logoBrands
  • About & Mission
  • Contact us
  • Privacy Policy
  • Terms and Conditions

Copyright 2025 Manuals.Online. All Rights Reserved.