Monacor PA-1200RDSU User manual

ELECTRONICS FOR SPECIALISTS ELECTRONICS FOR SPECIALISTS ELECTRONICS FOR SPECIALISTS ELECTRONICS FOR SPECIALISTS
EINBAU- und BEDIENUNGSANLEITUNG
INSTALLATION and OPERATING INSTRUCTIONS
NOTICE DE MONTAGE et D’UTILISATION
ISTRUZIONI PER IL MONTAGGIO e PER L’USO
INBOUW- en GEBRUIKSHANDLEIDING
INSTRUCCIONES INSTALACIÓN y FUNCIONAMIENTO
INSTALACJA i INSTRUKCJA OBSŁUGI
PA-1200RDSU
Bestell-Nr. • Order No. 17.5030
UKW/MW-RDS-Radio-Modul
mit USB-Audiospieler
FM/AM RDS Radio Module
with USB Audio Player


3
ELECTRONICS FOR SPECIALISTS ELECTRONICS FOR SPECIALISTS ELECTRONICS FOR SPECIALISTS ELECTRONICS FOR SPECIALISTS
Deutsch ..........Seite 4
English ...........Page 8
Français ..........Page 12
Italiano...........Pagina 16
Nederlands .......Pagina 20
Español ..........Página 24
Polski ............Strona 28

4
Deutsch
English
English Page
Français
Français Page
Italiano
Italiano Pagina
Español
Español Página
Nederlands
Nederlands Pagina
Polski
Polski Strona
TRACK
TUNEMODE BAND PTY AF
010
LEVEL
1/ 2/INT 3/RPT 4/RDM 5/
FOLDER
/6
PA -120 0 R DS U FM/AM RDS TUNER
Deutsch
Deutsch Seite
UKW/MW-RDS-Radio-Modul
mit USB-Audiospieler
Diese Anleitung richtet sich an Techniker, die das
Modul einbauen, und an Benutzer ohne beson-
dere Fachkenntnisse. Bitte lesen Sie die Anleitung
vor dem Betrieb gründlich durch und heben Sie
sie für ein späteres Nachlesen auf.
1 Einsatzmöglichkeiten
Das Modul ist für den Einbau in MONACOR-
ELA-Verstärker mit einem Modulschacht und in
MONACOR-Erweiterungsgeräte geeignet, zum
Beispiel:
PA-1120
PA-1240 ELA-Verstärker für 5 Zonen
PA-1200 ELA-Verstärker für 4 Zonen
PA-1200EX Erweiterungsgerät für 2 Module
PA-5240
PA-5480 ELA-Verstärker für 5 Zonen
PA-6240
PA-6480
PA-6600
ELA-Verstärker für 6 Zonen
2 Übersicht
/Ein-/Ausschalten; Abspielen beenden
Zum Ausschalten die Taste so lange gedrückt
halten, bis das Display erlischt.
USB-Buchse für einen USB-Speicherstick oder
eine USB-Festplatte mit eigener Stromver-
sorgung; mit einem USB-Adapter können
auch Speicherkarten (SD, SDHC) verwendet
werden.
Hinweis: Aufgrund der Vielfalt von Speicher-
Herstellern und Gerätetreibern kann nicht garan-
tiert werden, dass alle Speichermedien mit dem
PA-1200RDSU kompatibel sind.
1/
II Stationstaste 1/
Audiowiedergabe starten, unterbrechen,
fortfahren
2/INT Stationstaste 2/
Anspielen aller Titel
3/RPT Stationstaste 3/
Titel oder Ordner wiederholt abspielen
4/RDM Stationstaste 4/
Abspielen in zufälliger Reihenfolge
5/
FOLDER Stationstaste 5/
vorherigen Ordner anwählen
6/FOLDER
Stationstaste 6/
nächsten Ordner anwählen
MODE Umschalten zwischen Radio und Audio-
spieler
BAND Umschalten zwischen F1, F2, F3 und MW
(F steht für FM = UKW)
TRACK
TUNE Audiospieler
I= nächster Titel
I
= vorherigen Titel
Bei gedrückt gehaltener Taste schneller
Vor- bzw. Rücklauf
Radio
Zum Starten des Sendersuchlaufs die Taste
I
oder
Ikurz drücken. Zum Speichern
eine Stationstaste so lange gedrückt hal-
ten, bis links im Display „F“ oder „MW“
auf „M“ (Memory) wechselt. Manuelle
Sendereinstellung siehe Kapitel5.2.1.
PTY Auswahl des Programmtyps bei RDS-
Empfang
AF Funktion Alternativfrequenz bei RDS-
Empfang
LEVEL Lautstärkeregler

5
Deutsch
3 Hinweise für den
sicherenGebrauch
Das Modul entspricht allen relevanten Richtlinien
der EU und trägt deshalb das -Zeichen.
•
Verwenden Sie das Modul nur im Innenbereich
und schützen Sie es vor Tropf- und Spritzwasser
sowie vor hoher Luftfeuchtigkeit. Der zulässige
Einsatztemperaturbereich beträgt 0–40°C.
•
Nehmen Sie das Gerät mit dem eingebauten
Modul nicht in Betrieb, wenn:
1. sichtbare Schäden am Modul oder am Gerät
vorhanden sind,
2.
nach einem Sturz oder Ähnlichem der Ver-
dacht auf einen Defekt besteht,
3. Funktionsstörungen auftreten.
Geben Sie das Modul oder das komplette
Gerät in jedem Fall zur Reparatur in eine Fach-
werkstatt.
•
Verwenden Sie zum Säubern nur ein weiches,
trockenes Tuch, auf keinen Fall Chemikalien
oder Wasser.
•
Wird das Modul zweckentfremdet, nicht fach-
gerecht eingebaut, falsch bedient oder nicht
fachgerecht repariert, kann keine Garantie für
das Gerät und keine Haftung für daraus resul-
tierende Sach- oder Personenschäden übernom-
men werden.
Soll das Modul endgültig aus dem Be-
trieb genommen werden, übergeben
Sie es zur umweltgerechten Entsorgung
einem örtlichen Recyclingbetrieb.
4 Einbau des Moduls
WARNUNG Das Modul darf nur von einer qua-
lifizierten Fachkraft eingebaut wer-
den. Es besteht die Gefahr eines
elektrischen Schlages.
1)
Das Gerät, in welches das Modul eingebaut
werden soll (ELA-Verstärker/Erweiterungs-
gerät), von der Stromversorgung trennen und
den Gehäusedeckel des Gerätes abschrauben.
2)
Auf der Frontseite des Verstärkers/Erweite-
rungsgerätes die Abdeckblende für den Modul-
schacht abschrauben. Das Modul dort einset-
zen und festschrauben.
3) Über den 3-poligen Anschluss CONIN OUT (an
der hinteren Kante) erhält das Modul seine
Betriebsspannung (17V) und wird das Audio-
signal zum Verstärker geleitet. Die freiliegende
dreipolige Leitung des Verstärkers/Erweite-
rungsgerätes in diesen Anschluss stecken.
4)
Zur Montage der beiliegenden Antennen-
buchse auf der Rückseite des Verstärkers/Er-
weiterungsgerätes das Abdeckblech „ANT.
Terminal“ heraustrennen. Die Antennenbuchse
in die Öffnung einsetzen und festschrauben.
ANT
ANT. Terminal
(option)
AM GND 300 Ω
FM 75 Ω
5)
Die Leitung der eingesetzten Antennenbuchse
in den 5-poligen Anschluss ANT1 des Moduls
stecken.
6)
Das Gerät, in welches das Modul eingebaut
wurde, mit dem Gehäusedeckel wieder ver-
schließen. An die Antennenbuchse die Emp-
fangsantenne anschließen. Eine einfache Wurf-
antenne liegt dem Modul bei.
Sollen sowohl eine UKW- als auch eine
Mittelwellenantenne angeschlossen werden,
die Antennen über eine Antennenweiche an
die Buchse ANT anschließen.
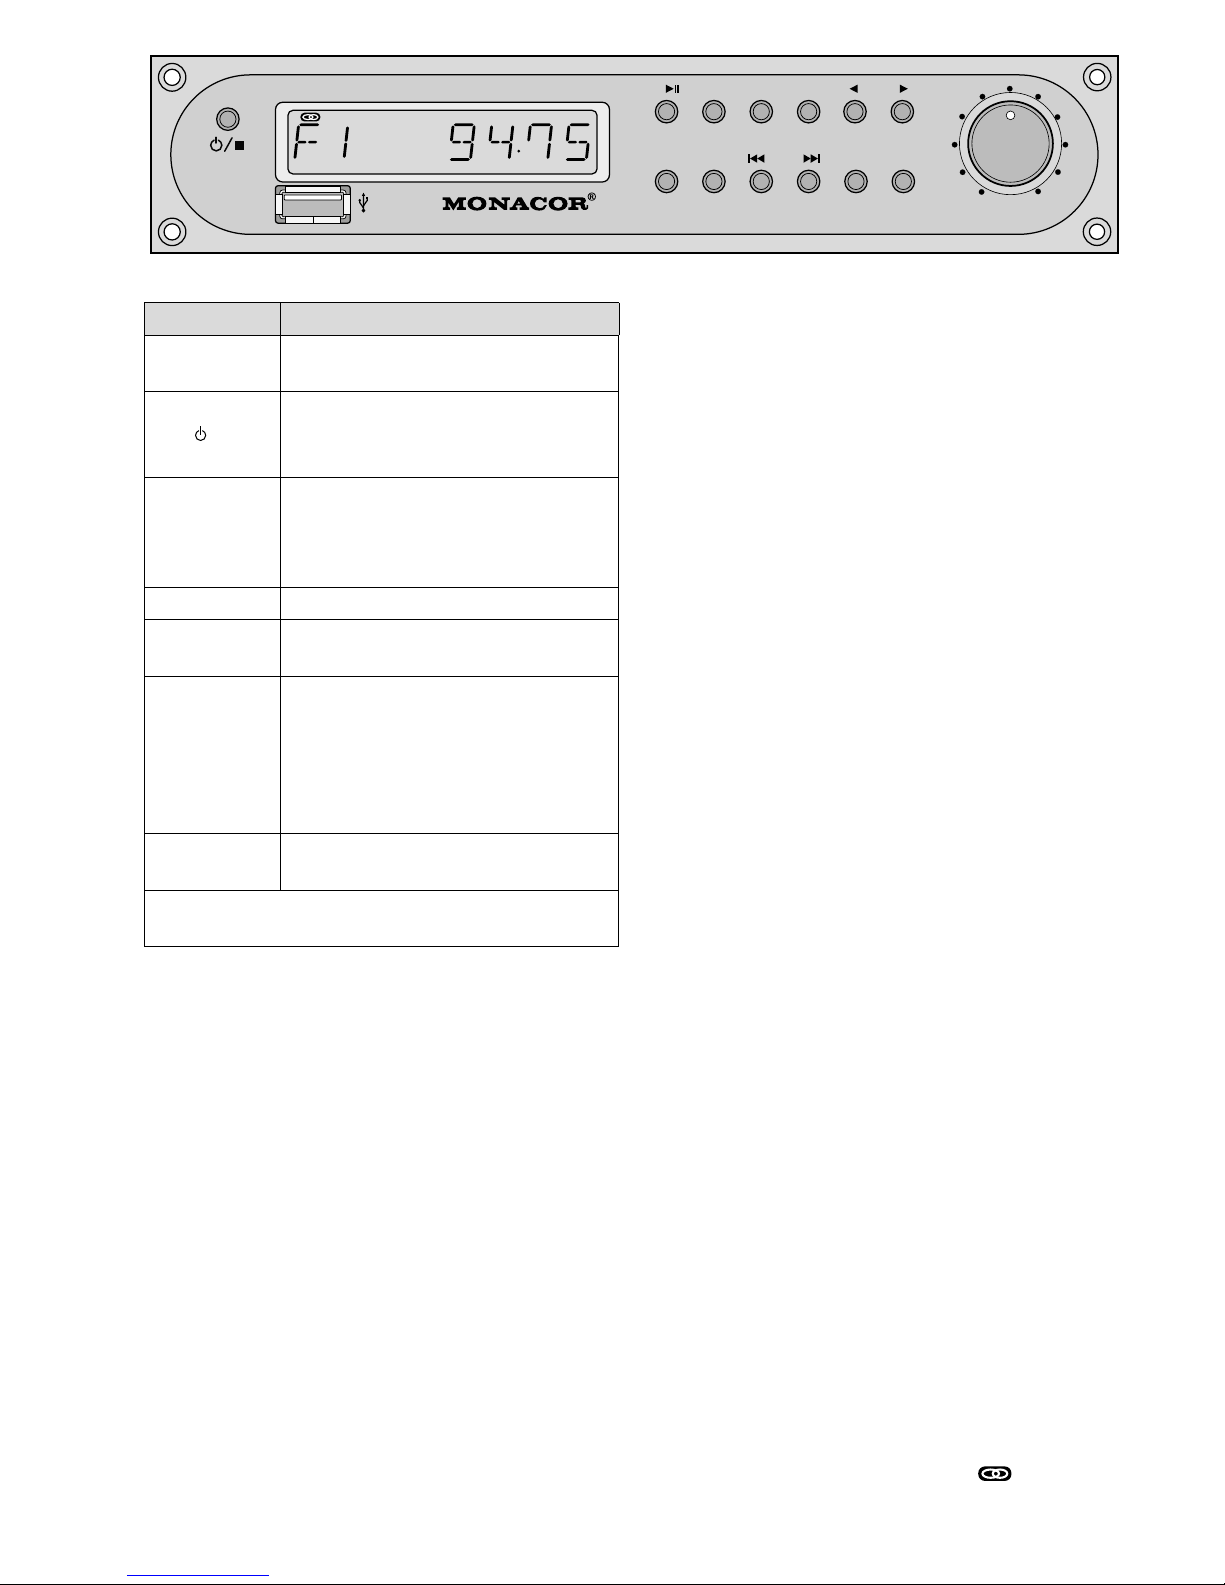
5 Bedienung
1)
Das Gerät, in dem das Modul eingebaut ist,
einschalten. Das Modul mit der Taste /ein-
schalten.
2) Zum Umschalten zwischen Radio und Audio-
spieler die Taste MODE drücken.
3)
Die gewünschte Lautstärke mit dem Regler
LEVEL einstellen.
4) Zum Ausschalten die Taste /so lange drü-
cken, bis das Display erlischt. Oder das Gerät
ausschalten, in dem das Modul eingebaut ist.
Beim nächsten Einschalten sind alle ge-
wählten Funktionen wieder aktiviert.
5.1 Bedienung des Audiospielers
Zum Abspielen von MP3- oder WMA-Dateien in
die USB-Buchse einen USB-Speicherstick stecken
oder an die USB-Buchse eine USB-Festplatte mit
eigener Stromversorgung anschließen. Mit einem
entsprechenden USB-Adapter können auch Spei-
cherkarten (SD, SDHC) verwendet werden.
Hinweis: Aufgrund der Vielfalt von Speicher-Herstellern
und Gerätetreibern kann nicht garantiert werden, dass alle
Speichermedien mit dem PA-1200RDSU kompatibel sind.

6
Deutsch
TRACK
TUNEMODE BAND PTY AF
010
LEVEL
1/ 2/INT 3/RPT 4/RDM 5/
FOLDER
/6
PA -120 0 R DS U FM/AM RDS TUNER
Taste Funktion
II Abspielen starten, unterbrechen und
fortfahren
/
kurz drücken:
Beenden des Abspielens
gedrückt halten, bis das Display
erlischt: Ausschalten
I
TRACK I
kurz drücken:
zum vorherigen/nächsten Titel
springen
gedrückt halten:
schneller Rück-/Vorlauf (ohne Ton)
FOLDER zum vorherigen/nächsten Ordner
springen
INT INTRO – Anspielen (10s) der Titel*
RPT
REPEAT – Wiederholtes Abspielen
des laufenden Titels
Wird die Taste erneut gedrückt,
blinkt die Anzeige REPEAT und alle
Titel im Ordner werden wiederholt*
RDM RANDOM – Abspielen der Titel in
zufälliger Reihenfolge*
*Zum Beenden einer Funktion die Taste erneut betä-
tigen oder eine andere dieser drei Tasten.
5.1.1 Starten des Abspielens automatisch
oder manuell
Der Audiospieler-Betrieb ist angewählt und das
Modul oder das Gerät, in dem das Modul ein-
gebaut ist, wird ausgeschaltet. Beim nächsten
Einschalten kann die Wiedergabe automatisch
starten oder manuell mit der Taste
II
gestartet
werden.
Umschalten zwischen automatischem und
manuellem Start: Während des Abspielens eines
Titels die Taste
II so lange gedrückt halten, bis
das Display MANUAL oder AUTO anzeigt.
5.2 Bedienung des Radios
Mit dem Radio können UKW- und Mittelwellen-
sender empfangen werden. Die sechs Stations-
tasten (1/ … /6) sind mehrfach belegbar, sodass
3×6 UKW-Sender (F 1, F 2, F3) und 6 Mittel-
wellensender (MW) gespeichert werden können.
5.2.1 Sender einstellen und speichern
1) Wird unten im Display AF angezeigt, mit der
Taste AF diese Anzeige ausschalten.
2) Mit der Taste BAND auf den gewünschten Be-
reich schalten (F1, F2, F3, MW).
3) Ein Sender lässt sich mit dem Sendersuchlauf
finden oder manuell einstellen:
Zum Starten des Sendersuchlaufs die Taste
TUNE I(vorwärts) oder I
(rückwärts) kurz
drücken. Der Sendersuchlauf läuft bis zum
nächsten Sender. Den Suchlauf so oft erneut
starten, bis der gewünschte Sender empfan-
gen wird.
Zur manuellen Sendereinstellung die Taste
TUNE
I
oder I
gedrückt halten, bis un-
gefähr die gewünschte Empfangsfrequenz
erreicht ist. Danach lässt sich die Frequenz mit
jedem Tastendruck schrittweise erhöhen oder
verringern (im UKW-Bereich um 0,05 MHz,
im Mittelwellenbereich um 9kHz). Nach dem
manuellen Einstellen schaltet das Radio nach
einigen Sekunden wieder auf automatischen
Suchlauf um, wenn nicht zuvor die Taste I
oder Ierneut gedrückt wird.
4)
Ist der Sender eingestellt, die gewünschte Sta-
tionstaste (1/ … /6) so lange gedrückt halten,
bis links im Display „F“ oder „MW“ auf „M“
(für Memory) wechselt.
5.2.2 Gespeicherte Sender aufrufen
1)
Mit der Taste BAND den Bereich wählen, in dem
der gewünschte Sender gespeichert wurde.
2)
Die Stationstaste (1/…/6) des Senders drücken.
Stereosendungen sind mit dem Symbol oben
links im Display gekennzeichnet.

7
Deutsch
5.2.3 RDS-Empfang
Strahlt der gewählte Sender RDS-Informationen
(Radio Data System) aus, wird im Display der Sen-
dername anstelle der Frequenz angezeigt. Einige
Sender geben im Wechsel mit dem Sendernamen
zusätzliche Informationen an, z.B. Musiktitel,
Interpret.
Programmtyp (Genre)
Mit der Taste PTY lässt sich von den gespeicherten
Sendern einer auswählen, der gerade Musik oder
Informationen eines bestimmten Genres sendet.
Folgende Genres können gewählt werden:
Gruppe Musik Gruppe Wort
mit der Stationstaste 1selektierbar
POP M Pop-Musik
ROCK M Rock-Musik
NEWS Nachrichten
AFFAIRS aktuelle Infos
INFO Service-Programm
mit der Stationstaste 2selektierbar
EASY M Unterhaltungs-
musik
LIGHT M leichte Klassik
SPORT Sport
EDUCATE Bildung
DRAMA Hörspiel, Literatur
mit der Stationstaste 3selektierbar
CLASSICS ernste Klassik
OTHER M spezielle Musik
CULTURE Kultur, Gesellschaft
SCIENCE Wissenschaft
VARIED Unterhaltung
mit der Stationstaste 4selektierbar
JAZZ Jazz
COUNTRY Country-Musik
WEATHER Wetter
FINANCE Wirtschaft
CHILDREN Kinderprogramm
mit der Stationstaste 5selektierbar
NATION M Landesmusik
OLDIES Oldies
SOCIAL Soziales
RELIGION Religion
PHONE IN Anrufsendung
mit der Stationstaste 6selektierbar
FOLK M Folklore
TRAVEL Reiseinformationen
LEISURE Freizeit
DOCUMENT Dokumentation
1) Mit der Taste PTY die Funktion Programmtyp
einschalten. Damit ist eine weitere Auswahl
aus der Gruppe Musik möglich. Im Display wird
ein Genre aus dieser Gruppe angezeigt. Zum
Umschalten auf die Gruppe Wort die Taste PTY
erneut drücken. Das Display zeigt ein Genre
aus dieser Gruppe an. (Beim dritten Tasten-
druck ist die Funktion Programmtyp wieder
ausgeschaltet.)
2)
Durch (mehrfaches) Drücken der zugehöri-
gen Stationstaste das gewünschte Genre aus
der zuvor gewählten Gruppe selektieren. Das
Radio sucht unter den gespeicherten Sendern
einen heraus, der zurzeit ein Programm in
dem gewählten Genre ausstrahlt. Während
des Suchvorgangs blinkt das Display.
Kann das Radio keinen Sender mit dem
gewünschten Genre finden, zeigt das Display
nach einiger Zeit kurz die Meldung PTY NONE
an. Der zuletzt gewählte Sender bleibt dann
eingestellt.
3) Um die Funktion Programmtyp auszuschalten
und die gespeicherten Sender wieder mit den
zugehörigen Stationstasten aufrufen zu kön-
nen, die Taste PTY ein- oder zweimal drücken,
sodass im Display die Senderfrequenz oder der
Sendername angezeigt wird.
Alternativfrequenz
Die meisten Programme werden auf verschiede-
nen Frequenzen gesendet. Das Radio kann auto-
matisch auf die am besten empfangbare Frequenz
wechseln. Zum Einschalten dieser Funktion die
Taste AF (Alternativfrequenz) drücken: Im Display
wird AF angezeigt. Blinkt die Anzeige AF, ist die
Funktion nicht verfügbar.
Hinweis: Für den stationären Betrieb des Radios in einer
ELA-Anlage wird diese Funktion nicht benötigt und sollte
deshalb ausgeschaltet bleiben.
6 Technische Daten
Empfangsfrequenz
UKW: � � � � � � � � � � � � � � � 87,5 – 108 MHz
MW: � � � � � � � � � � � � � � � � 522 – 1620 kHz
Speicherplätze: � � � � � � � � � � 24
UKW: � � � � � � � � � � � � � � � 3 ×6
MW: � � � � � � � � � � � � � � � � 1 ×6
HF-Empfindlichkeit / Störabstand
UKW: � � � � � � � � � � � � � � � 6 dBμV/> 60 dB
MW: � � � � � � � � � � � � � � � � 30 dBμV/> 35 dB
Klirrfaktor:� � � � � � � � � � � � � � < 0,5% (bei UKW)
Gleichstromversorgung:� � � � 17 V, 250mA über den
ELA-Verstärker oder über
das Erweiterungsgerät
Abmessungen:� � � � � � � � � � � 195 × 40 × 96 mm
Gewicht: � � � � � � � � � � � � � � � 260 g
Änderungen vorbehalten.
Diese Bedienungsanleitung ist urheberrechtlich für
MONACOR ®INTERNATIONAL GmbH & Co. KG geschützt.
Eine Reproduktion für eigene kommerzielle Zwecke – auch
auszugsweise – ist untersagt.

8
English
Deutsch
Deutsch Seite
Français
Français Page
Italiano
Italiano Pagina
Español
Español Página
Nederlands
Nederlands Pagina
Polski
Polski Strona
TRACK
TUNEMODE BAND PTY AF
010
LEVEL
1/ 2/INT 3/RPT 4/RDM 5/
FOLDER
/6
PA -120 0 R DS U FM/AM RDS TUNER
English
English Page
FM/AM RDS Radio Module with
USB Audio Player
These instructions are intended for technicians
installing the module and for users without any
specific technical knowledge. Please read the
instructions carefully prior to operation and keep
them for later reference.
1 Applications
This module is suited for installation into MONA-
COR PA amplifiers with insertion compartment
for modules and into MONACOR extensions, for
example:
PA-1120
PA-1240 PA amplifier for 5 zones
PA-1200 PA amplifier for 4 zones
PA-1200EX Extension for 2 modules
PA-5240
PA-5480 PA amplifier for 5 zones
PA-6240
PA-6480
PA-6600
PA amplifier for 6 zones
2 Overview
/On/off; stop replay
To switch off, keep the button pressed until
the display goes dark.
USB port for a USB flash drive or a USB hard
disk with separate power supply; with a cor-
responding USB adapter, memory cards (SD,
SDHC) can also be used.
Note: Due to the large number of storage device
manufacturers and device drivers, it cannot be guar-
anteed that all storage media are compatible with
the PA-1200RDSU.
1/
II Station button 1/
Start, pause and continue of audio replay
2/INT Station button 2/
Intro replay (first 10s) of all titles
3/RPT Station button 3/
Repeat of replay of titles or folders
4/RDM Station button 4/
Replay in random order
5/
FOLDER Station button 5/
Selection of previous folder
6/FOLDER
Station button 6/
Selection of next folder
MODE Switching between radio and audio player
BAND Switching between F1, F2, F3 and MW
(F= FM)
TRACK
TUNE Audio player
I= next title
I
= previous title
When button is kept pressed: fast forward/
reverse
Radio
To start the station scanning, briefly press
the button I
or I. To store a station,
keep the station button pressed until
“F” or “MW” on the left of the display
changes to “M” (memory). For manual
station tuning refer to chapter 5.2.1.
PTY Selection of program type for RDS recep-
tion
AF Alternative frequency function for RDS
reception
LEVEL Volume control

9
English
3 Safety Notes
The module corresponds to all relevant directives
of the EU and is therefore marked with .
•
The module is suitable for indoor use only.
Protect it against dripping water, splash water
and high air humidity. The admissible ambient
temperature range is 0–40°C.
•
Do not operate the unit with the integrated
module
1. if the module or the unit is visibly damaged,
2.
if a defect might have occurred after the unit
was dropped or suffered a similar accident,
3. if malfunctions occur.
In any case the module or the complete unit
must be repaired by skilled personnel.
•
For cleaning only use a dry, soft cloth; never use
water or chemicals.
•
No guarantee claims for the module and no
liability for any resulting personal damage or
material damage will be accepted if the module
is used for other purposes than originally in-
tended, if it is not correctly installed or operated,
or if it is not repaired in an expert way.
If the module is to be put out of oper-
ation definitively, take it to a local recy-
cling plant for a disposal which is not
harmful to the environment.
4 Installation of the Module
WARNING
The module must always be in-
stalled by experts; otherwise, you
will risk an electric shock.
1)
Disconnect the unit (PA amplifier/extension)
into which the module is to be installed from
the power supply and unscrew the cover of
its housing.
2)
On the front of the amplifier/extension, un-
screw the plate covering the insertion compart-
ment. Insert the module into the compartment
and screw it on.
3)
The 3-pole connection CONIN OUT (at the rear
edge) supplies the module with its operating
voltage (17V) and sends the audio signal to the
amplifier. Connect the three-pole line of the
amplifier/extension to this connection.
4)
For installing the antenna jack provided,
remove the cover plate “ANT. Terminal” on
the rear of the amplifier/extension. Insert the
antenna jack into the opening and screw it on.
ANT
ANT. Terminal
(option)
AM GND 300 Ω
FM 75 Ω
5) Connect the line of the inserted antenna jack
to the 5-pole connection ANT1 of the module.
6)
Close the housing cover of the unit into which
the module has been inserted. Connect the
reception antenna to the antenna jack. A basic
wire antenna is supplied with the module.
When using both an FM antenna and an
AM antenna, connect the antennas to the jack
ANT via an antenna combiner.
5 Operation
1) Switch on the unit into which the module has
been inserted. Use the button /to switch
on the module.
2)
Press the button MODE to switch between
radio and audio player.
3) Use the control LEVEL to set the desired vol-
ume.
4)
To switch off, keep the button /
pressed
until the display goes dark. Alternatively, switch
off the unit into which the module has been
inserted.
The next time the module is switched on,
all functions selected will be activated again.
5.1 Operation of the audio player
To replay MP3 files or WMA files, connect a USB
flash drive or a USB hard disk with separate power
supply to the USB port . With a corresponding
USB adapter, memory cards (SD, SDHC) can also
be used.
Note: Due to the large number of storage device manu-
facturers and device drivers, it cannot be guaranteed that
all storage media are compatible with the PA-1200RDSU.

10
English
TRACK
TUNEMODE BAND PTY AF
010
LEVEL
1/ 2/INT 3/RPT 4/RDM 5/
FOLDER
/6
PA -120 0 R DS U FM/AM RDS TUNER
Button Function
II To start, pause and continue the
replay
/
Press briefly to stop the replay.
Keep pressed until the display goes
dark to switch off.
I
TRACK I
Press briefly to go to the next/pre-
vious title.
Keep pressed for fast forward/re-
verse (without any sound).
FOLDER To go to the next/previous folder.
INT INTRO – replay of the first 10s of the
titles*
RPT
REPEAT – repeat of replay of the
current title
When the button is pressed again,
the indication REPEAT starts flashing
and all titles in the folder will be
repeated*.
RDM RANDOM – replay of titles in random
order*
*To exit a function, press the button once again or
press one of the three buttons.
5.1.1 Automatic or manual start of replay
The audio player mode is selected. The module or
the unit into which the module has been installed
is switched off. The next time it is switched on
again, the replay will either start automatically or
manually by means of the button
II.
To switch between automatic and manual
start, keep the button
II
pressed while a title
is replayed until the display indicates MANUAL
or AUTO.
5.2 Operation of the radio
The radio is able to receive FM and AM stations.
Multiple stations can be assigned to the six sta-
tion buttons (1/.../6). Therefore, it is possible to
store 3 ×6 FM stations (F1, F2, F3) and 6 AM
stations (MW).
5.2.1 Station tuning and storage
1)
If AF is indicated at the bottom of the dis-
play, press the button AF to switch off this
indication.
2)
Use the button BAND to select the desired
bandwidth (F1, F2, F3, MW).
3) Use the automatic scanning to find a station
or tune the station manually:
To start the automatic scanning, briefly press
the button TUNE
I
(forward) or
I
(reverse).
The scanning will stop at the next station. Re-
start the scanning repeatedly until the desired
station is received.
For manual tuning, keep the button TUNE
Ior I
pressed until the desired reception
frequency is roughly reached. Then press the
button to increase or reduce the frequency step
by step (in the FM band by 0.05MHz; in the
AM band by 9kHz). After manual tuning, the
radio will return to automatic scanning after a
few seconds. To prevent this, press the button
I
or Iagain before the radio switches over.
4)
When the desired station has been found, keep
the desired station button (1/... /6) pressed
until “F” or “MW” on the left of the display
changes to “M” (memory).
5.2.2 Calling up stations
whichhavebeenstored
1) Use the button BAND to select the bandwidth
where the desired station has been stored.
2)
Press the corresponding button (1/ … /6) of
the station.
For stereo broadcasts, the symbol appears on
the top left of the display.

11
English
5.2.3 RDS reception
If the station selected broadcasts RDS information
(Radio Data System), the display will indicate the
station name instead of the frequency. Some radio
stations provide additional information (e.g. music
title, artist) which is displayed alternately with the
station name.
Program type (genre)
The button PTY can be used to select a radio sta-
tion which currently broadcasts music or informa-
tion of a specific genre from the stations that have
been stored. The following genres are available:
Music Group Word Group
to be selected with station button 1
POP M Pop music
ROCK M Rock music
NEWS News
AFFAIRS Current affairs
INFO Information
to be selected with station button 2
EASY M Easy listening
music
LIGHT M Light classical
music
SPORT Sports
EDUCATE Education
DRAMA Drama
to be selected with station button 3
CLASSICS Serious classical
music
OTHER M Other music
CULTURE Culture
SCIENCE Science
VARIED Varied
to be selected with station button 4
JAZZ Jazz
COUNTRY Country music
WEATHER Weather
FINANCE Finance
CHILDREN Children’s pro-
grams
to be selected with station button 5
NATION M National music
OLDIES Oldies
SOCIAL Social affairs
RELIGION Religion
PHONE IN Phone in
to be selected with station button 6
FOLK M Folk music
TRAVEL Travel
LEISURE Leisure
DOCUMENT Documentary
1)
Use the button PTY to activate the program
type function. This will allow a detailed selec-
tion from the music group. The display will
indicate a genre from this group. To switch to
the word group, press the button PTY once
again. The display will indicate a genre from
this group. (When the button is pressed for
the third time, the program type function will
be deactivated.)
2)
Press the corresponding station button (re-
peatedly) to select the desired genre from the
group previously selected. Among the radio
stations stored, the radio will find a station
which currently broadcasts a program of the
genre selected. The display will keep flashing
while the search is in progress.
If the radio is unable to find a station of
the corresponding genre, the display will briefly
indicate the message PTY NONE after a while.
The radio will stay tuned to the station most
recently selected.
3)
To deactivate the program type function and to
be able to call up the stored stations with the
corresponding station buttons again, press the
button PTY once or twice so that the display
indicates the station frequency or the station
name.
Alternative frequency
Most programs are broadcast on various frequen-
cies. The radio can be set to go automatically to
the frequency with the best reception quality. To
activate this function, press the button AF (Alter-
native frequency). The display will indicate AF. If
the indication AF keeps flashing, this function is
not available.
Note: This function is not required for stationary oper-
ation of the radio in a PA system. It is therefore recom-
mended to deactivate this function.
6 Specifications
Reception frequency
FM:� � � � � � � � � � � � � � � � � 87�5 – 108 MHz
AM: � � � � � � � � � � � � � � � � 522 – 1620 kHz
Storage locations: � � � � � � � � 24
FM:� � � � � � � � � � � � � � � � � 3 ×6
AM: � � � � � � � � � � � � � � � � 1 ×6
RF sensitivity; S/N ratio
FM:� � � � � � � � � � � � � � � � � 6 dBµV; > 60dB
AM: � � � � � � � � � � � � � � � � 30 dBµV; > 35 dB
THD: � � � � � � � � � � � � � � � � � � < 0�5% (for FM)
DC power supply: � � � � � � � � 17 V, 250 mA via PA ampli-
fier or via the extension
Dimensions: � � � � � � � � � � � � 195 ×40 ×96 mm
Weight:� � � � � � � � � � � � � � � � 260 g
Subject to technical modification.
All rights reserved by MONACOR
®
INTERNATIONAL GmbH
& Co. KG. No part of this instruction manual may be repro-
duced in any form or by any means for any commercial use.

12
Français
Deutsch
Deutsch Seite
English
English Page
Italiano
Italiano Pagina
Español
Español Página
Nederlands
Nederlands Pagina
Polski
Polski Strona
TRACK
TUNEMODE BAND PTY AF
010
LEVEL
1/ 2/INT 3/RPT 4/RDM 5/
FOLDER
/6
PA -120 0 R DS U FM/AM RDS TUNER
Français
Français Page
Module radio RDS FM/AM avec
lecteur audio USB
Cette notice s’adresse aux techniciens installant
le module et aux utilisateurs sans connaissances
techniques particulières. Veuillez lire la notice
avant l’utilisation et conservez-la pour pouvoir
vous y reporter ultérieurement.
1 Possibilités d’utilisation
Le module est prévu pour être installé dans les
amplificateurs Public Adress MONACOR avec un
compartiment pour module et dans des appareils
complémentaires MONACOR, par exemple :
PA-1120
PA-1240
Amplificateur Public Adress pour
5zones
PA-1200 Amplificateur Public Adress pour
4zones
PA-1200EX Appareil complémentaire pour
2modules
PA-5240
PA-5480
Amplificateur Public Adress pour
5zones
PA-6240
PA-6480
PA-6600
Amplificateur Public Adress pour
6zones
2 Présentation
/Marche/Arrêt ; arrêter la lecture.
Pour éteindre, maintenez la touche enfoncée
jusqu’à ce que l’affichage s’éteigne.
Port USB pour une clé mémoire USB ou un
disque dur USB avec alimentation propre ;
avec un adaptateur USB, il est possible d’uti-
liser également des cartes mémoires (SD,
SDHC).
Remarque : En raison de la diversité des fabricants
de supports de mémoire et des drivers d’appareils,
nous ne pouvons assurer que tous les supports de
mémoire soient compatibles avec le PA-1200RDSU.
1/
II Touche station 1/
Démarrage, interruption, poursuite de la
lecture audio
2/INT Touche station 2 /
Lecture de l’introduction de tous les titres
3/RPT Touche station 3 /
Lecture répétée de titre ou de dossier
4/RDM Touche station 4 /
Lecture en ordre aléatoire
5/
FOLDER Touche station 5 /
Sélection du dossier précédent
6/FOLDER
Touche station 6/
Sélection du dossier suivant
MODE Commutation entre radio et lecteur audio
BAND Commutation entre F1, F2, F3 et MW
(F pour FM)
TRACK
TUNE Lecteur audio
I= titre suivant
I
= titre précédent
Si vous maintenez la touche enfoncée,
avance ou retour rapide
Radio
Pour démarrer la recherche de stations, ap-
puyez brièvement sur la touche
I
ou
I
.
Pour mémoriser, appuyez sur une touche
de station jusqu’à ce que, à gauche sur
l’affichage, «F» ou «MW» passe sur «M»
(Memory). Réglage manuel des stations,
voir chapitre 5.2.1.
PTY Sélection d'un type de programme lors de
réception RDS
AF Fonction fréquence alternative lors de ré-
ception RDS
LEVEL Réglage de volume

13
Français
3 Conseils de sécurité et
d'utilisation
Le module répond à toutes les directives néces-
saires de l’Union européenne et porte donc le
symbole .
•
Le module n’est conçu que pour une utilisation
en intérieur. Protégez-le des éclaboussures, de
tout type de projections d’eau et d’une humi-
dité élevée de l’air. La plage de température
ambiante admissible est de 0 à 40°C.
•
Ne faites pas fonctionner l’appareil avec le mo-
dule intégré dans les cas suivants :
1.
l’appareil ou le module présente des dom-
mages visibles.
2. après une chute ou accident similaire, vous
avez un doute sur l’état de l’appareil.
3. des dysfonctionnements apparaissent.
Dans tous les cas, les dommages sur le module
ou sur l’appareil complet doivent être réparés
par un technicien spécialisé.
•
Pour le nettoyage, utilisez uniquement un
chiffon sec et doux, en aucun cas de produits
chimiques ou d’eau.
•
Nous déclinons toute responsabilité en cas de
dommages corporels ou matériels résultants
si le module est utilisé dans un but autre que
celui pour lequel il a été conçu, s’il n’est pas
correctement installé ou utilisé ou s’il n’est pas
réparé par une personne habilitée ; en outre,
la garantie deviendrait caduque.
Lorsque le module est définitivement
retiré du service, vous devez le déposer
dans une usine de recyclage de proximité
pour contribuer à son élimination non
polluante.
4 Installation du module
AVERTISSEMENT Le module ne doit être installé
que par un personnel qualifié ;
il y a risque de décharge élec-
trique.
1)
Débranchez l’appareil dans lequel le module
doit être intégré (amplificateur PA/appareil
complémentaire) de l’alimentation secteur et
dévissez le couvercle du boîtier de l’appareil.
2) Sur la face avant de l’amplificateur/l’appareil
complémentaire, dévissez le cache pour le
compartiment module. Insérez le module et
revissez.
3) Via la prise 3 pôles CON IN OUT (sur l’arête ar-
rière), le module reçoit son alimentation (17V)
et le signal audio est dirigé vers l’amplificateur.
Branchez le câble trois pôles libre de l’amplifi-
cateur/l’appareil complémentaire à cette prise.
4) Pour le montage de la prise d’antenne livrée,
retirez le cache «ANT.Terminal» sur la face
arrière de l’amplificateur/l’appareil com-
plémentaire, Placez la prise d’antenne dans
l’ouverture et revissez.
ANT
ANT. Terminal
(option)
AM GND 300 Ω
FM 75 Ω
5)
Branchez le câble de la prise d’antenne insérée
dans la prise 5 pôles ANT1 du module.
6)
Refermez l’appareil dans lequel le module vient
d’être intégré avec le couvercle. Branchez l’an
-
tenne de réception dans la prise d’antenne.
Une antenne simple est livrée avec le module.
Pour utiliser non seulement une antenne
FM mais encore une antenne AM, branchez les
antennes via un filtre d’antenne à la prise ANT.
5 Utilisation
1)
Allumez l’appareil dans lequel le module est
installé. Allumez le module avec la touche /
.
2)
Pour commuter entre radio et lecteur audio,
appuyez sur la touche MODE.
3)
Réglez le volume souhaité avec le réglage
LEVEL.
4)
Pour éteindre, maintenez la touche /
enfoncée jusqu’à ce que l’affichage s’éteigne.
Ou éteignez l’appareil dans lequel le module
est intégré.
Au prochain allumage, toutes les fonctions
sélectionnées sont réactivées.
5.1 Utilisation du lecteur audio
Pour lire des fichiers MP3 ou WMA, mettez une
clé USB dans le port USB ou reliez un disque dur
USB avec alimentation propre au port USB. Il est
possible d’utiliser également des cartes mémoire
(SD, SDHC) avec un adaptateur USB adéquat.
Remarque : En raison de la diversité des fabricants de
supports de mémoire et des drivers d’appareils, nous ne
pouvons assurer que tous les supports de mémoire soient
compatibles avec le PA-1200RDSU.

14
Français
TRACK
TUNEMODE BAND PTY AF
010
LEVEL
1/ 2/INT 3/RPT 4/RDM 5/
FOLDER
/6
PA -120 0 R DS U FM/AM RDS TUNER
Touche Fonction
II Démarrer, interrompre, poursuivre
la lecture
/
Brève pression :
arrêt de la lecture
Touche maintenue enfoncée jusqu’à
ce que l’affichage s’éteigne : arrêt
du module
I
TRACK I
Brève pression :
aller au titre précédent/suivant
Touche maintenue enfoncée :
retour/avance rapide (sans son)
FOLDER Aller au dossier précédent/suivant
INT INTRO – Lecture de l’introduction
(10s) des titres*
RPT
REPEAT – Lecture répétée du titre
en cours
Par une nouvelle pression de la
touche, l’affichage REPEAT clignote
et tous les titres dans le dossier sont
répétés*
RDM RANDOM – Lecture des titres en
ordre aléatoire*
*Pour quitter une fonction, appuyez à nouveau sur
la touche ou sur une autre de ces trois touches.
5.1.1 Démarrage automatique ou manuel
delalecture
Le mode lecteur audio est sélectionné, le module
ou l’appareil dans lequel le module est intégré, est
éteint. Au prochain allumage, vous pouvez démar-
rer la lecture automatiquement ou manuellement
avec la touche
II.
Pour commuter entre démarrage automa-
tique et manuel, pendant la lecture d’un titre,
maintenez la touche
II enfoncée jusqu’à ce que
l’affichage indique MANUAL ou AUTO.
5.2 Utilisation de la radio
Avec la radio, vous pouvez recevoir des stations
FM ou AM. Les 6 touches de station (1/ … /6)
sont configurables de plusieurs manières afin de
pouvoir mémoriser 3 ×6 stations FM (F1, F 2, F 3)
et 6 stations AM (MW).
5.2.1 Réglage et mémorisation de stations
1) Si AF est visible en bas dans l’affichage, étei-
gnez cet affichage avec la touche AF.
2) Avec la touche BAND, commutez sur la plage
voulue (F1, F2, F3, MW).
3)
Recherchez une station avec la recherche de
stations ou faites le réglage manuellement :
Pour démarrer la recherche de stations,
appuyez brièvement sur la touche TUNE
I
(avant) ou I
(arrière). La recherche va jusqu’à
la prochaine station. Redémarrez la recherche
jusqu’à ce que la station voulue soit reçue.
Pour un réglage manuel de stations, main-
tenez la touche TUNE Iou I
enfoncée
jusqu’à ce que la fréquence de réception sou-
haitée soit atteinte à peu près. Ensuite, vous
pouvez augmenter ou diminuer la fréquence
avec chaque pression de touche par palier
(dans la plage FM de 0,05MHz, dans la plage
AM de 9kHz). Après le réglage manuel, la radio
repasse pendant quelques secondes sur la re-
cherche automatique si aucune touche I
ou
In’a préalablement été activée.
4)
Si la station est réglée, maintenez la touche de
la station souhaitée (1/ … /6) enfoncée jusqu’à
ce que, à gauche sur l’affichage, «F» ou «MW»
passe sur «M» (Memory).
5.2.2 Appeler une station mémorisée
1)
Avec la touche BAND, sélectionnez la plage
dans laquelle la station a été mémorisée.
2) Appuyez sur la touche de la station (1/ … /6).
Les émissions en stéréo sont signalées par le sym-
bole en haut à gauche sur l’affichage.

15
Français
5.2.3 Réception RDS
Si la station choisie émet des informations RDS
(Radio Data System), le nom de la station s’af-
fiche à la place de la fréquence. Quelques stations
donnent des informations supplémentaires, par
exemple titre du morceau, interprète, en alter-
nance avec le nom de la station.
Type programme (genre)
Avec la touche PTY, vous pouvez sélectionner
parmi les stations mémorisées, une qui émet de
la musique ou des informations d’un genre donné.
Vous pouvez sélectionner les genres suivants :
Groupe Musique Groupe Mots
sélectionnable avec la touche station 1
POP M Pop
ROCK M Rock
NEWS Informations
AFFAIRS Infos actuelles
INFO Programme service
sélectionnable avec la touche station 2
EASY M Musique divertisse-
ment
LIGHT M Musique classique
légère
SPORT Sport
EDUCATE Formation
DRAMA Littérature
sélectionnable avec la touche station 3
CLASSICS Musique classique
OTHER M Musique spécifique
CULTURE Culture, société
SCIENCE Science
VARIED Divertissement
sélectionnable avec la touche station 4
JAZZ Jazz
COUNTRY Country
WEATHER Météo
FINANCE Economie
CHILDREN Programme enfants
sélectionnable avec la touche station 5
NATION M Musique nationale
OLDIES Rétro
SOCIAL Sujets sociaux
RELIGION Religion
PHONE IN Emissions avec
appel public
sélectionnable avec la touche station 6
FOLK M Folklore
TRAVEL Informations
voyage
LEISURE Temps libre
DOCUMENT Documentation
1) Avec la touche PTY, activez la fonction type de
programme. Ainsi, une autre sélection dans le
groupe Musique est possible. Sur l’affichage,
un genre dans ce groupe est affiché. Pour com-
muter sur le groupe Mots, appuyez à nouveau
sur la touche PTY. L’affichage indique un genre
dans ce groupe. (A la troisième pression, la
fonction type de programme est à nouveau
désactivée).
2)
Par plusieurs pressions sur la touche de sta-
tion correspondante, sélectionnez le genre
voulu dans le groupe préalablement sélec-
tionné. Parmi les stations mémorisées, la radio
recherche une qui, à ce moment-là, émet le
genre sélectionné. L’affichage clignote pendant
la recherche.
Si la radio ne trouve pas de station avec le
genre voulu, l’affichage indique brièvement
le message PTY NONE après quelque temps.
La dernière station sélectionnée reste réglée.
3)
Pour désactiver la fonction type programme
et appeler les stations mémorisées avec les
touches de station correspondantes, appuyez
une ou deux fois sur la touche PTY pour que
sur l’affichage, la fréquence de station ou le
nom de la station soit affiché.
Fréquence alternative
La majorité des programmes est émise sur des
fréquences différentes. La radio peut automa-
tiquement commuter sur la fréquence ayant la
meilleure réception. Pour activer cette fonction,
appuyez sur la touche AF (fréquence alternative);
sur l’affichage, AF est indiqué. Si AF clignote, la
fonction n’est pas disponible.
Remarque : Pour le fonctionnement stationnaire de la
radio dans une installation PA, cette fonction n’est pas
nécessaire et devrait être désactivée.
6 Caractéristiques techniques
Fréquence réception
FM � � � � � � � � � � � � � � � � � 87,5 – 108 MHz
AM � � � � � � � � � � � � � � � � � 522 – 1620 kHz
Emplacements mémoire: � � � 24
FM � � � � � � � � � � � � � � � � � 3 × 6
AM � � � � � � � � � � � � � � � � � 1 × 6
Sensibilité HF/
Rapport signal/bruit
FM � � � � � � � � � � � � � � � � � 6 dBμV/> 60dB
AM � � � � � � � � � � � � � � � � � 30 dBμV/> 35 dB
Taux de distorsion � � � � � � � � < 0,5% (pour FM)
Alimentation
courant continu� � � � � � � � � � 17 V, 250mA via l’amplifi-
cateur PA ou via l’appareil
complémentaire
Dimensions � � � � � � � � � � � � 195 × 40 × 96mm
Poids� � � � � � � � � � � � � � � � � � 260 g
Tout droit de modification réservé.
Notice d’utilisation protégée par le copyright de
MONACOR
®
INTERNATIONAL GmbH & Co. KG. Toute
reproduction même partielle à des fins commerciales est
interdite.

16
Italiano
Deutsch
Deutsch Seite
English
English Page
Français
Français Page
Español
Español Página
Nederlands
Nederlands Pagina
Polski
Polski Strona
TRACK
TUNEMODE BAND PTY AF
010
LEVEL
1/ 2/INT 3/RPT 4/RDM 5/
FOLDER
/6
PA -120 0 R DS U FM/AM RDS TUNER
Italiano
Italiano Pagina
Modulo radio FM/OM con RDS e
con lettore audio USB
Queste istruzioni sono rivolte ai tecnici che mon-
tano il modulo e agli utenti senza particolari
conoscenze in materia. Vi preghiamo di leggere
attentamente le presenti istruzioni prima della
messa in funzione e di conservarle per un uso
futuro.
1 Possibilità d’impiego
Il modulo è adatto per il montaggio negli am-
plificatori PA di MONACOR con vano per inserti
e in dispositivi d’estensione di MONACOR, per
esempio:
PA-1120
PA-1240 Amplificatore PA per 5 zone
PA-1200 Amplificatore PA per 4 zone
PA-1200EX Dispositivo d’estensione per 2 moduli
PA-5240
PA-5480 Amplificatore PA per 5 zone
PA-6240
PA-6480
PA-6600
Amplificatore PA per 6 zone
2 Elementi di comando
/Accender/spegnere; terminare la riproduzione
Per spegnere tener premuto il tasto finché il
display non si spegne.
Presa USB per una chiavetta USB o per un
disco rigido USB con alimentazione propria;
con un adattatore USB si possono usare
anche schede di memoria (SD, SDHC).
N.B.: Dato il gran numero di produttori di mezzi
di memoria e di driver, non si può garantire che
tutti i mezzi di memoria siano compatibili con il PA-
1200RDSU.
1/
II Tasto stazione 1 /
Avviare, interrompere, continuare la ripro-
duzione audio
2/INT Tasto stazione 2 /
Riproduzione di tutti ti titoli
3/RPT Tasto stazione 3 /
Riproduzione ripetuta di titoli o cartelle
4/RDM Tasto stazione 4 /
Riproduzione in ordine casuale
5/
FOLDER Tasto stazione 5 /
Scelta della cartella precedente
6/FOLDER
Tasto stazione 6/
Scelta della cartella successiva
MODE Cambio fra radio e lettore audio
BAND Cambio fra F1, F2, F3 e MW
(F = FM, MW = OM)
TRACK
TUNE Lettore audio
I= Titolo successivo
I
= Titolo precedente
Con il tasto tenuto premuto avanzamento/
ritorno veloce
Radio
Per avviare la ricerca stazioni premere
brevemente il tasto I
o I. Per memo-
rizzare, tener premuto un tasto stazione
finché alla sinistra del display l’indica-
zione “F” o “MW” (OM) passa a “M”
(Memory). Per la sintonizzazione manuale
vedi capitolo 5.2.1.
PTY Scelta del tipo di programma con ricezione
RDS
AF Funzione frequenza alternativa con rice
-
zione RDS
LEVEL Regolatore livello

17
Italiano
3 Avvertenze per l’uso sicuro
Il modulo è conforme a tutte le direttive rilevanti
dell’UE e pertanto porta la sigla .
•
Usare il modulo solo all’interno di locali e pro-
teggerlo dall’acqua gocciolante e dagli spruzzi
d’acqua nonché da alta umidità dell’aria. La
temperatura d’esercizio ammessa è 0–40°C).
•
Non mettere in funzione l’apparecchio con il
modulo montato se:
1.
il modulo o l’apparecchio presentano dei
danni visibili;
2.
dopo una caduta o dopo eventi simili sussiste
il sospetto di un difetto;
3. l’apparecchio non funziona correttamente.
Per la riparazione portare il modulo oppure l’ap-
parecchio completo ad un’officina competente.
•
Per la pulizia usare solo un panno morbido,
asciutto; non impiegare in nessun caso acqua
o prodotti chimici.
•
Nel caso d’uso improprio, di montaggio non a
regola d’arte, d’impiego scorretto o di ripara-
zione non a regola d’arte del modulo, non si
assume nessuna responsabilità per eventuali
danni consequenziali a persone o a cose e non
si assume nessuna garanzia per l’apparecchio.
Se si desidera eliminare il modulo defi-
nitivamente, consegnarlo per lo smal-
timento ad un’istituzione locale per il
riciclaggio.
4 Montaggio del modulo
AVVERTIMENTO Il modulo deve essere montato
solo da un esperto qualificato.
Esiste il pericolo di una scarica
elettrica.
1)
Staccare dalla corrente l’apparecchio nel quale
si deve inserire il modulo (amplificatore PA/
dispositivo d’estensione) e svitare il coperchio
del contenitore dell’apparecchio.
2) Sul lato frontale dell’amplificatore/dispositivo
d’estensione svitare la mascherina sul vano per
inserti. Inserire il modulo e avvitarlo.
3)
Il contatto a 3 poli CONINOUT (sul bordo
posteriore) provvede all’alimentazione (17 V)
del modulo e all’inoltro del segnale audio
all’amplificatore. Inserire in questo contatto il
cavetto libero a 3poli dell’amplificatore/dispo-
sitivo d’estensione.
4)
Per il montaggio della presa per antenne in
dotazione, staccare sul retro dell’amplifica-
tore/dispositivo d’estensione la mascherina di
copertura “ANT. Terminal”. Inserire la presa per
antenne nell’apertura e avvitarla.
ANT
ANT. Terminal
(option)
AM GND 300 Ω
FM 75 Ω
5) Inserire il cavetto della presa per antenne nel
contatto a 5 poli ANT1 del modulo.
6) Richiudere con il suo coperchio l’apparecchio
nel quale è stato montato il modulo. Collegare
l’antenna di ricezione con la presa per antenne.
Una semplice antenna dipolare è in dotazione.
Se si deve collegare sia un’antenna FM che
OM, collegarle alla presa ANT per mezzo di un
filtro per antenne.
5 Funzionamento
1)
Accendere l’apparecchio nel quale è stato
inserito il modulo. Accendere il modulo con
il tasto /.
2) Per cambiare fra radio e lettore audio premere
il tasto MODE.
3) Impostare il volume con il regolatore LEVEL.
4)
Per spegnere, premere il tasto /finché
il display non si spegne. Oppure spegnere
l’apparecchio nel quale è inserito il modulo.
Alla prossima accensione, tutte le funzioni
scelte sono nuovamente attivate.
5.1 Funzionamento del lettore audio
Per riprodurre dei file MP3 o WMA, inserire una
chiavetta USB nella presa USB oppure collegare
alla stessa presa un disco rigido USB con alimen-
tazione propria. Con un adattatore USB adeguato
si possono usare anche schede di memoria (SD,
SDHC).
N.B.: Dato il gran numero di produttori di mezzi di
memoria e di driver, non si può garantire che tutti i mezzi
di memoria siano compatibili con il PA-1200RDSU.

18
Italiano
TRACK
TUNEMODE BAND PTY AF
010
LEVEL
1/ 2/INT 3/RPT 4/RDM 5/
FOLDER
/6
PA -120 0 R DS U FM/AM RDS TUNER
Tasto Funzione
II Avviare, interrompere e continuare la
riproduzione
/
Premere brevemente:
terminare la riproduzione
Tener premuto fino allo spegnimento
del display: spegnere
I
TRACK I
Premere brevemente:
saltare al titolo precedente/successivo
Tener premuto:
ritorno/avanzamento veloce
(senza audio)
FOLDER Saltare alla cartella precedente/
successiva
INT INTRO – Riproduzione dell’inizio (10 s)
dei titoli*
RPT
REPEAT – Riproduzione ripetuta del
titolo corrente
Se si preme il tasto un’altra volta,
l’indicazione REPEAT lampeggia e
tutti i titoli della cartella saranno
ripetuti*
RDM RANDOM – Riproduzione dei titoli in
ordine casuale*
*Per terminare una funzione, azionare ancora il
relativo tasto oppure un altro fra questi tre tasti.
5.1.1 Avviamento automatico o
manualedella riproduzione
Il modo lettore audio è stato scelto e il modulo
oppure l’apparecchio dove è inserito il modulo è
spento. Alla prossima accensione, la riproduzione
può avviarsi automaticamente oppure può essere
avviata manualmente con il tasto
II.
Per cambiare fra avviamento automatico e
manuale durante la riproduzione di un titolo, tener
premuto il tasto
II finché il display non indichi
MANUAL o AUTO.
5.2 Funzionamento della radio
Con la radio si possono ricevere delle stazioni FM
e di onde medie. I sei tasti stazione (1/ … /6) pos-
sono avere più funzioni, in modo che è possibile
memorizzare 3 × 6 stazioni FM (F1, F2, F3) e 6
stazioni di onde medi (MW).
5.2.1 Sintonizzare e memorizzare le stazioni
1) Se in basso al display si vede AF, con il tasto AF
disattivare tale indicazione.
2) Con il tasto BAND scegliere il settore (F1, F 2,
F3, MW).
3) Una stazione può essere trovata con la ricerca
stazioni oppure può essere impostata manual-
mente:
Per avviare la ricerca stazioni premere breve-
mente il tasto TUNE I(in avanti) o I
(in-
dietro). La ricerca stazioni si ferma alla stazione
successiva. Riavviarla finché non si riceve la
stazione richiesta.
Per la sintonizzazione manuale, tener
premuto il tasto TUNE
I
o
I
fino al rag-
giungimento approssimativo della frequenza
richiesta. Quindi, con ogni pressione del tasto,
la frequenza aumenta o si riduce passo dopo
passo (per FM di 0,05MHz, per le onde medie
di 9kHz). Dopo l’impostazione manuale, la
radio ritorna dopo alcuni secondi alla ricerca
automatica a meno che prima non venga
premuto nuovamente il tasto I
o I.
4)
Se la stazione è impostata, tener premuto il
relativo tasto stazione (1/ … /6) finché a sinistra
del display l’indicazione “F” o “MW” passa a
“M” (per Memory).
5.2.2 Attivare le stazioni memorizzate
1) Con il tasto BAND scegliere il settore dove è
stata memorizzata la stazione richiesta.
2) Premere il tasto (1/ … /6) della stazione.
Le trasmissioni stereo sono contrassegnate con il
simbolo in alto a destra del display.

19
Italiano
5.2.3 Ricezione RDS
Se la stazione scelta trasmette delle informazioni
RDS (Radio Data System), il display indica il nome
della stazione al posto della frequenza. Alcune
stazioni offrono oltre al suo nome delle informa-
zioni supplementari, p.es. titolo e interprete della
musica.
Tipo di programmi (genere)
Con il tasto PTY, fra le stazioni memorizzate si può
scegliere quella che in quel momento trasmette
musica o informazioni di un determinato tipo. Si
possono scegliere i seguenti generi:
Gruppo musica Gruppo voce
Selezionabile con il tasto stazione 1
POP M Musica Pop
ROCK M Musica Rock
NEWS Notizie
AFFAIRS Info attuali
INFO Programma di
servizio
Selezionabile con il tasto stazione 2
EASY M Musica leggera
LIGHT M Classica leggera
SPORT Sport
EDUCATE Educazione
DRAMA Radiodramma,
Letteratura
Selezionabile con il tasto stazione 3
CLASSICS Musica classica
OTHER M Musica particolare
CULTURE Cultura, Società
SCIENCE Scienza
VARIED Intrattenimento
Selezionabile con il tasto stazione 4
JAZZ Jazz
COUNTRY Musica country
WEATHER Meteo
FINANCE Economia
CHILDREN Programma per
bambini
Selezionabile con il tasto stazione 5
NATION M Musica nazionale
OLDIES Oldies
SOCIAL Problemi sociali
RELIGION Religione
PHONE IN da chiamare al
telefono
Selezionabile con il tasto stazione 6
FOLK M Folclore
TRAVEL Viaggi
LEISURE Tempo libero
DOCUMENT Documentazione
1)
Con il tasto PTY attivare la funzione Tipo di
programmi. A questo punto è possibile un’ul-
teriore scelta dal gruppo musica. Sul display è
visualizzato un genere di questo gruppo. Per
passare al gruppo voce, premere nuovamente
il tasto PTY. Sul display è visualizzato un genere
di questo gruppo. (Con la terza pressione del
tasto è nuovamente disattivata la funzione Tipo
di programmi.)
2) Con (ripetuta) pressione del relativo tasto sta-
zione selezionare il genere dal gruppo appena
scelto. Fra le stazioni memorizzate, la radio
sceglie quella che in quel momento trasmette
un programma con il genere scelto. Durante
la ricerca, il display lampeggia.
Se la radio non riesce a trovare nessuna
stazione con il genere richiesto, il display in
-
dica poco dopo brevemente il messaggio PTY
NONE. La stazione impostata per ultima rimane
allora attivata.
3) Per disattivare la funzione Tipo di programmi
e per potere attivare le stazioni memorizzate
nuovamente con i loro tasti stazione, premere
uno o due volte il tasto PTY, in modo che il
display indichi la frequenza oppure il nome
della stazione.
Frequenza alternativa
La maggiore parte dei programmi viene trasmessa
con varie frequenze. La radio è in grado di sce-
gliere automaticamente la frequenza con la rice-
zione migliore. Per attivare questa funzione, pre-
mere il tasto AF (frequenza alternativa): il display
indica AF. Se l’indicazione AF lampeggia, significa
che la funzione non è disponibile.
N.B.: Per l’uso stazionario della radio in un impianto
PA, questa funzione non è necessaria e dovrebbe quindi
rimanere disattivata.
6 Dati tecnici
Frequenza di ricezione
FM:� � � � � � � � � � � � � � � � � 87,5 – 108 MHz
OM: � � � � � � � � � � � � � � � � 522 – 1620 kHz
Locazioni di memoria: � � � � � 24
FM:� � � � � � � � � � � � � � � � � 3 × 6
OM: � � � � � � � � � � � � � � � � 1 × 6
Sensibilità HF/Rapporto S/R
FM:� � � � � � � � � � � � � � � � � 6 dBμV/> 60dB
OM: � � � � � � � � � � � � � � � � 30 dBμV/> 35 dB
Fattore di distorsione: � � � � � < 0,5% (con FM)
Alimentazione DC:� � � � � � � � 17 V, 250mA tramite l’am-
plificatore PA opp� tramite il
dispositivo d’estensione
Dimensioni:� � � � � � � � � � � � � 195 × 40 × 96mm
Peso:� � � � � � � � � � � � � � � � � � 260 g
Con riserva di modifiche tecniche.
La MONACOR
®
INTERNATIONAL GmbH & Co. KG si riserva
ogni diritto di elaborazione in qualsiasi forma delle presenti
istruzioni per l’uso. La riproduzione – anche parziale – per
propri scopi commerciali è vietata.

20
Nederlands
Deutsch
Deutsch Seite
English
English Page
Français
Français Page
Italiano
Italiano Pagina
Español
Español Página
Polski
Polski Strona
TRACK
TUNEMODE BAND PTY AF
010
LEVEL
1/ 2/INT 3/RPT 4/RDM 5/
FOLDER
/6
PA -120 0 R DS U FM/AM RDS TUNER
Nederlands
Nederlands Pagina
FM/MW-RDS-radiomodule
met USB-audiospeler
Deze handleiding is bedoeld voor technici die de
module inbouwen en voor gebruikers zonder spe-
cifieke vakkennis. Lees de handleiding grondig
door, alvorens het apparaat in gebruik te nemen,
en bewaar ze voor latere raadpleging.
1 Toepassingen
De module is geschikt voor montage in MONA-
COR 100V-versterkers met een moduleopening
en in MONACOR uitbreidingsapparatuur, bijvoor-
beeld:
PA-1120
PA-1240 100 V-versterkers voor 5 zones
PA-1200 100V-versterkers voor 4 zones
PA-1200EX uitbreidingsapparaat voor 2 modules
PA-5240
PA-5480 100 V-versterkers voor 5 zones
PA-6240
PA-6480
PA-6600
100V-versterkers voor 6 zones
2 Overzicht
/In-/uitschakelen; afspelen beëindigen
Om uit te schakelen, houdt u de toets inge-
drukt tot het display uitgaat.
USB-connector voor een USB-geheugenstick
of een USB-harddisk met eigen voeding; met
een USB-adapter kunnen ook geheugenkaar-
ten (SD, SDHC) worden gebruikt.
Opmerking: Door de verscheidenheid aan opslag-
geheugenfabrikanten en besturingsprogramma’s
kan niet gegarandeerd worden, dat alle opslagmedia
compatibel zijn met de PA-1200RDSU.
1/
II Stationtoets 1/
Audioweergave starten, onderbreken,
voortzetten
2/INT Stationtoets 2/
Het begin van alle tracks afspelen
3/RPT Stationtoets 3/
Track of map herhaald afspelen
4/RDM Stationtoets 4/
In willekeurige volgorde afspelen
5/
FOLDER Stationtoets 5/
Vorige map selecteren
6/FOLDER
Stationtoets 6/
Volgende map selecteren
MODE Tussen radio en audiospeler omschakelen
BAND Tussen F 1, F 2, F 3 en MW omschakelen
(F staat voor FM)
TRACK
TUNE Audiospeler
I= volgende track
I
= vorige track
Bij ingedrukt gehouden toets snel vooruit
of achteruit zoeken
Radio
Om de zenderzoekfunctie te starten, drukt
u kort op de toets
I
of
I
. Om een zen-
der op te slaan, houdt u een stationtoets
ingedrukt tot links op het display “F” of
“MW” naar “M” (Memory) wisselt. Hand-
matige zenderinstelling zie hfdst. 5.2.1.
PTY Selectie van het programmatype bij RDS-
ontvangst
AF Functie alternatieve frequentie bij RDS-
ontvangst
LEVEL Volumeregelaar
Table of contents
Languages:
Other Monacor Tuner manuals
Popular Tuner manuals by other brands

Universal Electronics
Universal Electronics URC-10000 Installation & user guide

Pro-Ject Audio Systems
Pro-Ject Audio Systems Box Design Pro-Ject Tuner Box S2 Instructions for use

LDG
LDG Z-100A manual

Panasonic
Panasonic TY-FB9TU operating instructions

Kenwood
Kenwood Z-838W troubleshooting guide

ELECRAFT
ELECRAFT KAT100 manual