manuals.online logo
Brands
  1. Home
  2. •
  3. Brands
  4. •
  5. Monacor
  6. •
  7. TV Mount
  8. •
  9. Monacor IMG STAGELINE PAST-84/SW User manual

Monacor IMG STAGELINE PAST-84/SW User manual

Wandhalterung für
PA-Lautsprecherboxen
Bitte lesen Sie diese Anleitung vor der Installation
gründlich durch und heben Sie sie für ein späteres
Nachlesen auf.
1 Verwendungsmöglichkeiten
Diese Halterungen dienen zur Montage von
PA-Lautsprecherboxen an eine Wand und können
folgende Last tragen:
PAST-84/SW max. 25 kg
PAST-550/SW max. 15 kg
2 Hinweise für den sicheren Gebrauch
GDie Montage darf nur durch Fachpersonal erfol-
gen. Die Lautsprecherbox durch ein Fangseil
sichern, damit sie nicht auf Personen fallen kann,
falls sich die Box von der Halterung löst.
GWird die Halterung zweckentfremdet, überlastet
oder nicht fachgerecht montiert, kann keine
Garantie für die Halterung und keine Haftung für
daraus resultierende Sach- oder Personenschä-
den übernommen werden.
3 Montage
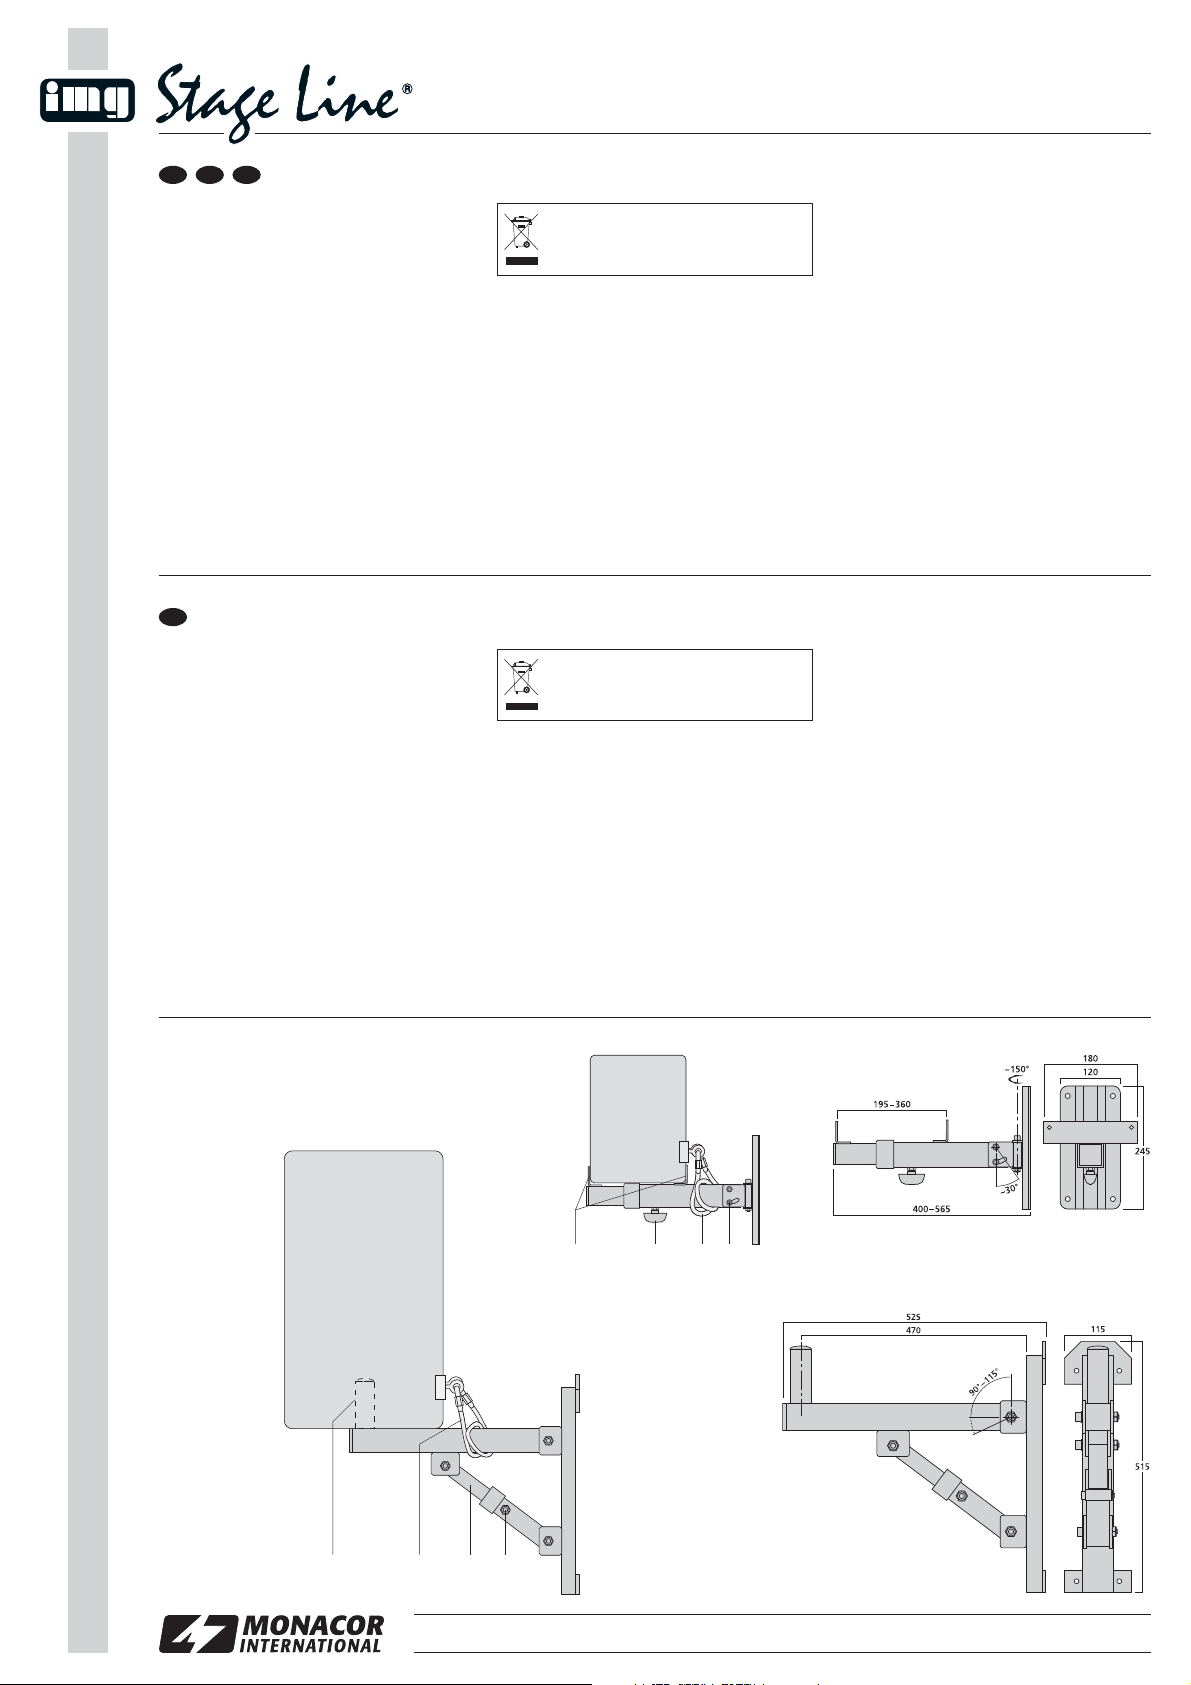
1) Die Halterung an geeigneter Stelle mit entspre-
chendem Befestigungsmaterial an der Wand
festschrauben.
2) Bevor die Lautsprecherbox auf die Halterung
gesetzt wird, den Neigungswinkel einstellen.
Anderenfalls muss das gesamte Gewicht der
Box nach dem Lösen der Feststellschraube/n (4
oder 8) per Hand gehalten werden.
PAST-84/SW:
Die Schraube (8) abschrauben.
Im Stützarm (7) sind vier Bohrungen für ver-
schiedene Neigungswinkel vorhanden. Den Arm
so weit herein- oder heraus ziehen, bis die
Schraube in die entsprechende Bohrung wieder
eingesetzt werden kann.
Übergeben Sie die Halterung zur umwelt-
freundlichen Entsorgung einem örtlichen
Recyclingbetrieb, wenn sie nicht mehr
verwendet wird.
PAST-550/SW:
Die Schrauben (4) auf beiden
Seiten des Haltearms lösen und den Haltearm
wie gewünscht neigen (max. 30°).
3) Die Feststellschraube/n wieder anziehen.
4) Bei dem Modell PAST-84/SW die Lautsprecher-
box auf den Haltedorn (5) setzen. Bei der Halte-
rung PAST-550/SW den Abstand zwischen den
Haltewinkeln (1) einstellen. Dazu die Knebel-
schraube (2) lösen, den Abstand einstellen und
die Knebelschraube wieder fest anziehen. Die
Box an die Winkel schrauben.
5) Die Lautsprecherbox mit einem Fangseil (3, 6)
sichern (siehe Abb.), sodass der Fallweg der Box
nicht mehr als 20 cm betragen kann.
6) Bei der Halterung PAST-550/SW kann der Hal-
tearm ca. ±75° geschwenkt werden.
7) Um eine dauerhafte, sichere Montage zu ge-
währleisten, regelmäßig alle Schrauben kontrol-
lieren und ggf. festziehen.
Änderungen vorbehalten.
wwwwww..iimmggssttaaggeelliinnee..ccoomm
PAST-84/SW Best.-Nr. 11.0610
PAST-550/SW Best.-Nr. 11.0600
Wall Bracket for
PA Speaker Cabinets
Please read these operating instructions carefully
prior to installing the unit and keep them for later use.
1 Applications
These brackets serve for mounting PA speaker cab-
inets to a wall and are capable of carrying the fol-
lowing load:
PAST-84/SW: max. 25 kg
PAST-550/SW: max. 15 kg
2 Safety Notes
GMounting must only be made by specialized per-
sonnel. Secure the speaker cabinet by a safety
rope so that it cannot fall onto persons in case the
cabinet works loose from the bracket.
GNo guarantee claims for the bracket and no liabil-
ity for any resulting personal damage or material
damage will be accepted if the bracket is used for
other purposes than originally intended, if it is
overloaded, or not mounted in an expert way.
3 Mounting
1) Tightly screw the bracket to a suitable place at
the wall with adequate fixing material.
2) Before placing the speaker cabinet on the
bracket, adjust the angle of inclination. Otherwise
the complete weight of the cabinet must be held
by hand after releasing the setscrew/s (4 or 8).
PAST-84/SW:
Unscrew the screw (8). In the sup-
porting arm (7) four drill holes for different incli-
nation angles are provided. Pull out or pull in the
arm so far until the screw can be reinserted into
the corresponding drill hole.
PAST-550/SW:
Release the screws (4) on both
If the bracket is to be put out of operation
definitively, take it to a local recycling plant
for a disposal which is not harmful to the
environment.
sides of the supporting arm and incline the sup-
porting arm as desired (max. 30°).
3) Retighten the setscrew/s.
4) Model PAST-84/SW: Place the speaker cabinet
on the fixing bolt (5). Model PAST-550/SW:
Adjust the distance between the holding brackets
(1). For this purpose release the knob screw (2),
adjust the distance, and retighten the knob
screw. Screw the cabinet to the brackets.
5) Secure the speaker cabinet with a safety rope (3,
6) [see fig.] so that the falling distance of the cab-
inet will not exceed 20 cm.
6) The holding arm of PAST-550/SW can be moved
by approx. ±75°.
7) To ensure a permanent, safe mounting, regularly
check all screws and tighten them, if required.
Subject to technical modifications.
PAST-84 / SW
PAST-550/SW1234
5678
®
MONACOR INTERNATIONAL GmbH & Co. KG • Zum Falsch 36 • 28307 Bremen • Germany
Copyright
©
by MONACOR INTERNATIONAL. All rights reserved. A-0471.99.02.11.2011
D A CH
GB
Support mural
pour enceintes
professionnelles
Veuillez lire la notice dʼutilisation soigneusement
avant lʼinstallation et la conserver pour vous y repor-
ter ultérieurement.
1 Possibilités dʼutilisation
Ces supports servent pour le montage dʼenceintes
professionnelles sur un mur et peuvent supporter
les charges suivantes :
PAST-84/SW 25 kg max.
PAST-550/SW 15 kg max.
2 Conseils dʼutilisation et de sécurité
GLe montage ne doit être effectué que par un per-
sonnel spécialisé. Assurez lʼenceinte avec une
corde de sécurité pour éviter quʼelle ne tombe sur
des personnes si elle venait à se détacher du
support.
GNous déclinons toute responsabilité en cas de
dommages matériels ou corporels résultants si le
support est utilisé dans un but autre que celui
pour lequel il a été conçu, sʼil y a surcharge ou sʼil
nʼest pas monté de manière professionnelle; en
outre, la garantie deviendrait caduque.
3 Montage
1) Vissez le support à lʼendroit voulu sur le mur avec
le matériel de fixation adapté.
2) Réglez lʼangle dʼinclinaison avant de placer lʼen-
ceinte sur le support. Sinon, il faut tenir tout le
poids de lʼenceinte à la main, une fois la (les) vis
de réglage (4 ou 8) desserrées.
PAST-84/SW
: devissez la vis (8). Quatre trous
sont prévus dans le bras de support (7) pour les
différents angles dʼinclinaison. Faites coulisser
Lorsque le support est définitivement
retiré du service, vous devez le déposer
dans une usine de recyclage adaptée pour
contribuer à son élimination non polluante.
lʼélément du bras jusquʼà ce que la vis puisse en-
trer dans le perçage correspondant.
PAST-550/SW :
desserrez les vis (4) sur les deux
côtés du bras et orientez le bras comme souhaité
(30° max.).
3) Replacez la (les) vis.
4) Sur le modèle PAST-84/SW, placez lʼenceinte sur
lʼinsert (5). Sur le modèle PAST-550/SW, réglez
la distance entre les étriers de maintien (1). Pour
ce faire, desserrez la vis (2), réglez la distance et
revissez la vis. Vissez lʼenceinte sur les étriers.
5) Assurez lʼenceinte avec une corde de sécurité (3,
6) [voir schéma] de telle sorte que la chute de
lʼenceinte ne puisse excéder 20 cm.
6) Sur le PAST-550/SW, le bras de maintien peut
être orienté de ±75° environ.
7) Pour garantir un montage sûr et permanent,
contrôlez régulièrement toutes les vis et si besoin
resserrez-les.
Tout droit de modification réservé.
wwwwww..iimmggssttaaggeelliinnee..ccoomm
PAST-84/SW Best.-Nr. 11.0610
PAST-550/SW Best.-Nr. 11.0600
Supporto a parete per
casse acustiche PA
Vi preghiamo di leggere attentamente le presenti
istruzioni prima dellʼinstallazione e conservatele per
un uso futuro.
1 Possibilità dʼimpiego
Questi supporti servono per il montaggio di casse
acustiche PA ad una parete e accettano i seguenti
pesi:
PAST-84/SW max. 25 kg
PAST-550/SW max. 15 kg
2 Avvertenze di sicurezza
GIl montaggio deve essere fatto solo da persone
qualificate. La cassa acustica deve essere assi-
curata con una fune di trattenuta per escludere
che possa cadere su delle persone nel caso si
staccasse dal suo supporto.
GNel caso dʼuso improprio, di sovraccarico o di
montaggio non a regola dʼarte del supporto, non
si assume nessuna responsabilità per eventuali
danni consequenziali a persone o a cose e non si
assume nessuna garanzia per il supporto.
3 Montaggio
1) Avvitare il supporto in un punto adatto alla parete
servendosi di materiale adeguato per il fissaggio.
2) Prima di posizionare la cassa acustica sul sup-
porto regolare lʼinclinazione del supporto. Altri-
menti occorre tenere con la mano tutto il peso
della cassa dopo aver allentato la vite/le viti di
bloccaggio (4 o 8).
PAST-84/SW:
Svitare la vite (8). Il braccio di
sostegno (7) presenta quattro fori per differenti
angoli di inclinazione. Sfilare il braccio al punto
tale da poter inserire nuovamente la vite nel foro
desiderato.
Se non si usa più il supporto, consegnarlo
per lo smaltimento ad unʼistituzione locale
per il riciclaggio.
PAST-550/SW:
Allentare le viti (4) sui due lati del
braccio di appoggio e inclinare il braccio secondo
necessità (max. 30°).
3) Stringere di nuovo la vite/le viti di bloccaggio.
4) Nel modello PAST-84/SW posizionare la cassa
acustica sul perno (5). Nel supporto PAST-550/
SW regolare la distanza fra gli angoli (1) di
tenuta. Per fare ciò allentare la vite ad alette (2),
regolare la distanza e stringere di nuovo la vite.
Avvitare la cassa acustica agli angoli.
5) Assicurare la cassa acustica con una fune di trat-
tenuta (3, 6) [vedi fig.], in modo tale che la caduta
della cassa non possa superare i 20 cm.
6) Nel supporto PAST-550/SW il braccio di appog-
gio può essere girato di ±75° ca.
7) Per garantire una montaggio duraturo e sicuro,
controllare regolarmente tutte le viti e eventual-
mente stringerle di nuovo.
Con riserva di modifiche tecniche.
PAST-84 / SW
PAST-550/SW1234
5678
®
MONACOR INTERNATIONAL GmbH & Co. KG • Zum Falsch 36 • 28307 Bremen • Germany
Copyright
©
by MONACOR INTERNATIONAL. All rights reserved. A-0471.99.02.11.2011
F B CH
I

This manual suits for next models

3

Other Monacor TV Mount manuals

Monacor IMG STAGELINE PAST-84/SW User manual

Monacor

Monacor IMG STAGELINE PAST-84/SW User manual

Monacor img Stage Line MHB-08 User manual

Monacor

Monacor img Stage Line MHB-08 User manual

Monacor PAST-84/SW User manual

Monacor

Monacor PAST-84/SW User manual

Popular TV Mount manuals by other brands

Alphamount APLT1 manual

Alphamount

Alphamount APLT1 manual

Sanus VISIONMOUNT VMF Assembly instructions

Sanus

Sanus VISIONMOUNT VMF Assembly instructions

Sanus F180c instruction manual

Sanus

Sanus F180c instruction manual

Metra Electronics TX86 Assembly instructions

Metra Electronics

Metra Electronics TX86 Assembly instructions

AmazonBasics B07KR4BT31 Welcome guide

AmazonBasics

AmazonBasics B07KR4BT31 Welcome guide

MINN KOTA MKA-48 quick start guide

MINN KOTA

MINN KOTA MKA-48 quick start guide

IZI Mounting TWA-44 installation instructions

IZI Mounting

IZI Mounting TWA-44 installation instructions

ricoo R02-22 quick start guide

ricoo

ricoo R02-22 quick start guide

Goobay ScreenScope 63496 user manual

Goobay

Goobay ScreenScope 63496 user manual

Dynex DX-TVM102 Quick setup guide

Dynex

Dynex DX-TVM102 Quick setup guide

ViewZ VZ-CM-V1 installation manual

ViewZ

ViewZ VZ-CM-V1 installation manual

Strong SM-RAZOR-ART1-M instruction manual

Strong

Strong SM-RAZOR-ART1-M instruction manual

ricoo S7722 quick start guide

ricoo

ricoo S7722 quick start guide

Sony SU-W210 instructions

Sony

Sony SU-W210 instructions

Crestron TSW-UMB-70 Series quick start

Crestron

Crestron TSW-UMB-70 Series quick start

OWI IC6 Instructions for mounting

OWI

OWI IC6 Instructions for mounting

Mounting Dream MD5109 Installation instruction

Mounting Dream

Mounting Dream MD5109 Installation instruction

Alphamount APPSLTK1 instruction manual

Alphamount

Alphamount APPSLTK1 instruction manual

manuals.online logo
manuals.online logoBrands
  • About & Mission
  • Contact us
  • Privacy Policy
  • Terms and Conditions

Copyright 2025 Manuals.Online. All Rights Reserved.