Mono Equipment METRO Manual instruction

FG021- METRO RevA19 17-01-19
SET UP AND OPERATION INSTRUCTIONS
METRO MOULDER
Enter Serial No. here.____________________________
In the event of an enquiry please quote this serial number.
www.monoequip.com
FILE 22

FG021- METRO RevA19 17-01-19
2
Failure to adhere to the cleaning and maintenance instructions
detailed in this booklet could affect the warranty of this
machine

FG021- METRO RevA19 17-01-19
3
SAFETY SYMBOLS
The following safety symbols are used throughout this product documentation and manual
(available at www.monoequip.com).
Before using your new equipment, read the instruction manual carefully and pay special
attention to information marked with the following symbols.
Indicates a hazardous situation which, if not avoided,
will result in death or serious injury.
Indicates a hazardous situation which, if not avoided,
will result in electric shock.
Indicates a hazardous situation which, if not avoided,
will result in minor or moderate injury.
WARNING
WARNING
CAUTION

FG021- METRO RevA19 17-01-19
4
ELECTRICAL SAFETY AND ADVICE REGARDING
SUPPLEMENTARY ELECTRICAL PROTECTION:
Commercial bakeries, kitchens and foodservice areas are environments where electrical
appliances may be located close to liquids or operate in and around damp conditions or
where restricted movement for installation and service is evident.
The installation and periodic inspection of the appliance should only be undertaken by a
qualified, skilled and competent electrician, and connected to the correct supply suitable for
the load as stipulated by the appliance data label.
The electrical installation and connections should meet the necessary requirements of the
local electrical wiring regulations and any electrical safety guidelines.
We Recommend:
−Supplementary electrical protection with the use of a residual current device (RCD)
−Fixed wiring appliances incorporate a locally situated switch disconnector to connect
to, which is easily accessible for switching off and safe isolation purposes. The switch
disconnector must meet the specification requirements of IEC 60947.
The supply to this machine must be protected by a
30mA RCD

FG021- METRO RevA19 17-01-19
5

FG021- METRO RevA19 17-01-19
6
CONTENTS
1.0 Introduction
2.0 Dimensions
3.0 Specifications
4.0 Safety
5.0 Installation
6.0 Isolation
7.0 Cleaning
Daily
Weekly
8.0 Operating Instructions
How the Metro moulds dough.
Operating the moulder
oa. Hopper width adjustment
ob. Sheeting gap adjustment
oc. Side guides adjustment
od. Moulding pressure adjustment
Starting the Metro
9.0 Trouble shooting
10.0 Service and spares
11.0 Electrical information

FG021- METRO RevA19 17-01-19
7
1.0 INTRODUCTION
The metro moulder has been designed with reliability and ease of operation in mind.
Fully interlocked guards and covers ensure that semi skilled personnel can safely operate
this versatile machine, which has a maximum output of 1200 dough pieces an hour.
The double sheeting rolls give a gentle two stage reduction of the dough and two curling
chains give greatly improved consistency of shape and size to the moulded dough piece.
Windows at the front and rear of the machine allow the operator to monitor the progress of
the dough right through the moulder.
2.0 DIMENSIONS
HEIGHT 1310mm (WITHOUT HOPPER)
WIDTH 750mm
LENGTH 1740mm

FG021- METRO RevA19 17-01-19
8
3.0 SPECIFICATIONS
CAPACITY: Dough piece weight range – 56grms to 1.8Kg – (2oz to 4lbs)
OUTPUT: Up to 1200 pieces per hour
POWER: 0.75kW, 3 phase and neutral
WEIGHT: 230kg (507lbs)
NOISE LEVEL: Less than 85dB
The supply to this machine must be protected by a
30mA RCD

FG021- METRO RevA19 17-01-19
9
4.0 SAFETY
1Never use a machine in a faulty condition and always report any damage.
2No-one under the age of 16 may operate this machine.
3No-one under the age of 18 may clean this machine under any circumstances.
4Only trained personnel may remove any part from this machine that
requires a tool to do so.
5Always ensure hands are dry before touching any electrical appliance
(including cable, switch and plug).
6All operatives must be fully trained.
7People undergoing training on the machine must be under direct supervision.
8Do not operate the machine with any panels removed.
9All guards must be fixed in place with bolts or screws unless
protected by a safety switch.
10 No loose clothing or jewellery to be worn while operating the machine.
11 Switch off power at the mains isolator when machine is not in use and
before carrying out any cleaning or maintenance.
12 The pressure board adjusting handle, side guide adjuster handle and
dough sheet roller gap lever may be adjusted while the machine is running.
ALL OTHER CLEANING AND MAINTENANCE OPERATIONS MUST
BE MADE WITH MACHINE DISCONNECTED FROM THE POWER SUPPLY
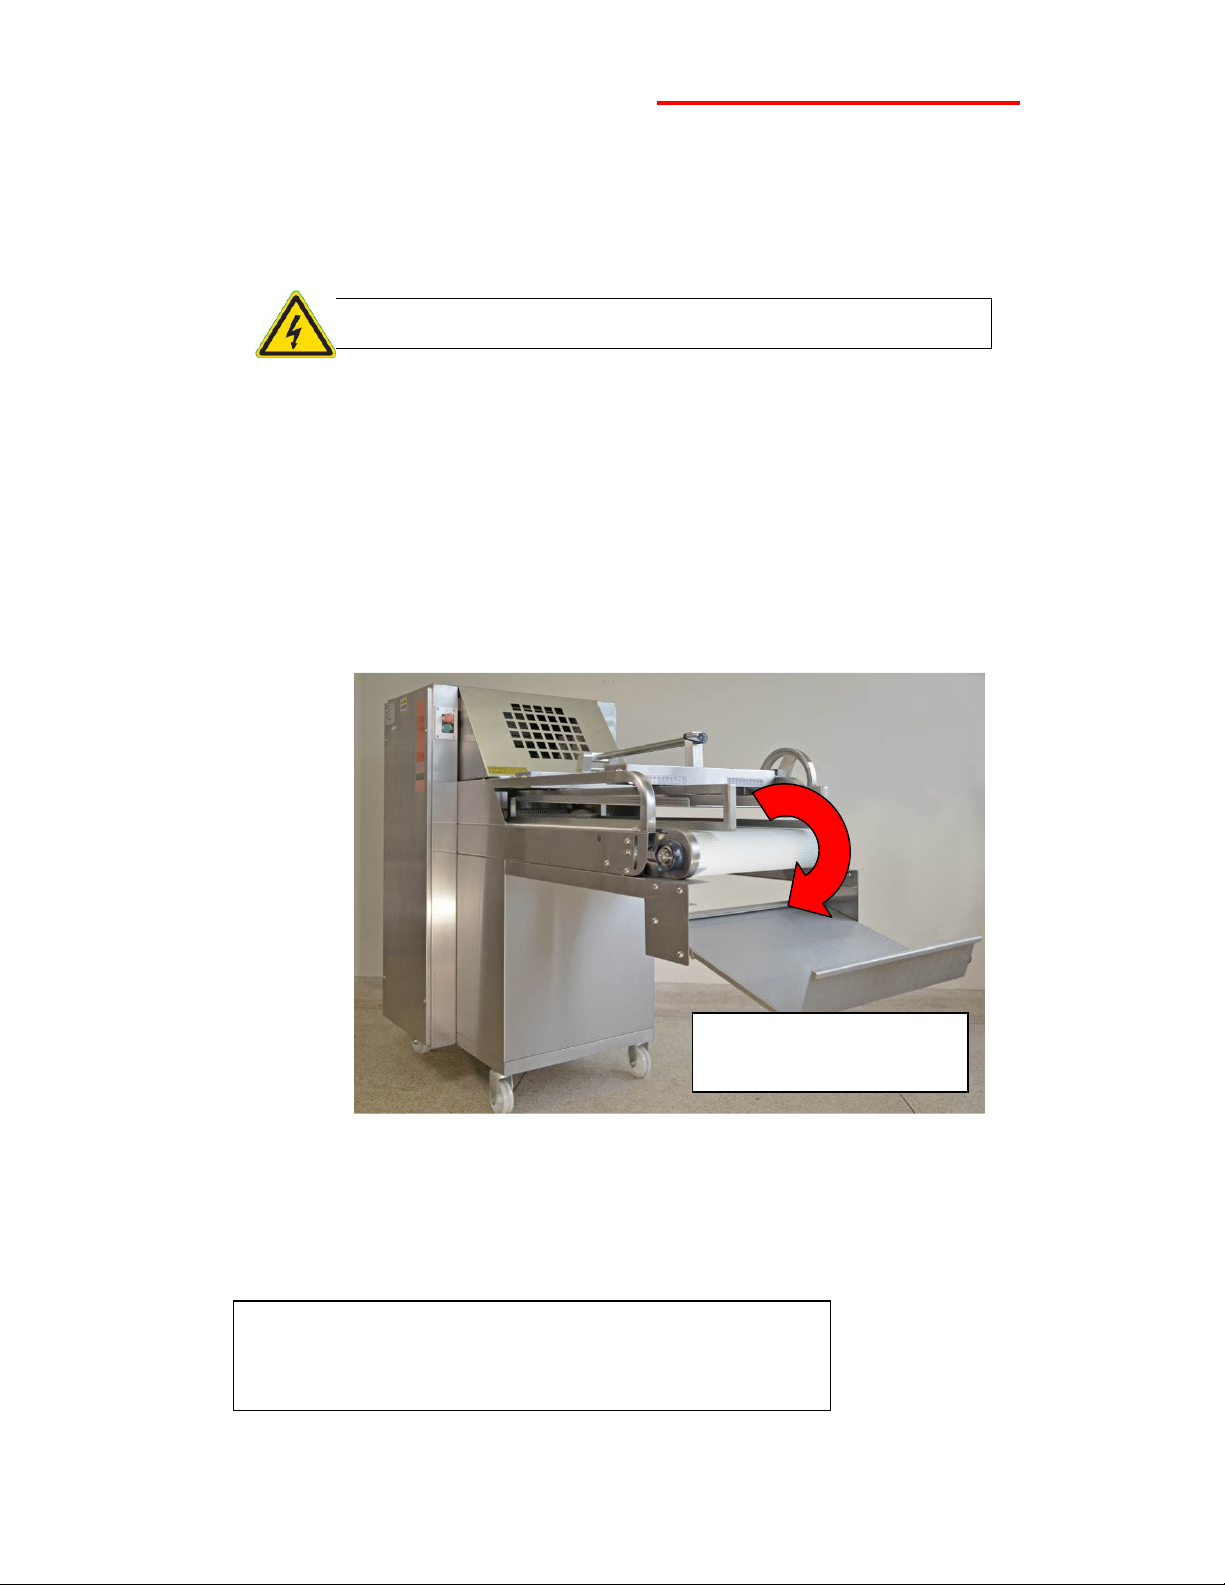
DO NOT ATTEMPT TO CLEAN THE MOULDING BELT
WHEN THE MACHINE IS RUNNING
13 The Bakery Manager or the Bakery Supervisor must carry out daily safety
checks on the machine.
WARNING:
Hand or bodily contact with moving belt surfaces may cause friction burns
to skin. This situation need not occur to successfully operate the moulder.

FG021- METRO RevA19 17-01-19
10
5.0 INSTALLATION
1The Metro moulder should be connected to a mains wall isolator or
the correct socket on a breadplant.
2Check the machine after installation to ensure the conveyor belt runs
in the right direction (see direction of arrow below). This should be
done by “inching” the motor.
If the motor rotation is incorrect transpose any two wires of the three
phase carrying wires.
3Ensure the machine is standing on a solid level floor.
Note
The Metro will only work if connected to a bread plant
or a safety hopper is fitted.
CONVEYOR BELT
DIRECTION
The supply to this machine must be protected by a
30mA RCD

FG021- METRO RevA19 17-01-19
11
6.0 ISOLATION
In an emergency, switch off the machine at the wall
isolator or at the emergency stop button shown below.
EMERGENCY STOP BUTTON
To release stop button after use, twist and release.

FG021- METRO RevA19 17-01-19
12
7.0 CLEANING
SWITCH OFF AND ISOLATE MACHINE FROM MAINS
SUPPLY BEFORE COMMENCING CLEANING
DAILY CLEANING (DO NOT USE A PRESSURE WASHER)
1. Remove hopper (if fitted) or pull machine away from prover.
2. Scrape off any dough residue.
3. If a hopper is fitted, wipe over the plastic window with a soft cloth
dampened in a sterilising solution and hot water.
4. Replace hopper where applicable.
5. Raise front-hinged cover (2).
6. Lift out curling chain (3) and shake off any dough residue, then brush
with a stiff nylon brush. ***DO NOT WASH***
7. Replace chain.
8. Unclip the scrapers and wipe clean (see photo above).
***DO NOT WASH***
Smear edges with vegetable oil.
9. Scrape rollers with a plastic scraper and remove any debris from the
roller edges.
10. Replace scrapers and close front cover.
3
2
UNCLIP SCRAPERS FOR CLEANING

FG021- METRO RevA19 17-01-19
13
11. Unclip and lower the rear window (5)
12. Unclip and wipe the rear scrapers
***DO NOT WASH***
Smear edges with vegetable oil.
13. Scrape rollers with a plastic scraper and remove any debris from the
roller edges.
14. Replace scrapers. Raise rear window. Wipe over plastic window, with
soft cloth dampened in a sterilising solution and hot water.
15. Open dough guides to maximum width by turning wheel (6).
Push pressure board (7) towards the main body, then withdraw.
16. Wash pressure board in sterilising solution and hot water, then dry and replace.
17. Scrape dough belt (8) with a plastic scraper.
18. Brush down external surface of machine to loosen any dough
remaining.
19. Spot clean with cloth and sterilising solution and hot water paying
particular attention to handles, levers and controls.
DO NOT USE METAL SCRAPER
OR ATTEMPT TO CLEAN
WITH WATER. BELT WILL NEED TO BE INCHED FORWARD
TO GAIN ACCESS TO ALL PARTS OF SURFACE.
SEE SAFETY INSTRUCTIONS.
8
7
6
5
UNCLIP SCRAPERS FOR CLEANING

FG021- METRO RevA19 17-01-19
14
WEEKLY CLEANING
SWITCH OFF AND ISOLATE MACHINE FROM MAINS
SUPPLY BEFORE COMMENCING CLEANING
1. Follow the daily cleaning instructions 1 - 14 in previous section.
2. Remove side and back panels placing screws in a safe place.
3. Brush down framework where accessible to remove excess flour and
dough.
4. Wipe down with a damp cloth and sterilising fluid and hot water.
5. Replace panels ensuring all screws are accounted for.
6. Follow the daily cleaning instructions 15 - 19 in previous section.
7. Scrape and scrub wheels clean as needed.

FG021- METRO RevA19 17-01-19
15
8.0 OPERATING INSTRUCTIONS
HOW THE METRO MOULDS DOUGH PIECES
Dough piece is feed into hopper (A) from intermediate prover or safety
hopper.
Twin sets of rollers (B) form a sheet of dough.
This is carried along the off take conveyor (C) to the curling chain (D).
The curling chain then picks up the leading edge of the dough sheet and
forms a curled roll of dough.
This is then carried to the pressure module (E) in which it is moulded.
Its final shape and consistency are determined by the pressure board (F)
and the side guides (G) positions.
The finished dough pieces are conveyed to the collection tray.
G
B
A
E
F
D
C
F

FG021- METRO RevA19 17-01-19
16
OPERATING THE METRO MOULDER
To ensure the best mould, make sure that the moulder is free of any previous dough
used and set the following adjustments.
a. Hopper width. (move cheeks(15) to required width).
b. Sheeting gap. (move lever (16))
c. Side guides position.(turn wheel (6) to adjust pressure board width)
d. Moulding pressure.(turn handle (17) to adjust pressure board height)
a. HOPPER WIDTH ADJUSTMENT.
1. Slacken wing bolts (14) and slid the hopper cheeks (15) to the required
setting. See chart above for suggested settings.
2. Hand-tighten wing bolts and go on to the next adjustment.
14
15
14

FG021- METRO RevA19 17-01-19
17
b. SHEETING GAP ADJUSTMENT.
1. Move roller gap lever (16) to required setting.
See chart for suggested settings.
c. SIDE GUIDES ADJUSTMENT.
1. Turn wheel (6) to required setting.
See chart for suggested settings.
d. MOULDING PRESSURE ADJUSTMENT.
1. The pressure board height is adjusted by turning the adjusting handle (17).
To ensure the moulding pressure can be exactly reproduced at a later date,
the adjusting handle shaft is graduated (18).
17
18
6
16

FG021- METRO RevA19 17-01-19
18
START BUTTON
STARTING THE METRO
Before starting ensure the metro has been adjusted for the product mould
required. (See previous section.)
If using in conjunction with a prover make sure that the eight minute pocket
is open.
Do not allow dough pieces to “skin” as this will result in the dough pieces
catching each other up, “doubling”, and could cause a jam.
To start the machine press the green button found either on the main body next to
the stop switch or, if used with a prover, on the front of the off take conveyor right
hand side.
START BUTTON
WHEN USED
WITH A
PROVER
If used with a prover always start the moulder before the prover or a build up of
dough could clog the moulder hopper

FG021- METRO RevA19 17-01-19
19
9.0 TROUBLE SHOOTING
MOULDER WILL NOT START
Is power supply switched on?
Is stop button released?
(twist to release)
Are all covers and doors closed?
When used with a prover, is machine in the correct position
under the conveyor?
DOUGH PIECES DOUBLE UP
Dough has been allowed to “skin” (left too long proving).
Hopper setting incorrect. (Increase gap)
DOUGH PIECES TEARING
Pressure board (7) too low.
Sheeting gap too small

FG021- METRO RevA19 17-01-19
20
10.0 SERVICE AND SPARES
If a fault arises, please do not hesitate to contact the
Customer Service Department, quoting the machine serial number
on the silver information plate of the machine and on the front cover of this manual
.
.
MONO
Queensway
Swansea West Industrial Estate
Swansea.
SA5 4EB
UK
email:spares@monoequip.com
Spares Tel. +44(0)1792 564039
Web site:www.monoequip.com
Main Tel. 01792 561234
Fax. +44(0)1792 561016
Table of contents