31-11062 3
Installation Instructions
PRE-INSTALLATION CHECKLIST
ALL INSTALLATION INFORMATION ON THE
FOLLOWING PAGES IS TO BE USED FOR
ELECTRIC INDOOR PIZZA OVEN INSTALLATION!
Remove packaging materials and literature pack.
Remove Installation Instructions from literature pack
and read them carefully before you begin.
Be sure to place all literature, Owner’s Manual,
Installations, etc. in a safe place for future
reference.
Place the oven on a table or platform even
with the cutout opening. Platform must support
200 lbs. (91 Kg).
These ovens are not approved for stackable
installations.
CAUTION
Installing the oven below the
minimum height of 47 inches creates a burn
hazard for children. Do not install below the
minimum height.
Literature Pack
Beforeyou begin-Read theseins
tructionscompletelyand carefully.
IMPORTANT- Save these ins
tructions
forlocal inspector's use.
IMPOR
TANT-OBSERVE
ALLGO VERNINGCODES
AND ORDIANCES.
NotetoIns
taller-Be su reto leave theseins
tructions
with theco nsumer.
OWNER-Keeptheseinstructionsf orfuturereference.
Note-This appliance mus
tbeproperlygrounded (if applicable).
Before you begin-R
eadthese
instructionsco mpletelyand
carefully.
IMPORTANT-Save these
instructionsfor local insp ector'sus
e.
IMPORTANT- OBSERVEALL
GOVERNINGCODESANDORDIANCES.
NotetoInstal ler-Besu reto leave
theseinstructions withthecons
umer.
OWNER-Keepthese instr u ctions
forfuturereference.
Note-This
appliance must be
properlygrounded (if applicable).
FORYOU R SAFETY
Beforeyou begin-Re adtheseins
tructionscompletelyand car efully.
IMPOR
TANT-Sa ve theseins
tructions
for local inspector's
use.
IMPORTANT- OBSERVE
ALLGO VERNINGCODESAND ORDIANCES.
NotetoIns
taller-Be s
uretoleavetheseinstru ct ionswiththeconsumer.
OWNER-Keepthese ins
tructionsforfuturereference.
Note-Thisapplian cemust be properlygrounded (if applicable).
Before you begin-Read theseins
tructionscompletelyan dcarefully.
IMPOR
TANT-Sa vethes
eins
tructions
for local inspector'suse.
IMPORTANT- OBSERVE
ALLGO VERNINGCODES
AND ORDIANCES
.
NotetoInst al ler-Be sure to leave t heseins
tructions
with theconsumer.
OWNER-Keeptheseinst r u ctionsforfuture reference.
Note-Thisappliance mus
tbeproperly grounded (if applicable).
E
LEC
TRICALREQUIRE
ME
NTS
Before you begin-Re ad these
instructionsco mpletelyand
carefully.
IMPORTANT- Save thes
e
instructionsforloca lins
pector'sus
e.
IMPORTANT- OBSERVE
ALL
GOVERNINGCODE
SAND ORDIANCES.
NotetoInstaller- Be su retoleave
theseinstruct ionswiththecons
umer.
OWNER-Keep theseinst ructions
forfuturereference.
Note-This
appliance must be
properlygrounded (if applicable).
Beforeyo ubegin-Read these
ins
tructions
comp letelyand
carefully.
IMPORTANT- Save these
instructionsforlocal ins
pector'sus
e.
IMPORTANT- OBSERVE ALL
GOVERNINGCO DESAND ORDIANCE
S.
NotetoInst al ler-Bes
uretoleave
thes
einstructionswith the consumer.
OWNER
-Keep theseinst ructions
forfuturereference.
Note-This appliance must be
properlygrounded(if applicable).
Beforeyo ubegin-R
eadthes
e
instructionscomp letelyand
carefully.
IMPOR
TANT-Sa vethes
e
ins
tructionsfor local insp ector'suse.
IMPORTANT- OBSERVE ALL
GOVERNINGCO DESAND ORDIANCES.
NotetoIns
taller-Be su retoleave
thes
einstructionswith the consumer.
OWNER-Keeptheseinstructions
forfuturereference.
Note-Thisappliance mus
tbe
properlygrounded (if applicable).
Before you begin-Read theseinst r u ctionsco mpletelyandcarefully.
IMPORTANT- Sav e theseins
tructions
forlocal inspector's
use.
IMPOR
TANT-OBSERVE
ALLGO VERNINGCOD ESAND ORDIANCES.
NotetoInstaller- Be su reto leave theseinstructionswith the consumer.
OWNER-Keepthes
eins
tructionsfor futurereference.
Note-Thisappliance must be properlygrounded (if applicable).
Before you begin-R
eadthese
instructionsco mpletelyand
carefully.
IMPORTANT-Save these
instructionsfor local insp ector'sus
e.
IMPORTANT- OBSERVEALL
GOVERNINGCODESANDORDIANCES.
NotetoInstal ler-Besu reto leave
theseinstructions withthecons
umer.
OWNER-Keepthese instr u ctions
forfuturereference.
Note-This
appliance must be
properlygrounded (if applicable).
FORYOU R SAFETY
Beforeyou begin-Re adtheseins
tructionscompletelyand car efully.
IMPOR
TANT-Sa ve theseins
tructions
for local inspector's
use.
IMPORTANT- OBSERVE
ALLGO VERNINGCODESAND ORDIANCES.
NotetoIns
taller-Be s
uretoleavetheseinstru ct ionswiththeconsumer.
OWNER-Keepthese ins
tructionsforfuturereference.
Note-Thisapplian cemust be properlygrounded (if applicable).
Before you begin-Read theseins
tructionscompletelyan dcarefully.
IMPOR
TANT-Sa vethes
eins
tructions
for local inspector'suse.
IMPORTANT- OBSERVE
ALLGO VERNINGCODES
AND ORDIANCES
.
NotetoInst al ler-Be sure to leave t heseins
tructions
with theconsumer.
OWNER-Keeptheseinst r u ctionsforfuture reference.
Note-Thisappliance mus
tbeproperly grounded (if applicable).
E
LEC
TRICALREQUIRE
ME
NTS
Before you begin-Re ad these
instructionsco mpletelyand
carefully.
IMPORTANT- Save thes
e
instructionsforloca lins
pector'sus
e.
IMPORTANT- OBSERVE
ALL
GOVERNINGCODE
SAND ORDIANCES.
NotetoInstaller- Be su retoleave
theseinstruct ionswiththecons
umer.
OWNER-Keep theseinst ructions
forfuturereference.
Note-This
appliance must be
properlygrounded (if applicable).
Beforeyo ubegin-Read these
ins
tructions
comp letelyand
carefully.
IMPORTANT- Save these
instructionsforlocal ins
pector'sus
e.
IMPORTANT- OBSERVE ALL
GOVERNINGCO DESAND ORDIANCE
S.
NotetoInst al ler-Bes
uretoleave
thes
einstructionswith the consumer.
OWNER
-Keep theseinst ructions
forfuturereference.
Note-This appliance must be
properlygrounded(if applicable).
Beforeyo ubegin-R
eadthes
e
instructionscomp letelyand
carefully.
IMPOR
TANT-Sa vethes
e
ins
tructionsfor local insp ector'suse.
IMPORTANT- OBSERVE ALL
GOVERNINGCO DESAND ORDIANCES.
NotetoIns
taller-Be su retoleave
thes
einstructionswith the consumer.
OWNER-Keeptheseinstructions
forfuturereference.
Note-Thisappliance mus
tbe
properlygrounded (if applicable).
Beforeyou begin-Read theseins
tructionscompletelyand carefully.
IMPORTANT- Save these ins
tructions
forlocal inspector's use.
IMPOR
TANT-OBSERVE
ALLGO VERNINGCODES
AND ORDIANCES.
NotetoIns
taller-Be su reto leave theseins
tructions
with theco nsumer.
OWNER-Keeptheseinstructionsf orfuturereference.
Note-This appliance mus
tbeproperlygrounded (if applicable).
Before you begin-R
eadthese
instructionsco mpletelyand
carefully.
IMPORTANT-Save these
instructionsfor local insp ector'sus
e.
IMPORTANT- OBSERVEALL
GOVERNINGCODESANDORDIANCES.
NotetoInstal ler-Besu reto leave
theseinstructions withthecons
umer.
OWNER-Keepthese instr u ctions
forfuturereference.
Note-This
appliance must be
properlygrounded (if applicable).
FORYOU R SAFETY
Beforeyou begin-Re adtheseins
tructionscompletelyand car efully.
IMPOR
TANT-Sa ve theseins
tructions
for local inspector's
use.
IMPORTANT- OBSERVE
ALLGO VERNINGCODESAND ORDIANCES.
NotetoIns
taller-Be s
uretoleavetheseinstru ct ionswiththeconsumer.
OWNER-Keepthese ins
tructionsforfuturereference.
Note-Thisapplian cemust be properlygrounded (if applicable).
Before you begin-Read theseins
tructionscompletelyan dcarefully.
IMPOR
TANT-Sa vethes
eins
tructions
for local inspector'suse.
IMPORTANT- OBSERVE
ALLGO VERNINGCODES
AND ORDIANCES
.
NotetoInst al ler-Be sure to leave t heseins
tructions
with theconsumer.
OWNER-Keeptheseinst r u ctionsforfuture reference.
Note-Thisappliance mus
tbeproperly grounded (if applicable).
E
LEC
TRICALREQUIRE
ME
NTS
Before you begin-Re ad these
instructionsco mpletelyand
carefully.
IMPORTANT- Save thes
e
instructionsforloca lins
pector'sus
e.
IMPORTANT- OBSERVE
ALL
GOVERNINGCODE
SAND ORDIANCES.
NotetoInstaller- Be su retoleave
theseinstruct ionswiththecons
umer.
OWNER-Keep theseinst ructions
forfuturereference.
Note-This
appliance must be
properlygrounded (if applicable).
Beforeyo ubegin-Read these
ins
tructions
comp letelyand
carefully.
IMPORTANT- Save these
instructionsforlocal ins
pector'sus
e.
IMPORTANT- OBSERVE ALL
GOVERNINGCO DESAND ORDIANCE
S.
NotetoInst al ler-Bes
uretoleave
thes
einstructionswith the consumer.
OWNER
-Keep theseinst ructions
forfuturereference.
Note-This appliance must be
properlygrounded(if applicable).
Beforeyo ubegin-R
eadthes
e
instructionscomp letelyand
carefully.
IMPOR
TANT-Sa vethes
e
ins
tructionsfor local insp ector'suse.
IMPORTANT- OBSERVE ALL
GOVERNINGCO DESAND ORDIANCES.
NotetoIns
taller-Be su retoleave
thes
einstructionswith the consumer.
OWNER-Keeptheseinstructions
forfuturereference.
Note-Thisappliance mus
tbe
properlygrounded (if applicable).
Installation
Instructions
BEFOREYOU BEGIN
Readthese instructions carefully and completely.
•
IMPORTANT— Save these instructions
forlocal inspector’s use.
• IMPORTANT— Observe all governing
codesand ordinances.
• Noteto Installer – Be sure to leave these
instructionswith the consumer.
• Noteto Consumer – Keep these instructions for
futurereference.
• Properinstallation is the responsibility of the
installerand product failure due to improper
installationis NOT covered under warranty.
• Note– This appliance must be properly grounded.
• ATTENTION INSTALLER
Allelectric wall ovens must be hard wired (direct
wired)into an approved junction box. A plug and
receptacleis NOT permitted on these products.
Electric Indoor Pizza Oven
ZEP30
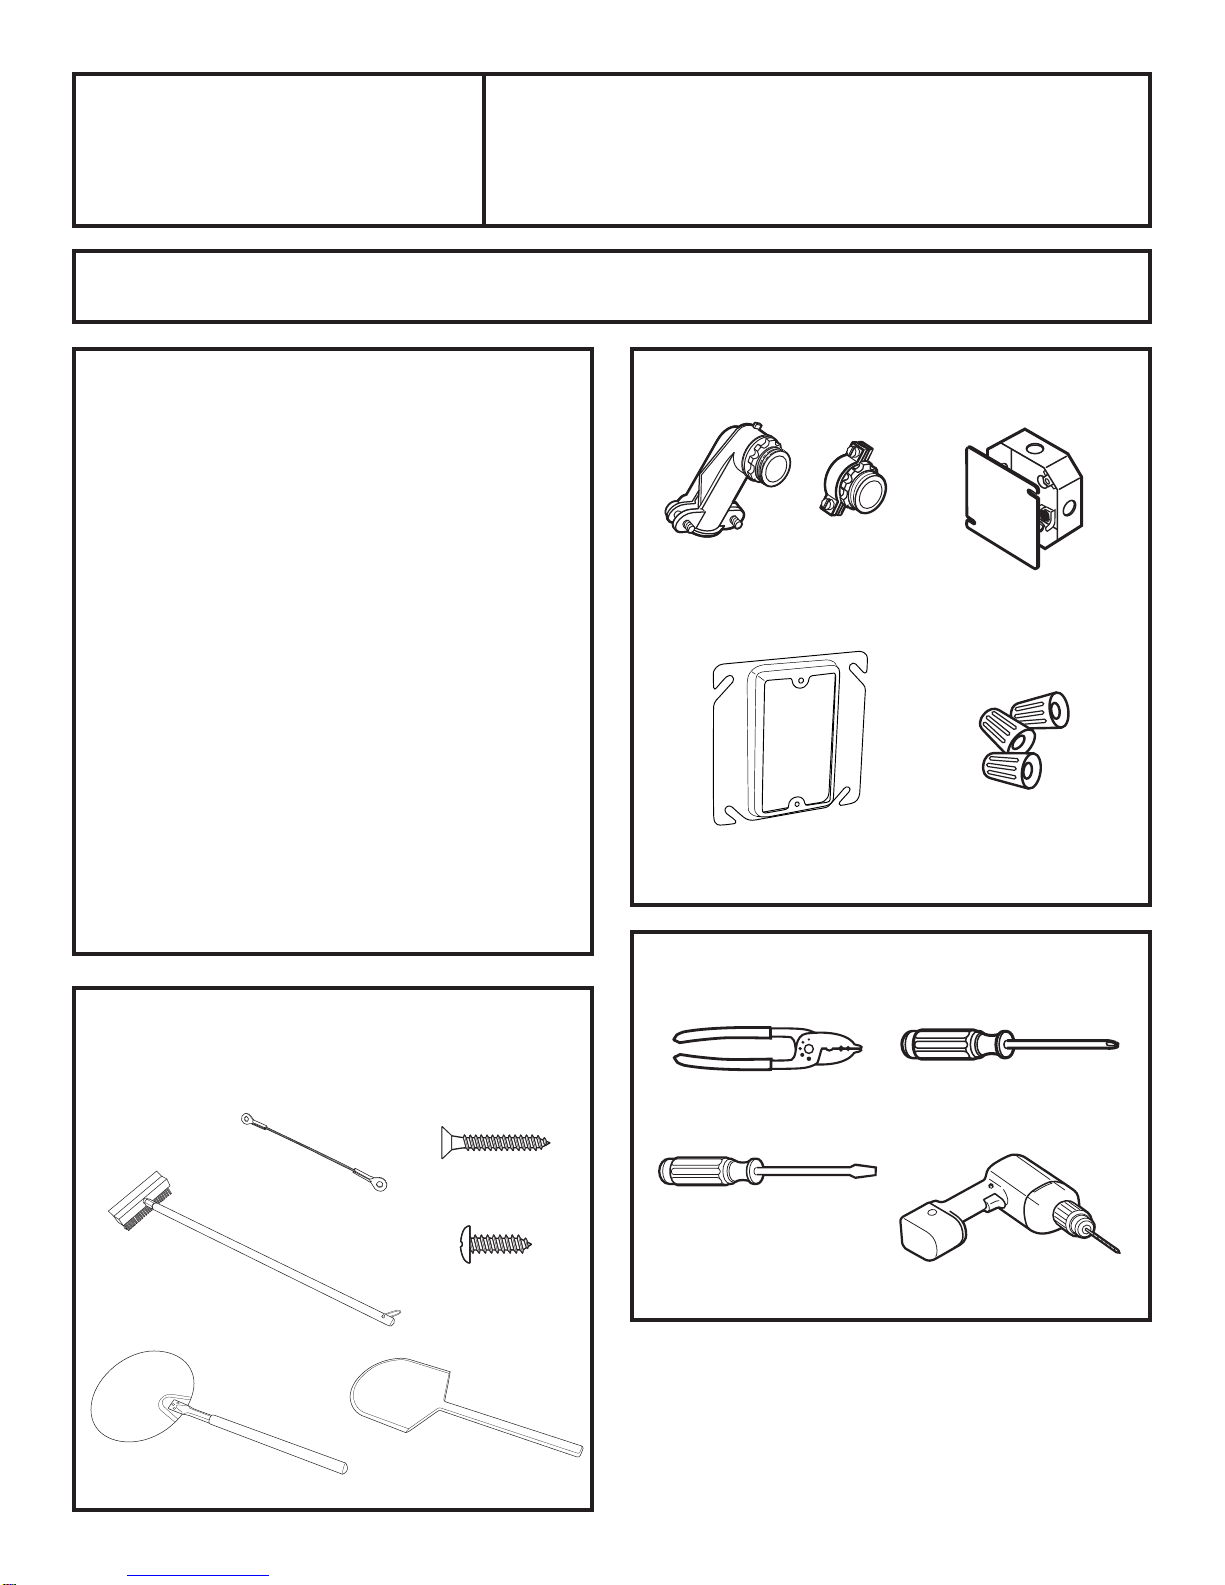
MATERIALSNEEDED
TOOLSNEEDED
PARTSINCLUDED
(Appearancewill vary)
Ifyou have questions, call GE Appliances at 800.GE.CARES (800.432.2737)
orvisit our website at: GEAppliances.com.
31-11062 12-16 GEA
StrainRelief Clamp
for1/2” conduit
PlasterRing
(Option1)
WireStrippers
JunctionBox
(11/2 Depth Max.)
Phillips#2
Screwdriver
Flathead
Screwdriver
Drilland 1/8” drill bit
WireNuts
Brush
Option1
Option2
MetalPeel WoodenPeel
1”Drywall Screw
5/8”Phillips
CaseScrew
Tether
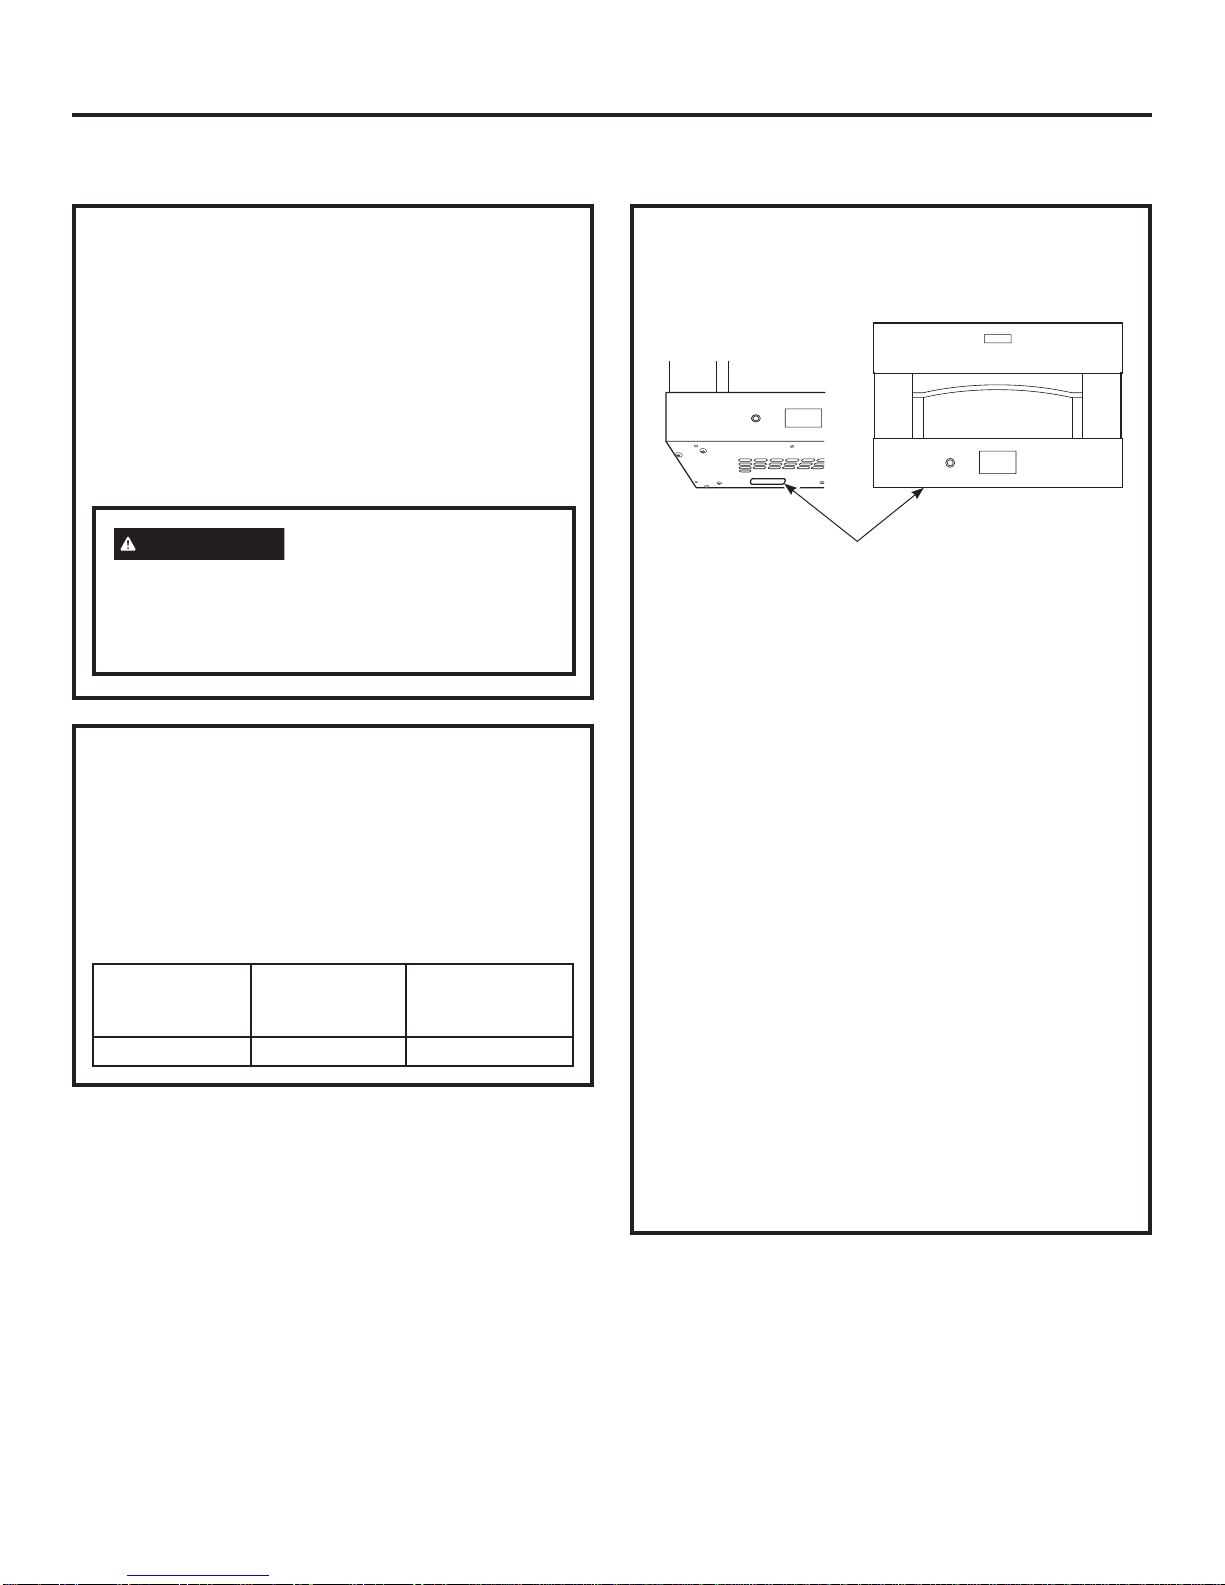
1ACUTOUT FOR 30” (76.2 CM) ELECTRIC INDOOR PIZZA OVEN
A47” is the required minimum installation height. Oven
may be installed higher based on owner preference.
BBack of standard depth cabinet may need to be
removed to install oven at correct depth. Drywall is
acceptable as back enclosure.
CPlatform must be able to support 200 lbs (91 kg).
DSolid enclosure required on the top, bottom, left and
right sides and back of oven.
EJunction box location (May also be located in
adjacent cabinet)
24” (60.9) min
cutout depth
18 3/8” (46.6) min
18 7/16” (46.8) max
47” (119.4) min
INSTALLATION
SIDE VIEW
ELEC
28 1/2” (72.4) min
28 5/8” (72.7) max
4” (10.2) min
to bottom of
junction box
Solid enclosure
required on the
top, bottom, left
and right sides,
and back of oven
INSTALLATION
FRONT VIEW
B
C
A
E
D