Monoprice 21596 User manual

MONOPRICE
Vacuum Food Sealer
P/N 21596
User's Manual

2
CONTENTS
SAFETY WARNINGS AND GUIDELINES ................................................................................................................... 3
INTRODUCTION............................................................................................................................................................................ 5
CUSTOMER SERVICE................................................................................................................................................................6
PACKAGE CONTENTS.............................................................................................................................................................6
PRODUCT OVERVIEW............................................................................................................................................................. 7
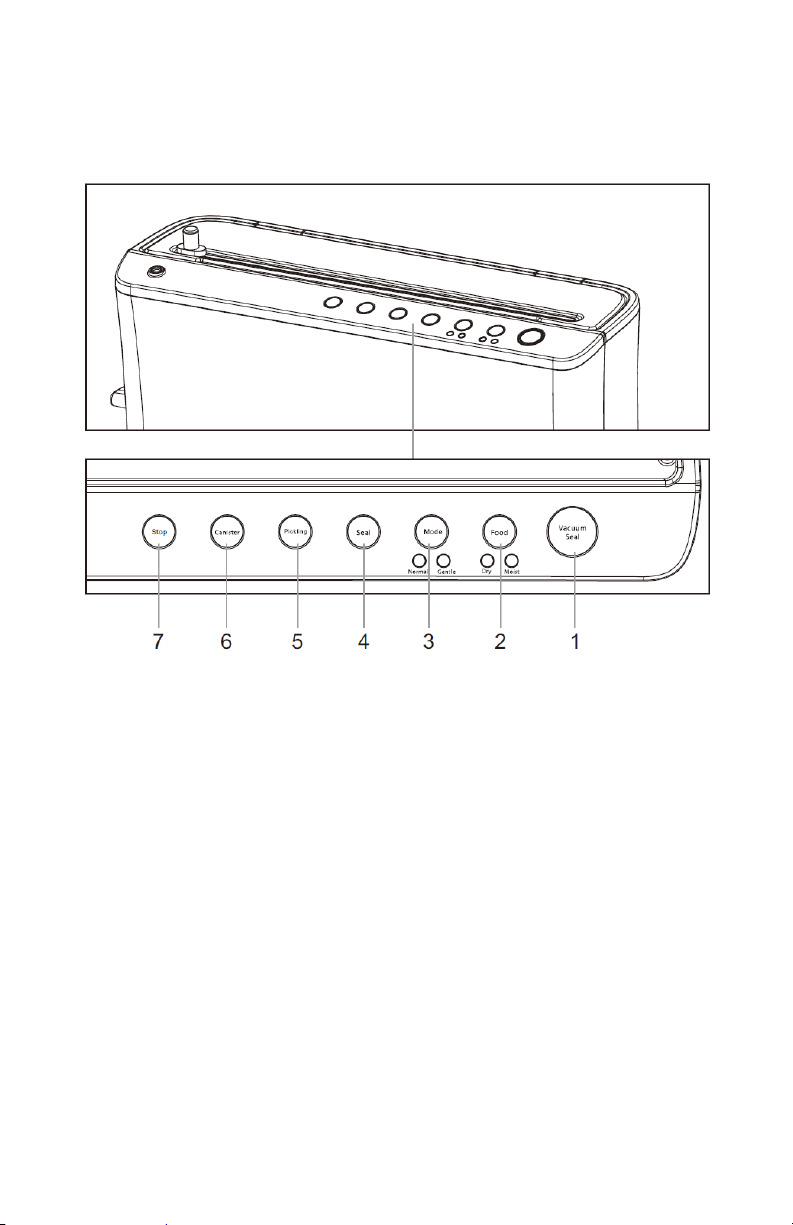
Top Panel .................................................................................................................................................................................. 7
Main Body................................................................................................................................................................................8
OPERATION .....................................................................................................................................................................................9
Creating Custom-Sized Vacuum Bags............................................................................................................. 9
Vacuuming and Sealing a Bag..............................................................................................................................10
Vacuuming an External Canister ......................................................................................................................... 11
Auto Marinate Function ............................................................................................................................................ 12
CARE AND CLEANING.......................................................................................................................................................... 13
HELPFUL TIPS AND HINTS ................................................................................................................................................ 13
TROUBLESHOOTING..............................................................................................................................................................15
Nothing Happens When Trying to Vacuum Seal ................................................................................. 15
Air is Still in the Bag After Vacuuming.......................................................................................................... 15
STORAGE GUIDE .......................................................................................................................................................................16
Refrigerated (+41° ±3.5°F).........................................................................................................................................16
Room Temperature (+77° ±3.5°F) .......................................................................................................................16
Frozen (+0° ±3.5°F)...........................................................................................................................................................17
SPECIFICATIONS .......................................................................................................................................................................18
REGULATORY COMPLIANCE..........................................................................................................................................18
Notice for FCC....................................................................................................................................................................18
Notice for Industry Canada..................................................................................................................................... 19

3
SAFETY WARNINGS AND GUIDELINES
Please read this entire manual before using this device, paying extra
attention to these safety warnings and guidelines. Please keep this manual
in a safe place for future reference.
This device is intended for indoor use only.
Do not use this device on wet or hot surfaces.
Do not immerse any part of this product in water. If it falls into
water, immediately unplug it from its power source and allow it to
fully dry before plugging it in again.
Do not touch the device, the power cord, or any other connected
cables with wet hands.
Do not expose this device to excessively high temperatures. Do
not leave it in direct sunlight.
Prior to operation, check the unit and power cord for physical
damage. Do not use if physical damage has occurred.
Before plugging the unit into a power outlet, ensure that the
outlet provides the same type and level of power required by the
device.
Unplug this device from the power source when not in use and
before cleaning.
Take care to prevent damage to the power cord. Do not allow it to
become crimped, pinched, walked on, or become tangled with
other cords. Ensure that the power cord does not present a
tripping hazard.
Never unplug the unit by pulling on the power cord. Always grasp
the connector head or adapter body.
Clean the drip tray after each use. The drip tray is dishwasher safe.

4
Do not expose this device to corrosive materials. Do not clean
using abrasive materials. Clean using a damp cloth or sponge with
mild soap, if necessary. Allow it to fully dry before using it again.
Allow the device to rest for at least 40 seconds between each
sealing or vacuuming action.
Allows the device to cool for 5 minutes after performing a sealing
action.
To avoid possible illness, do not reuse bags that have been used to
store meats, fish, or greasy foods. Do not reuse bags that have
been microwaved or boiled.
Allow hot foods to cool to room temperature before vacuum
packaging, otherwise the contents may bubble up out of the
container.
Do not vacuum package carbonated or sparkling beverages as gas
removal will cause them to go flat.
Always remove the lid from a canister before microwaving the
contents.
Before attempting to open a vacuum sealed external container,
turn the knob on the lid to equalize the pressure inside the
container with the air outside it.
When using external containers, leave 1" of space at the top of the
container to prevent food or liquid from being vacuumed out of
the container.
For best results, pre-freeze fruits and blanch vegetables before
vacuum sealing.

5
INTRODUCTION
Thank you for purchasing this Vacuum Food Sealer! Exposure to air can
cause food to lose flavor and nutritional value and can lead to the growth
of bacteria, mold, and yeast, which can cause the food to spoil. Vacuum
sealing food removes air and seals in the flavor and freshness, allowing
food to remain fresh and unspoiled for up to 7 times longer than normal.
Some of the additional benefits of vacuum sealing food are:
Saves Money: You can buy food in bulk or when it is on sale, then
vacuum seal it for use at a later time.
Saves Time: You can cook ahead for the week with pre-prepared
meals, then microwave them at mealtime.
Marinate in Minutes: Vacuum sealing food opens the pores and
allows marinade to more easily penetrate the food, so you can get
that great marinated taste in as little as 20 minutes, rather than
overnight.
Makes Entertaining Easier: Prepare your favorite dishes and holiday
feasts ahead of time, so you can spend time with your guests
instead of in the kitchen.
Portion Control: You can vacuum package sensible portions of
food and write the calories or fat content on the bag, allowing you
to more easily control calorie intake.
Sous Vide Cooking: Sous Vide cooking involves cooking food by
placing a sealed plastic bag in boiling water.
Organizing Non-Food Items: You can put non-food items in sealed
plastic bags, allowing for easier organization, particularly with
items with many small parts, such as board games or spare
hardware for a wall mount.

6
Protecting Non-Food Items: By vacuum sealing non-food items in
sealed plastic bags, you can protect them from exposure to air. For
example, you can polish your silver, then seal it to keep it from
tarnishing between uses.
CUSTOMER SERVICE
The Monoprice Customer Service department is dedicated to ensuring that
your ordering, purchasing, and delivery experience is second to none. If you
have any problem with your order, please give us an opportunity to make it
right. You can contact a Monoprice Customer Service representative
through the Live Chat link on our website www.monoprice.com during
normal business hours (Mon-Fri: 5am-7pm PT, Sat-Sun: 9am-6pm PT) or via
PACKAGE CONTENTS
Please take an inventory of the package contents to ensure you have all the
items listed below. If anything is missing or damaged, please contact
Monoprice Customer Service for a replacement.
1x Vacuum Food Sealer
1x 8" x 79" Vacuum Roll
5x 8" x 11" Vacuum Bags
1x Accessory Hose
1x User's Manual

7
PRODUCT OVERVIEW
Top Panel
1. Vacuum Seal Button: Vacuums and seals a bag. The sealer should
be allowed to rest for at least 40 seconds between vacuuming and
sealing actions.
2. Food Button: Toggles between Dry and Moist operating modes.
3. Mode Button: Toggles between Normal and Gentle operating
modes.
4. Seal Button: Seals a bag without vacuuming.
5. Marinate Button: When used with an external marinate container,
the sealer will automatically run through several vacuum/release
cycles to work the marinade into the food.
6. Canister Button: Vacuums an external container.
7. Stop: Cancels any vacuuming or sealing operation in progress.

8
Main Body
A. Cutter Knob: Cuts the internal vacuum roll to the desired length.
B. Roll Lid: Covers the vacuum roll chamber.
C. Locking Latch: Once the bag is inserted into the sealing chamber,
press down on the latches on each side until each locks in place
before attempting to seal and/or vacuum the bag.
D. Release Button: Press the button on each side to release the locking
latches.
E. Vacuum Hole: Plug the Accessory Hose into the Vacuum Hole to
vacuum seal an external container (not included).
F. Sealing Tray: Contains the lower heating element, the rubber seals
necessary for vacuuming, and the removable drip tray.

9
G. Rubber Seal: The rubber seal and gasket combine to allow the
suction necessary to vacuum air out of a bag.
H. Removable Drip Tray: When vacuuming liquid or moist food, some
liquid can be sucked out and into the drip tray. Remove and clean the
drip tray after each use. The drip tray is dishwasher safe.
I. Lower Heating Element: Used in conjunction with the upper heating
element (not pictured) to seal a bag.
OPERATION
Creating Custom-Sized Vacuum Bags
You can use either premade, fixed-size vacuum bags or you can make
custom-sized vacuum bags by cutting them the desired size and sealing the
bottom. Perform the following steps to create a custom-sized vacuum bag
from a vacuum roll.
1. Ensure that the Cutter Knob is on the left side of the cutting slot.
2. Open the Sealer Lid and pull out the desired length of plastic.
3. Close the Sealer Lid, then slide the Cutter Knob from left to right to
cut the plastic.
4. Insert one end of the plastic into the slot between the Sealing Tray
and the Main Body (i.e., the Sealing Slot). Ensure that the plastic is
evenly inserted into the slot.
5. Press down on the Locking Latches on each side to lock the bag into
the Sealing Slot.
6. Gently tug on the plastic to ensure that it is firmly seated in the slot.
If it moves on either side, press the Release Buttons on each side,
reorient the plastic, then press down on the Locking Latches again to
lock the plastic in place. Repeat until the plastic is firmly held within
the Sealing Slot.
7. Plug the sealer into a nearby AC power outlet.

10
8. Press the Seal Button to seal the end of the plastic.
9. Press the Release Buttons on the sides to release the Locking Levers.
10. Remove the sealed plastic from the sealing slot. Inspect it to make
sure that the end is properly sealed.
11. Allow the sealer to cool for 5 minutes before attempting to seal
another bag.
Vacuuming and Sealing a Bag
Perform the following steps to seal and optionally vacuum a premade or
custom-sized vacuum bag.
1. Plug the sealer into a nearby AC power outlet.
2. If you are going to seal liquid or moist food, press the Food Button to
toggle Moist mode. The Moist LED should be illuminated.
3. If you are going to seal delicate or crumbly food, press the Mode
Button to toggle Gentle mode. The Gentle LED should be illuminated.
4. Place the desired food, liquid, or non-food item(s) into the sealing
bag.
5. Insert the open end of the sealing bag into the slot between the
Sealing Tray and the Main Body (i.e. the Sealing Slot). Ensure that the
plastic is evenly inserted into the slot.
6. Press down on the Locking Latches on each side to lock the bag into
the Sealing Slot.
7. Gently tug on the bag to ensure that it is firmly seated in the slot. If it
moves on either side, press the Release Buttons on each side,
reorient the plastic, then press down on the Locking Latches again to
lock the bag in place. Repeat until the plastic is firmly held within the
Sealing Slot.
8. Press either the Vacuum Seal Button or Seal Button, depending on
whether you want to remove air from the bag or not.

11
9. Press the Release Buttons on each side to release the Locking
Latches.
10. Inspect the bag end to make sure that it is properly sealed.
11. Allow the sealer to cool for 5 minutes before attempting to seal
another bag.
Vacuuming an External Canister
In addition to vacuum sealing a plastic storage bag, you can store food in
an external container/canister and vacuum seal it. External containers are
ideal for storing delicate or sharp items that would either be crushed in a
bag or risk puncturing the bag. Perform the following steps to vacuum seal
an external container.
1. Plug the sealer into a nearby AC power outlet.
2. Open the external container (not included) and insert the item(s) you
want to store, then close the lid.
3. Plug one end of the Accessory Hose into the Vacuum Hole on the
top of the sealer, then plug the other end into the vacuum hole on
the container's lid.
4. Press the Canister Button on the sealer. The sealer will start
vacuuming air out of the container. You can press the Stop Button at
any time to stop vacuuming. When all the air is removed from the
external canister, the sealer will automatically stop.
5. Remove the Accessory Hose from the vacuum hole on the canister
lid, then remove it from the Vacuum Hole on the sealer.
6. Allow the sealer to rest for at least 40 seconds before further use.

12
Auto Marinate Function
The sealer features an automatic marinate function, which works with an
external marinate container to marinate food in a matter of minutes. By
vacuuming the air out of the container, it opens the pores in the food and
draws the marinade in. After holding the vacuum for one minute, the sealer
releases it, allowing the food to rest by cycles. It then repeats the process
15 times. The sealer will automatically shut down when marinating is
complete. Perform the following steps to marinate food using an external
marinate container.
1. Open your external marinate container and add your food and
marinade. For best results, the food should be completely covered by
the marinade. Ensure that there is about 1" between the
food/marinade and the lid. If there is insufficient space, use a larger
marinate container.
2. Plug one end of the Accessory Hose into the Vacuum Hole on the
sealer, then plug the other end into the vacuum hole on the external
marinate container (not included).
3. Plug the sealer into a nearby AC power outlet.
4. Press the Marinate Button on the sealer. The sealer will start the
marinate process. You can stop it at any time by pressing the Stop
Button. The sealer will automatically shut down when the auto
marinate process is complete.
5. Remove the Accessory Hose from the external marinate container,
then remove it from the Vacuum Hole on the sealer.
6. Unplug the sealer from the AC power outlet.
7. Allow the sealer to rest for at least 40 seconds before further use.
Congratulations, your food is marinated and ready for cooking!

13
CARE AND CLEANING
Perform the following steps to clean the vacuum sealer after use.
1. Unplug the sealer from the AC power outlet.
2. Press the Release Buttons on each side of the sealer to release the
Locking Latches.
3. Carefully remove the Sealing Tray from the Main Body.
4. Carefully remove the Removable Drip Tray from the Sealing Tray.
5. Clean the Removable Drip Tray with mild soap and water. It is
dishwasher safe.
6. Using a damp cloth, clean the outside of the sealer.
7. Inspect the sealing chamber for liquid or food deposits. If any is
present, wipe the chamber clean with a dry tissue.
8. Allow the sealer to fully dry before using it again.
Keep the following safety guidelines in mind when cleaning the sealer.
Always unplug the sealer before cleaning.
Never immerse the sealer in water. The only part that can be
immersed in water or cleaned in a dishwasher is the Removable Drip
Tray.
Do not use abrasive cleaners to clean the sealer.
HELPFUL TIPS AND HINTS
The following tips and hints can help you get the most out of your vacuum
sealer.
Do not overfill vacuum bags. Leave sufficient space at the top to
insert the bag into the sealing chamber.
Ensure that the opening of the bag is not wet. A wet bag may be
difficult to seal.

14
Vacuum sealing cannot replace the need to refrigerate or freeze
perishable foods.
Ensure that the opening of the bag is clean and flat, with no foreign
objects or folds, which can prevent the end from sealing properly.
To prevent wrinkles in the seal when sealing bulky item, stretch the
bag flat before inserting it into the sealing chamber and hold it there
until the vacuum pump begins to operate.
When vacuum sealing items with sharp edges, such as dry spaghetti
or silverware, protect the bag from punctures by wrapping the sharp
ends in a soft cushioning material, such as tissue paper. You may
need to use an external container instead of a bag.
When using an external container, ensure there is at least 1" space at
the top of the container.
For best results, pre-freeze fruits and blanch vegetables before
vacuum sealing.
Allow the unit to rest for at least 40 seconds between any
vacuuming or sealing action.
To prevent unwanted melting of bags, allow the sealing chamber to
cool for about 5 minutes after sealing a bag.
If you are unsure that a bag is properly sealed, create another seal.
Do not reuse bags that have been used to hold meats, fish, or greasy
foods. Do not reuse bags that have been microwaved or boiled.
Allow hot foods to cool to room temperature before attempting to
vacuum seal them.
Do not vacuum seal carbonated or sparkling beverages as gas
removal will cause them to go flat.
Remove the lid from an external container before microwaving the
contents.
Do not freeze external containers.

15
TROUBLESHOOTING
Nothing Happens When Trying to Vacuum Seal
Check that the power cord is plugged into an AC power outlet.
Ensure that the power cord is not damaged.
Test the AC outlet to ensure it is live by plugging in another device,
such as a lamp.
Ensure the Locking Latches are in the locked position.
Ensure the bag is correctly placed inside the sealing chamber.
Allow the sealer to rest for at least 40 seconds between vacuuming
or sealing actions.
Allow the Sealing Chamber to cool for 5 minutes after sealing a bag.
Air is Still in the Bag After Vacuuming
Ensure that the opening of the bag is fully inside the sealing
chamber.
Check the seal of the bag to ensure there are no wrinkles, liquid,
food particles, or other debris in the seal.
Ensure that the bag has not been punctured by any sharp objects
inside it.
Fermentation or food spoilage may have occurred, causing the
release of gasses into the bag.

16
STORAGE GUIDE
Vacuum sealing allows you to keep food fresh for longer periods of time.
The following tables are a comparative guide to the amount of time
specific foods can be stored in different environments, with and without
vacuum sealing.
Refrigerated (+41° ±3.5°F)
Food Type
No Vacuum
Vacuum Sealed
Red Meat
3-4 days
8-9 days
White Meat
2-3 days
6-8 days
Fish
1-3 days
4-5 days
Cooked Meat
3-5 days
10-15 days
Soft Cheese
5-7 days
20 days
Hard/Semi-Hard Cheese
1-5 days
60 days
Fruits
5-7 days
14-20 days
Vegetables
1-3 days
7-10 days
Soup
2-3 days
8-10 days
Pasta/Rice Leftovers
2-3 days
6-8 days
Cream Desserts
2-3 days
8 days
Room Temperature (+77° ±3.5°F)
Food Type
No Vacuum
Vacuum Sealed
Fresh Bread
1-2 days
8-10 days
Biscuits
4-6 months
12 months
Uncooked Rice/Pasta
5-6 months
12 months
Flour
4-6 months
12 months

17
Dry Fruits
3-4 months
12 months
Ground Coffee
2-3 months
12 months
Loose Tea
5-6 months
12 months
Milk Tea
1-2 months
12 months
Frozen (+0° ±3.5°F)
Food Type
No Vacuum
Vacuum Sealed
Meat
4-6 months
15-20 months
Fish
3-4 months
10-12 months
Vegetables
8-10 months
8-24 months
TECHNICAL SUPPORT
Monoprice is pleased to provide free, live, online technical support to assist
you with any questions you may have about installation, setup,
troubleshooting, or product recommendations. If you ever need assistance
with your new product, please come online to talk to one of our friendly
and knowledgeable Tech Support Associates. Technical support is available
through the online chat button on our website www.monoprice.com during
regular business hours, 7 days a week. You can also get assistance through

18
SPECIFICATIONS
Model
21596
Vacuum Power
-0.8 bar
Sealing Time
6 ~ 10 seconds
Vacuum/Sealing Time
10 ~ 20 seconds
Input Power
110 VAC, 60 Hz
Maximum Power Consumption
110 watts
Dimensions
17.3" x 5.1" x 8.9" (440 x 130 x 225 mm)
Weight
6.0 lbs. (2.73 kg)
REGULATORY COMPLIANCE
Notice for FCC
This device complies with Part 15 of the FCC rules. Operation is subject to
the following two conditions: (1) this device may not cause harmful
interference, and (2) this device must accept any interference received,
including interference that may cause undesired operation.
Modifying the equipment without Monoprice’s authorization may result in
the equipment no longer complying with FCC requirements for Class B
digital devices. In that event, your right to use the equipment may be
limited by FCC regulations, and you may be required to correct any
interference to radio or television communications at your own expense.
This equipment has been tested and found to comply with the limits for a
Class B digital device, pursuant to Part 15 of the FCC Rules. These limits are
designed to provide reasonable protection against harmful interference in a
residential installation. This equipment generates, uses and can radiate

19
radio frequency energy and, if not installed and used in accordance with
the instructions, may cause harmful interference to radio communications.
However, there is no guarantee that interference will not occur in a
particular installation. If this equipment does cause harmful interference to
radio or television reception, which can be determined by turning the
equipment off and on, the user is encouraged to try to correct the
interference by one or more of the following measures:
Reorient or relocate the receiving antenna.
Increase the separation between the equipment and receiver.
Connect the equipment into an outlet on a circuit different from that
to which the receiver is connected.
Consult the dealer or an experienced radio/TV technician for help.
Notice for Industry Canada
This Class B digital apparatus complies with Canadian ICES-003.
Cet appareil numérique de la classe B est conforme à la norme NMB-003 du
Canada.
Table of contents
Other Monoprice Kitchen Appliance manuals
Popular Kitchen Appliance manuals by other brands

camry
camry CR 4470 user manual

Parkinson Cowan
Parkinson Cowan SG 320 Operating and installation instructions

Tower Hobbies
Tower Hobbies T14003/EGL Safety and instruction manual

Westinghouse
Westinghouse WHSWP01SS instruction manual

Gaggenau
Gaggenau VK 230 714 installation instructions

Kompernass
Kompernass KH498-08-V1 operating instructions