Montgomery Ward SG775185 User manual

Instruction Manual
Item: 775185
wards.com 1•888•557•3848
Montgomery Ward Customer Service
8:00 am to Midnight, Monday through Friday
For your
DIY
needs!
wards.com 1•888•557•3848
®
®
2-Tool Combo Kit

Thank you for purchasing your Montgomery Ward 2-Tool Combo Kit.
Put through the paces by the experts, we guarantee that these tools
will perform to the highest standard, time after time, with all the
convenience and durability you rely on from Wards.
3
Important Safeguards .............. 3–4
Electrical Safety ...............................4
Specications.................................... 4
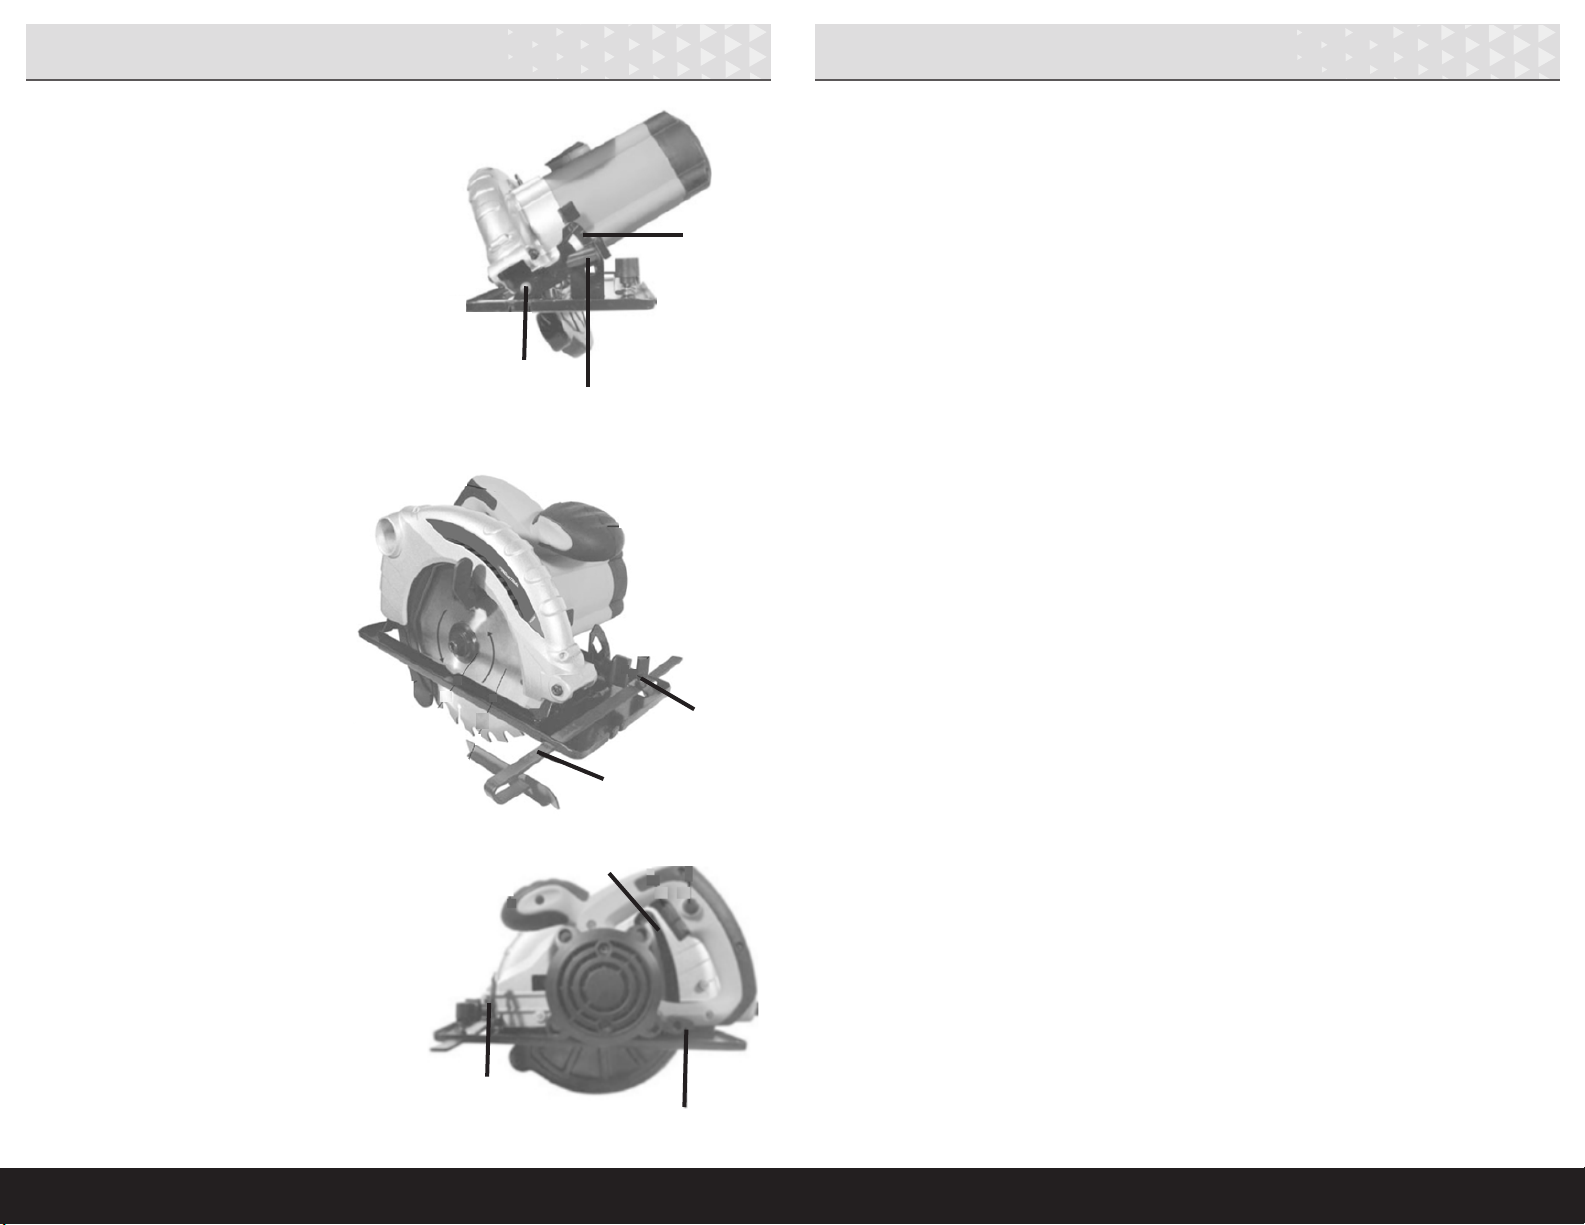
Parts & Features............................... 5
How to Use.................................... 6–8
Cleaning & Care................................ 9
Troubleshooting............................. 10
Notes..................................................... 11
Return Information ........................12
Warranty..............................................13
Table of Contents
21•888•557•3848
wards.com
Important Safeguards
READ CAREFULLY BEFORE USING AND SAVE THESE INSTRUCTIONS!
• FOR HOUSEHOLD USE ONLY. DO NOT USE THESE POWER TOOLS FOR
OTHER THAN THEIR INTENDED USE.
• Remove all packaging materials before rst use. Maintain labels and nameplates
on tools for important safety information.
• DO NOT drape cords where they can be damaged, pulled on or tripped over.
• DO NOT wrap a cord tightly around the power tool.
• The power cord must reach the work area with enough length to allow free
movement while working.
• If an extension cord is used, it must be a cord for outdoor use and the electrical
rating should be at least as great as the electrical rating of the tool.
• CLOSE SUPERVISION IS NECESSARY WHEN USING THIS POWER TOOL NEAR
CHILDREN, BYSTANDERS OR ANIMALS.
• Store tools out of reach of children.
• Keep work area clean, well ventilated and well lit.
• DO NOT use near water. DO NOT expose tools to wet conditions. If a damp area
cannot be avoided, ensure the electrical outlet is GFCI protected.
• DO NOT use an accessory or attachment not recommended by Wards, as this
may cause injury or damage the power tool.
• Keep hands, hair, jewelry and clothing away from all moving parts.
• Turn off and unplug when not in use.
• THERE ARE NO SERVICEABLE PARTS INSIDE THIS POWER TOOL.
• DO NOT USE A POWER TOOL WITH A DAMAGED CORD OR PLUG, OR AFTER
IT MALFUNCTIONS OR HAS BEEN DAMAGED IN ANY MANNER.
• DO NOT use tools in areas where ammable liquids, gases or dust are present.
• Know how to stop the tool quickly. Be thoroughly familiar with the controls
before using.
• Always wear eye protection. Use hearing protection, gloves, masks and
safety shoes when needed.
• Secure loose workpieces using a vise or clamps to prevent movement.
• Stay alert. DO NOT operate power tools when fatigued or under the inuence
of alcohol or drugs.
• DO NOT overreach. Keep proper footing and balance at all times.
• Check for misalignment or binding of moving parts or any other condition that
may affect the operation of the tool. Keep tools clean.
• Avoid contact with grounded surfaces (pipes, radiators, appliances, etc.) when
using electric tools. DO NOT work near utility lines or other hazardous objects.
• DO NOT put down a tool until it has come to a complete stop.
• Disconnect the plug from the electrical outlet before making adjustments,
changing accessories or storing.
• Tools contain valuable materials that can be recycled. Dispose of old tools using
appropriate collection systems in accordance with federal and local regulations.
Thank you
for your
purchase!
®

Parts & Features
Specications
Electrical Safety
41•888•557•3848
wards.com
45
These power tools are equipped with polarized plugs in which 1 prong is wider
than the other. This is a safety feature to reduce the risk of electrical shock. The
plug will t into a polarized outlet only 1 way. If you are unable to insert the plug
into the outlet, try reversing the plug. If it still does not t, contact a qualied elec-
trician. DO NOT attempt to modify the plug in any way. Montgomery Ward cannot
accept any liability for damage or injury resulting from failure to observe these
safety procedures.
DRILL POWER RATING 120V, 60Hz, 500W, 4.2A
NO LOAD SPEED 0–2800 RPM
KEYLESS CHUCK SIZE 3/8"
CORD LENGTH 72"
WEIGHT 3½ lbs.
DIMENSIONS 9¾" W x 7¼" H x 2½" D
MODEL CB50093
•
Important Safeguards (cont.)
• People with pacemakers should consult a physician before using power tools.
Electromagnetic elds in close proximity to a heart pacemaker could cause
pacemaker failure or interference.
• These tools vibrate during use. Repeated or long-term exposure to vibration may
cause temporary or permanent physical injury, particularly to the hands, arms
and shoulders.
DRILL
1. Bit Opening/Jaws
2. Chuck
3. Chuck Collar
4. Tool Housing
5. Vents
6. Level
7. Handle
8. Power Cord
9. Trigger Lock Button
10. Trigger
11. Forward/Reverse Switch
1
5
8
6
7
10
11
3
2
4
9
SAW
A. Handle
B. Top Handle
C. Blade/Motor Lock
D. Parallel Stop Lock Screw
E. Miter Scale and Lock Screw
F. Parallel Stop
G. Blade
H. Flange with Screw
I. Blade Guard
J. Blade Guard Lever
K. Trigger
L. Safety Button
M. Power Cord
N. Base Plate
O. Cut Depth Lock Screw
P. Motor Housing with Vents
Q. Hex Key (not shown)
R. Tool Bag (not shown)
A
F
E
D
C
B
B
H
G
L
K
A
O
I
M
I
N
SAW POWER RATING 120V, 60Hz, 1300W, 11A
IDLE SPEED 4700 RPM
CUTTING DEPTH 1¾" (45°), 2½" (90°)
SAW BLADE 7¼"
CORD LENGTH 60"
WEIGHT 8½lbs.
DIMENSIONS 11¼" W x 9" H x 9¼" D
MODEL CB50093
J
(Right View)
(Left View)
P

1•888•557•3848
wards.com 7
6
How to Use How to Use (cont.)
DRILL
1. Make sure the drill is OFF (trigger is not depressed) and cord is unplugged.
2. While holding the collar of the chuck with one hand, rotate the chuck counter-
clockwise until the jaws of the drill are opened enough to t the drill bit.
3. Place the desired bit into the drill between the jaws. DO NOT use dull, bent or
damaged bits.
NOTE: Drill bits get hot; let cool completely before changing or adjusting.
4. Hand tighten the chuck by turning clockwise until the bit is held securely in
place and centered.
5. The forward/reverse switch is used to control the direction the chuck spins.
Push the switch to the left for forward (to drive screws) and to the right for
reverse (to remove screws). Never change the direction while the motor is
running.
6. Plug the power cord into an electrical outlet.
7. Depress the trigger to turn on the drill. The farther the trigger is depressed, the
faster the drill speed.
NOTE: For prolonged drilling, depress the trigger and then press the trigger lock
button. The drill will continue to run. To unlock, depress the trigger again.
8. Start by drilling slowly to keep the bit in place, then increase speed as needed.
9. When drilling a hole, keep the drill running when pulling the bit out of a
completed hole to prevent jamming.
TIPS:
• If the drill bit jams, release the trigger immediately; drill torque can cause injury
or break the bit.
• Use rm pressure when drilling or driving a screw, but DO NOT press too hard.
Too much pressure may cause the bit to overheat or may stall the drill motor.
• Drill in a straight line.
• DRILLING THROUGH METAL: Use a punch rst, then a high-speed steel, carbide
or specialty bit. DRILL SLOWLY.
• DRILLING THROUGH WOOD: Use a high-carbon or specialty bit and increase
speed as you go.
CIRCULAR SAW
NOTE: This circular saw is designed for sawing straight cuts in wood, materials
similar to wood or plastics.
INSTALLING OR CHANGING THE BLADE
1. Make sure the power cord in unplugged.
2. Press and hold the motor/blade lock to keep the blade from spinning.
3. Using the hex key provided, loosen the screw and remove it with the ange.
4. Press and hold open the blade guard. Carefully pull the old saw blade down
and out.
5. If needed, clean the ange with a cloth.
6. Again, press and hold open the blade guard. Carefully attach a new blade. The
direction of rotation marked on the blade should be the same as the arrow on
the blade guard. Release the blade guard so it returns to position around the
blade.
7. Replace the ange and retighten the screw with the hex key. Hold down the
blade lock and make sure the blade is rmly attached.
OPERATING THE SAW
1. Before plugging in the circular saw, check that the blade guard is functioning
properly: the blade guard will be pushed back automatically by the workpiece
and should slide back to its original position when cutting is completed.
2. Check that the blade is properly tted and that the workpiece is secure.
3. Make sure the saw is OFF (trigger is not depressed) and plug the cord into an
electrical outlet.
4. Hold the saw rmly: right hand on the handle and left hand on the top handle.
5. To start the saw, press the safety button with your right thumb and squeeze the
trigger with your right ngers.
6. Rest the front of the base plate on the workpiece. Advance the saw gently and
steadily. The off-cut piece should be to the right of the saw so the wide part of
the base plate stays supported.
WARNINGS:
• Clamp small pieces of wood securely before sawing. Never hold by hand.
• DO NOT use defective saw blades or blades with cracks or aws.
• DO NOT use anges or screws with a hole which is larger or smaller than the
saw blade hole.
• DO NOT try to stop the saw blade with your hand or by applying pressure to
the side of the blade.

1•888•557•3848
wards.com
89
How to Use (cont.)
ADJUSTING THE CUT ANGLE
1. Loosen the miter lock screw.
2. Tilt the base plate and use the scale to
adjust the cutting angle to the desired
angle between 0° and 45°.
3. Retighten the lock screw.
4. Follow steps for saw operation on page 7.
5. We recommend doing a trial cut to test the
angle before cutting into your workpiece.
USING THE PARALLEL STOP
1. Loosen the parallel stop lock
screw.
2. Adjust the parallel stop to
desired distance using the
scale.
3. Retighten the lock screw.
4. Align the parallel stop with the
guide edge of material.
5. Follow steps for saw operation
on page 7.
6. We recommend doing a trial cut
to test the measurement before
cutting into your workpiece.
ADJUSTING THE CUT DEPTH
1. Release the cut depth lock screw.
2. Swing the base plate downward.
3. Adjust the cut depth using the scale.
4. The saw teeth must project at least 2mm
through the thickness of the workpiece.
5. Retighten the lock screw.
6. Follow steps for saw operation on
page 7.
7. We recommend doing a trial cut to test
the depth before cutting into your workpiece.
Miter Lock
Screw
Miter
Scale
Parallel Stop
with Scale
Parallel Stop
Lock Screw
Base Plate
Hinge Cut-Depth
Lock Screw
Cut-Depth
Scale
Cleaning & Care
1. Turn off and unplug the power tool.
2. Always allow it to cool completely before cleaning.
3. Keep vents clean and unobstructed at all times. Blow out any dust and dirt at
regular intervals.
4. Never use any caustic agents to clean the plastic tool parts.
5. DO NOT use abrasive brushes or pads, or harsh cleaning solutions.
6. Wipe down the exterior of the tool with a clean cloth (beware of sharp points
and edges).
7. DO NOT immerse any electrical tool, cord or plug into water.
8. Store tools in a dry environment, out of reach of children.
Base Plate
Hinge

1•888•557•3848
wards.com
10 11
Notes
Problem Possible Causes Likely Solutions
Tool will not start. Cord not connected.
No power at outlet.
Tool is overheated.
Check that cord is plugged in.
Check outlet and circuit breaker.
Turn off, unplug and let tool cool
down.
Tool operates
slowly.
Forcing tool to work too
fast.
Using incorrect extension
cord size.
Allow tool to work at its own
rate.
Use proper size extension cord.
Performance
decreases over
time.
Bits or blades dull or
damaged.
Replace bits or blades as
needed.
Tool is
overheating.
Forcing tool to work too
fast.
Bits or blades dull or
damaged.
Blocked vents.
Motor being strained by
long or small diameter
extension cord.
Allow tool to work at its own
rate.
Replace bits or blades as
needed.
Clear vents.
Use proper size extension cord.
Troubleshooting
________________________________________________________
________________________________________________________
________________________________________________________
________________________________________________________
________________________________________________________
________________________________________________________
________________________________________________________
________________________________________________________
________________________________________________________
________________________________________________________
________________________________________________________
________________________________________________________
________________________________________________________

1•888•557•3848
wards.com
12 13
If any item, for any reason, does not meet your expectations, just
return it to us. We’ll gladly either:
• Refund your merchandise amount
• Credit your account
• Send a replacement
You can return any unused item in its original packaging within 60
days of its receipt for a full refund of the purchase price (excluding
shipping and handling charges).
Please send returns to:
Montgomery Ward, Inc.
Attn: Customer Returns
2000 Harrison Suite 100
Clinton, IA 52732-6676
When returning an item:
• Use the original packaging and pack it securely.
• Please adequately insure your item in case you need to
make a claim with the carrier you choose for returning your
item.
• Include your order number and reason for return.
• We recommend keeping the receipt for 4 weeks.
Montgomery Ward, Inc. warrants this product
to be free from defects in material and workmanship
for one year from provable date of purchase.
Within this warranty period,
Montgomery Ward will repair or
replace, at its option, defective parts of this
product at no charge provided the product is returned
freight prepaid with proof of purchase to
Montgomery Ward.
Allow 2–4 weeks for return shipping.
This warranty does not cover improper installation, misuse,
abuse or neglect on part of the owner. Warranty is also
invalid in any case that the product is taken apart or
serviced by an unauthorized service station.
This warranty gives you specic legal rights and they may
vary from state to state.
THE FOREGOING WARRANTIES ARE IN LIEU OF ALL
OTHER WARRANTIES AND CONDITIONS,
EXPRESS OR IMPLIED, INCLUDING
BUT NOT LIMITED TO THOSE OF MERCHANTABILITY
OR FITNESS FOR A PARTICULAR PURPOSE.
1 Year Limited Warranty
Montgomery Ward Customer Service
8:00 am to Midnight CST, Monday through Friday
wards.com 1•888•557•3848
Returns ®

1514
This manual suits for next models
1
Table of contents
Other Montgomery Ward Power Tools manuals
Popular Power Tools manuals by other brands

EINHELL
EINHELL TE-CD 18/2 Li Original operating instructions

Ingersoll-Rand
Ingersoll-Rand 1100PS4 Series Operation and maintenance manual

Hilti
Hilti GX 3 operating instructions

Scheppach
Scheppach DP16SL Translation from the original instruction manual

Secabo
Secabo TS5 Economy operating instructions

Pop
Pop PRT5200 instruction manual