Montpelier RMC60CX Assembly Instructions

Electric Cooker
RMC60CC&
RMC60CX&
RMC60CK&&
&
Cooker serial number place sticker here
Issue 1 - 17/10/16
Installation & User Instructions - Please keep for future reference
Important – Please read these instructions fully before installing or using
These instructions contain important information which will help you get the best from
your appliance and ensure safe and correct installation, use and maintenance.
For all other help, please contact Montpellier Customer Services on 0333 323 4473


1
Safety Information
Parts
Installation
Positioning
Fixing to the wall
Electrical connection
User Instructions
Using the hob
Cookware selection
Using the main oven
2
3
4-5
4
4
5
6-8
6
6
7
Timer 8-9
Using the top oven
Care and Maintenance
Cleaning
Removing the inner door glass
Troubleshooting
Technical Specifications
Disposal information
A Guide to Wall Mounting & Fixings
Guarantee
10
11
11
11
12
13
14
14
Back
Contents
You can find your serial number when you
open the oven door, near the bottom plinth
of the cooker, you will see a white stick with
Serial No: & Model No:

2
IMPORTANT: This product MUST be installed
by a qualified fitter in accordance with local
regulations.
IMPORTANT: This appliance has been designed
for non-professional, domestic use only.
IMPORTANT: Carefully unpack and examine the
appliance for any damage. If you think there is a
defect, do not use the appliance and contact
Montpellier Service on 01527 888133.
IMPORTANT: The cooker is supplied setup
according to the conditions shown on the rating
label which is stuck to the rear of the appliance.
IMPORTANT: Keep the electrical cable of your
oven away from the hot areas; do not let them
touch the appliance. Keep them away from
sharp edges and heated surfaces.
IMPORTANT: In the event that the flexible
cable is damaged, contact your authorised
service agent for replacement - the cable fitted
to this appliance must not be replaced by an
unauthorised person.
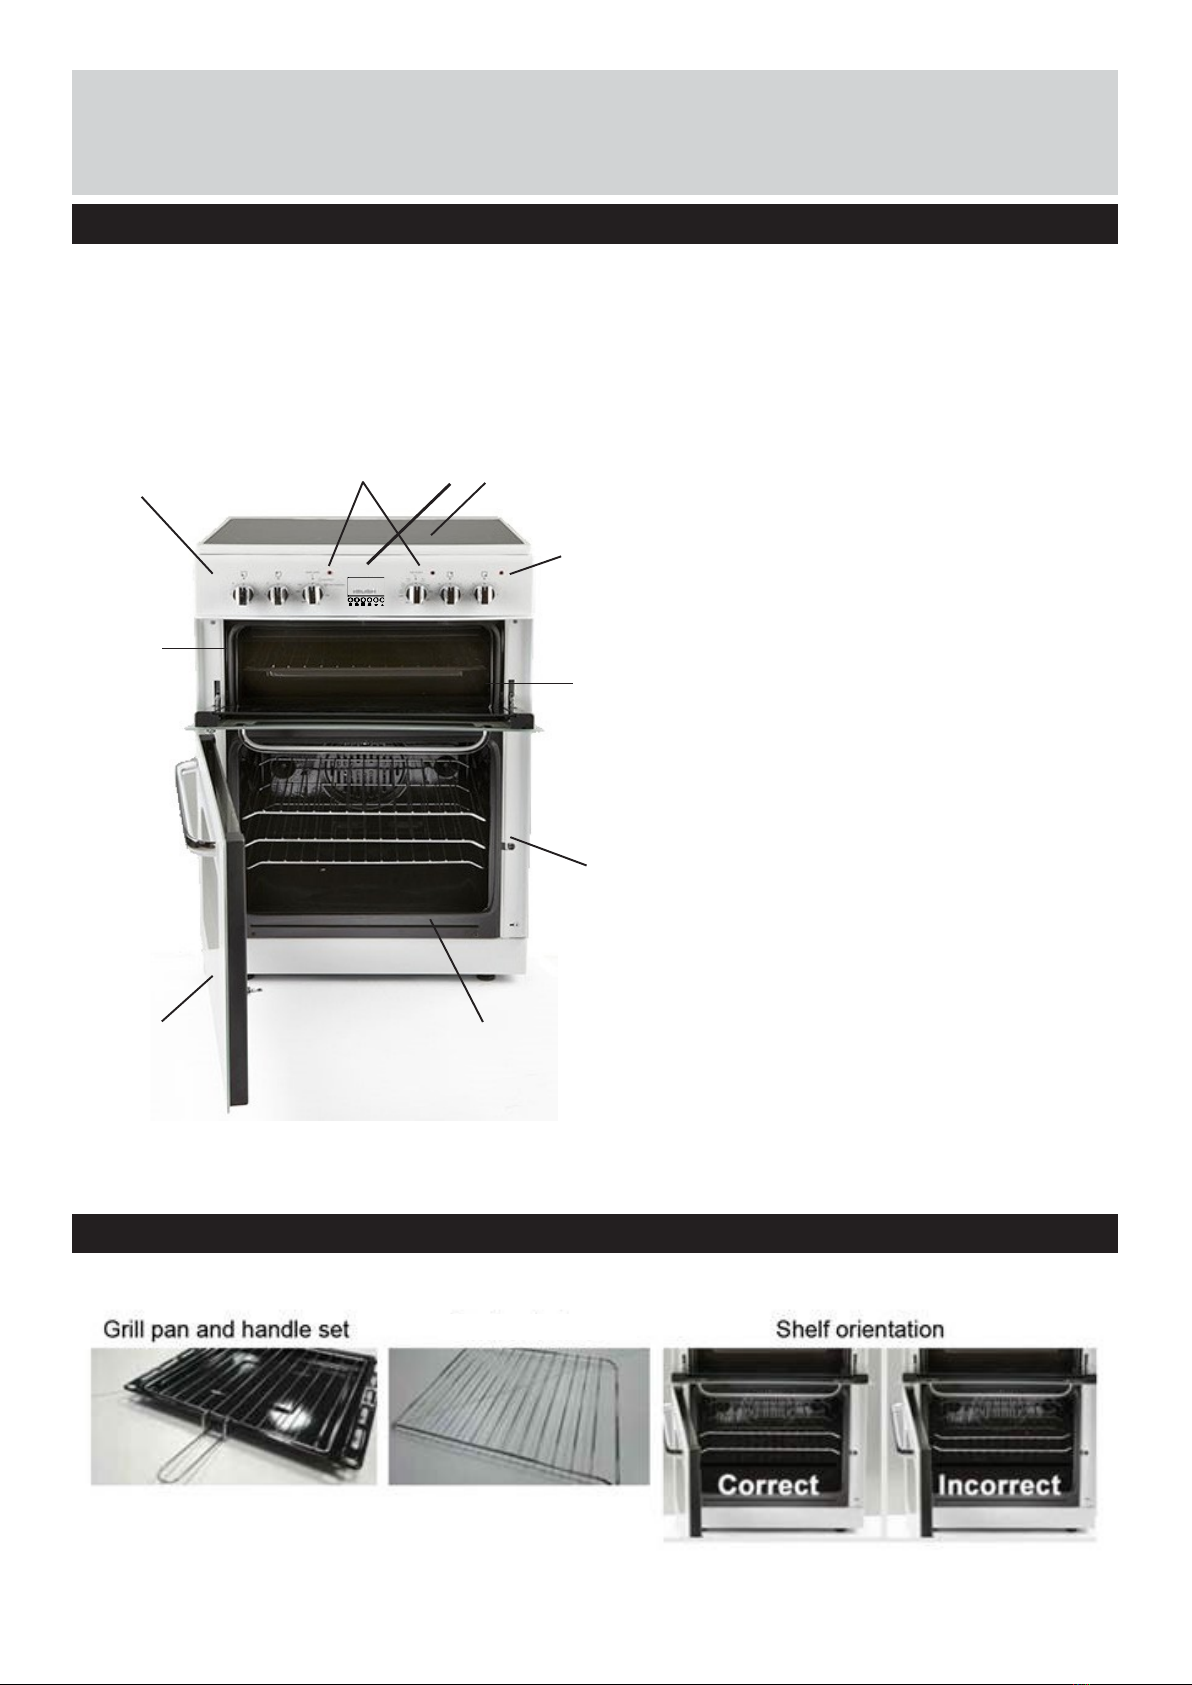
IMPORTANT: When using the grill the oven door
must be kept closed to prevent damage to the
cooker knobs and to prevent the burn hazard
that very hot knobs would present.
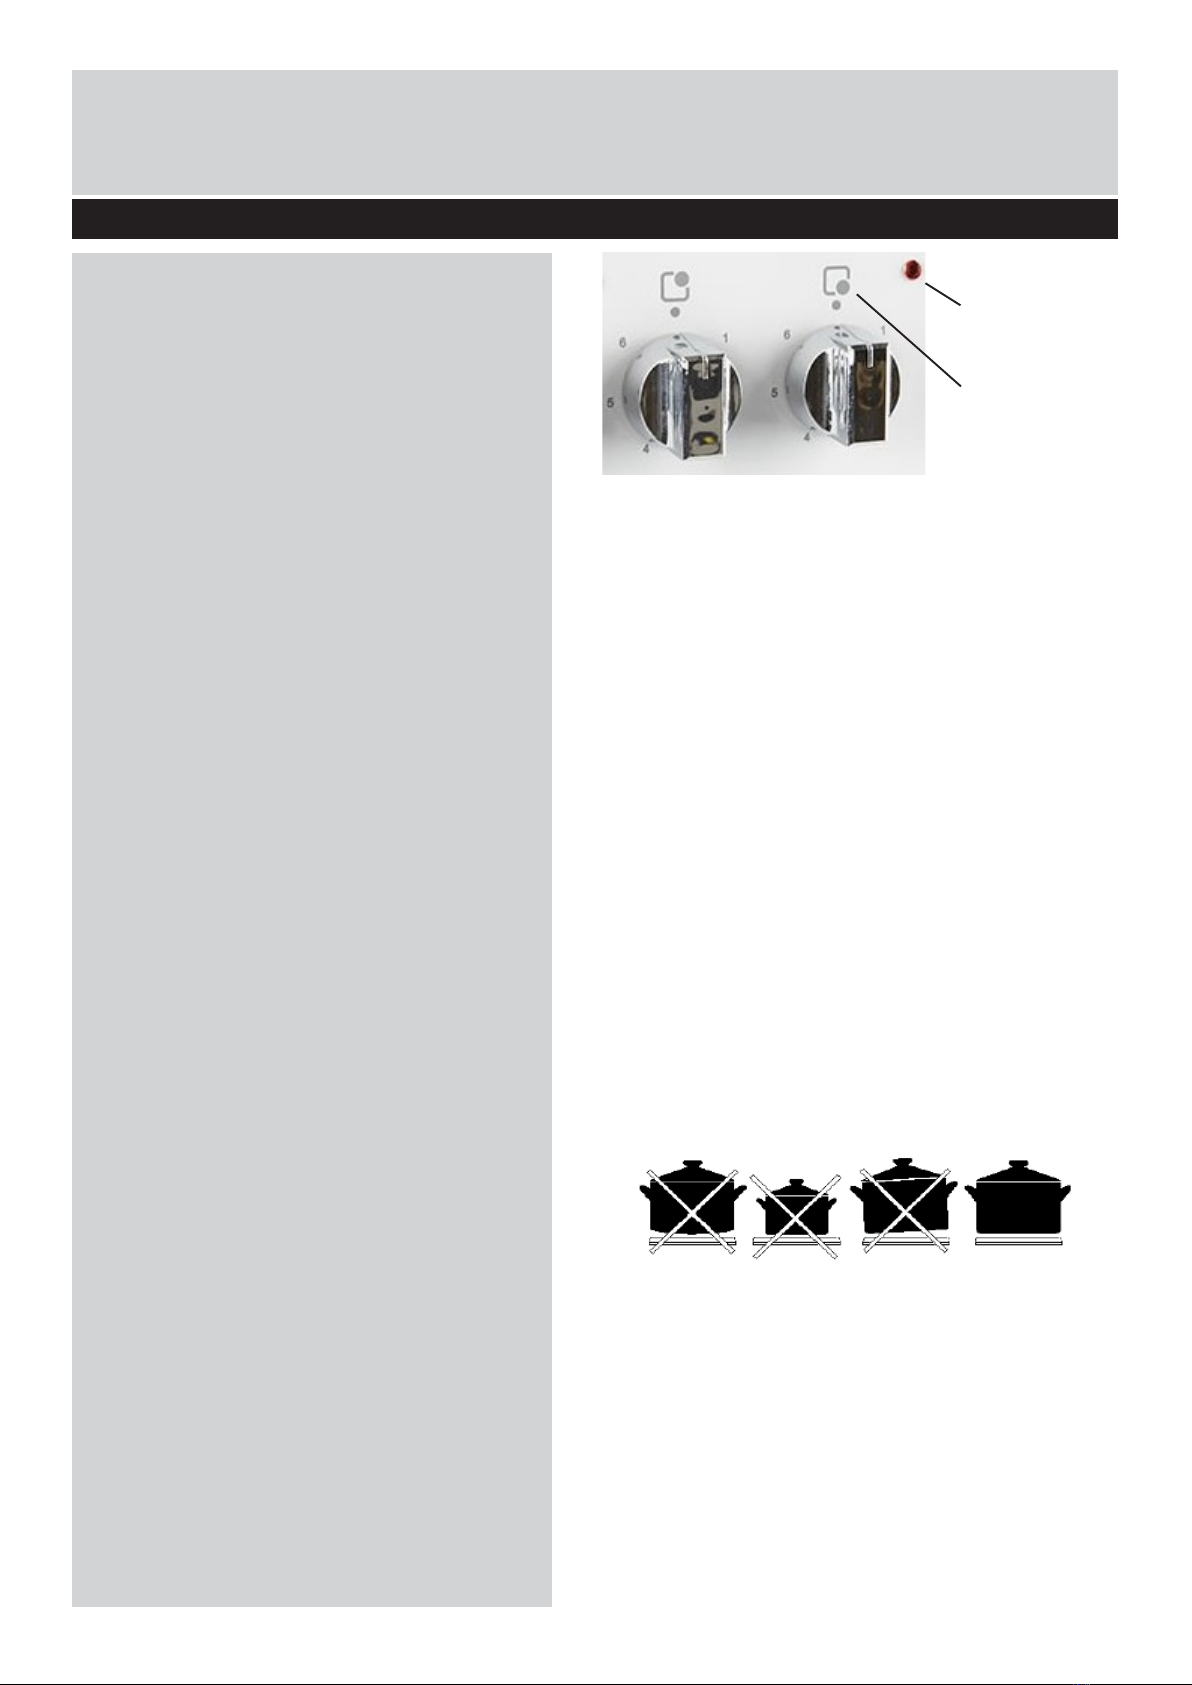
IMPORTANT: The cooker control knobs have a
safety feature to prevent children from operating
them. They must be pressed in before they can
be turned from the off position. Do not attempt
to turn them without pressing as this is likely to
break the knobs.
IMPORTANT: Children and persons with
reduced physical, sensory or mental capabilities
or lack of experience and knowledge should not
be allowed to use the cooker unless supervised
and warned of the hazards involved
WARNING: The appliance and its accessible
parts become hot during use. Care should be
taken to avoid touching hot parts.
WARNING: Cooking on a hob with fat or oil can
be dangerous and should not be left unattended.
WARNING: NEVER try to extinguish a cooking
fire with water. Instead switch off the appliance
and cover flame e.g. with a lid or a fire blanket.
WARNING: Danger of fire: do not store items on
the cooking surfaces or in the oven.
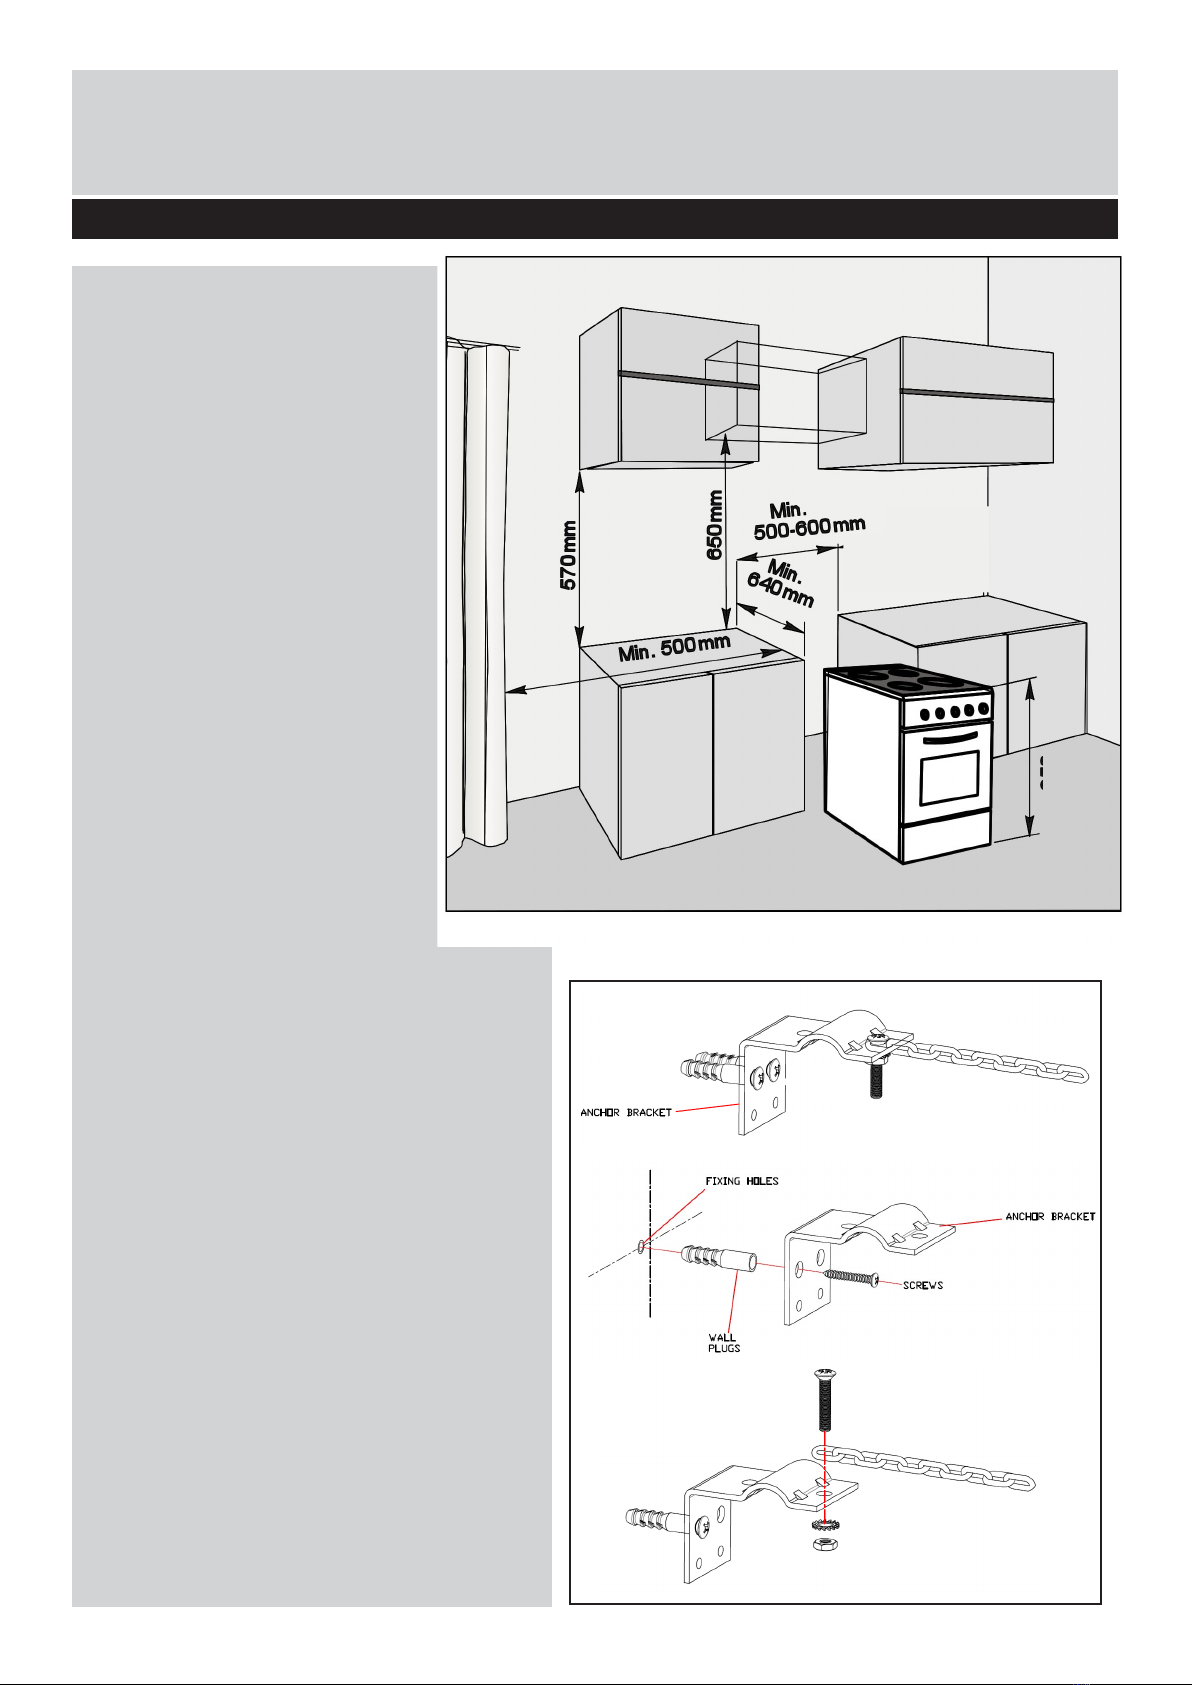
CAUTION: Cookers may topple forward if a child
climbs onto the cooker door. Children should be
supervised in the kitchen at all times and this
cooker must be secured to the wall using the
fixing points provided to prevent accidents.
CAUTION: Do not allow children in the kitchen
when cooking or while cooker parts may still be
hot. Many parts of the cooker will become hot
and present a considerable hazard to children.
CAUTION: When the oven is hot never touch
the oven glass by hand or with tools.
CAUTION: Before starting to use your
appliance, ensure curtains, paper or flammable
items are kept away from your appliance.
Do not keep flammable materials inside of or
around your cooker.
CAUTION: Take care when closing the oven
door that there is nothing obstructing it from
closing as this may break the glass oven door.
IMPORTANT: Do not send back to retailer.
Safety Information
Important – Please read these instructions fully before installation

3
X 3
Please familiarise yourself with the parts and accessories listed below
2
10
3
4
7
9
1 1 - Control panel
2 - Oven control + heat indicators
3 - Ceramic hobs X 4
8
5 4 - Hob heat indicator
5 - Grill pan with removable handle
6 - Wire shelves X 3
6 7 - Oven door
8 - Top oven and grill
9 - Main oven
10 - Timer
Parts
Accessories
Correct Positioning of shelves
3 wire shelves

4
Positioning and fixing to the wall
Positioning
1.
Make sure that there are no
combustible or flammable materials,
such as curtains, in the vicinity of the
installation.
2.
Furniture and cabinets surrounding
the oven must be of material resistant
to temperatures
greater than 50°C.
3.
Surrounding furniture, cabinets and
extractor fans should be positioned in
accordance with
the diagram shown in Figure 1.
4.
There must be at least 2cm of
free space between the back wall and
the rear of the appliance to
allow for ventilation and air
circulation.
5.
If fitted, the extractor fan must be at
least 65cm above the hob. If no fan is
fitted the minimum distance between
the hob and any cabinet
or other structure must be 75cm.
Fixing to the wall
Before using the appliance fix it
securely to the wall using the chains
on the back of the cooker. This will
prevent the cooker from toppling
forward if excess weight is placed on
the oven door. Since the chains must
be attached to wall fixings suitable for
your wall type, the wall fixings are not
supplied with the cooker (Figure 2).
Please refer to the ‘Guide to Wall
Mounting and Fixings’ on page 12.
Levelling
Level the cooker before using it. To do
this, use the adjustable feet to achieve
the correct level and height
Figure 1
Installation
Figure 2
900mm

5
Electrical connection
IMPORTANT: Electrical connections
must be carried out by a suitably
qualified person and in accordance with
all relevant local building and installation
regulations.
1. See the rating label at the rear of the product for
the appliance’s load rating.
2. The cooker must be connected to a dedicated
circuit suitably rated for the load of the appliance
(see rating label at rear of appliance) as shown in
the wiring diagrams below. It must be connected
via a suitably rated cable to a double pole isolator
cooker switch also suitably rated for the appliance.
3. The electrical cable should not touch the
hot parts of the appliance.
The electrical cable (not supplied)
should not be routed through any
area that may be affected by heat from
the oven, especially the area directly
behind the oven.
Minimum of 32 AMP Connection on A
6 mm cable.
Installation

6
Using the Hob
Each ceramic hob is regulated by a
selector knob (Fig. 3).
The control allows for the efficient transfer
of heat to the cooking pan.
The knob can be turned in both directions,
to numbers 1 to 6
These numbers correspond to the power
setting of the ceramic hob where 6 is the
highest setting and 1 is the lowest.
Figure 3
COOKWARE SELECTION
Hob hot
indicator
Hob for this
knob
Front right
Turn the hob control knob to off (l) when
finished.
We recommend you turn off the ceramic
hob 5 to 10 minutes before the dish is
ready. This allows the heat accumulated in
the ceramic hob to be used economically.
The ceramic hob remains hot for a while
after use.
SAFETY ADVICE IN THE CASE OF A
COOKING PAN FIRE
In the event of a cooking pan fire:
1. Turn off the cooker at the wall switch.
2. Cover the pan with a fire blanket or
damp cloth. This will smother the flames
and extinguish the fire.
3. Leave the pan to cool for at least an
hour before attempting to move it. Injuries
are often caused by picking up a hot pan
and rushing outside with it.
NEVER USE A FIRE EXTINGUISHER TO
PUT OUT A PAN FIRE
as the force of the extinguisher could
tip the pan over.
Never use water to extinguish oil or fat
pan fires.
•
Any cookware should have a thick, flat and dry
base of the same diameter or slightly bigger than
the hob. If the cookware diameter is smaller than
the hob, heat will be wasted.
•
Cookware with uneven bases is very inefficient,
making the cooking time longer and wasting
electricity.
•
Cookware made of flameproof glass, suitable
for ceramic hob cooking, should match
the hob size. Pans projecting beyond the hob
may be broken due to temperature stresses.
The heated pan must never be filled up with cold
water or placed on cold metal or stone surfaces.
•
Always use the pan with its lid on. This prevents
the accumulation of vapour in the kitchen.
Only use flat bottomed pans
IMPORTANT!
1. Never turn the hob on before placing a pan on
it, except when first used.
2. If the ceramic hob is not to be used for a long
time, apply a little grease to the
painted surface.
3. Do not allow spills to be burned onto the hob
as baked stains are harder to remove
User Instructions

7
Using the main oven
Using the Main Fan Oven
Turn the Main Oven knob clockwise and
align the marker on the control knob with
the required temperature (°C)
The indicator light on the control panel
will go out and the thermostat will turn
the element off when the selected
temperature has been reached inside the
oven. These will come back on once the
thermostat falls below the set value.
Fan only defrost
The fan can be used without heat to
defrost food (DEFROST)
IMPORTANT! Before using this method
of defrosting refer to the food packaging
defrosting information
Always turn the control knob to off (l)
when cooking has finished.
Please note: The appliance incorporates
a safety thermostat which cuts the electric
supply to the oven if the temperature
becomes excessive.
When using your oven for the first time
your cooker may give off an unusual
odour from the heating elements. This is
normal for new cookers. To eliminate this
odour run the oven at 250 degrees for 40-
60 mins with the oven empty.
Main oven
Oven indicator
Defrost only
User Instructions

2) Input the period of time
to be counted down.
You have now set your oven to
cook for 2 hours and 15 minutes.
Please do not forget to turn
the oven knob to the required
temperature
At any time during cooking you can press the
stop cooking button (3) to see the time that
the food will be ready.
8
User Instructions
Using the programmable timer
Setting the timer (alarm)
With this feature you can set the alarm to
sound after lapsed period of time.
Cancelling the timer (alarm)
Automatic oven cooking control
If you want to start cooking in your oven
immediately, you just need to input the length
of cooking time.
Display icons
Auto program has been set.
Auto program now cooking.
Auto program food is now ready.
Note, Alarm is now sounding
1
Buttons
1. Alarm
2
3
4
5 6
2. Start cooking
3. Stop cooking
4. Manual control
5. Down
6. Up
The electronic timer functions
1. Clock with alarm
2. Set cooking time
3. Set food ready time
4. Timer
5. Buzzer volume control
6. LED brightness control
Setting the time
To set the time, ensure that no automatic cooking
program is in progress (there should be just the
time and the manual control icon displayed as
shown in the image above).
Press the manual control button (4) the double
point icon between the hours and minutes will
start to flash. Use the up and down buttons to
set the clock. Press and hold the up and down
buttons for faster adjustment.

Alarm volume
Press and hold the key to hear the current
alarm tone. Releasing and pressing the
same button will allow you to scroll through
the 3 available tones.
Note, the default setting is the highest tone
level of the three.
LED brightness
By pressing and releasing the key, you can
scroll through the three available brightness
settings.
Note, the default setting is the highest
brightness level of the three.
9
User Instructions
Using the programmable timer (continued)
We have now programmed our oven to have
our food ready at 21:30. The cooking time
was pre-programmed as 2 hours and 15
minutes so your oven will start cooking at
19:15 and ensure that your food is ready at
21:30.
As advised before do not forget to set the
oven temperature control to the desired
temperature.
Resetting after loss of mains power
If the cooker has been turned off or had
a power interruption the screen will flash
and 12:00 will be displayed. Any cooking
program will have been cancelled.
The flashing hand icon indicates that your
oven is inoperative.
Press the manual control button once to get
your oven operational. Press the manual
button once again to set the clock (see
setting the time section).
Delayed cooking program
Once you have set the length of cooking
time, you can use this feature to have your
food ready at a set given time.
For example,
To have you food ready at 21:30 press the
stop button (3) then set the desired ready
time. After a few seconds the display will
switch to clock mode.

10
Using the top oven
Using the Top Oven
Turn the control knob (TOP OVEN)
clockwise and align the marker on the
knob with the required temperature.
The indicator light on the control panel will
go out when the selected
temperature has been reached inside the
oven.
Always turn the control knob to off (l)
when cooking has finished.
Please note: The appliance incorporates
a safety thermostat which cuts the electric
supply to the oven if the temperature
becomes excessive.
For using the
Bottom element
Top element
Grill
Turn the control knob counter clockwise
and align the marker with the desired
function.
These elements are set to operate at their
maximum output (fixed)
The TOP OVEN door must be closed for all
operations
Always use the handle when handling
the grill pan
Bottom element
Top element
Grill
Oven (variable temp)
Oven indicator
User Instructions

11
Cleaning
After cleaning the interior parts of the oven with a soapy cloth, rinse it and then dry thoroughly
with a soft cloth.
Clean the glass surfaces with special glass cleaning agents.
Never use flammable agents like acid, thinner or petrol when cleaning your oven.
Do not clean your oven with a steam cleaner.
Do not wash any part of your oven in dishwasher.
REMOVAL OF DOOR GLASS FOR CLEANING
Care and use of the ceramic hob
For best results use pans with thick flat bases and match cooking pans to cooking zones of equal
size.
Always place the pan on the cooking zone before switching on the cooking zone.
Always disconnect the power and check that the hob is cool before cleaning.
Do not use harsh or abrasive cleaning agents or abrasive cleaning products such as wire
wool to clean the hob. Use only cleaning products designed to be used on ceramic hobs.
Cleaning and Maintenance
WARNING! Isolate the power supply to the cooker and make sure that the oven is cool.
Do not clean using caustic creams, abrasive cleaning powders, thick wire wool or hard tools.
Enamelled parts of the oven can be damaged if excess cleaning liquids are not immediately
removed.
1
1- Outer Glass
2- Inner Glass
3- Middle Glass
4- Plastic Holder
2
For triple glass doors;
Remove the plastic holder using a screw
driver as shown on the diagram. Pay attention
to the direction of the arrows.
For double glass doors; there is no need to
remove the plastic holder
3
Outer Inner Middle
Remove the inner glass, and middle glass (if
applicable) by pulling out in the direction of the
arrow shown on the diagram.

12
If your cooker does not appear to function correctly
1. If no functions appear to work, check the
cooker isolation switch has not been turned
off also check the fuse in the switch and the
circuit breaker in you consumer unit
2. After replacing the fuse or resetting the
circuit breaker turn on individual parts of your
cooker one at a time to check function
3. DO NOT attempt to repair this cooker
yourself. Call Montpellier Service on
01527 888133 or consult a qualified
electrician
Problem
Possible Cause
Solution
Only parts of the cooker work
it may be that the hobs, the
ovens or the grill, do not work
Links may be missing in the
rear connector box
Refer to the Quick Start Guide
to check the correct placement
of the links
This must be done by a
qualified competent person
Nothing works (completely
dead)
Power is turned off at the
isolation switch or the
consumer unit
Poor electrical connection
Ensure isolation switch is on
Check consumer unit has not
tripped out
Have the connections checked
by a qualified electrician
Oven not heating up
Oven temperature not set
correctly
Door is not properly closed
Ensure that the correct
temperature has been selected
and the door is properly closed
Not cooking in the specified
time
Incorrect oven shelf positioning
Position shelves following the
cooking guidelines
Troubleshooting

13
Model
RMC60CC/CX/CK
Power supply
220-240V~50 Hz
Maximum power
10000 W
Size (H x W x D)
900 x 600 x 600
Net Weight
48.42 Kg
Top oven volume
30 Lt.
Main oven volume
67 Lt.
Energy rating
A
www.montpellier-appliances.com0
This appliance/fitting is marked according to the European directive 2002/96/EC on Waste
Electrical and Electronic Equipment (WEEE). By ensuring this product is disposed of
correctly, you will help prevent potential negative consequences for the environment and
human health, which could otherwise be caused by inappropriate waste handling of
this product.
The symbol on the product, or on the documents accompanying the product, the
crossed out wheelie bin symbol, indicates that this appliance/fitting may not be
treated as household waste. Instead it shall be handed over to the applicable
collection point for the recycling of electrical and electronic equipment. Disposal must
be carried out in accordance with local environmental regulations for waste disposal.
For more detailed information about treatment, recovery and recycling of this product, please
contact your local authority, your household waste disposal service or the retailer where you
purchased the product.
Technical Specifications

14
Important: When drilling into walls always
checkthattherearenohiddenwiresorpipesetc.
Make sure that the screws and wall plugs being used
tradesperson
if
you
ar
e
unsu
re
.
Hints:
1: General rule:
Always use a larger screw and wall plug
if
you
ar
e
not
su
re
.
2: Ensure you use the recommended drill bit to match the wall
plug and hole size.
3: Ensureyoudrill the hole horizontally,do not force thedrill or
enlarge the hole.
4: Take extra care when drilling high walls, ceilings and ceramic
tiles. Ensure wall plugs are inserted beyond the thickness of
the ceramic tiles to avoid the tiles splitting or cracking.
5:
drilled hole.
Types of walls
You can use one of the following types of wall plug if your walls are made
of brick, breeze block, concrete, stone or wood.
No.1 “General Purpose” wall plug
No.3 “Cavity Fixing” wall plug
No.5 “HammerFixing” wall plug
Generally aerated blocks should not
be used to support heavy loads, use
loads, general purpose wall plugs can
be used.
No.2 “Plasterboard” wall plug
For use with plasterboard partitions or
hollowwoodendoors.
No.4 “Cavity Fixing-Heavy Duty”
wall plug
For use with walls stuck with
is secure to the retaining wall.
No.6 “Shield Anchor” wall plug
Heavy loads
For use when attaching light loads on
to plasterboar
heavy loads such as
shelving, wall cabinets and coat
racks.
Safety:
Wall Fixing Guide
Importantnote:
If plastic wall plugs
are supplied with your
product:
- theseare onlysuitable for
use in masonry walls.
If you are in any doubt about
the correct wall plugs for
your wall, seek professional
advice.
Failureoftheproductdueto
responsibility of the installer.

15
0
00000000000000www.montpellier-appliances.com/support/register-your-product0
We apologise for any inconvenience caused by minor inconstancies within these instructions that may
occur due to product improvements and development.
All images and drawing are for illustration purposes only.
This manual suits for next models
2
Table of contents