MoonRun CONNECT Instruction manual

Quick start manual
FCC ID:2AUEG-MR01

WARNINGS
LIMITED WARRANT
• Consult with your physician before any exercise. All exercise programs
involve a risk of injury.
• For optimal use read the full Warnings and Operating Manual in the
MoonRun app or at www.MoonRun.com/pages/manual.
• Before use, carefully check your MoonRun device, anchor and play area. In the case of damage to
any component, stop and discontinue use immediately.
• Stretch and warm-up the body before MoonRunning.
• In continuous presence of pain or discomfort, stop and discontinue MoonRun training and seek
professional advice.
Warranty period:
• Elastic units and bar pads - 6 months
• Other MoonRun parts - 1 year
In the box
• 1 X MoonRun bar unit (1)
• 1 X electronic box (2)
• 2 X MoonRun handles, arm straps
and buckle covers (3)
• 2 X bar straps and buckle covers (4)
• 1 X MEDIUM elastic set (5)
o 2 X MEDIUM bar units (blue)
o 2 X MEDIUM arm units (black)
• 1 X Top carabiner
• 1 X Top carabiner cover
• 1 X Door strap (6)
• 1 X Triangular Door Warning (7)
• 1 X Branded bag (8)
• 1 X USB charging cable (9)
See optional accessory list at www.MoonRun.com
This limited warranty does not cover damage resulting from:
• Abuse, misuse, accident, improper storage, exposure to liquid or dampness.
• Exposure to direct sunlight or extreme heat over 250C (800F).
• Normal wear and tear.
• Usage of MoonRun other than its normal and customary manner according to
instructions in the warnings and operating manual (MoonRun.com/pages/manual).
MoonRun assumes no responsibility for personal injury, material damage or any loss which might occur
by using this product.
Patents: 8,221,293 (US) 2,831,211 (Can). Additional patents pending.
Quick Start
1
2
3
4
5
6
7
DO NOT OPEN THE DOOR
IN PROGRESS
8
9
Scan for Full Manual
1

1. Ensure a at and clear playing area 2m (6.5ft) from the anchoring spot.
• The playing area can be to any direction from anchoring spot.
• Minimal width of playing area is 1m (3ft).
2. For MoonRunning with apps, position the playing area in front of a monitor or a phone/tablet.
3. Preferably, set the playing area in a comfortable temperature environment with abundant
fresh air.
4. Avoid exposing MoonRun to direct sunlight or heat above 250C (800F) for prolonged periods
to prevent damage to elastic and electronic components.
1. Locate and clear playing area
MoonRun can be anchored either to a hinged door, a wall hook or a beam or post.
• Minimum anchoring height (for adults) is 1.8m (6ft) from oor.
• Ideal anchoring height (for adults) is 2m (6.5ft) from oor.
1. Connect the triangular warning sign to the logo
side of the Door Strap.
• Position the warning sign as seen on photo by
inserting the rubber band around a stitching in the
strap and then wrapping the protruding loop around
the sign.
2. Connect upper end of Door Strap to top carabiner
of MoonRun.
3. Make sure logo badges face same directions.
4. Create a lasso loop at lower end of Door Strap.
Option 1 : MOUNTING MOONRUN TO A HINGED DOOR TOP WITH DOOR STRAP
Prepare MoonRun for door mounting
5. Place the lasso loop of step 4 over door handle.
6. Tighten the loop, securing it to handle.
7. Place strap over the door top close to the hinge.
• Ensure the padded door block remains on the
side of door that will not be used.
8. Ensure warning logo is facing away from door.
9. Inspect that the strap is positioned over the
door-top, is secured safely to handle and triangular
warning sign is fully visible at eye height.
On the side that will NOT be used
10. Close the door from the MoonRun side,
until you hear a click. Lock the door with key!
11. Ensure MoonRun's top logo is facing user.
Close door
2. Anchor MoonRun
56
3
4
1
2
3
DO NOT OPEN THE DOOR
IN PROGRESS
2

1. Fix a sturdy hook in the wall at 2m
height. Working load of 300kg (650lb)
2. Fix another similar hook next to main
hook
Locate a sturdy post, beam or ladder bar at about 2m (6.5ft) from oor
• With the lower end of the Door Strap, create a loop around
post, beam or ladder bar
• Connect the top carabiner to a close slot in the Door Strap
• Ensure logo is facing user
• Connect Top carabiner to wall hook together with the
safety strap
• Ensure MoonRun's top logo is facing user
Option 2 : CONNECTING MoonRun TO A WALL HOOK, WITH DOOR STRAP AS SAFETY
Option 3 : CONNECTING MOONRUN TO A POST, BEAM OR LADDER BAR WITH DOOR STRAP
1. Inside the safety hook,
create a lasso loop with
the lower end of Door
Strap
21
2
1
2
7
8
DO NOT OPEN THE DOOR
IN PROGRESS
9
11
10
3

3. Hook up, ne-tune and inspect MoonRun
1. Ensure the top cover logo is facing you.
2. Ensure that the bar is not upside down (when lifted).
3. Inspect and check that straps and elastic units are not twisted or entangled.
4. Ensure all the plastic strap buckles face outwards.
5. Under the top cover:
a. Ensure that the 2 blue (bar) resistance units are placed in between the 2 black (arm)
resistance units.
b. Ensure that the blue (bar) elastic units are in front of the black (arm) elastic units.
6. Check that all four metal buckles connecting the elastic units to their straps are covered
with their sleeves at the same height.
7. Untwist the handle straps to create comfortable ‘cup’ shape for wrists.
Adjust MoonRun straps length by sliding the ladder buckles
(1) up or down:
Bar straps
1. Slide the plastic buckles up or down to adjust length of straps.
2. The ideal height of the bar from the oor is between 20-40cm
(8-16 inches).
3. Ensure the bar is even to the oor, and that the plastic buckles
are at same height.
Arm straps
4. Adjust both arm straps to the same length and that the plastic
buckles are at same height.
• Shorter strap (slide plastic buckle down) - More difficult on
arms and upper body.
• Longer straps (slide plastic buckle up) - Less difficult on arms
and upper body.
5. Ensure both arm strap buckles and logos are facing forward or outwards.
1 5
6
33
7
4
MOONRUN
2
3
2
111
4
5
1
4

• MoonRun is a highly effective aerobic trainer, therefore stretching before and after exercise is
imperative to prevent injuries and maximize aerobic exercise effect as well as overall performance.
• Perform these stretches before and after MoonRunning:
• Start the workout with several minutes of walking/jogging while facing towards the
anchoring point (see Picture below). This allows you to visually inspect your MoonRun settings
before the actual workout begins.
• If you are new to MoonRunning or out of practice, stretch well and limit yourself to easy sessions
of 10-15 minutes. Gradually, increase pace and workout time according to comfort and goals.
• For exercise comfort and effectiveness, adjust the arm straps length by sliding up or down the
plastic buckles:
o Shorter straps - for more arm resistance.
o Longer straps - for less arm resistance.
• To prevent physical monotony and discomfort, vary your body movements, turn around and
change arm holdings. Use this as an effective tool as frequently as required.
• Balance the MoonRun bar on the pelvic bones (below stomach) and lean
forwards until the body weight is balanced with the elastic pull.
• Connect and gently tighten the ‘seat belt’ behind the pelvis. Tidy excess
webbing with elastic rings.
• Hold both arm handles with relaxed ngers.
o Ensure the handle logo M is facing away from the palms, and that the
handle straps are not twisted and form a comfortable ‘cuff’ shape.
• Lean further forward on padded bar and start MoonRunning while
balancing the body weight.
For an advanced stretching routine please refer to
www.MoonRun.com/pages/exercises
• Always inspect your MoonRun for blemishes before activity.
• If discomfort or pain is persistent during exercise, stop immediately and seek professional help.
Stretch the body
While MoonRunning
Exercise options:
MoonRun facing away from anchoring point:
Important to remember
4. MoonRun safely to prevent injuries
Calf Stretch Anterior Thigh Stretch Posterior Thigh Stretch
5
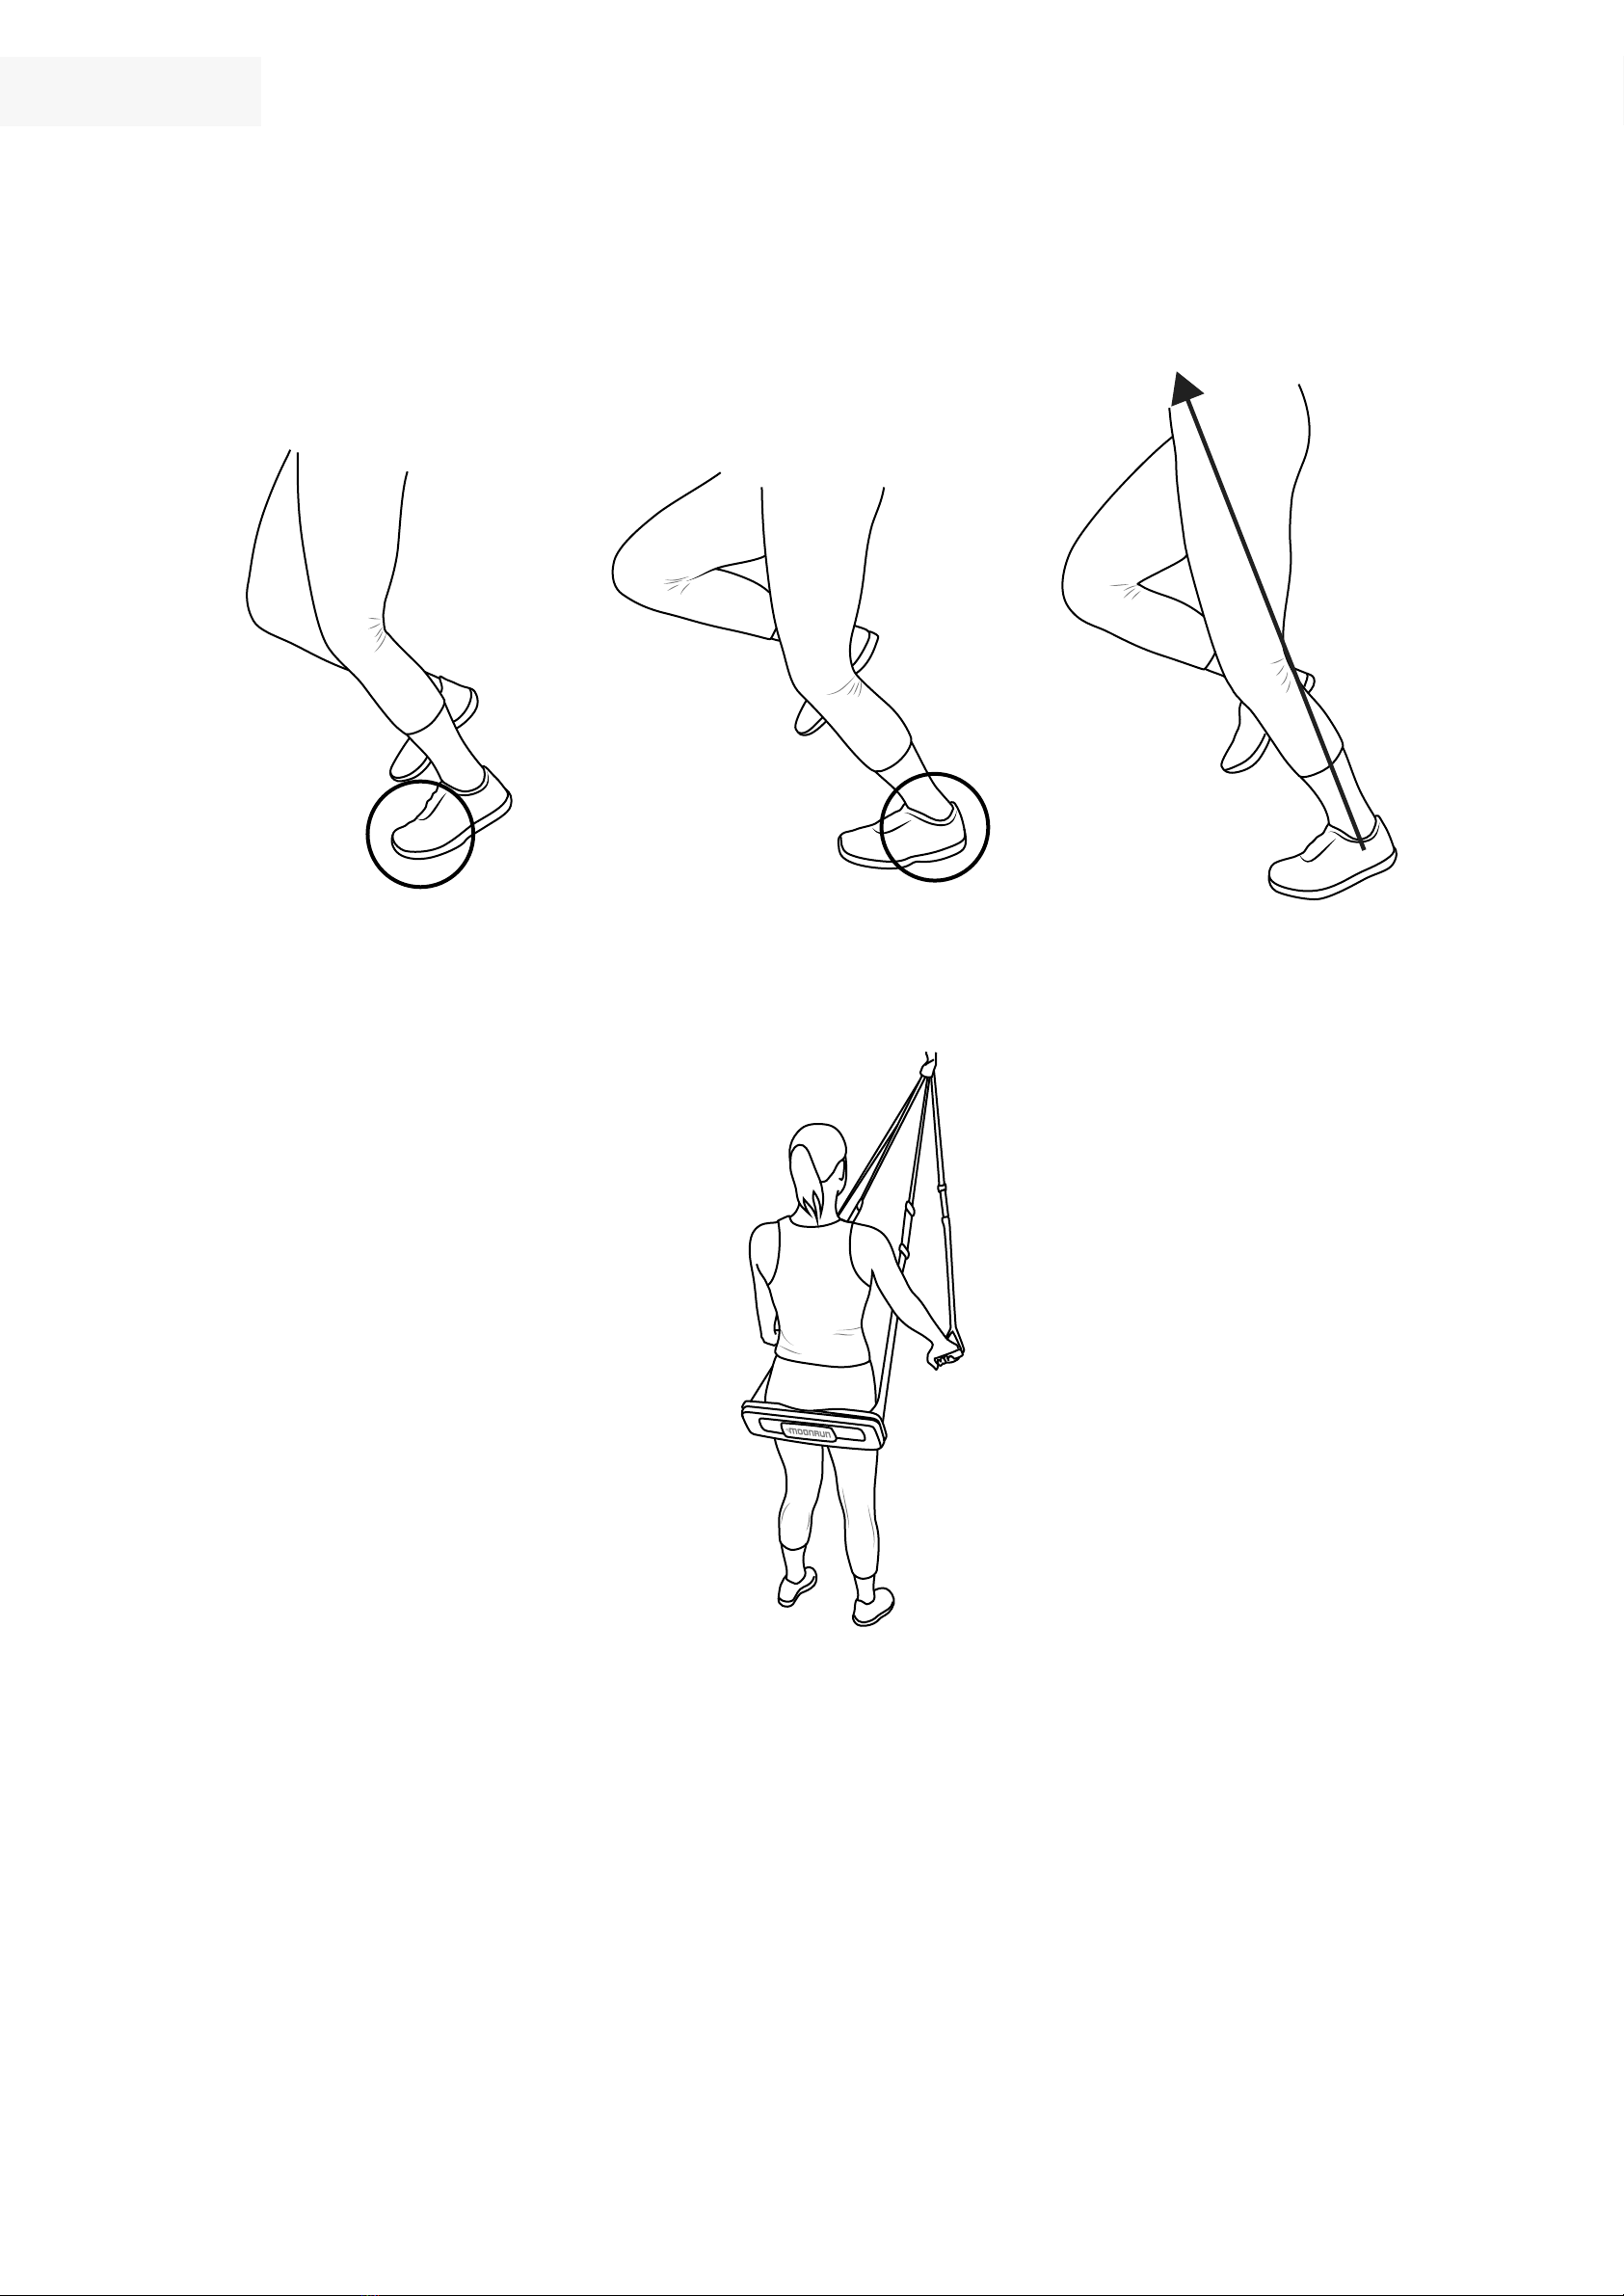
1. Land on the balls of the foot.
2. Then let the heel tap the oor.
3. Simultaneously, extend the hip and knee and ex the ankle to push the body forward
(unlike running on the spot!).
• Lean on the belly bar and employ a double-staged foot landing:
• Balance MoonRun bar on sit-bones and lean backwards until the body weight is balanced with
the elastic pull.
• Connect and gently tighten the ‘seat belt’ in front of pelvis. Tidy excess webbing with elastic rings.
o Ensure the top logo M is facing you, and the straps or elastic units are not entangled.
• Hold both arm handles with relaxed ngers.
• MoonRun ‘backwards’ while pulling the arms towards you in different directions.
• Important: avoid MoonRunning on tiptoes - this is not effective and can cause calf injuries.
• Perform the aforementioned stretches again.
For more exercise options visit www.MoonRun.com/pages/exercises.
Technique:
MoonRun facing towards anchoring point:
After MoonRuning
1
2
3
6

1. Charge the electronic box with the attached cable.
• A fully charged battery should last for 20-30 hours of MoonRunning depending on use.
2. Prepare a monitor, tablet or phone tripod in front of playing area.
3. Open www.MoonRun.com or the app store and download the "MoonRun tness" app to your
Android or IOS device.
4. Open app and register.
5. Switch on the MoonRun electronic box by pressing its button. A green light will appear.
6. In the open app, connect to your MoonRun by clicking on the green connection icon at
the top right corner of the screen.
7. Identify your MoonRun sensor code which appears in the window and click on it.
• Your sensor ID is written under the electronic box
8. When connected, the LED on the MoonRun button and the ‘Connect’ logo on the app turn blue.
9. In the RUN page of the app you will nd three running options to choose from:
• No Limits
• Set distance limit
• Set time limit
10. Set your virtual coach speed to challenge.
• This can be adjusted also during the run by swiping the screen left or right.
11. Start workout.
• Open the MoonRun app for a list of links to a wide variety of compatible 3rd party
applications for any device.
• Proceed setup according to the specic app instructions.
• Charge in advance with provided cable.
• Turn on by pressing the button on bar. Turn off by pressing button again
• LED color indicators:
TURN ON ELECTRONIC BOX
USE THE MOONRUN ‘VIRTUAL COACH’ GAME
USING THIRD PARTY APPLICATIONS
5. Connect
Status /Color Green Blue Red Flashing
red Yellow
Device on, not connected +
+
+
+
+
Device on, Bluetooth connected
Device is charging
Low ba�ery (please charge)
Full memory card (connect to
MoonRun app)
7

FOR PORTABLE DEVICE (<20cm from body / SAR needed)
Radiation Exposure Statement
The product comply with the Canada portable RF exposure limit set forth for an uncontrolled environment and are safe for intended operation as
described in this manual. The further RF exposure reduction can be achieved if the product can be kept as far as possible from the user body or set the
device to lower output power if such function is available.
Déclaration d'exposition aux radiations:
Le produit est conforme aux limites d'exposition pour les appareils portables RF pour les Etats-Unis et le Canada établies pour un environnement non
contrôlé.
Le produit est sûr pour un fonctionnement tel que décrit dans ce manuel. La réduction aux expositions RF peut être augmentée si l'appareil peut être
conservé aussi loin que possible du corps de l'utilisateur ou que le dispositif est réglé sur la puissance de sortie la plus faible si une telle fonction est
disponible.
FCC statements:
This device complies with part 15 of the FCC rules. Operation is subject to the following two conditions: (1) this device may not cause harmful
interference, and (2) this device must accept any interference received, including interference that may cause undesired operation.
NOTE: The manufacturer is not responsible for any radio or TV interference caused by unauthorized modifications or changes to this equipment. Such
modifications or changes could void the user’s authority to operate the equipment.
NOTE: This equipment has been tested and found to comply with the limits for a Class B digital device, pursuant to part 15 of the FCC Rules. These limits are
designed to provide reasonable protection against harmful interference in a residential installation. This equipment generates uses and can radiate radio
frequency energy and, if not installed and used in accordance with the instructions, may cause harmful interference to radio communications. However,
there is no guarantee that interference will not occur in a particular installation. If this equipment does cause harmful interference to radio or television
reception, which can be determined by turning the equipment off and on, the user is encouraged to try to correct the interference by one or more of the
following measures:
- Reorient or relocate the receiving antenna.
- Increase the separation between the equipment and receiver.
-Connect the equipment into an outlet on a circuit different from that to which the receiver is connected.
-Consult the dealer or an experienced radio/TV technician for help.
Table of contents
Popular Fitness Equipment manuals by other brands


G-FITNESS
G-FITNESS AIR ROWER user manual

CAPITAL SPORTS
CAPITAL SPORTS Dominate Edition 10028796 manual

Martin System
Martin System TT4FK user guide

CIRCLE FITNESS
CIRCLE FITNESS E7 owner's manual

G-FITNESS
G-FITNESS TZ-6017 user manual

Accelerated Care Plus
Accelerated Care Plus OMNISTIM FX2 CYCLE/WALK user manual


