manuals.online logo
Brands
  1. Home
  2. •
  3. Brands
  4. •
  5. Moree
  6. •
  7. Lantern
  8. •
  9. Moree Lounge Led Pro Accu User manual

Moree Lounge Led Pro Accu User manual

Moree Ltd.
Kaiserswerther Markt 11
40489 Düsseldorf
Germany
Website: www.moree.de
Designed and produced in Germany © 2006
Änderungen an den Produkten vorbehalten./ Products are sub-
ject to change.
Gerät und Verpackungsmaterial sind aus recyclefähigen Materi-
alien hergestellt. Die getrennte, umweltgerechte Entsorgung von
Materialresten fördert die Wiederverwertung von Wertstoffen.
Das ausgediente Gerät sofort unbrauchbar machen und einer
ordnungsgemäßen Entsorgung zuführen. Entsorgungshinweise
erhalten Sie von der Gemeindeverwaltung.
Packaging material and appliance are made from recyclable mate-
rials. Seperation of the remaining waste materials into different
types facilitates the recycling of valuable raw materials.
When the appliance is to be no longer used please dispose of the
appliance in the proper manner. You can obtain information on
disposal from your local authority.
Sehr geehrte Kundin, sehr geehrter Kunde,
der Verkäufer leistet für einwandfreies Material und fehlerfreie
Fertigung Garantie innerhalb 12 Monaten, gerechnet vom Tage
des Kaufs, zu nachfolgenden Bedingungen:
Der Garantieanspruch erlischt bei Veränderungen am Gerät
durch den Käufer oder durch Dritte. Schäden, die durch unsach-
gemässe Behandlung oder Bedienung, Umbau oder durch falsches
Aufstellen, durch unsachgemässen Anschluss oder Verwendung
falscher Leuchtmittel sowie höhere Gewalt oder sonstige Einflüsse
entstehen, fallen nicht unter die Garantieleistungen. Wir behalten
uns vor, bei Reklamationen die defekten Teile auszubessern oder
Sollte Ihr Gerät nicht mehr funktionieren, so prüfen Sie bitte vorerst,
ob ein entladener Akku, eine defekte Sicherung, eine nicht funkti-
onierende Fernbedienung oder falsche Handhabung die Ursache
sein können. Sollte Ihr Gerät einen Defekt aufweisen, wenden Sie
sich bitte an den Verkäufer.
If your product does not function any longer, please examine rst if the
battery is charged, the fuse is broken, the remote control is fully
operational or if you have handled the product incorrectly. If your
product is faulty in any way, please contact the vendor.
Als Tischplatte ist eine Glasscheibe erhältlich.
A glass table top is available as an accessory.
Der Tisch besteht aus hochwertigen Kunststoff, bitte nur mit einem
feuchten, weichen Tuch abwischen. Auf keinen Fall aggressive,
lösungsmittel- oder alkoholhaltige Reiniger verwenden.
The table is made from a high-quality plastic. Clean with a soft,
damp cloth only. Do not use abrasives, alcohol or solvent based
cleaners.
zu ersetzen oder das Gerät auszutauschen. Ausgetauschte Teile
gehen in unser Eigentum über. Weitergehende Ansprüche bestehen
aufgrund der Garantie nicht. Der Garantieanspruch ist vom Käufer
durch Vorlage der Kaufquittung nachzuweisen. Im Garantiefall
wird der Tisch nur in unbeschädigter Originalverpackung zurück-
genommen.
Dear customer,
the vendor provides warranty for perfect material and error free
manufacturing for 12 months, starting from the day of purchase
on the following conditions:
The warranty is void with interference by the customer or through
a third party. Damage caused by inappropriate treatment, natural
causes or causes beyond control do not fall under the warranty. In
response to complaints, we will replace/ repair defect parts or the
whole product. Replaced parts will be retained. No further claims
exist due to the warranty. The warranty claim needs to be proven
with the purchase receipt by the customer. In the case of warranty
the table can only be returned and accepted providing that it is in
its original (intact) packaging.
Zur Sicherheit gegen Überspannung sind zwei Sicherungen einge-
baut. Wenn der Tisch nicht funktioniert, bitte prüfen Sie ob diese
defekt sind und tauschen Sie sie ggf. aus (TYP: T 2A).
Two fuses are built in for the protection of the electrical components.
In case of malfunction, please check if the fuses are broken, and
only replace with specied fuses (TYP: T 2A).
Maße / Dimensions:ca.84 cm, 33 cm hoch/ high
Gewicht / Weight: ca. 13 kg / approx. 13kg
Leuchtmittel / Illuminant:
3x high-power multi colour LEDs (Typ: 04-06-01)
3x 1-Farb/ 3x 1 colour high-power LED (Typ: 04-07-01)
Akku / Battery type: 12V 18 Ah
Sicherungen / Fuses: T 2A
Ladezeit Akku / Charging time (battery): ca./ approx. 12-15h
Ladegerät / Charger: 230V/ 12V,1800mA
Fernbedienung / Remote control: 2x Bat.-Typ. AAAA 1,5V
Betriebsdauer / Operating time: ca./ approx. 30h
Schutzklasse / Protection class: II
Sicherungen Fuses
Technische Daten Technical data
Der eingebaute Akku darf nur von Fachpersonal ersetzt werden.
Verwenden Sie ausschließlich zertizierte Qualitätsbatterien.
The used battery must only be changed by qualied personnel
using specied batteries.
Den Akku wechseln Changing the battery
Garantie Warranty
Glasscheibe Glas top (04-01-01)
Pegehinweise Maintenance
Fehlerbehebung In case of malfunction
Entsorgung/ Umweltschutz Disposal/ Ecology
Vertrieb Distribution
Version 3.0 © Moree Ltd.
0
I
Inklusive Fernbedienung und Ladegerät
Inclusive remote control and charger
D
GB
D
D
GB
D
GB
D
GB
D
GB
GB
D
GB
Bedienungsanleitung / Instruction Manual
Typ: 04-06-01 Multicolour / 04-07-01 Single colour
0
I
0
I
0
I
0
I
Aus-/ Reset-Taste / Off/ reset button
90 Sekunden RGB Farbwechsel
Programm / 90 second RGB colour
change program
3 Minuten RGB Farbwechselprogramm /
3 minute RGB colour change program
Farbselektionstaste; kann zu jeder Zeit
gedrückt werden, um die aktuelle Farbe
auszuwählen. Um ein Programm wieder
zu aktivieren oder andere Programme
zu wählen, muss die Aus-/ Resettaste
gedrückt werden. /
Colour selection button; can be used at
any time to choose the actual colour. To
activate the previous program or choose
other programs please push the off/ reset
button.
Weißes Licht / White light
Puls-Programm (1x drücken)
Flash-Programm (2x drücken) /
Pulse program (single press)
Flash program (double press)
1
2
3
4
5
1
2 3 4
5
Abb. 1/ Fig. 1
Aufbau Construction diagram
Montage Assembly
Den Akku laden Charging the battery
Programme der Fernbedienung Remote control programs
Einbau der Ladebuchse Fit the charging point
Gehäuseunterteil
Lower housing
Ladebuchse
charging point
Unterlegscheibe
Washer
Mutter
Nut
Wichtige Sicherheitshinweise Important safeguards
Gebrauchsanweisung vor dem
ersten Gebrauch vollständig lesen
und sorgfältig aufbewahren.
Den Tisch nur unter Strom
benutzen, nachdem er korrekt
montiert wurde und sich in tech-
nisch einwandfreiem Zustand
bendet.
Das Produkt darf nur in trockenen
Innenräumen geladen und benutzt
werden.
Der Tisch ist nur horizontal, mit
der Tischplatte nach oben aufge-
stellt, zu verwenden! Das max.
Aufstellgewicht beträgt 5 Kg.
Nur auf festem, trockenem, nicht
leicht entzündlichem Untergrund
verwenden.
Nicht am Kabel oder an der Logo-
Schlaufe ziehen.
Die Leuchte darf nur mit dem
mitgelieferten Ladegerät mit
einer Netzspannung von 230V
betrieben werden.
Vor dem Öffnen des Tisches den
Netzstecker ziehen und den Tisch
ausschalten. Veränderungen an
der Tischleuchte dürfen nicht
erfolgen.
Prüfen Sie, ob die Spannungs-
angabe auf dem Gerät mit der
Netzspannung übereinstimmt.
Netzkabel regelmäßig auf even-
tuelle Schadstellen prüfen. Sollte
dieses beschädigt sein, stellen
Sie die Nutzung ein. Ersetzen Sie
defekte Komponenten ausschließ-
lich durch Ersatzteile vom Hersteller
oder seinem Servicevertreter.
Durch unsachgemäße Repara-
turen können erhebliche Gefahren
für den Benutzer entstehen.
Moree Leuchten entsprechen den
einschlägigen Sicherheitsbestim-
mungen.
BEI DEMONTAGE NICHT IN
DIE EINGESCHALTETE LICHT-
QUELLE SEHEN - GEFAHR
IRREVERSIBLER AUGEN-
SCHÄDEN!
Before using the product, please
read fully the instruction manual.
Keep the manual for the entire life
of the product.
The table may only be used as
an illuminant after correct instal-
lation.
The product may only be charged
and used in dry rooms.
This table may only be used
when positioned horizontally,
and with the table top upturned.
Max. load is 5 kg.
It may only be used on firm,
dry, horizontal, non-flammable
surfaces.
Do not pull on the cable or the
logo strap.
The light (table) may only be
charged with the supplied charger
and a mains voltage of 230V.
Disconnect the table from the
mains supply before opening.
Do not alter the light table in any
way.
Make sure your voltage corres-
ponds to the voltage printed on
the product. Connect it to alter-
nating current only.
Check the cable regularly for
possible damage. If the appli-
ance (including cable) shows
any defect, stop using it and
replace damaged components
with specified parts. These are
available from the manufacturer
or a representative.
Faulty or unqualied repair work
may cause accidents or injury to
the user.
Moree product appliances meet all
applicable safety standards.
WHEN DISASSEMBLING DO
NOT LOOK DIRECTLY INTO THE
OPERATING LIGHT SOURCE-
RISK OF IRREVERSIBLE EYE
DAMAGE!
Bedienungsanleitung Instruction manual
LED Leuchtmittel
LED Light Source
Gehäuseoberteil
Upper housing
Gehäuseunterteil
Lower housing
Schrauben/ Unterlegscheiben
Screws/ Washers
Gewindebohrung
Tapped holes
Ladegerät
Charger
Ladebuchse,
EIN/ AUS Schalter
Charging Point,
ON/ OFF button
Sicherungen
Fuses
Fernbedienung
IR Remote Control
8
EIN/ AUS Schalter
ON/ OFF button
8
BITTE SCHUTZFOLIEN ENTFERNEN! Stellen Sie sicher, dass
das Gerät von der Stromquelle getrennt ist (Netzstecker ziehen).
Der Montageort muss trocken und staubfrei sein. Bauen Sie bitte
die Ladebuchse ein (Abb. 2). Stellen Sie nun das Gehäuseoberteil
mit der Tischplatte nach unten auf den Boden. Bitte weiche Unter-
lage verwenden, um ein Verkratzen zu vermeiden. Setzen Sie das
Gehäuseunterteil auf das Gehäuseoberteil. Fixieren Sie mit den vier
mitgelieferten Schrauben Gehäuseunterteil und Gehäuseoberteil.
Vergewissern Sie sich, dass alle Schrauben festsitzen.
PLEASE REMOVE THE PROTECTIVE PLASTIC FILM!
Ensure that the charging equipment is disconnected from the
mains. The place of assembly must be dust free and dry. Please
insert charging point (g. 2). Place the upper housing with the top
on the ground. Please place the table on a soft surface in order to
avoid scratching. Place the lower housing on top of the upper
housing. Assemble the lower housing and upper housing with the
four provided screws. Make sure that all screws are xed rmly.
D
GB
Der Tisch muß vor dem Laden ausgeschaltet werden.
BITTE ZUERST DEN STECKER VOM LADEGERÄT IN DIE
LADEBUCHSE AM TISCH STECKEN, dann erst das Ladegerät
in die Steckdose stecken. Wenn der Akku geladen ist (nach ca.
12-15h) bitte den Netzstecker ziehen, dann erst den Stecker am
Tisch. Jetzt kann der Tisch eingeschaltet werden. Der Tisch schaltet
sich automatisch ab, wenn der Akku durch Dauerbetrieb leer ist.
Er schaltet sich wieder ein, wenn der Akku wieder aufgeladen
wird - das kann ca. 1-3 Stunden dauern.
The table must be switched off before charging.
FIRST, PLUG THE CHARGER INTO THE CHARGING POINT.
ONLY NOW MAY YOU CONNECT THE CHARGING PLUG TO THE
POWER POINT. Once the table is fully charged (approx. 12-15h)
remove the charging plug from the power point, then disconnect the
charger from the charging point. The table will automatically shut
off when the battery is empty. It will turn on again when the battery
is being recharged - this may take about 1-3 hours.
D
GB
Sehr geehrte Kundin, sehr geehrter Kunde, wir freuen uns, dass
Sie sich für ein Moree-Produkt entschieden haben.
Dear customer, we are delighted that you have chosen a Moree
product.
D
GB
WICHTIG: Vor erstem Gebrauch und bei jedem Transport Lade-
buchse ein- bzw. ausbauen.
IMPORTANT: Before use and when transporting please t/ dismount
charging point.
D
GB
Abb. 2/ Fig. 2
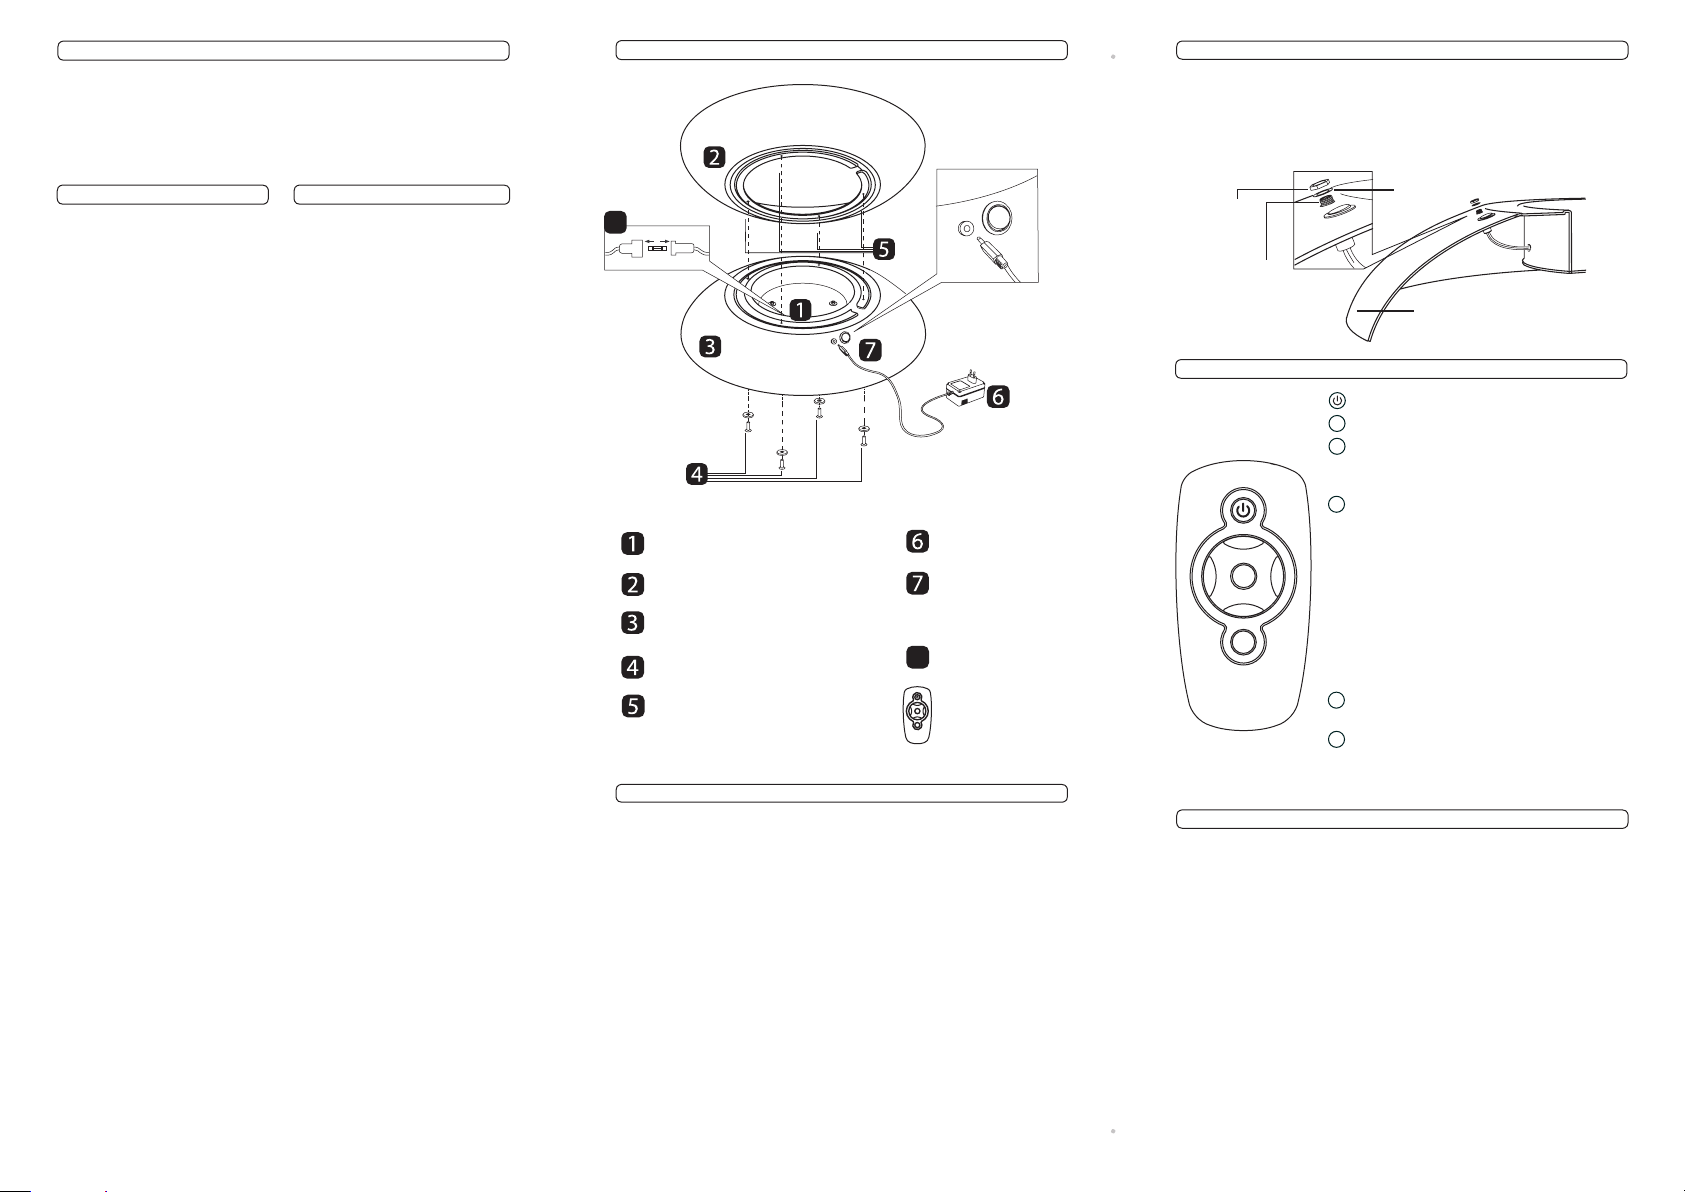
Pluspol am Innenkontakt voreingestellt ab Werk/ Positive terminal within inner contact is preset at factory
Dieses Batterieladegerät dient dem Auaden von Bleiakku-
mulatoren der Produkte Lounge LED Pro Accu, Lounge Up
LED Pro Accu und Cube LED Pro Accu. Das Gerät ist gegen
Überlastung und falsche Polarität geschützt. Dadurch wird
sichergestellt, dass die Batterie während des Ladevorgangs
nicht beschädigt wird.
WICHTIG!
Die Batteriespannung wird auf der Oberseite des Gerätes
mit einem Schalter eingestellt und muß vor dem Laden
der Produkte auf 12V stehen.
Eingangsspannung: 230V AC ~ 50 Hz
Ausgangsspannung: 6V / 12V DC
Ausgangsstrom: 1800mA
Bedienungshinweise
1.) Batteriespannung mit dem Schalter auf der Oberseite
des Ladegeräts auf 12V einstellen.
2.) Ladegerät mittels des Anschlusssteckers mit dem
Produkt verbinden.
3.) Sobald das Ladegerät mit dem Stromnetz verbunden
ist, leuchtet die rote LED auf.
4.) Der Ladeprozess beginnt.
5.) Ladezeit: ca. 12-15h.
Warnung:
1.) Das Ladegerät darf nur in trockenen Innenräumen
betrieben werden.
2.) Niemals das Gerät öffnen.
3.) Ein beschädigtes Netzanschlusskabel darf nur von
Fachpersonal ersetzt werden.
4.) Ladegerät nur zum Laden von 12V Bleiakkus verwen-
den.
ACHTUNG!
DieeingebauteBatterie(Akku)darfnurvonFachpersonal
ersetzt werden. Verwenden Sie ausschließlich: Typ 12V,
18 Ah.
Der Tisch schaltet sich automatisch ab, wenn der Akku
durch Dauerbetrieb leer ist. Er schaltet sich wieder ein,
wenn der Akku wieder aufgeladen wird - das kann ca. 1-3
Stunden dauern.
Wenn das Produkt länger nicht benutzt wird, bitte aus-
schalten, da es sich im Standby Modus bendet und die
Batterie sich über Wochen tiefentlädt. Bitte die Batterie in
den empfohlenen Intervallen auswechseln:
Oberächentemperatur der Batterie: Austauschintervall:
Unter 25oC (77oF) 6 Jahre
30oC (86oF) 4 Jahre
40oC (104oF) 2 Jahre
BATTERIE-LADEGERÄT
BATTERIE
D
Typ: 04-06-01 / 04-07-01
Typ: 08-02-01
Typ: 06-01-01 / 06-02-01
The battery charger is designed for use with the products
Lounge LED Pro Accu, Lounge Up LED Pro Accu and Cube
LED Pro Accu. There is a built-in polyswitch for over-current
protection and polarity-reverse protection. This ensures that
the battery will not be damaged during the charge.
IMPORTANT!
The battery voltage is selected via the switch on the top of
the unit. Please make sure it is set to 12V before charging
the product.
Input Voltage: 230V AC ~ 50Hz
Output Voltage: 6V / 12V DC
Output Current: 1800mA
Operating Instructions
1.) Check the battery voltage is set to 12V by using the
switch on top of the charger unit.
2.) Connect the charging plug into the product.
3.) Plug the charger into the mains supply. The red LED will
turn on.
4.) The charging process will now automatically commence.
5.) Charging time: approx. 12-15h
Warning:
1.) Keep your charger in a dry place (indoor use only).
2.) Never try to open the charger. Danger of re and electric
shock !
3.) If the external exible cable is damaged, it may only be
replaced by the manufacturer or a representative with the
specic part.
4.) Only use this charger with 12V Lead Acid batteries.
CAUTION!
The used battery must only be changed by qualied
personnel using a specic certied quality battery.
The table will automatically shut off when the battery is
empty. It will turn on again when the battery recharged - this
may take about 1-3 hours.
If the table is not used for a long period of time please turn
it off, because the standby mode will slowly empty the bat-
tery. Please replace the battery after the correct time interval
shown below, and do not continue to use the battery after its
recommended replacement time.
Temperature of battery surface: Replacement time:
Below 25oC (77oF) 6 Years
30oC (86oF) 4 Years
40oC (104oF) 2 Years
GB
Vers.1.4 © moree ltd.
BATTERY CHARGER
BATTERY
- Der Tisch schaltet sich automatisch ab, wenn der Akku
durch Dauerbetrieb leer ist. Er schaltet sich erst wieder
ein, wenn der Akku die minimale Betriebsspannung er-
reicht hat - das kann ca. 1-3 Stunden dauern.
- Die Batteriespannung wird auf der Oberseite des Lade-
gerätes mit einem Schalter eingestellt und muß vor dem
Laden der Produkte auf 12V stehen. WICHTIG: Position
auf 6V entlädt die Batterie und muss dann ausgetauscht
werden.
-ErstdenSteckervomLadegerätindieBuchseamProdukt
stecken, dann in die Steckdose (sonst kann die Sicherung
durchbrennen).
1) DAS GERÄT FUNKTIONIERT NICHT
Die Batterie ist entladen
Lösung: das Gerät entsprechend der Bedienungsanlei-
tung 12-15h laden, min. 1-3 Std. (erreichen der mini-
malen Betriebsspannung).
Eine oder beide Sicherungen defekt
Lösung: Sicherungen überprüfen und austauschen.
Erst den Stecker vom Ladegerät in Buchse am Produkt
stecken, dann in die Steckdose (sonst kann die Sich-
erung durchbrennen). Gerät vor Feuchtigkeit schützen.
Ladegerät steht NICHT auf 12V!
Resultat: Batterie defekt und muss ausgetauscht werden.
Lösung: Ladegerät auf 12V stellen.
Rote Kontroll-LED des Ladegerätes leuchtet nicht
Lösung: Steckdose auf Spannung überprüfen, wenn
Kontroll-LED des Ladegerätes nicht leuchtet, dann ist
das Ladegerät defekt.
Ladevorgang unterbrochen
Lösung: Stecker des Ladegerätes richtig in die Ladebu-
chse des Gerätes stecken!
Ladevorgang zu kurz
Lösung: Produkt für die vorgesehene Dauer laden: 12-15h
2) FERNBEDIENUNG FUNKTIONIERT NICHT
- Batterien leer oder verpolt eingesetzt (On/Off Knopf
muss rot leuchten)
- Aus verschiedenen Richtungen auf das Gerät halten
- LED-Produkt ausschalten/ Stecker ziehen zum Zurück-
setzen.
3) FERNBEDIENUNGSCODE VERSTELLT
Zum einstellen des richtigen Code 11233, halten Sie
die MAGIC Taste gedrückt bis das Lämpchen zweimal
aueuchtet. Geben Sie den Einstell-Code entsprech-
end der unten angegebenen Tabelle ein (das Lämpchen
leuchtet nach Eingabe des kompletten Einstellcodes
zweimal auf)
1 = LAUTSTÄRKE PLUS, 2 = LAUTSTÄRKE MINUS,
3 = KANAL PLUS, 4 = KANAL MINUS
D
- The table turns off automatically when the battery is
empty through continuous use. It will turn itself back on
when the battery has been charged to a minimum level.
This can take approx. 1-3 hours.
- The battery voltage is selected via the switch on the top
of the charging unit. Please make sure it is set to 12V
before charging the product.
IMPORTANT: Switching the charger to 6V can damage
the battery. When this happens it must be changed.
- Make sure that the charger is plugged into the product
before plugging into the mains (otherwise the fuse may
blow).
1) THE UNIT DOES NOT WORK
Battery is empty
solution: according to the instruction manual the unit re-
quires 12-15h to fully charge, and a minimum of 1-3h (to
reach the minimum operating voltage).
One or both fuses are defect
Solution: Check fuses and replace if necessary. Make
sure that the charger is plugged into the product before
plugging into the mains (otherwise the fuse may blow).
Keep product away from moisture.
Charger is NOT switched to 12V!
Result: battery is damaged and must be replaced.
Solution: Make sure unit is set to 12V.
Red light on charger is not lit
Solution: check the power supply, if the red light on the
charger is still not lit, the charger is faulty.
Charge is interrupted
Solution: make sure the charger is correctly plugged into
the socket of the unit!
Charge is to short
Solution: charge the product for the specied amount of
time: 12-15h.
2) THE REMOTE CONTROLLER DOES NOT WORK
- The battery is empty or the batteries are inserted the
wrong way round (On/Off button must be lit red)
- Point the remote controller at the unit from different
angles.
- Switch the LED product off or pull the plug to reset.
3) THE REMOTE CONTROLLER IS BLOCKED
To set the correct code 11233, hold the ‘MAGIC’ button
down until the small light ashes twice. Enter the in-
stallation code according to the table below (the small
light lights up twice after entering the correct installation
code)
1 = VOLUME PLUS, 2 = VOLUME MINUS,
3 = CHANNEL PLUS, 4 = CHANNEL MINUS
GB
WICHTIGE INFORMATIONEN PROBLEMBEHEBUNG LED
AKKU-PRODUKTE - BITTE LESEN!
IMPORTANT TROUBLESHOOTING INFORMATION FOR LED
BATTERY PRODUCTS - PLEASE READ!

This manual suits for next models

7

Other Moree Lantern manuals

Moree LOUNGE VARIATION LED PRO User manual

Moree

Moree LOUNGE VARIATION LED PRO User manual

Popular Lantern manuals by other brands

ABSINA Duo Light 2001 user manual

ABSINA

ABSINA Duo Light 2001 user manual

Brunton Liberty instruction manual

Brunton

Brunton Liberty instruction manual

Coleman BG 200L quick start guide

Coleman

Coleman BG 200L quick start guide

Coleman 2000000850 How to use

Coleman

Coleman 2000000850 How to use

FEUERHAND BABY SPECIAL 276 user manual

FEUERHAND

FEUERHAND BABY SPECIAL 276 user manual

Flair 6746179 Assembly instructions

Flair

Flair 6746179 Assembly instructions

Green Lighting GL2362LU Assembly & fitting instructions

Green Lighting

Green Lighting GL2362LU Assembly & fitting instructions

Fumagalli ANNA quick guide

Fumagalli

Fumagalli ANNA quick guide

J D Williams PD529 Assembly instructions

J D Williams

J D Williams PD529 Assembly instructions

REV TERRA ESCB-8A Assembly and operating instructions

REV

REV TERRA ESCB-8A Assembly and operating instructions

Delta Light INDUSTRIAL P A quick start guide

Delta Light

Delta Light INDUSTRIAL P A quick start guide

Thomas&Betts Sta-Kon LD2P Push-in Wire Series installation instructions

Thomas&Betts

Thomas&Betts Sta-Kon LD2P Push-in Wire Series installation instructions

HAMPTON BAY DYX1691A instruction manual

HAMPTON BAY

HAMPTON BAY DYX1691A instruction manual

MOLTO LUCE SYSTEM 01.1 F Mounting instruction

MOLTO LUCE

MOLTO LUCE SYSTEM 01.1 F Mounting instruction

Hitachi UB 12DL Technical data and service manual

Hitachi

Hitachi UB 12DL Technical data and service manual

Megatron MEGATRON FERA Series instruction manual

Megatron

Megatron MEGATRON FERA Series instruction manual

CAPTELEC L3094 quick start guide

CAPTELEC

CAPTELEC L3094 quick start guide

BaltLED TANAGER installation guide

BaltLED

BaltLED TANAGER installation guide

manuals.online logo
manuals.online logoBrands
  • About & Mission
  • Contact us
  • Privacy Policy
  • Terms and Conditions

Copyright 2025 Manuals.Online. All Rights Reserved.