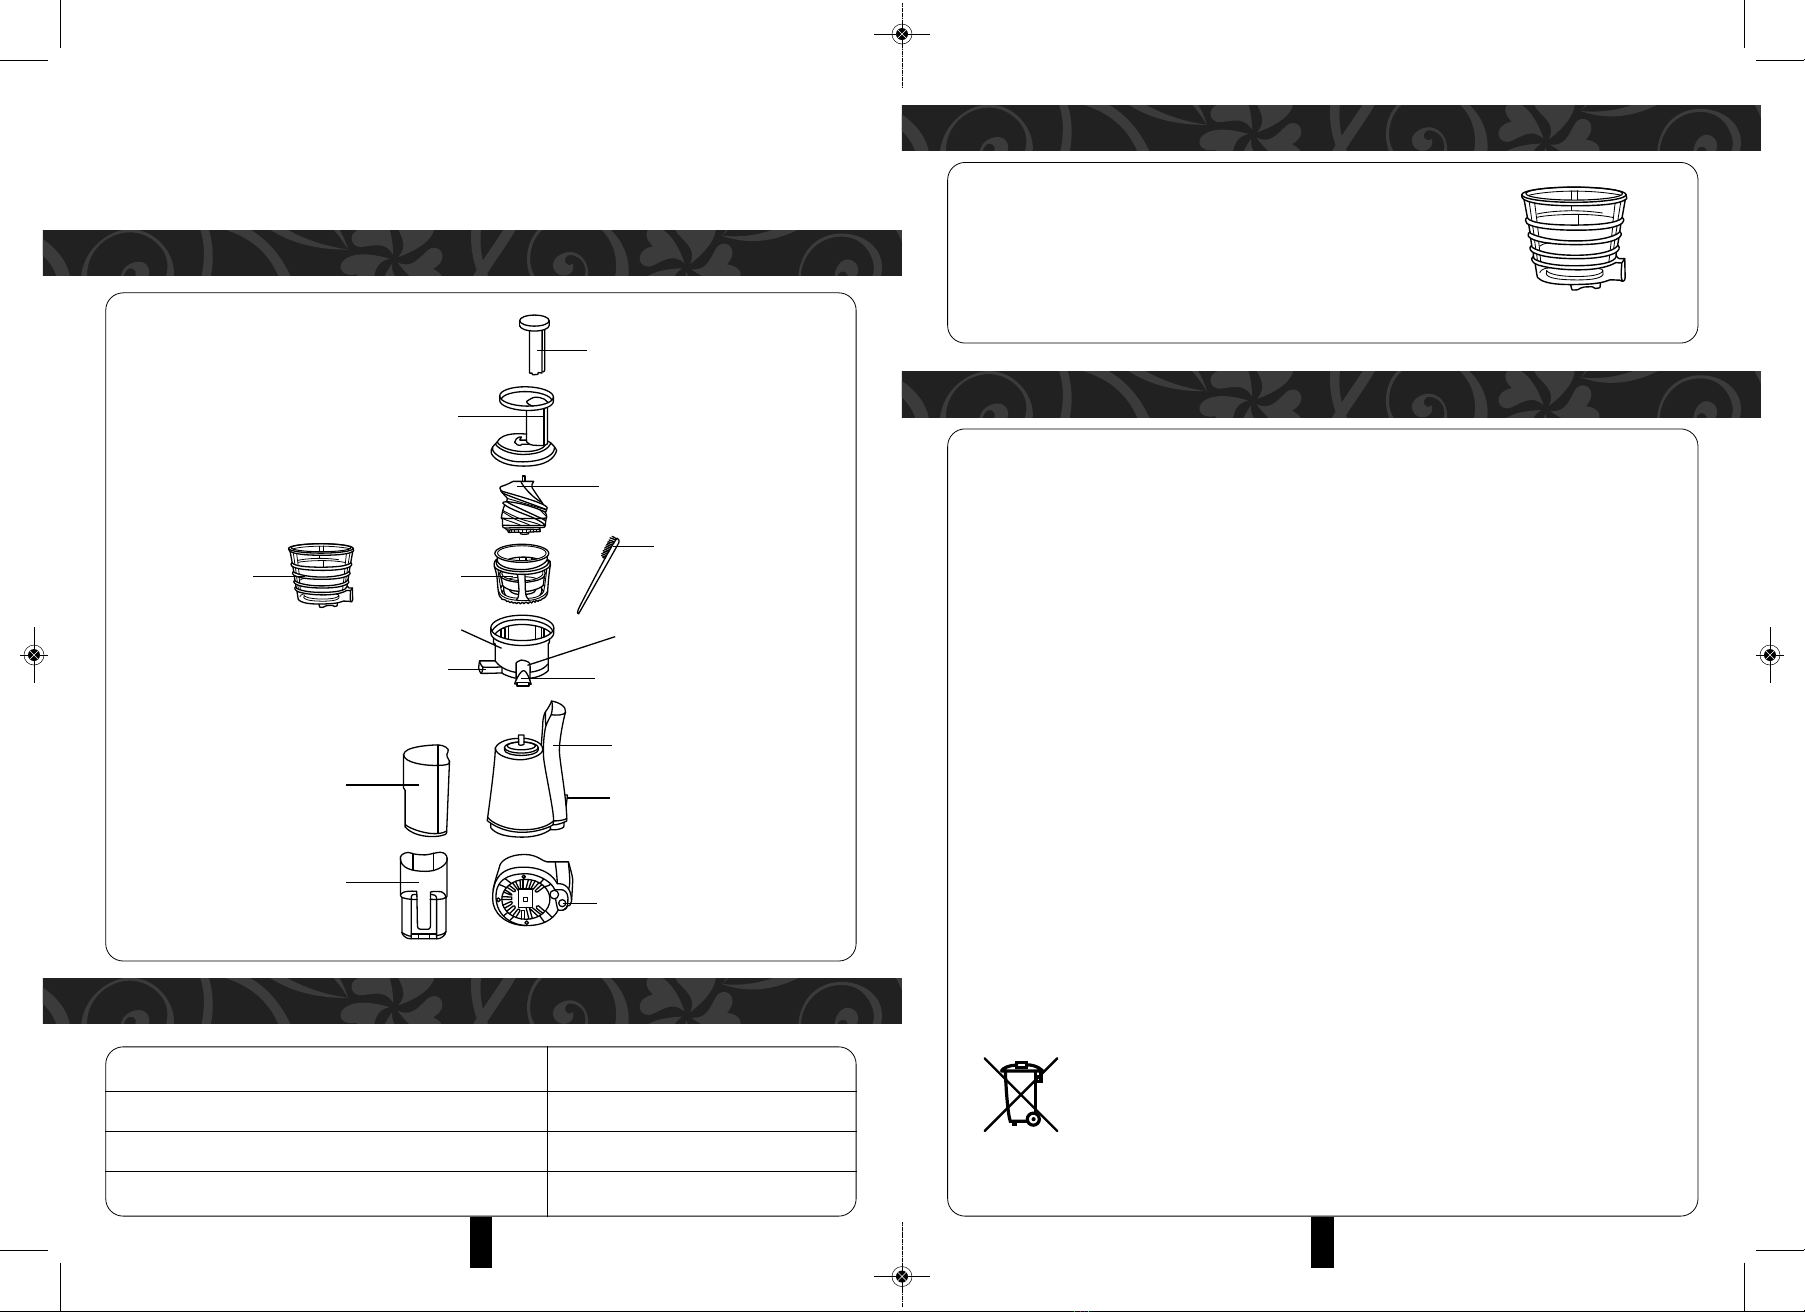
Morgan MSJ-B6001 User manual

USER MANUAL
Slo
Juicer
MSJ-B6001
E-mail: electrical.appliance@dksh.com
www.morgan.my
Market Expansion
Services by
www.dksh.com.my
facebook.com/morganappliances
MSJ-B6001(IM)151015_Layout 1 11/17/15 9:39 AM Page 1

2
PARTS IDENTIFICATION
SPECIFICATIONS
MODEL MSJ-B6001
RA ED VOL AGE / FREQUENCY 220-240V~ 50/60Hz
RA ED WA AGE 150W
CAPACI Y 0.4L
Food Pusher
Grinding Head
Small Cleaning
brush
Juice Outlet
Motor Unit
Power Switch
Reset Switch
(on the bottom of the motor unit)
Juice Outlet Cover
Strainer
Hopper
Jar
Residue Outlet
Residue
Container
Juice
Container
Sorbet
Making
Attachment
Please read this instruction manual thoroughly before use. hank you for purchasing
a quality MORGAN Juicer. We trust that you will have a pleasant juicing experience
with your new product. o guarantee safety and best efficiency, please read this
manual carefully and keep a copy for future reference.
7
USING YOUR JUICER
PRECAUTIONS
To make frozen fruit sorbet your fruit should not be placed in the
freezer exceed 4 hours, avoid prolonged freezing because it will loss
the freshness of the fruit. Freezing the fruit for too long also will
generating an excellent hardness to the fruit which will destruction of
non-porous filter (See Fig. 4).
CLEANING AND MAINTENANCE
1.Unplug the appliance and wait it completely cool down before cleaning.
2.In order to detach & for better and easier cleaning, operate the juicer without load for about 30
seconds after removing any remnants. If the hopper cannot be detached easily, follow and repeat the
following operation for two or three times:
=Reverse—OFF—ON simultaneously, hold and rotate the hopper to detach it. After finish extracting
juice, pour some water into the hopper to clean it so that it will be easier to be detached.
3.Unlock the hopper by turning it in anti-clockwise and then remove it.
4.Detach the grinding head, strainer and rotary cleaning brush in sequence.
5.Rotate the jar anti-clockwise and then remove the jar.
6.Empty the residue container, and then clean the hopper, grinding head, strainer, and rotary cleaning
brush, jar, and residue container under running water. The small cleaning brush can be used to clean
the strainer.
CAUTION:
=Exercise caution when cleaning the strainer as it is sharp.
=Do not use metal sponge to clean, it will damage the machine.
7. To thoroughly clean the residue outlet, pull the buffer plate out of the residue outlet and then clean it
completely using the small cleaning brush.
8. Wipe the outside of motor unit with a damp cloth. Never immerse the motor unit in water or other
liquids.
9. Dry all parts and assemble all parts properly before storing the appliance in a cool, dry place. The
juice container can be stored in the residue container.
ENVIRONMENT FRIENDLY DISPOSAL
You can help protect the environment! lease remember to respect the local regulations: Dispose of all
non-functional electrical equipment to an appropriate waste disposal centre.
Fig.4
MSJ-B6001(IM)151015_Layout 1 11/17/15 9:39 AM Page 2

5
SLOW JUICER ASSEMBLY
Firstly assemble the jar onto the motor unit by following the operation as below:
1. Align the symbol “;” on the jar (the symbol on the left) with the symbol “s” on the motor unit and
push the jar downwards (See Fig.1) and then rotate the jar clockwise to the lock position “;” (the
symbol on the right) so that the jar can be locked on the motor unit tightly. Ensure that the jar is
assembled in position properly otherwise the appliance will not operate. Also ensure that the buffer
plate is assembled securely in the residue outlet (See Fig.2).
2. Then place the strainer into the rotary cleaning brush. Align the symbol “t” on the strainer to the “s”
symbol on the motor unit and then push the strainer downwards. Ensure that the strainer is
assembled securely into the jar.
3. Assemble the grinding head into the jar. Ensure that the grinding head is
covered into the axis of the motor unit.
4. Finally, assemble the hopper on the jar correctly. Align the symbol “t” on
the hopper to the “s” symbol on the motor unit and then rotate the hopper
clockwise until the symbol “
I
” on the hopper aligns with the “s” symbol on
the motor unit (See Fig.3).
5. Ensure that the hopper is assembled in position securely otherwise the
appliance will not operate.
6. lace your juice container below the juice outlet and residue container below the residue outlet. Your
slow juicer is now ready for operation.
4
FEAUTURES & FUNCTIONS
The low speed juicing juicer is a unique system where fresh juice comes from squeezing rather than
grinding – allowing it to maintain its natural taste, pure colour, and with all nutrients and vitamins intact.
The juice will flow into your cup from the juicer spout, and the pulp will be ejected from the pulp ejection
spout and be collected by the pulp container.
When using the juicer, the pulp container and juice container must be assembled correctly.
FOR THE INITIAL USE
1. Unpack the appliance and place all parts on a horizontal surface.
2. Immerse all detachable parts and accessories in warm soapy water and rinse them and dry. Never
immerse motor unit in water to prevent the risk of electric shocks.
3. NO E: The strainer can be cleaned completely using the small cleaning brush.
4. The correct assembly method will be described for details in below sections.
5. Before assembling, ensure that the power cord is unplugged from the power supply and the power
switch is set to the “0” position.
NOTES BEFORE USE
1. repare all the required ingredients according to their individual characteristics:
– Items with hard fibre
– The items with hard fibre should be cut into slices 3~5cm in length and 1.5~2cm in thickness.
– Leafy vegetables and items with long & hard fibre (such as celery, wild celery herb and collard etc.)
Cut the stems of the items into slices 3~5cm in length and then roll up the leaves of the items
as well.
– Fruit with hard cores should be pitted. The cores of peach, plum, mango, apricot and jujube should
not be put into the hopper to avoid any malfunction.
– Items with thick or hard peel should be peeled before being put into the juicer for processing.
– Frozen items can just be used after being defrosted. Never use ice.
– Never process items with high vegetable oil or animal oil with this juicer to avoid damaging the
grinding head
2. Never put sugarcane, coconut, kudzu or cereal without being soaked with water (e.g. bean, rice) into
this juicer for processing.
3. Do not over fill items into the juicer. Always place items with less moisture and hard fibre into the
hopper first after slicing them.
4. Assemble the buffer plate securely in position
5. The buffer plate should be assembled securely in the residue outlet after every cleaning.
Buffer
Plate
Residue
Outlet
Fig.1
Fig.3
Fig.2
MSJ-B6001(IM)151015_Layout 1 11/17/15 9:39 AM Page 3

6
USING YOUR JUICER
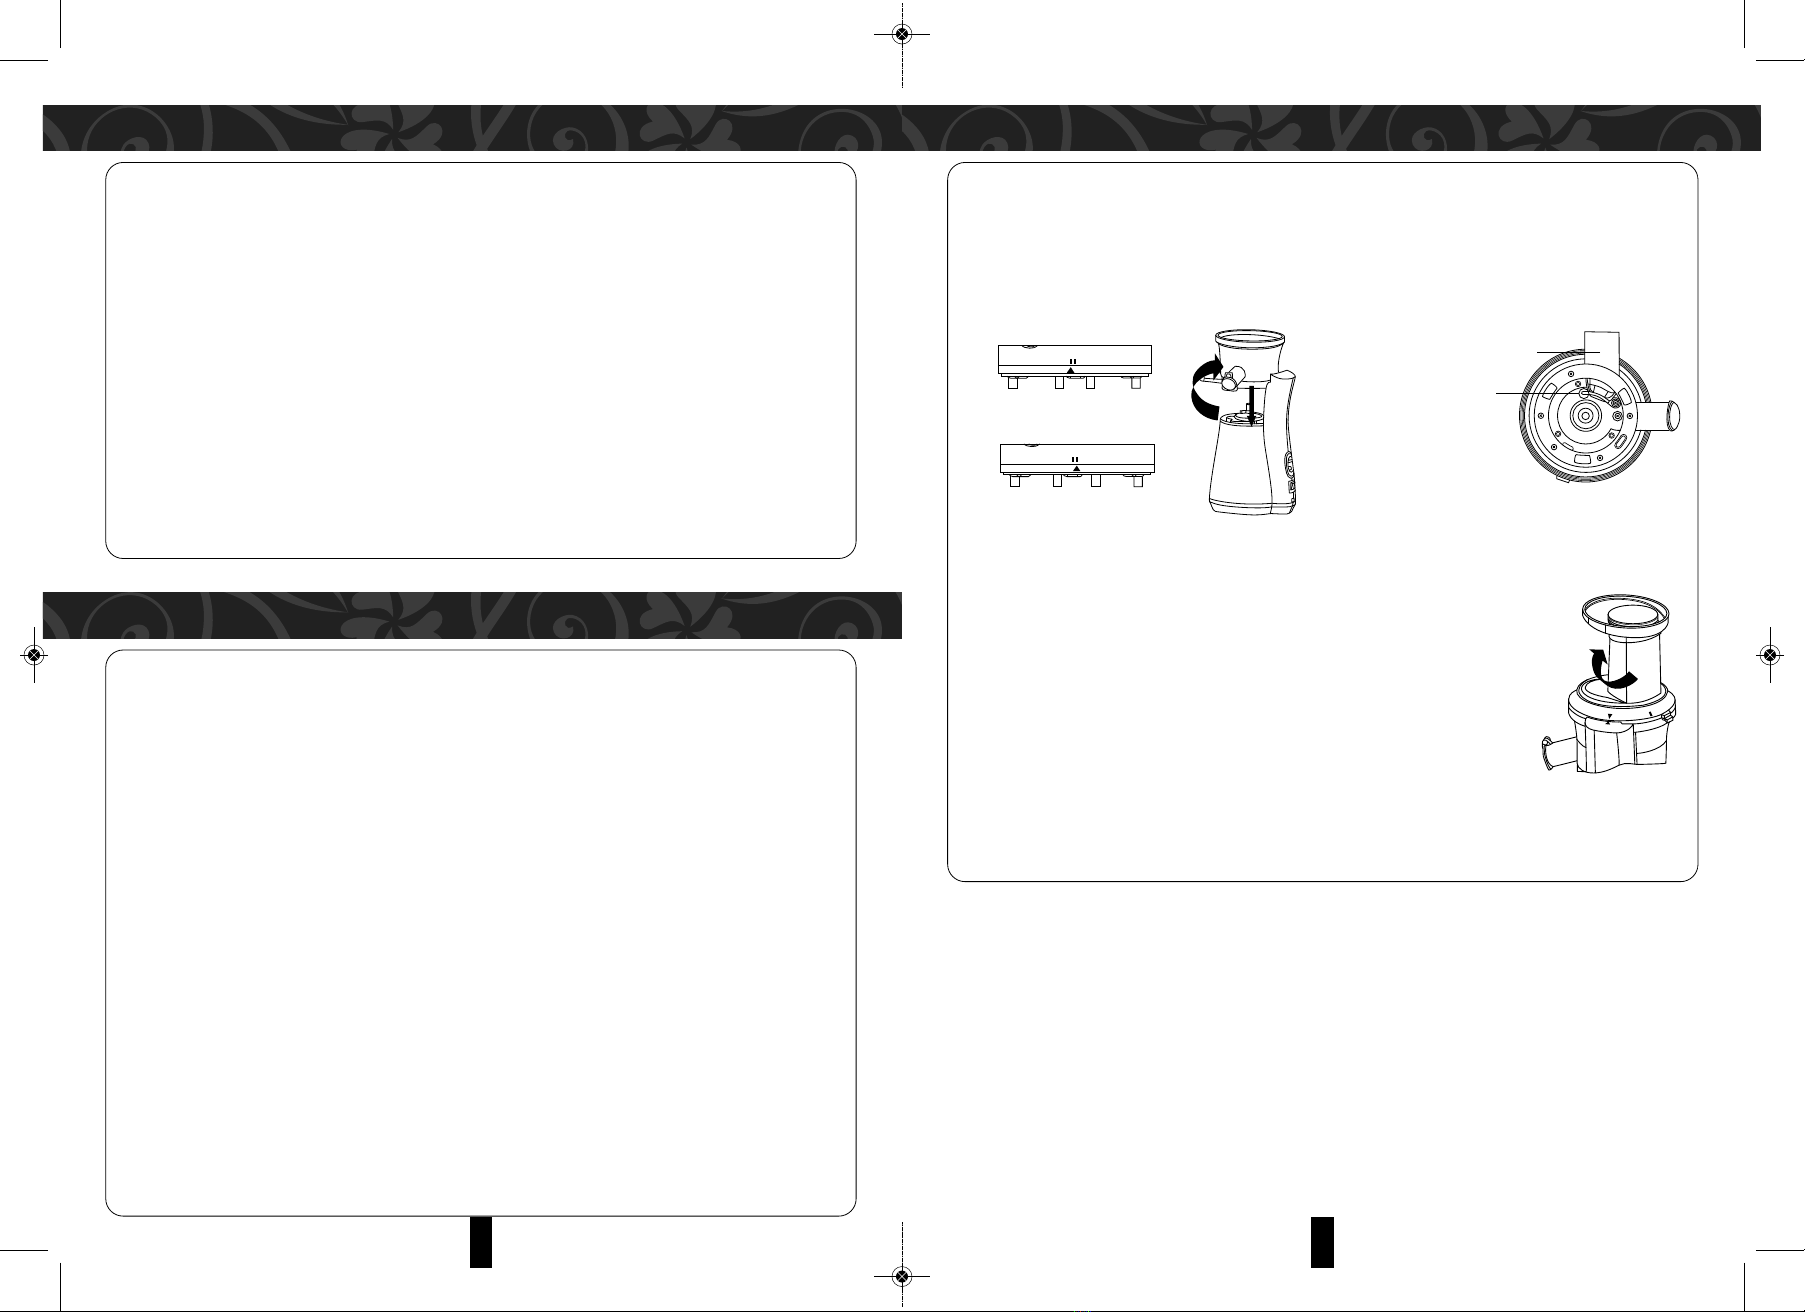
1. Before inserting the power cord into the power supply, ensure that the power switch is in the
“OFF”position. The power switch has three settings: “ON”, press the power switch to position to
activate the motor and start making juice; “OFF” , press the power switch to “OFF” position to turn
off the machine; “REV” means reverse rotation, which is only used when something is stuck and
you need to unclog the blockage.
2. Ensure that the juice container and the residue container are placed in position.
3. Cut fruits and vegetables into smaller pieces. For example, carrots should be cut into thin slices of
around 15mm×15mm before inserting into the machine.
NOTE:
=Remove hard seeds before juicing.
=It is not recommended to process coconuts or similar hard foodstuffs, since this may damage the
motor.
=It is not recommended to process hard fruits or vegetables rich in fibre and starch, such as
sugarcane.
=Fruit peel and pits should be removed from oranges, lemons, grapefruits and melons.
4. Insert the prepared fruits or vegetables into the hopper and gently push the fruit down into the
grinding head using the food pusher.
5. ress the power switch to “ON” position to begin operating the machine. After few minutes of
processing, the juices will flow out.
CAUTION:
=Do not operate the machine without any contents inside the jar.
=Do not insert fingers or other foreign objects into the feeding opening while it is in operation.
6. During operation, the machine may be overfilled with fruit and vegetable remnants and become
blocked and inoperable. To rectify this, press the power switch to “OFF” position and then tilt the
motor unit and press the reset switch on the bottom of the motor unit. Then press and hold the power
switch to the “REV” position for few seconds to operate it again. If the above steps do not rectify the
situation, turn off the machine and reassemble following the instructions given. After reassembly try
operating the machine again.
7. When the juice container is full (the max capacity is 400ml) or the food has been finished extracting,
turn the power switch to the “OFF” position and empty the juice container and residue container
before continuing extracting. Note:
=The max operation time per time should not exceed 15 minutes. Minimum 30 minutes rest time must
be maintained between continuous two cycles.
=Do not insert too much items to into the machine in one go. During operation, once the juice
container is full, you must stop the appliance and empty the remnants inside the container before
resuming the next cycle.
=During operation, if the interlock switch between the hopper and the motor unit is disconnected, the
motor will stop operating to prevent any hazards.
8. After juicing, enjoy your juice immediately to get the freshest taste and best nutrition. Any unused
juice should be stored in the refrigerator.
3
IMPORTANT SAFEGUARDS
When using electrical appliances, basic safety precautions should always be
followed, including the following:
1. Read all instructions carefully.
2. Before using ensure that the voltage power corresponds to the one shown on the appliance’s
power rating plate.
3. Do not operate any appliance with a damaged power cord or power plug or after the appliance
malfunctions or has been damaged in any manner. Return the appliance to your nearest authorized
service facility for examination, repair or adjustment.
4. The use of non-recommended attachments or not supply by the manufacturer, including sieve, top
lid, food pusher, may cause fire, electric shock or injury.
5. Do not place on or near a hot gas or electric burner or in a heated oven.
6. Do not allow the power cord to hang over edge of table or counter.
7. Never operate the appliance without food inside it.
8. Do not operate the appliance if the rotating sieve is damaged.
9. To avoid risk of personal injury keep hands and utensils out of the juicer and away from its sharp
blade during operation. Use the pusher, not fingers or utensils, to feed the produce into the juicer
when the appliance is still connected to the power supply.
10. Should food become lodged in the chute, use the food pusher or a piece of vegetable to dislodge
it. If this method fails, turn off the power switch, allow the motor to stop completely - unplug the
power cord, disassemble the juicer and dislodge any food remnants.
11. Always ensure that the juicer cover is clamped securely in place before motor is turned on.
12. Do not unfasten clamps while juicer is in operation.
13. WARNING: Sharp blades - Always use food pusher and avoid contacting moving parts.
14. For safety reasons, always ensure that the power switch of the juicer is set to “OFF” position before
every use.
15. Always ensure the motor has completely stopped before disassembling.
16. NEVER immerse the motor unit into water or other liquids.
17. Always ensure all detachable parts are completely dry after cleaning before assembling them into
the appliance for next use.
18. If the supply cord is damaged, it must be replaced by the manufacturer, its service agent or similarly
qualified persons in order to avoid a hazard.
19. Always disconnect the juicer from the power supply if it is left unattended and before assembling,
disassembling or cleaning.
20. Never allow this appliance to be used by persons (including children) with psychological, physical
or sensory impairments or with insufficient knowledge, unless closely supervised and instructed by
someone responsible for their safety. Always supervise children and ensure they do not play with
the appliance at all times.
21. This appliance is not intended for outdoor use.
FOR HOUSEHOLD USE ONLY
MSJ-B6001(IM)151015_Layout 1 11/17/15 9:39 AM Page 4
Other Morgan Juicer manuals