Morgan MDH-936STHC User manual

USER MANUAL
Designer
Hood
MDH-936STHC
E-mail: electrical.appliance@dksh.com
www.morgan.my
Market Expansion
Services by
www.dksh.com.my
facebook.com/morganappliances

32
IMPORTANT SAFEGUARDS
When using electric appliances, asic safety precautions should always e followed including the
following:
SAFETY PRECAUTIONS
1. Read all instructions carefully and retain them for future reference.
2. Before connecting to the power supply, ensure that the unit is earthed and its voltage corresponds to
the voltage indicated on the power supply rating label.
3. Always disconnect appliance from the power supply when not in use or before cleaning.
4. It is recommended to use a dedicated power socket that is not shared with other electrical appliances.
5. To protect against electric shock, do not immerse power cord, power plug, or any parts of the unit in
water or other liquids.
6. Do not operate the appliance with a damaged power cord or power plug or after it malfunctions or
has been damaged in any manner. In such a situation, it is recommended to return the unit to your
nearest Authorized Service Centre for examination, repair, or adjustment.
7. Ensure the power cord is not exposed to heat, chemicals, sharp objects or anything that may damage
or affect its performance.
8. Ensure adequate ventilation of the room where the cooker hood is used.
9. Exercise extreme caution when operating the cooker hood in the same room or the same area of the
house at the same time as another heating appliance that depends on the air from the room.
10. WARNING: Risk of fire if cleaning is not carried out in accordance with the instructions given in this
manual.
11. Do not flambe under the cooker hood.
12. The air must not be discharged into a flue that is used for exhausting fumes from appliances burning
gas or other fuels (not applicable to appliances that only discharge the air back into the room).
13. This appliance can be used by children aged from 8 years and above and persons with reduced physical,
sensory or mental capabilities or lack of experience and knowledge if they have been given supervision
or instruction concerning use of the appliance in a safe way and understand the hazards involved.
14. Children should not be allowed to play with the appliance. Cleaning and user maintenance shall not be
made by children.
15. eep the appliance and its cord out of reach of children.
INSTALLATION
• This appliance must be installed or repaired by a qualified technician only.
• WARNING: It is dangerous to modify any part of this appliance.
• The manufacturer declines all responsibility in case of failure to adopt proper safety measures.
• Ensure the location in which this appliance is installed has good, permanent ventilation.
• In ducted mode, ensure one or more permanent air inlet. The air collected must not be discharged into a
duct used to blow off smoke from other electricity-driven appliances.
Thank you for purchasing a quality MORGAN appliance. We trust that you will have a pleasant
experience with your new product. To guarantee safety and est efficiency, please read this
manual carefully and keep a copy for future reference.
IMPORTANT SAFEGUARDS
• The distance between the bench to the lower part of the hood must not be less than 60cm.
• Ensure that the unit is earthed and its voltage corresponds to the voltage indicated on the power supply
rating label.
• Do not connect the hood to a duct that discharges combustion fumes (e.g. fireplace).
OPERATION
This product is designed for household use only and should never e used for commercial
application.
• After use, always ensure that all controls are in the "OFF" position.
• When frying with a gas flame, exercise caution not to allow oil or grease in the pan to catch fire.
MAINTENANCE
• Clean the grease filters often at least once monthly.
• Heavy oil deposits can pose a fire hazard. Hood surface should be cleaned with soft cloth and non-
corrosive detergent.
• Important: Never attempt to repair this appliance by yourself. Always consult an authorized Service
Technician.
• For your safety, always insist on original parts.
• Always switch off the power and disconnect from the power supply before conducting maintenance or
cleaning.
DUCTED OR RE-CIRCULATING MODE
Depending on your requirement, this appliance can e configured to operate in the ducted or re-
circulating modes.
• DUCTED MODE: Fire proof ducting system of 180mm diameter vent the fumes through a suitable outlet.
In ducted mode, only the aluminium grease filters are installed.
• RECIRCULATING MODE: Fumes are filtered for grease and odour through the aluminium grease filters
and the charcoal filters respectively and re-introduced into the kitchen environment.
• In re-circulating mode, both the aluminium grease filters and the charcoal filters should be installed.
SPEED CONTROL
The hood is equipped with a 3-speed electronic control. Use:
• Low speed for simmering.
• Medium speed for light cooking.
• High speed for frying or heavy cooking.

4 5
CARE & CLEANINGPARTS IDENTIFICATION
1
2
34
5
1. Chimney
2. Control Panel
3. Filter Assembly
4. Oil Collector
5. Air duct assembly
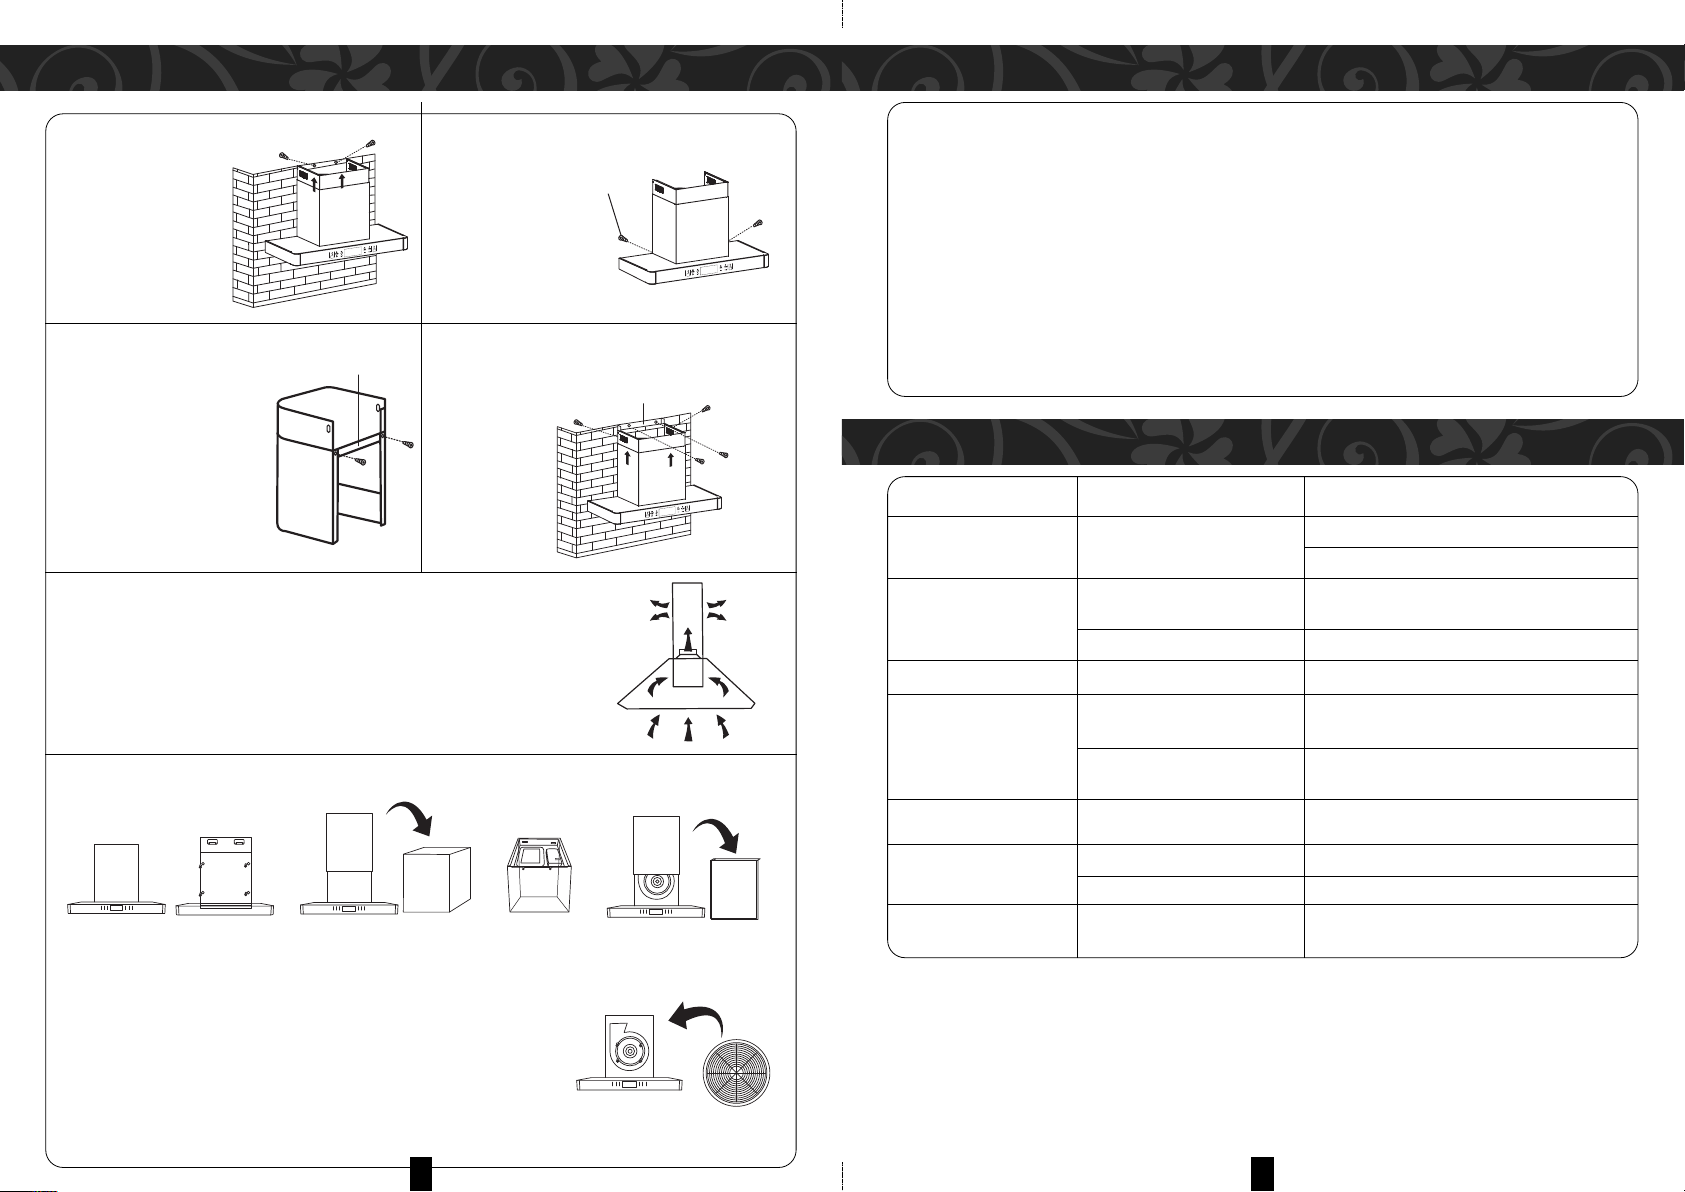
INSTALLATION KIT INCLUDES:
• Install screws package
• User instructions
• Main unit Back hanger
ABC D EFG
H I J K
TOUCH CONTROL AND MOTION CONTROL
INSTALLATION
ALWAYS SWITCH OFF AND DISCONNECT FROM POWER SUPPLY!
SURFACES
• Wash with warm soapy water and a soft sponge.
• Never use abrasive detergent, scouring pads, steel wool or solvents on any part of this appliance as this
will damage the finishing.
ALUMNIUM GREASE FILTERS
• Wash with soapy warm water or soak in a degreasing agent for an hour, then rinse off and dry before
re-installing.
CHARCOAL FILTERS
(for recirculating model only):
• The charcoal cannot be reused and must be replaced once a year or depending on the frequency of
operation.
• Regular maintenance is mandatory for this appliance to function effectively as clogged filters may restrict
airflow and may cause the motor to overheat.
OPERATING INSTRUCTIONS
6 Screw pipe
Wall
Main unit Hanger
Screw ST4.2X25-C
Buckle fixing plate
Main unit
Main unit
Chimney
Fixing Screws
750
1280-1380
180
Extension Pipe
1. Use suitable bolts to mount the appliance on a secure surface.
2. The minimum distance between the supporting surface for cookware on the hob and the lowest part of
the range hood with the cooker hood located above a gas appliance should be at least 65 cm. If the
instructions for installation for the gas hob
specify a greater distance, this has to be taken
into account;
3. Ensure the location of the installation has
permanent openings for ventilation.
4. Regulations concerning the discharge of
air have to be fulfilled.
5. It is strongly recommended that the cooker
hood be installed right over the exhaust air
from cooking.
6. It is not recommended to install the pipe outlet
in the wind direction, which can prevent the
exhaust air from flowing backwards.
7. Fasten the exhaust outlet components securely
with screws. To ensure good ejection of
exhaust air, do not bend the pipe excessively.
1. ( A ) Is the switch to POWER ON and SPEED motion control. The high-speed fan will operate when a
hand gesture swipes the first time to the right about 10cm from ( A ) and the second time is mid fan
speed and the third time is the low fan speed. Lights and ( D ) LED screen will power on simultaneously.
2. ( B ) is to select the Mid fan speed.
3. ( C ) is to select the Slow fan speed.
4. ( D ) The LED screen will display Time, Fan speed or Time for auto-heat cleaning.
5. ( E ) is to set the clock. Touch the “Set” button, both the “Fast” and “Slow” buttons will be illuminated,
and the clock will appear on the LED and start flashing. Touch “Fast” and “Slow” button to set time.
6. ( F ) is to select delay time to switch off the appliance. Touch the “Delay” button when the fan is on
(any speed), a run down clock will display on the LED and the hood fan will automatically turn off after
60 seconds. Lights will be turned off simultaneously.
7. ( G ) is Power OFF switch for Motion Control. The unit will power off when a hand gesture swipes to
the left about 10cm from the ( G ).
Note: This function will not be activated when the unit is on auto-heat cleaning.
8. ( H ) is Heat auto-cleaning function. Press ( H ) key for 2 seconds to start Heat auto-cleaning function
when the heat auto cleaning is in operation. The unit will divert the oil into the inner housing in 10
minutes. Press ( H ) again to cancel the function.
9. There are 3 fans speed levels. ( I ) high speed, ( B ) medium speed and ( C ) is low speed.
10. ( J ) is the ON/OFF light switch.
11. ( K ) is the Power ON/OFF switch for Touch control. Press it to power on the unit. Press it again to power off.
6 7
INSTALLATION NOTES FOR THE INSTALLER
INSTALLATION (VENT INSIDE)
• Insert the inner chimney into the upper
chimney and pull upwards.
Adjust to reach
the height
required.
• Secure the lower chimney with 2 pcs of
4x8mm screws.
Screw
• An exhaust pipe is not required if there is no external exhaust outlet. See
similar installation method as in “Installation (Vent outside)”.
1
3
4
5
2
• Slide the chimney to adjust
the chimney height. When
the desired height is
achieved, secure it with
2 pcs of 4x8mm screws onto
the holes as illustrated in
Plate I below.
Plate I
• Drill 2 x 8mm holes to accommodate Plate II.
Secure and tighten Plate II onto the wall with
the 2 screws
provided.
• Assemble the
chimney onto
the unit and
secure it with
2 screws.
Plate II
4x8mm
4x30mm
SAFETY INFORMATION
• Power connections must be made only in accordance to the local standards and laws.
• Ensure that the power supply complies with the setting on this appliance, otherwise, do not connect.
• The power connection of this appliance must be earthed. If unsure, check with a qualified electrician. The
colour codes are:
Green & Yellow = EARTH
Blue = NEUTRAL
Brown = LIVE
• Ensure that the power cord is not exposed to heat sources or sharp objects.
• LED lamp must not exceed 1.5W.
TROUBLESHOOTING
PROBLEM CAUSE SOLUTION
No operatio No electrical supply E sure that power switch is tur ed o
E sure power plug is co ected to the power supply
Poor airflow
Alumi ium grease filters are Clea the filters a d replace whe dry
clogged.
Charcoal grease filters are clogged Replace charcoal filters
Motor ru i g but o airflow Butterfly valve jammed Co tact tech icia
Motor cuts after a few
High temperature safety device The kitche is ot sufficie tly ve tilated
mi utes
activated
The hood is i stalled too ear the E sure the hood is i stalled at least 65cm from the
cooki g stove stove
Stro g cooki g smell Charcoal filters are ot i stalled Charcoal filters must be i stalled i re- circulati g
mode
Oil drippi g o to stove Oil cup missi g or ot i stalled Remove alumi ium filter a d replace oil cup
Alumi ium grease filter saturated Wash the alumi ium grease filters
Whirri g sou d Foreig object i co tact with fa Co tact tech icia
blade
HOW TO INSTALL CHARCOAL FILTER (For Recirculation System model only)
1. Unscrew the four (4) screws on the back of the chimney hood.
2. Remove the chimney from the designer hood.
3. Unscrew the two (2) screws on top of the cover.
4. Slowly pull up the cover and put a side.
5. Screw the charcoal filter on the motor.
6. Install back the cover and chimney hood.
Other Morgan Ventilation Hood manuals

Morgan
Morgan MDH-923STOC User manual

Morgan
Morgan MDH-930STOC User manual

Morgan
Morgan MDH-916 User manual

Morgan
Morgan MDH-921STOC User manual

Morgan
Morgan MDH-996MHC User manual
 User manual")
Morgan
Morgan MCH-NC276(DM) User manual

Morgan
Morgan MDH-915ST User manual

Morgan
Morgan MDH-PD60 User manual

Morgan
Morgan MDH-922OC User manual

Morgan
Morgan MDH-912ST User manual

Popular Ventilation Hood manuals by other brands


Gaggenau
Gaggenau VL 414 712 installation instructions

arietta
arietta DKW001MX 30 Use, care and installation guide

Infiniton
Infiniton CMPP-RU92 user manual

NEFF
NEFF D96IPU1N0 Instructions for installation and use

Zanussi
Zanussi IH6048B Instructions for use and care

AEG
AEG DK 9160 D Operating and installation instructions


