Morris 57044 User manual

MODEL 57044
OPERATING INSTRUCTION
AUTORANGING MULTIMETER

1
SAFETY INFORMATION
The following safety information must be observed to insure
maximum personal safety during the operation at this meter:
●Do not use the meter if the meter or test leads look damaged,
or if you suspect that the meter is not operating properly.
●Never ground yourself when taking electrical measurements.
Do not touch exposed metal pipes, outlets, fixtures, etc.,
which might be at ground potential. Keep your body isolated
from ground by using dry clothing, rubber shoes, rubber mats,
or any approved insulating material.
●Turn off power to the circuit under test before cutting,
unsoldering, or breaking the circuit. Small amounts of current
can be dangerous.
●Use caution when working above 60V dc or 30V ac rms,
such voltages pose a shock hazard.
●When using the probes, keep your fingers behind the finger
guards on the probes.
●Measuring voltage which exceeds the limits of the multimeter
may damage the meter and expose the operator to a shock
hazard. Always recognize the meter voltage limits as stated
on the front of the meter.

2
SAFETY SYMBOLS
! Indicates operators must refer to the explanation in this
manual.
Indicates terminals at which dangerous voltage may be
present.
SPECIFICATIONS
Display: 4000 counts LCD display with function indication.
Polarity: Automatic, (-) negative polarity indication.
Over range:“OL” mark indication.
Low Battery Indication: “BAT” is displayed when the battery
voltage drops below the operating
level.
Measurement Rate: 2 times per second, nominal.
Auto Power Off: Meter automatically shuts down after approx.
30 minutes of inactivity.
Operating Environment: 0 oC to 50 oC at < 70 % relative
humidity.
Storage Temperature: -20 oC to 60 oC at < 80 % relative
humidity.
Power: Two standard type size “AAA” 1.5V batteries, UM4.
Dimensions: 121.5 (H) x 60.6 (W) x 40 (D) mm.
Weight: Approx.: 260g including holster.

3
Accuracy is given at 23 oC to 5 oC, less than 70 % RH.
DC Voltage (Auto-ranging)
Range Resolution Accuracy
400.0mV 0.1mV +0.8% of rdg + 2 dgts
4.000V 1mV
+0.5% of rdg + 2 dgts
40.00V 10mV
400.0V 100mV
600V 1V +1.0% of rdg + 2 dgts
Input Impedance: 10MΩ.
Maximum Input: 600V dc or 600V ac rms.
AC Voltage (Auto-ranging except 400mV)
Range Resolution Accuracy
400.0mV 0.1mV +2.0% of rdg + 4 dgts
4.000V 1mV
+1.5% of rdg + 3 dgts
40.00V 10mV
400.0V 100mV
600V 1V +2.0% of rdg + 4 dgts
Input Impedance: 10MΩ.
Frequency Range: 40 to 400Hz, 40 to 200Hz for 400mV and 4V
ranges.
Maximum Input: 600V dc or 600V ac rms.

4
DC Current (Auto-ranging for µAand mA)
Range Resolution Accuracy
400.0µA 0.1µA
+1.5% of rdg + 3 dgts
4.000mA 1µA
40.00mA 10µA
400.0mA 100µA
10A 10mA +2.0% of rdg + 5 dgts
Overload Protection: 0.5A / 250V and 10A/ 250V Fuse.
Maximum Input: 400mA dc or 400mA ac rms on µA / mA
ranges, 10Adc or ac rms on 10Arange.
AC Current (Auto-ranging for µAand mA)
Range Resolution Accuracy
400.0µA 0.1µA
+1.8% of rdg + 5 dgts
4.000mA 1µA
40.00mA 10µA
400.0mA 100µA
10A 10mA +3.0% of rdg + 7 dgts
Overload Protection: 0.5A / 250V and 10A/ 250V Fuse.
Frequency Range: 40 to 400 Hz, 40 to 200 Hz for 400µA and
4mA ranges.
Maximum Input: 400mA dc or 400mA ac rms on µA / mA
ranges, 10Adc or ac rms on 10Arange.

5
Resistance (Auto-ranging)
Range Resolution Accuracy
400.0Ω0.1Ω+0.8% of rdg + 4 dgts
4.000kΩ1Ω
+0.8% of rdg + 2 dgts
40.00kΩ10Ω
400.0kΩ100Ω
4.000MΩ1kΩ
40.00MΩ10kΩ+1.2% of rdg + 3 dgts
Input Protection: 250V dc or 250V ac rms.
Capacitance (Auto-ranging)
Range Resolution Accuracy
40.00nF 10pF +5.0% of rdg+7 dgts
400.0nF 0.1nF +3.5% of rdg + 5 dgts4.000µF 1nF
40.00µF 10nF
200.0µF 0.1µF +5.0% of rdg + 5 dgts
Input Protection: 250V dc or 250V ac rms.

6
Frequency (Auto-ranging)
Range Resolution Accuracy
9.999Hz 0.001Hz
+1.0% of rdg + 5 dgts
99.99Hz 0.01Hz
999.9Hz 0.1Hz
+0.8% of rdg + 3 dgts
9.999kHz 1Hz
99.99kHz 10Hz
999.9kHz 100Hz
9.999MHz 1kHz +1.5% of rdg + 4 dgts
Sensitivity: 0.8V RMS min. at >20% and <80% duty cycle.
Effect Reading: More than 100 digits at pulse width >2µSec.
Overload protection: 250V dc or ac rms.
Duty Cycle
Range Resolution Accuracy
0.1%~99.9% 0.1% +1.2% of rdg + 2 dgts
Pulse width: >100µs, <100ms.
Overload protection: 250V dc or ac rms.
Diode Test
Test current Resolution Accuracy
1 mA typical 1 mV +10% of rdg + 5 dgts
Open circuit voltage: 2.8V dc typical
Overload protection: 250V dc or ac rms.
Audible continuity
Audible threshold: Less than 30Ω.
Test current: <0.7mA.
Overload protection: 250V dc or ac rms.

7
OPERATION
Before taking any measurements, read the Safety Information
Section.
Always examine the instrument for damage, contamination
(excessive dirt, grease, etc.) and defects. Examine the test leads for
cracked or frayed insulation. If any abnormal conditions exist do
not attempt to make any measurements.
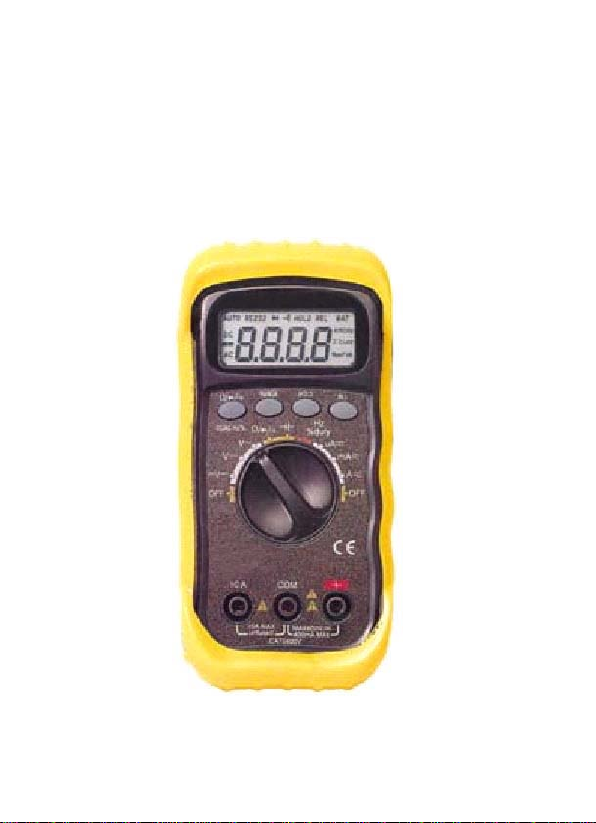
AC/DC OR OHM/DIODE/CONTINUITY OR Hz/% SELECTING
BUTTON:
Push this button to select AC/DC current measuring function
when the function switch is set at µA, mA, and A positions.
Push this button to select OHM/DIODE/CONTINUITY
measuring function when the function switch is set at
OHM/DIODE/ CONTINUITY position.
Push this button to select Hz/% (Duty Cycle) measuring function
when function switch is set at Hz/% Duty Cycle position.
RANGE CONTROL BUTTON:
This is the manual range setting switch.
When power is first switched on, auto-ranging is automatically
selected.
Whenever this switch is pressed, manual range setting is possible.
Pressing the button once switches to the manual ranging mode and
RANGE mark is displayed.
Subsequent Button
When the highest range is reached, the next press returns the
instrument to its lowest range. To cancel manual range, hold the
range hold switch in for more than 1 second and the RANGE
mark disappears and the auto-ranging function is restored (Manual
range except capacitance and frequency).

8
DATA HOLD BUTTON:
When this button is pushed, the display will show the last reading
and "HOLD" symbol will appear until pushing it again.
Data holding will be canceled automatically when the function
switch is rotated.
RELATIVE ZERO BUTTON:
For convenient readings, comparison & offset.
FUNCTION / POWER SWITCH:
Switch for changing the measurement function and power on and
off.
INPUT JACKS:
This meter has three input jacks that are protected against overload
to the limits except 10A. During use, connect the black test lead to
the COM jack and the red test lead as shown below:
Function Red lead Connection Input limits
mV DC “+” 600V de or ac rms.
DCV/ACV “+” 600V dc or ac rms.
Ω/CONTINUITY/DIODE “+” 250V dc or ac rms
CAP/Hz/% “+” 250V dc or ac rms
µA/mA “+” 400mAdc or ac rms.
A “10A” 10Adc or ac rms.
MEASURINGVOLTAGE
1. Connect the black test lead to the COM jack and red lead to the
“+” jack.
2. Set the function at mV DC DCV or ACV range to be used and
connect test leads across the source or load under measurement.
3. Read LCD display. The polarity of red connection will be
indicated when making a DC measurement.

9
MEASURING CURRENT
1. Connect the black test lead to the COM jack and the red test
lead to the “+” jack for a maximum of 400mA. For a maximum
of 10A, move the red lead to the “10A” jack.
2. Set the function switch at µA, mA or A range to be used and
push DC/AC button to select DCAor ACA measuring mode.
3. Connect test leads in series with the load in which the current is
to be measured.
4. Read LCD display, the polarity of red lead connection will be
indicated when making a DC measurement.
MEASURING RESISTANCE
1. Connect the black test lead to the COM jack and the red test
lead to the “+” jack.
2. Set the function switch to Ω/DIODE/CONTINUITY.
3. Make sure all the power of the circuit to be measured is off.
4. Connect the test leads to the circuit to be measured. The range
will change automatically, and will hold on the range that will
display the measured resistance with the best resolution.
5. The value indicated on the display is the measured value of
resistance with proper decimal point and annunciation
indication.

10
DIODE TEST
1. Connect the black test lead to the COM jack and the red test
lead to the “+” jack.
2. Set the function switch to OHM/DIODE/CONTINUITY
(Ω/ ./ •))) ).
3. Make sure all the power is OFF.
4. To select diode test, touch the mode selection switch
(OHM/DIODE/CONTINUITY) and the "DIODE" mark is
indicated in the left side on the display. This is diode check
mode.
When you touch the switch again, the mode changes to the
continuity test mode.
5. Next, connect the test leads to the diode be tested. When
measuring the forward voltage across diode a normal diode will
indicate 0.4V to 0.7V and the reverse voltage will indicate
"OL" (same as on open condition).
For a short-circuited diode, a value near 0 mV will be displayed.
CONTINUITY CHECK
1. Connect the black test lead to the COM jack and the red test
lead to the “+” jack.
2. Set the function switch to OHM/DIODE/CONTINUITY.
3. To select continuity test, touch the mode selection switch
(OHM/DIODE/BUZZER) and the "(•))) )" mark is indicated
in the left side on the display. This is continuity check mode. In
the continuity mode, a buzzer sounds when the resistance of the
circuit to be measured is less than approx.30 Ω.

11
MEASURING CAPACITANCE
1. Connect the black test lead to the COM jack and the red test
lead to the “+” jack. (NOTE: The polarity of the lead
connection is positive "+").
2. Connect test leads across the capacitor under measurement and
be sure that the polarity of connection is observed.
NOTE:
1. When checking in-circuit capacitance, be sure that the circuit
has all power removed and all capacitors are fully discharged.
2. The range control mode in capacitance measurement is
auto-ranging.
MEASURING FREQUENCY
1. Connect the black test lead to the COM jack and the red test
lead to the “+” jack.
2. Set the function switch to "Hz/% Duty" range.
3. Connect the test leads to the circuit to be measured. The range
will change to display the measured frequency with the best
resolution.
When you push the “HZ/%” Button, the mode changes to the
duty cycle check mode.
NOTE:
The input voltage should be between 800mV and 10V rms.ac. If
the voltage is more than 10V rms., reading may be out of the
accuracy range.

12
MEASURING DUTY CYCLE
1. Connect the black test lead to the COM jack and the red test
lead to the “+” jack.
2. Set the function switch to "Hz/% Duty”.
3. Push the “Hz/%” button changing the function to % Duty
Cycle.
4. Connect the test leads to the circuit to be measured. The range
will change to display the measured duty cycle with the best
resolution.
NOTE:
The input voltage should be between 800mV and 10V rms. ac.
If the voltage is more than 10V rms., reading may be out of the
accuracy range.
BATTERYAND FUSE REPLACEMENT
If the sign “BAT” appears on the LCD display, it indicates that
the battery should be replaced. Remove screws on the back cover
and open the case. Replace the exhausted battery with new
batteries. (2 x “AAA” 1.5V batteries, UM4)
Fuse rarely needs replacement and blows almost always as a result
of the operator’s error. Open the case and replace the blown fuse
with ratings specified.
WARNING:
Before attempting to open the case, be sure that test leads have
been disconnected from measurement circuit to avoid electric
shock hazard.
Replace fuse only with specified ratings:
Fuse: F1 500mA/ 250V fast blow, F2 10A/ 250V fast blow.
Table of contents
Other Morris Multimeter manuals